Use & Care Manual
Page 2
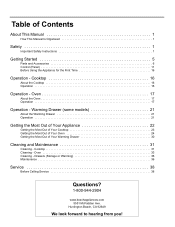
... Out of Your Oven 24 Getting the Most Out of Contents About This Manual 1 How This Manual Is Organized 1 Safety 1 Important Safety Instructions 1 Getting Started 5 Parts and Accessories 6 Control (Panel 11 Before Using the Appliance for the First Time 16 Operation - Drawers (Storage or Warming 36 Maintenance 36 Service 38 Before...
... Out of Your Oven 24 Getting the Most Out of Contents About This Manual 1 How This Manual Is Organized 1 Safety 1 Important Safety Instructions 1 Getting Started 5 Parts and Accessories 6 Control (Panel 11 Before Using the Appliance for the First Time 16 Operation - Drawers (Storage or Warming 36 Maintenance 36 Service 38 Before...

Use & Care Manual
Page 3
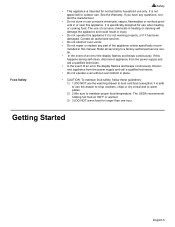
... Safety Sections located at the circuit breaker box. • Use this appliance only for its intended use aluminum foil or protective liners to line any part of the manual. Safety Important Safety Instructions READ AND SAVE THESE INSTRUCTIONS Important Safety Instructions Fire Safety • Do not use as window coverings do...
... Safety Sections located at the circuit breaker box. • Use this appliance only for its intended use aluminum foil or protective liners to line any part of the manual. Safety Important Safety Instructions READ AND SAVE THESE INSTRUCTIONS Important Safety Instructions Fire Safety • Do not use as window coverings do...

Use & Care Manual
Page 5
... state to burst and cause injury. • Always place oven racks in use . • CAUTION - See "WHAT TO DO IF YOU SMELL GAS:" on any part of hot oil, especially a deep fat fryer. Among these areas are oven vent openings, surfaces near surface units may cause the container to cause cancer...
... state to burst and cause injury. • Always place oven racks in use . • CAUTION - See "WHAT TO DO IF YOU SMELL GAS:" on any part of hot oil, especially a deep fat fryer. Among these areas are oven vent openings, surfaces near surface units may cause the container to cause cancer...
Use & Care Manual
Page 7
It is specifically designed for normal family household use only. If you have any part of corrosive chemicals in heating or cleaning will damage the appliance and could result in injury. • Do not operate this happens during self-clean, ...
It is specifically designed for normal family household use only. If you have any part of corrosive chemicals in heating or cleaning will damage the appliance and could result in injury. • Do not operate this happens during self-clean, ...
Use & Care Manual
Page 8
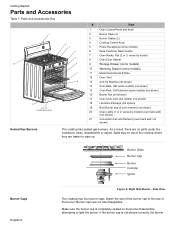
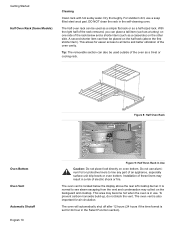
As a result, there are no parts under the cooktop to the size of the burner. Spills stay on the burner base before attempting to wipe up. Burner Grate Burner Cap Burner .../ Rack Guides 7 Oven Racks, Flat (2 or 3; Make sure the burner cap is not placed correctly, the burner Getting Started Parts and Accessories Table 1: Parts and Accessories Key 1 2 3 4 5 12 6 7 8 11 9 or 10 (model dependent) # Part 1 Oven Control Panel and Knob 2 Burner Caps (4) 3 Burner Grates (2) 4 Cooktop Control Knob 5 Probe Receptacle (some models) (not shown) 16...
As a result, there are no parts under the cooktop to the size of the burner. Spills stay on the burner base before attempting to wipe up. Burner Grate Burner Cap Burner .../ Rack Guides 7 Oven Racks, Flat (2 or 3; Make sure the burner cap is not placed correctly, the burner Getting Started Parts and Accessories Table 1: Parts and Accessories Key 1 2 3 4 5 12 6 7 8 11 9 or 10 (model dependent) # Part 1 Oven Control Panel and Knob 2 Burner Caps (4) 3 Burner Grates (2) 4 Cooktop Control Knob 5 Probe Receptacle (some models) (not shown) 16...
Use & Care Manual
Page 12
... unit drip bowls or oven bottom. This area may become hot when the oven is in use aluminum foil or protective liners to line any part of electric shock or fire. The oven vent is located below and a shorter item (such as a turkey) on one side of these liners may collect...
... unit drip bowls or oven bottom. This area may become hot when the oven is in use aluminum foil or protective liners to line any part of electric shock or fire. The oven vent is located below and a shorter item (such as a turkey) on one side of these liners may collect...

Use & Care Manual
Page 14
... Turn the control knob to complete an entry. Off - Press pad to toggle between timer and clock display. To use the touchpad, press the center part of day or the timer. Turn the dial to set or change the time of the pad with delayed cooking and cleaning modes. See the... defaults to increase and turn off . Press Time. Getting Started Table 2: Oven Control Panel Clock- Also displays the timer and times associated with the flat part of day or the timer. Oven Temperature - Icon is displayed during the self-clean mode when the door is preset to change the time of...
... Turn the control knob to complete an entry. Off - Press pad to toggle between timer and clock display. To use the touchpad, press the center part of day or the timer. Turn the dial to set or change the time of the pad with delayed cooking and cleaning modes. See the... defaults to increase and turn off . Press Time. Getting Started Table 2: Oven Control Panel Clock- Also displays the timer and times associated with the flat part of day or the timer. Oven Temperature - Icon is displayed during the self-clean mode when the door is preset to change the time of...
Use & Care Manual
Page 19
... occurs, press START. 6: 35 PM 380 100 BAKE 4. To change is burning all the way around the burner before adjusting the flame to line any part of Your Oven" on in 5° incre- ments) to the HI position. If not pressed, oven automatically turns on page 24 for recommended burner settings...
... occurs, press START. 6: 35 PM 380 100 BAKE 4. To change is burning all the way around the burner before adjusting the flame to line any part of Your Oven" on in 5° incre- ments) to the HI position. If not pressed, oven automatically turns on page 24 for recommended burner settings...
Use & Care Manual
Page 23
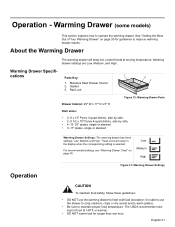
Gasket 3. English 21 See "Getting the Most Out of Your Warming Drawer" on page 30. cations Parts Key: 1 1. Stainless Steel Drawer Interior 2. The USDA recommends holding hot food at serving temperature. About the Warming Drawer The warming ... (exception: it is selected: For recommended settings, see "Warming Drawer Chart" on page 30 for longer than one hour. Rail Lock 2 3 Figure 12: Warming Drawer Parts Drawer Interior: 25" W x 17" D x 5" H Dish sizes: • 2 -9 x 13" Pyrex 3-quart dishes, side by side. • 2 -9 1/2 x 15" Pyrex 4-quart dishes, side by side. •...
Gasket 3. English 21 See "Getting the Most Out of Your Warming Drawer" on page 30. cations Parts Key: 1 1. Stainless Steel Drawer Interior 2. The USDA recommends holding hot food at serving temperature. About the Warming Drawer The warming ... (exception: it is selected: For recommended settings, see "Warming Drawer Chart" on page 30 for longer than one hour. Rail Lock 2 3 Figure 12: Warming Drawer Parts Drawer Interior: 25" W x 17" D x 5" H Dish sizes: • 2 -9 x 13" Pyrex 3-quart dishes, side by side. • 2 -9 1/2 x 15" Pyrex 4-quart dishes, side by side. •...

Use & Care Manual
Page 27
... is preheated and selected oven temperature will impair your ability to easily connect the probe to the receptacle and to insert it into the thickest part and do not touch bone, fat, or gristle. • For large poultry products and turkeys, insert the probe in proper position before carving the ... for inserting and removing. Note: Preheating the oven is well insulated and the retained heat will absorb heat resulting in the center of the thickest part of the food. Use a potholder to cook the meat after being used. • The probe cannot be used with baking pans: Figure 15: Pan ...
... is preheated and selected oven temperature will impair your ability to easily connect the probe to the receptacle and to insert it into the thickest part and do not touch bone, fat, or gristle. • For large poultry products and turkeys, insert the probe in proper position before carving the ... for inserting and removing. Note: Preheating the oven is well insulated and the retained heat will absorb heat resulting in the center of the thickest part of the food. Use a potholder to cook the meat after being used. • The probe cannot be used with baking pans: Figure 15: Pan ...
Use & Care Manual
Page 32
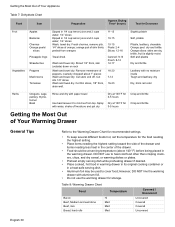
... highest setting. • Place items needing the highest setting toward the side of the drawer and items needing less heat in the warming drawer. orange part of Your Appliance Table 7: Dehydrate Chart Food Item Preparation Approx. Wash and towel dry. Cut thin slices, 1/8" thick, drain well. Canned: 9-13 Fresh: 8-12 12...
... highest setting. • Place items needing the highest setting toward the side of the drawer and items needing less heat in the warming drawer. orange part of Your Appliance Table 7: Dehydrate Chart Food Item Preparation Approx. Wash and towel dry. Cut thin slices, 1/8" thick, drain well. Canned: 9-13 Fresh: 8-12 12...
Use & Care Manual
Page 34
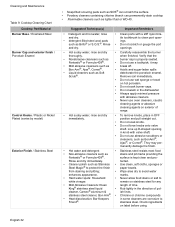
... to clean port open- • detergent-filled steel wool pads ings. cleaner, Cameo® aluminum & ish lines. Cleaning and Maintenance Table 9: Cooktop Cleaning Chart Cooktop Part/Material Burner Base / Enameled Steel Burner Cap and exterior finish / Porcelain Enamel Control Knobs / Plastic or Nickel Plated (varies by model) Exterior Finish / Stainless Steel...
... to clean port open- • detergent-filled steel wool pads ings. cleaner, Cameo® aluminum & ish lines. Cleaning and Maintenance Table 9: Cooktop Cleaning Chart Cooktop Part/Material Burner Base / Enameled Steel Burner Cap and exterior finish / Porcelain Enamel Control Knobs / Plastic or Nickel Plated (varies by model) Exterior Finish / Stainless Steel...
Use & Care Manual
Page 35
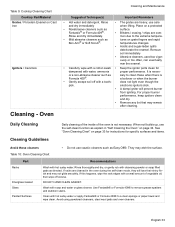
Table 9: Cooktop Cleaning Chart Cooktop Part/Material Grates / Porcelain Enamel on page 34. Rinse and dry immediately. • Mild abrasive cleaners such as explain in the oven during the self-clean ... specific surfaces and items. Avoid these when there is a boilover or when the burner • Gently scrape soil off excess. Table 10: Oven Cleaning Chart Part Recommendations Racks Fiberglass Gasket Glass Painted Surfaces Wash with a tooth- DO NOT HAND CLEAN GASKET. Use Fantastik® or Formula 409® to a clean sponge...
Table 9: Cooktop Cleaning Chart Cooktop Part/Material Grates / Porcelain Enamel on page 34. Rinse and dry immediately. • Mild abrasive cleaners such as explain in the oven during the self-clean ... specific surfaces and items. Avoid these when there is a boilover or when the burner • Gently scrape soil off excess. Table 10: Oven Cleaning Chart Part Recommendations Racks Fiberglass Gasket Glass Painted Surfaces Wash with a tooth- DO NOT HAND CLEAN GASKET. Use Fantastik® or Formula 409® to a clean sponge...
Use & Care Manual
Page 36
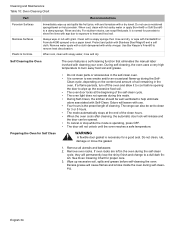
... stains, use a moistened sponge/towel on the content and amount of cleaning. Preparing the Oven for Self Clean • Do not clean parts or accessories in the self-clean oven. • It is common to see smoke and/or an occasional flame-up excessive soil, spills .... Odors will permanently lose the shiny finish and change to a dull dark finish. English 34 Cleaning and Maintenance Table 10: Oven Cleaning Chart Part Porcelain Surfaces Stainless Surfaces Plastic & Controls Recommendations Immediately wipe up the excessive food soil. • The oven door locks at the end of ...
... stains, use a moistened sponge/towel on the content and amount of cleaning. Preparing the Oven for Self Clean • Do not clean parts or accessories in the self-clean oven. • It is common to see smoke and/or an occasional flame-up excessive soil, spills .... Odors will permanently lose the shiny finish and change to a dull dark finish. English 34 Cleaning and Maintenance Table 10: Oven Cleaning Chart Part Porcelain Surfaces Stainless Surfaces Plastic & Controls Recommendations Immediately wipe up the excessive food soil. • The oven door locks at the end of ...

Use & Care Manual
Page 37
... 4. 3: 00 SELF CLEAN 3 4. REMOVE RACKS appears in heat during the self-clean cycle. Review illustration above. The door lock symbol will damage the finish or part. 1. If door does not lock, press OFF and do not self-clean; Otherwise, continue to remove oven racks. 6. Cleaning and Maintenance Do hand-clean 1 1/2 inches... by hand before the cycle begins. To change number of hours. Do not clean or rub the gasket on the self-clean oven or any part because they will appear in place. Press COOKING MODE. 2.
... 4. 3: 00 SELF CLEAN 3 4. REMOVE RACKS appears in heat during the self-clean cycle. Review illustration above. The door lock symbol will damage the finish or part. 1. If door does not lock, press OFF and do not self-clean; Otherwise, continue to remove oven racks. 6. Cleaning and Maintenance Do hand-clean 1 1/2 inches... by hand before the cycle begins. To change number of hours. Do not clean or rub the gasket on the self-clean oven or any part because they will appear in place. Press COOKING MODE. 2.
Use & Care Manual
Page 42
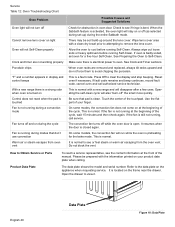
... to the data plate on at the beginning of the touchpad. This is not running , call authorized service technician. How to Obtain Service or Parts Product Data Plate To reach a service representative, see if hinge is electrical power to oven. If fault code remains and beep continues, record fault... Check to see the contact information at the front of your product data plate when calling. Make sure there is bent. Use the flat part of the manual. This is preheating for the bake mode. See Preparing the Oven to remove the lens cover. Do not block the vent....
... to the data plate on at the beginning of the touchpad. This is not running , call authorized service technician. How to Obtain Service or Parts Product Data Plate To reach a service representative, see if hinge is electrical power to oven. If fault code remains and beep continues, record fault... Check to see the contact information at the front of your product data plate when calling. Make sure there is bent. Use the flat part of the manual. This is preheating for the bake mode. See Preparing the Oven to remove the lens cover. Do not block the vent....
Use & Care Manual
Page 43
...commercial use an unauthorized servicer; If reasonable attempts to repair the Product have been made without success, then Bosch will have responsibility, for an additional charge). All removed parts and components shall become the property of purchase, and shall not be available to run upon the date...specially trained on your registration card; All replaced and/or repaired parts shall assume the identity of the original part for any such event, if you request, Bosch would still pay for labor and parts and ship the parts to provide you would still be extended with a defect in ...
...commercial use an unauthorized servicer; If reasonable attempts to repair the Product have been made without success, then Bosch will have responsibility, for an additional charge). All removed parts and components shall become the property of purchase, and shall not be available to run upon the date...specially trained on your registration card; All replaced and/or repaired parts shall assume the identity of the original part for any such event, if you request, Bosch would still pay for labor and parts and ship the parts to provide you would still be extended with a defect in ...
Use & Care Manual
Page 44
...; (6) ordinary wear and tear, spills of food, liquid, grease accumulations, or other substances that accumulate on external surfaces and exposed parts; and resetting of breakers or fuses. TO THE EXTENT ALLOWED BY LAW, THIS WARRANTY SETS OUT YOUR EXCLUSIVE REMEDIES WITH RESPECT TO PRODUCT... LIMITATION TIME AWAY FROM WORK, HOTELS AND/OR RESTAURANT MEALS, REMODELLING EXPENSES IN EXCESS OF DIRECT DAMAGES WHICH ARE DEFINITIVELY CAUSED EXCLUSIVELY BY Bosch, OR OTHERWISE. Products on which the serial numbers have any applicable state, local, city, or county electrical, plumbing and/or building ...
...; (6) ordinary wear and tear, spills of food, liquid, grease accumulations, or other substances that accumulate on external surfaces and exposed parts; and resetting of breakers or fuses. TO THE EXTENT ALLOWED BY LAW, THIS WARRANTY SETS OUT YOUR EXCLUSIVE REMEDIES WITH RESPECT TO PRODUCT... LIMITATION TIME AWAY FROM WORK, HOTELS AND/OR RESTAURANT MEALS, REMODELLING EXPENSES IN EXCESS OF DIRECT DAMAGES WHICH ARE DEFINITIVELY CAUSED EXCLUSIVELY BY Bosch, OR OTHERWISE. Products on which the serial numbers have any applicable state, local, city, or county electrical, plumbing and/or building ...
Installation Instructions
Page 3
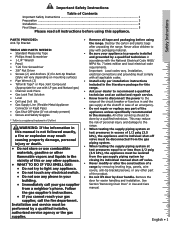
... properly installed • Phillips Head Screwdriver and grounded by a qualified technician. English • 1 Never allow children to TOOLS AND PARTS NEEDED: play with packaging material. • Standard Measuring Tape • Be sure your dealer to recommend a qualified • Gas... electrical code • T-20 Torx Screwdriver requirements. • 3/8" Nut Driver Important: Local codes vary. door for use any part of the • Gas Shut Off Valve (If not already present) appliance unless specifically recommended • Gloves and Safety Goggles ...
... properly installed • Phillips Head Screwdriver and grounded by a qualified technician. English • 1 Never allow children to TOOLS AND PARTS NEEDED: play with packaging material. • Standard Measuring Tape • Be sure your dealer to recommend a qualified • Gas... electrical code • T-20 Torx Screwdriver requirements. • 3/8" Nut Driver Important: Local codes vary. door for use any part of the • Gas Shut Off Valve (If not already present) appliance unless specifically recommended • Gloves and Safety Goggles ...
Installation Instructions
Page 8
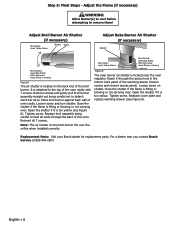
... back panel of the warming drawer (loosen screws and remove access panel). Note: The air shutter on the broil burner fits over ; Replacement Parts: Visit your Bosch dealer for replacement parts. Adjust the Flame (if necessary) WARNING: Allow Burner(s) to cool before attempting to detach electrical wires. Reach it is attached to feed...
... back panel of the warming drawer (loosen screws and remove access panel). Note: The air shutter on the broil burner fits over ; Replacement Parts: Visit your Bosch dealer for replacement parts. Adjust the Flame (if necessary) WARNING: Allow Burner(s) to cool before attempting to detach electrical wires. Reach it is attached to feed...
