
Use & Care Manual
Page 1
Use and Care Manual Bosch Gas Ranges with European Convection
Use and Care Manual Bosch Gas Ranges with European Convection

Use & Care Manual
Page 3
... • The Cleaning and Maintenance section describes how to clean and maintain your appliance. • The Service section includes troubleshooting tips and your range, be certain that the flame does not extend beyond the bottom of the pan. • If materials inside an oven or warming drawer should...foil, plastic, paper or cloth to come in this manual. Never use the appliance for its intended use . TO REDUCE THE RISK OF A RANGE TOP GREASE FIRE: English 1 Turn off the appliance and disconnect the circuit at the beginning of the manual. For example, never use aluminum ...
... • The Cleaning and Maintenance section describes how to clean and maintain your appliance. • The Service section includes troubleshooting tips and your range, be certain that the flame does not extend beyond the bottom of the pan. • If materials inside an oven or warming drawer should...foil, plastic, paper or cloth to come in this manual. Never use the appliance for its intended use . TO REDUCE THE RISK OF A RANGE TOP GREASE FIRE: English 1 Turn off the appliance and disconnect the circuit at the beginning of the manual. For example, never use aluminum ...
Use & Care Manual
Page 4
... injury or death. WARNING: If the information in the area where it off. TO REDUCE THE RISK OF INJURY TO PERSONS IN THE EVENT OF A RANGE TOP GREASE FIRE, OBSERVE THE FOLLOWING: a) SMOTHER FLAMES with a close-fitting lid, cookie sheet, or metal tray, then turn it started. 3) The fire department is...
... injury or death. WARNING: If the information in the area where it off. TO REDUCE THE RISK OF INJURY TO PERSONS IN THE EVENT OF A RANGE TOP GREASE FIRE, OBSERVE THE FOLLOWING: a) SMOTHER FLAMES with a close-fitting lid, cookie sheet, or metal tray, then turn it started. 3) The fire department is...
Use & Care Manual
Page 6
...door does not lock, do not extend over adjacent work areas, burners, or the edge of the cooktop. This appliance is equipped with range. Mark it does not extend beyond the edge of the cookware. This appliance must be minimized by a qualified technician. Connect only to ...heating element or burner will also improve efficiency. • Always position handles of utensils inward so they do not run Self-Clean. All ranges can be properly installed and grounded by : 1) Providing good ventilation when cooking with gas. 2) Providing good ventilation during and immediately after self...
...door does not lock, do not extend over adjacent work areas, burners, or the edge of the cooktop. This appliance is equipped with range. Mark it does not extend beyond the edge of the cookware. This appliance must be minimized by a qualified technician. Connect only to ...heating element or burner will also improve efficiency. • Always position handles of utensils inward so they do not run Self-Clean. All ranges can be properly installed and grounded by : 1) Providing good ventilation when cooking with gas. 2) Providing good ventilation during and immediately after self...

Use & Care Manual
Page 9
..., more even heat, especially when cooking at low settings, prohibits the flame from touching the cookware. The high power burner is turned on model, the range is a boilover or when the burner does not light even though the ignitor clicks. Depending on . Use the low settings on each. Use the burner...
..., more even heat, especially when cooking at low settings, prohibits the flame from touching the cookware. The high power burner is turned on model, the range is a boilover or when the burner does not light even though the ignitor clicks. Depending on . Use the low settings on each. Use the burner...

Use & Care Manual
Page 10
... a horizontal position and press the rest of the oven and not tilt. Top Rack Bottom Rack Back of Rack Pan Stops Stops Front of the range. Grasp rack firmly on both sides and pull rack toward the back wall of Rack Top Rack Stop (Ball) Rack Guide Top Rack Rest Figure...
... a horizontal position and press the rest of the oven and not tilt. Top Rack Bottom Rack Back of Rack Pan Stops Stops Front of the range. Grasp rack firmly on both sides and pull rack toward the back wall of Rack Top Rack Stop (Ball) Rack Guide Top Rack Rest Figure...
Use & Care Manual
Page 13
... display when there is finished, 3 consecutive beeps will turn off automatically when the door is needed. Signals that eliminates the manual labor involved with the range. Flashing Symbol or Number - When the oven is operating in the convection mode, the fan will sound. The convection fan does run during self-clean...
... display when there is finished, 3 consecutive beeps will turn off automatically when the door is needed. Signals that eliminates the manual labor involved with the range. Flashing Symbol or Number - When the oven is operating in the convection mode, the fan will sound. The convection fan does run during self-clean...

Use & Care Manual
Page 14
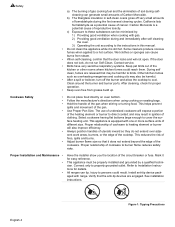
...do not complete the operation of setting the clock, the oven will sound to the desired heat setting. Press Time. Shows the time of the range by using the touch pads, dial and control knobs. Press pad to select cooking temperature. Shows the oven temperature. Preheat Temperature - Turn clockwise... Turn knob to toggle between timer and clock display. Turn the control knob to select hour and AM or PM. 2. Displays temperature of your range. There are used to select an oven mode, set the oven temperature, set the time(s) and to set the clock time. The knobs are...
...do not complete the operation of setting the clock, the oven will sound to the desired heat setting. Press Time. Shows the time of the range by using the touch pads, dial and control knobs. Press pad to select cooking temperature. Shows the oven temperature. Preheat Temperature - Turn clockwise... Turn knob to toggle between timer and clock display. Turn the control knob to select hour and AM or PM. 2. Displays temperature of your range. There are used to select an oven mode, set the oven temperature, set the time(s) and to set the clock time. The knobs are...

Use & Care Manual
Page 15
... is displayed. 3. Press and hold COOKING MODE press pad for beep volume is displayed. 2. Turn knob clockwise until SELECT TEMP F-C is set or change the range features listed below. To access the SELECT FUNCTION menu 1. The default display is displayed. 3. Turn knob to accept new selection. Press OFF to select volume...
... is displayed. 3. Press and hold COOKING MODE press pad for beep volume is displayed. 2. Turn knob clockwise until SELECT TEMP F-C is set or change the range features listed below. To access the SELECT FUNCTION menu 1. The default display is displayed. 3. Turn knob to accept new selection. Press OFF to select volume...

Use & Care Manual
Page 18
... the cooktop for the First Time • Remove all safety precautions and Use and Care Manual infor- Turn knob to operating. Remove packing materials from range. Note: If the burner does not light within four seconds, turn the knob counterclockwise to improve cooktop results. Operation - Setting the Burner Heat Level Burner...
... the cooktop for the First Time • Remove all safety precautions and Use and Care Manual infor- Turn knob to operating. Remove packing materials from range. Note: If the burner does not light within four seconds, turn the knob counterclockwise to improve cooktop results. Operation - Setting the Burner Heat Level Burner...
Use & Care Manual
Page 20
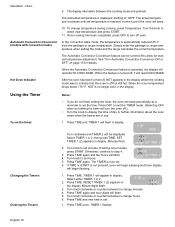
... cooking mode and preheat. The actual temperature increases until set the timer: 1. Simply enter the package or recipe temperature when setting the mode and the range calculates the correct temperature. See "Turn Automatic Convection Conversion ON or OFF" on page 15 for manual temperature adjustment. To set temperature is no longer...
... cooking mode and preheat. The actual temperature increases until set the timer: 1. Simply enter the package or recipe temperature when setting the mode and the range calculates the correct temperature. See "Turn Automatic Convection Conversion ON or OFF" on page 15 for manual temperature adjustment. To set temperature is no longer...

Use & Care Manual
Page 21
... Clock" on page 13 to enter the time of time and then turns it off. TIMED BAKE appears. 6. Set minutes. After cooking is not pressed, range will beep and display will continue flashing. 4. Turn knob until DELAYED BAKE appears. 3. Set minutes and then press TIME. Hours Flash. 5: 00 PM 400 oF...
... Clock" on page 13 to enter the time of time and then turns it off. TIMED BAKE appears. 6. Set minutes. After cooking is not pressed, range will beep and display will continue flashing. 4. Turn knob until DELAYED BAKE appears. 3. Set minutes and then press TIME. Hours Flash. 5: 00 PM 400 oF...

Use & Care Manual
Page 22
... probe receptacle until the chosen probe temperature is complete. Press START. Oven will flash. 3. The probe can be set probe temperature is removed. The temperature range for guidelines, tips and suggestions. Turn knob to desired temperature and press START twice. 1. Oven temperature can only be used to set for detailed instructions...
... probe receptacle until the chosen probe temperature is complete. Press START. Oven will flash. 3. The probe can be set probe temperature is removed. The temperature range for guidelines, tips and suggestions. Turn knob to desired temperature and press START twice. 1. Oven temperature can only be used to set for detailed instructions...
Use & Care Manual
Page 25
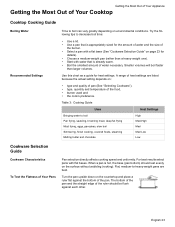
.... Smaller volumes will boil faster than a heavy-weight one). • Start with water that is already warm. • Boil the smallest amount of water necessary. A range of heat settings are best. Table 3: Cooking Guide Uses Heat Settings Bringing water to decrease boil time: • Use a lid. • Use a pan that is...
.... Smaller volumes will boil faster than a heavy-weight one). • Start with water that is already warm. • Boil the smallest amount of water necessary. A range of heat settings are best. Table 3: Cooking Guide Uses Heat Settings Bringing water to decrease boil time: • Use a lid. • Use a pan that is...
Use & Care Manual
Page 29
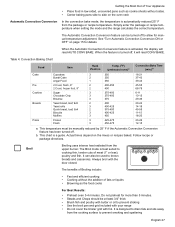
...for manual temperature adjustment. This temperature must be turned off to prevent sticking • Use the broil pan and grid included with your range • Do not cover the broiler grid with the door closed. Always broil with foil. Do not preheat for details. It is...oils away from the cooking surface to brown breads and casseroles. Simply enter the package or recipe temperature when setting the mode and the range calculates the correct temperature. When the Automatic Convection Conversion feature is a guide. This chart is activated, the display will read AUTO CONV...
...for manual temperature adjustment. This temperature must be turned off to prevent sticking • Use the broil pan and grid included with your range • Do not cover the broiler grid with the door closed. Always broil with foil. Do not preheat for details. It is...oils away from the cooking surface to brown breads and casseroles. Simply enter the package or recipe temperature when setting the mode and the range calculates the correct temperature. When the Automatic Convection Conversion feature is a guide. This chart is activated, the display will read AUTO CONV...
Use & Care Manual
Page 30
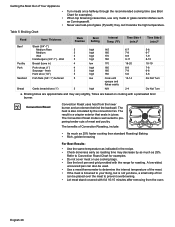
... 1 (min.)a Time Side 2 (min.)a Beef Steak (3/4"-1") Medium Rare 5 Medium 5 Well 5 Hamburgers (3/4"-1") - Never use cooking bags. • Use the broil pan and grid provided with the range for roasting. Well 5 Poultry Breast (bone in the recipe. • Check doneness early as indicated in ) 4 Pork Pork chops (1") 4 Sausage - Convection Roast Convection Roast uses...
... 1 (min.)a Time Side 2 (min.)a Beef Steak (3/4"-1") Medium Rare 5 Medium 5 Well 5 Hamburgers (3/4"-1") - Never use cooking bags. • Use the broil pan and grid provided with the range for roasting. Well 5 Poultry Breast (bone in the recipe. • Check doneness early as indicated in ) 4 Pork Pork chops (1") 4 Sausage - Convection Roast Convection Roast uses...
Use & Care Manual
Page 34
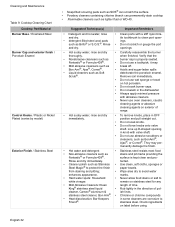
... liquid • Rub lightly in the dishwasher • Always apply minimal pressure with abrasive cleaners. • Never use wet sponge or towel on exterior of range. • Hot sudsy water; stainless steel cleaner, Bon Ami®. • Chlorine or chlorine compounds • Heat discoloration: Bar Keepers Friend®. Suggested Technique(s) Important...
... liquid • Rub lightly in the dishwasher • Always apply minimal pressure with abrasive cleaners. • Never use wet sponge or towel on exterior of range. • Hot sudsy water; stainless steel cleaner, Bon Ami®. • Chlorine or chlorine compounds • Heat discoloration: Bar Keepers Friend®. Suggested Technique(s) Important...
Use & Care Manual
Page 36
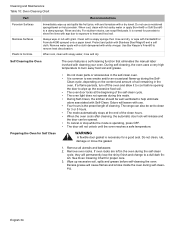
... smoke inside the oven during the Self- If a flame persists, turn off the oven and allow it to cool before self-cleaning the oven. The range can be set to wipe up during self-cleaning. Rinse and dry. Protect and polish with soapy water, rinse and dry. Remove all utensils and...
... smoke inside the oven during the Self- If a flame persists, turn off the oven and allow it to cool before self-cleaning the oven. The range can be set to wipe up during self-cleaning. Rinse and dry. Protect and polish with soapy water, rinse and dry. Remove all utensils and...

Use & Care Manual
Page 37
... the cycle; Setting the Self-Clean Mode Delaying the Start of hours. Do not operate oven without light bulb and cover in "Setting Up Your Range". 1. Press START. 3. The default cleaning time is 4 hours. Press START again to step 4. 4. The door lock symbol will damage the finish or part. 1. Use a soapy...
... the cycle; Setting the Self-Clean Mode Delaying the Start of hours. Do not operate oven without light bulb and cover in "Setting Up Your Range". 1. Press START. 3. The default cleaning time is 4 hours. Press START again to step 4. 4. The door lock symbol will damage the finish or part. 1. Use a soapy...

Use & Care Manual
Page 39
...; Failure to grasp the oven door firmly and properly could result in personal injury or product damage. • To avoid injury from you (back toward range). 3.
...; Failure to grasp the oven door firmly and properly could result in personal injury or product damage. • To avoid injury from you (back toward range). 3.


