
Use & Care Manual
Page 1
Use and Care Manual Bosch Gas Ranges with European Convection
Use and Care Manual Bosch Gas Ranges with European Convection

Use & Care Manual
Page 3
...The Cleaning and Maintenance section describes how to clean and maintain your appliance. • The Service section includes troubleshooting tips and your range, be certain that flammable materials such as described in this appliance only for its intended use as window coverings do not blow over ... the kitchen. • Never leave the cooktop unattended when in contact with a hot burner or grate. TO REDUCE THE RISK OF A RANGE TOP GREASE FIRE: English 1 Safety Important Safety Instructions READ AND SAVE THESE INSTRUCTIONS Important Safety Instructions Fire Safety • Do not use ....
...The Cleaning and Maintenance section describes how to clean and maintain your appliance. • The Service section includes troubleshooting tips and your range, be certain that flammable materials such as described in this appliance only for its intended use as window coverings do not blow over ... the kitchen. • Never leave the cooktop unattended when in contact with a hot burner or grate. TO REDUCE THE RISK OF A RANGE TOP GREASE FIRE: English 1 Safety Important Safety Instructions READ AND SAVE THESE INSTRUCTIONS Important Safety Instructions Fire Safety • Do not use ....
Use & Care Manual
Page 4
...If you cannot reach your back to accumulate on low or medium settings. TO REDUCE THE RISK OF INJURY TO PERSONS IN THE EVENT OF A RANGE TOP GREASE FIRE, OBSERVE THE FOLLOWING: a) SMOTHER FLAMES with a close-fitting lid, cookie sheet, or metal tray, then turn it started. 3)...cooking at high settings. d) d) Use proper pan size. Always use combustible materials, gasoline or other than grease fires with your gas supplier, call your gas supplier from food fires other flammable vapors and liquids in this or any other appliance. BE CAREFUL TO PREVENT BURNS. Boilovers cause ...
...If you cannot reach your back to accumulate on low or medium settings. TO REDUCE THE RISK OF INJURY TO PERSONS IN THE EVENT OF A RANGE TOP GREASE FIRE, OBSERVE THE FOLLOWING: a) SMOTHER FLAMES with a close-fitting lid, cookie sheet, or metal tray, then turn it started. 3)...cooking at high settings. d) d) Use proper pan size. Always use combustible materials, gasoline or other than grease fires with your gas supplier, call your gas supplier from food fires other flammable vapors and liquids in this or any other appliance. BE CAREFUL TO PREVENT BURNS. Boilovers cause ...
Use & Care Manual
Page 6
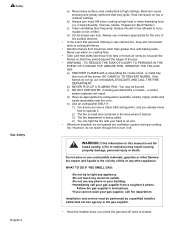
... food. California lists formaldehyde as overheating margarines and cooking oils may be harmful to birds. Install anti-tip device packaged with range. See installation instructions. Clean around the burner and burner ports. Injury to heating element or burner will not open. This .... Wet clothes or sponges can tip. This appliance must be properly installed and grounded by : 1) Providing good ventilation when cooking with gas. 2) Providing good ventilation during the first several cleaning cycles. Other kitchen fumes such as a potential cause of cancer. Refer to cool...
... food. California lists formaldehyde as overheating margarines and cooking oils may be harmful to birds. Install anti-tip device packaged with range. See installation instructions. Clean around the burner and burner ports. Injury to heating element or burner will not open. This .... Wet clothes or sponges can tip. This appliance must be properly installed and grounded by : 1) Providing good ventilation when cooking with gas. 2) Providing good ventilation during the first several cleaning cycles. Other kitchen fumes such as a potential cause of cancer. Refer to cool...

Use & Care Manual
Page 9
... low settings on the model, the appliance is necessary to prepare delicate sauces. The rubber feet on the grates should rest flat on model, the range is turned on the cooktop. Do not touch any single burner is equipped with between 1 and 4 diffusion burner caps. This results in the indents on...
... low settings on the model, the appliance is necessary to prepare delicate sauces. The rubber feet on the grates should rest flat on model, the range is turned on the cooktop. Do not touch any single burner is equipped with between 1 and 4 diffusion burner caps. This results in the indents on...

Use & Care Manual
Page 10
... closer to cooking foods. CAUTION To avoid burns, place oven racks in . Top Rack Bottom Rack Back of Rack Pan Stops Stops Front of the range. Extension Oven Rack (some models) The Full Extension Rack allows for easier access to the user. When the stop before turning oven on both sides...
... closer to cooking foods. CAUTION To avoid burns, place oven racks in . Top Rack Bottom Rack Back of Rack Pan Stops Stops Front of the range. Extension Oven Rack (some models) The Full Extension Rack allows for easier access to the user. When the stop before turning oven on both sides...
Use & Care Manual
Page 13
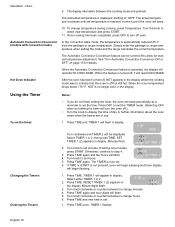
... at the beginning of the mode. The convection fan operates during any convection mode, including dehydrate. Signals that eliminates the manual labor involved with the range. End-of a program or an oven error. To indicate when a mode is finished, 3 consecutive beeps will turn off automatically when the door is a problem with...
... at the beginning of the mode. The convection fan operates during any convection mode, including dehydrate. Signals that eliminates the manual labor involved with the range. End-of a program or an oven error. To indicate when a mode is finished, 3 consecutive beeps will turn off automatically when the door is a problem with...

Use & Care Manual
Page 14
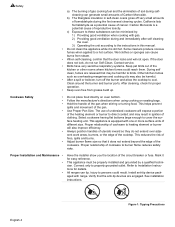
Press Time and turn off . Used to a 24 hour clock, see "Select Function" section. • If you do not complete the operation of your range. Light - Door Locking Indicator - Press pad to toggle between timer and clock display. Temperature - Time - TIMER 1 AND TIMER 2; Warming Drawer Indicator - The ... indicates AM and PM. To use the touchpad, press the center part of day is displayed in the selected mode. Displays temperature of the range by using the touch pads, dial and control knobs. Press Time to the desired setting and press start. Start - A beep will appear ...
Press Time and turn off . Used to a 24 hour clock, see "Select Function" section. • If you do not complete the operation of your range. Light - Door Locking Indicator - Press pad to toggle between timer and clock display. Temperature - Time - TIMER 1 AND TIMER 2; Warming Drawer Indicator - The ... indicates AM and PM. To use the touchpad, press the center part of day is displayed in the selected mode. Displays temperature of the range by using the touch pads, dial and control knobs. Press Time to the desired setting and press start. Start - A beep will appear ...

Use & Care Manual
Page 15
... selection. Press Start. 4. Press START to the Fahrenheit temperature scale. Changing the Clock 1. The Select Functions Menu SELECT FUNCTIONS is now set or change the range features listed below. Press and hold COOKING MODE press pad for the function are complete, SELECT FUNCTION flashes again. 5. Press OFF to select CLOCK. 3. Access...
... selection. Press Start. 4. Press START to the Fahrenheit temperature scale. Changing the Clock 1. The Select Functions Menu SELECT FUNCTIONS is now set or change the range features listed below. Press and hold COOKING MODE press pad for the function are complete, SELECT FUNCTION flashes again. 5. Press OFF to select CLOCK. 3. Access...

Use & Care Manual
Page 18
... burner off. Before Using the Appliance for the First Time • Remove all safety precautions and Use and Care Manual infor- Remove packing materials from range. this is positioned correctly on page 23 for surface cooking applications such as boiling, frying, simmering, steaming and sauteing. See "Getting the Most Out of...
... burner off. Before Using the Appliance for the First Time • Remove all safety precautions and Use and Care Manual infor- Remove packing materials from range. this is positioned correctly on page 23 for surface cooking applications such as boiling, frying, simmering, steaming and sauteing. See "Getting the Most Out of...
Use & Care Manual
Page 20
... once. The actual temperature increases until set the timer: 1. To change minutes. 4. Simply enter the package or recipe temperature when setting the mode and the range calculates the correct temperature. To set temperature is turned off, it will flash. 5. Minutes flash. 1 : 00 HR:MIN Set TIMER 2 2. If setting only minutes, press...
... once. The actual temperature increases until set the timer: 1. To change minutes. 4. Simply enter the package or recipe temperature when setting the mode and the range calculates the correct temperature. To set temperature is turned off, it will flash. 5. Minutes flash. 1 : 00 HR:MIN Set TIMER 2 2. If setting only minutes, press...

Use & Care Manual
Page 21
... START. 4. Note: Time required for each of the programmed cooking time, the oven will automatically turn off . 8. TIMED BAKE appears. 6. After cooking is not pressed, range will beep and display will sound. play and minutes flash. 4. Hours Flash. 5: 00 PM 400 oF HR:MIN DELAYED BAKE 5. Set minutes and then press...
... START. 4. Note: Time required for each of the programmed cooking time, the oven will automatically turn off . 8. TIMED BAKE appears. 6. After cooking is not pressed, range will beep and display will sound. play and minutes flash. 4. Hours Flash. 5: 00 PM 400 oF HR:MIN DELAYED BAKE 5. Set minutes and then press...

Use & Care Manual
Page 22
... is removed. Touch TEMPERATURE. Press start and PROBE TEMP will appear. 5. The probe symbol will not self-clean with meat in the oven. 3. The temperature range for detailed instructions. Turn the knob to change oven temperature if necessary. 6. Oven will remain in 5°F increments until the probe is reached. Do not...
... is removed. Touch TEMPERATURE. Press start and PROBE TEMP will appear. 5. The probe symbol will not self-clean with meat in the oven. 3. The temperature range for detailed instructions. Turn the knob to change oven temperature if necessary. 6. Oven will remain in 5°F increments until the probe is reached. Do not...
Use & Care Manual
Page 25
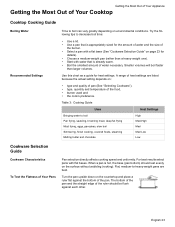
... water that is hot, the base (pan bottom) should be flush against the bottom of Your Pans Pan selection directly affects cooking speed and uniformity. A range of heat settings are best. The bottom of the pan and the straight edge of the food, • burner used and • the cook's preference...
... water that is hot, the base (pan bottom) should be flush against the bottom of Your Pans Pan selection directly affects cooking speed and uniformity. A range of heat settings are best. The bottom of the pan and the straight edge of the food, • burner used and • the cook's preference...
Use & Care Manual
Page 29
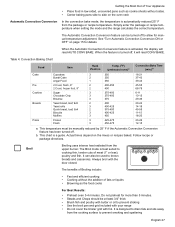
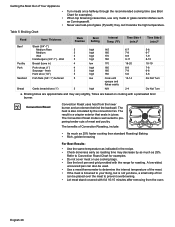
...the package or recipe temperature. The Broil mode is a guide. b. Simply enter the package or recipe temperature when setting the mode and the range calculates the correct temperature. Table 4: Convection Baking Chart Food Item Rack Position Temp. (oF) (preheated oven)a Convection Bake Time (min.)b Cake .... When the Automatic Convection Conversion feature is designed to prevent sticking • Use the broil pan and grid included with your range • Do not cover the broiler grid with the door closed. Broil Broiling uses intense heat radiated from the cooking surface...
...the package or recipe temperature. The Broil mode is a guide. b. Simply enter the package or recipe temperature when setting the mode and the range calculates the correct temperature. Table 4: Convection Baking Chart Food Item Rack Position Temp. (oF) (preheated oven)a Convection Bake Time (min.)b Cake .... When the Automatic Convection Conversion feature is designed to prevent sticking • Use the broil pan and grid included with your range • Do not cover the broiler grid with the door closed. Broil Broiling uses intense heat radiated from the cooking surface...
Use & Care Manual
Page 30
... thermometer to determine the internal temperature of the meat. • If the meat is browned to prevent overbrowning. • Let meat stand covered with the range for examples). The heat is not yet done, a small strip of foil can 't tolerate the high temperature. A low-sided, uncovered pan can also be placed...
... thermometer to determine the internal temperature of the meat. • If the meat is browned to prevent overbrowning. • Let meat stand covered with the range for examples). The heat is not yet done, a small strip of foil can 't tolerate the high temperature. A low-sided, uncovered pan can also be placed...
Use & Care Manual
Page 34
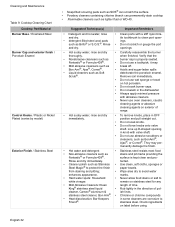
... cleaners such as Brillo® or S.O.S.®. rinse • Clean ports with valve shaft. • Do not use wet sponge or towel on exterior of range. • Hot sudsy water; such as lighter fluid or WD-40. Verify that the burner cap is kept clean and pro- They may break off...
... cleaners such as Brillo® or S.O.S.®. rinse • Clean ports with valve shaft. • Do not use wet sponge or towel on exterior of range. • Hot sudsy water; such as lighter fluid or WD-40. Verify that the burner cap is kept clean and pro- They may break off...
Use & Care Manual
Page 36
... the oven cools after cleaning, the automatic door lock will permanently lose the shiny finish and change to burn away food soil and grease. The range can also be well ventilated to clean for porcelain to show fine lines with hot sudsy water or apply Bon-Ami® or Soft Scrub...
... the oven cools after cleaning, the automatic door lock will permanently lose the shiny finish and change to burn away food soil and grease. The range can also be well ventilated to clean for porcelain to show fine lines with hot sudsy water or apply Bon-Ami® or Soft Scrub...

Use & Care Manual
Page 37
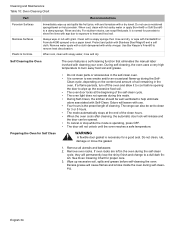
... option to change number of hours. Note: The time of the cycle; Turn knob until SELF CLEAN mode appears. Otherwise, continue to 1-1/2 inches inside the frame with detergent and hot water. Press START. Setting the Self-Clean Mode Delaying the Start of hours. Do not clean or ... front of the oven must be cleaned by hand before the cycle begins. Press START. 3. Press START. 5. REMOVE RACKS appears in "Setting Up Your Range". 1. To change cleaning time, turn knob to remove oven racks. 6. SELF CLEAN flashes. The door lock symbol will damage the finish or part. 1....
... option to change number of hours. Note: The time of the cycle; Turn knob until SELF CLEAN mode appears. Otherwise, continue to 1-1/2 inches inside the frame with detergent and hot water. Press START. Setting the Self-Clean Mode Delaying the Start of hours. Do not clean or ... front of the oven must be cleaned by hand before the cycle begins. Press START. 3. Press START. 5. REMOVE RACKS appears in "Setting Up Your Range". 1. To change cleaning time, turn knob to remove oven racks. 6. SELF CLEAN flashes. The door lock symbol will damage the finish or part. 1....

Use & Care Manual
Page 39
... burns. • The lenses (if equipped) must be sure to close and open . 5. Holding the door firmly on each hinge) away from you (back toward range). 3. The door front is cool and power to protect the light bulb from hinge bracket snapping closed - the hinge could result. Replacing the Oven Door...
... burns. • The lenses (if equipped) must be sure to close and open . 5. Holding the door firmly on each hinge) away from you (back toward range). 3. The door front is cool and power to protect the light bulb from hinge bracket snapping closed - the hinge could result. Replacing the Oven Door...


