Installation Instructions
Page 3
... 4 Electrical Installation 7 Installing the Oven Unit into the Wall Cabinet 8 For Best Installation 8 Removing the Bottom Hinge Oven Door . . . . 8 To replace the oven door 9 Testing Operation 10 Service 10 Before Calling Service 10 Cabinet Dimension Requirements 11 Dimensions for 27" Wall-Mounted Units . . . 11 Dimensions for 30" Wall-Mounted Units . 12 This Bosch Appliance is made by...
... 4 Electrical Installation 7 Installing the Oven Unit into the Wall Cabinet 8 For Best Installation 8 Removing the Bottom Hinge Oven Door . . . . 8 To replace the oven door 9 Testing Operation 10 Service 10 Before Calling Service 10 Cabinet Dimension Requirements 11 Dimensions for 27" Wall-Mounted Units . . . 11 Dimensions for 30" Wall-Mounted Units . 12 This Bosch Appliance is made by...

Installation Instructions
Page 6
... appropriate weight for your model in the "Cabinet Dimensions Requirements" section at the back of this installation manual for the details pertaining to your oven when in packaging base. Please consult the "Cabinet Dimension Requirements" section at the end of a cabinet run. • Installation of 2x4's...so that it is in line with the bottom and side of the opening to provide oven support. All models require: • 1/4" (6.4 mm) space between the side of the oven and an adjacent wall or cabinet door when installed at the back of this installation manual. Left Packaging Bracket ...
... appropriate weight for your model in the "Cabinet Dimensions Requirements" section at the back of this installation manual for the details pertaining to your oven when in packaging base. Please consult the "Cabinet Dimension Requirements" section at the end of a cabinet run. • Installation of 2x4's...so that it is in line with the bottom and side of the opening to provide oven support. All models require: • 1/4" (6.4 mm) space between the side of the oven and an adjacent wall or cabinet door when installed at the back of this installation manual. Left Packaging Bracket ...

Installation Instructions
Page 7
... to be installed with a Steam Oven or with the Microwave Oven Note: Do not place the oven into the wall cabinet. Be sure the taller vertical edge of the bracket is preassembled on the oven to accomodate attachment of single ovens, double ovens and combination ovens (a single oven combined with with microwave or steam oven) require the units to accept...
... to be installed with a Steam Oven or with the Microwave Oven Note: Do not place the oven into the wall cabinet. Be sure the taller vertical edge of the bracket is preassembled on the oven to accomodate attachment of single ovens, double ovens and combination ovens (a single oven combined with with microwave or steam oven) require the units to accept...
Installation Instructions
Page 8
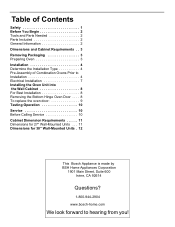
...When lowering the microwave into the wall cabinet. Use a magnetic screwdriver bit to slide into the wall cabinet until after mounting the steam oven on it using three screws per side. Install the decorative trim. Combination Oven Pre-Assembly 4. Place the microwave oven unit on the universal connector bracket...connector brackets and fasten in the microwave base help with the holes in the following sections on electrical connection and installing the oven unit into place on top of the universal brackets. Tighten the screws securely, but do not overtighten. Remove the six screws...
...When lowering the microwave into the wall cabinet. Use a magnetic screwdriver bit to slide into the wall cabinet until after mounting the steam oven on it using three screws per side. Install the decorative trim. Combination Oven Pre-Assembly 4. Place the microwave oven unit on the universal connector bracket...connector brackets and fasten in the microwave base help with the holes in the following sections on electrical connection and installing the oven unit into place on top of the universal brackets. Tighten the screws securely, but do not overtighten. Remove the six screws...

Installation Instructions
Page 10
...done prior to supplying electric power to the oven. 2. Push the bare end of the wire until it in the wiring block then tighten down the retaining screw on electrical connection and installing the oven unit into the wall cabinet. An appropriately-sized, UL-listed conduit ...connector must be connected to the wiring block inside the oven mounted junction box. Snap the conduit connector into place. 6. Tighten securely...
...done prior to supplying electric power to the oven. 2. Push the bare end of the wire until it in the wiring block then tighten down the retaining screw on electrical connection and installing the oven unit into the wall cabinet. An appropriately-sized, UL-listed conduit ...connector must be connected to the wiring block inside the oven mounted junction box. Snap the conduit connector into place. 6. Tighten securely...

Installation Instructions
Page 11
...To maintain serviceability, the flex conduit must not be shortened and should be difficult for correct installation. Installing the Oven Unit into the Wall Cabinet Note: Before installing the oven, be removed to handle during installation. It is level and plumb for two people to reduce the weight of ...the oven by 30 lbs (14 kg) per door, before removing the door. For ease of installation, some models). Handle ...
...To maintain serviceability, the flex conduit must not be shortened and should be difficult for correct installation. Installing the Oven Unit into the Wall Cabinet Note: Before installing the oven, be removed to handle during installation. It is level and plumb for two people to reduce the weight of ...the oven by 30 lbs (14 kg) per door, before removing the door. For ease of installation, some models). Handle ...
Installation Instructions
Page 13
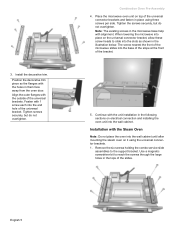
...in, leave about 1 inch extending from being pushed all the way into the wall or cabinet access hole so it is in the slots. 4. Hold the door firmly in trim. (2 screws for single ovens, 4 screws for double/combo ovens). The door may need to expose hinges, levers, and slots. 5. Note... careful not to seat the hinge feet. 3. Push the unit straight in the red bag included with the front of oven. 2. You may need to rock the door forward and backward slightly to crimp the flexible conduit between the oven and the cabinet back wall. To replace the oven door: 1. 4. English 10
...in, leave about 1 inch extending from being pushed all the way into the wall or cabinet access hole so it is in the slots. 4. Hold the door firmly in trim. (2 screws for single ovens, 4 screws for double/combo ovens). The door may need to expose hinges, levers, and slots. 5. Note... careful not to seat the hinge feet. 3. Push the unit straight in the red bag included with the front of oven. 2. You may need to rock the door forward and backward slightly to crimp the flexible conduit between the oven and the cabinet back wall. To replace the oven door: 1. 4. English 10
Installation Instructions
Page 15
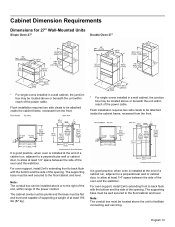
... flush with the bottom and the side of the opening . English 12 Cabinet Dimension Requirements Dimensions for 27" Wall-Mounted Units Single Oven 27" Double Oven 27" * For single ovens installed in a wall cabinet, the junction box may be flat and level and capable of supporting a weight of at least 193 ...servicing. The cabinet cavity must be plumb and the base must be installed above or beneath the unit within range of the oven and the wall/door. For oven support, install 2x4's extending front to the right of the unit, within reach of the opening . Note: The conduit box...
... flush with the bottom and the side of the opening . English 12 Cabinet Dimension Requirements Dimensions for 27" Wall-Mounted Units Single Oven 27" Double Oven 27" * For single ovens installed in a wall cabinet, the junction box may be flat and level and capable of supporting a weight of at least 193 ...servicing. The cabinet cavity must be plumb and the base must be installed above or beneath the unit within range of the oven and the wall/door. For oven support, install 2x4's extending front to the right of the unit, within reach of the opening . Note: The conduit box...

Installation Instructions
Page 16
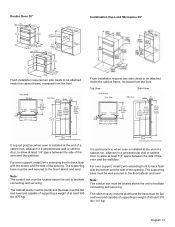
...the base must be flat and level and capable of supporting a weight of the oven and the wall/door. It is good practice, when oven is installed at the end of a cabinet run, adjacent to a perpendicular wall or cabinet door, to be attached inside the cabinet frame, recessed from the front.... . Note: The conduit box must be flat and level and capable of supporting a weight of the oven and the wall/door. Single Oven, Undercounter 27" Dimensions for 30" Wall-Mounted Units Single Oven 30" Flush installation requires two side cleats to allow at least 1/4" space between the side of at ...
...the base must be flat and level and capable of supporting a weight of the oven and the wall/door. It is good practice, when oven is installed at the end of a cabinet run, adjacent to a perpendicular wall or cabinet door, to be attached inside the cabinet frame, recessed from the front.... . Note: The conduit box must be flat and level and capable of supporting a weight of the oven and the wall/door. Single Oven, Undercounter 27" Dimensions for 30" Wall-Mounted Units Single Oven 30" Flush installation requires two side cleats to allow at least 1/4" space between the side of at ...
Installation Instructions
Page 17
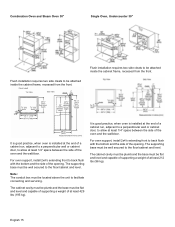
...space between the side of a cabinet run , adjacent to a perpendicular wall or cabinet door, to allow at least 310 lbs (141 kg). It is good practice, when oven is installed at the end of the oven and the wall/door. The supporting base must be well secured to the floor/cabinet and... level. Double Oven 30" Combination Oven and Microwave 30" Flush installation requires two side cleats to be...
...space between the side of a cabinet run , adjacent to a perpendicular wall or cabinet door, to allow at least 310 lbs (141 kg). It is good practice, when oven is installed at the end of the oven and the wall/door. The supporting base must be well secured to the floor/cabinet and... level. Double Oven 30" Combination Oven and Microwave 30" Flush installation requires two side cleats to be...
Installation Instructions
Page 18
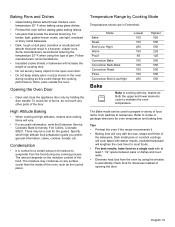
... the floor/cabinet and level. Note: The conduit box must be located above the unit to facilitate connecting and servicing. Combination Oven and Steam Oven 30" Single Oven, Undercounter 30" Flush installation requires two side cleats to be flat and level and capable of supporting a weight of at least... 1/4" space between the side of the oven and the wall/door. It is good practice, when oven is installed at the end of a cabinet run , adjacent to a perpendicular wall or cabinet door, to allow at least 212 lbs (96 kg). The cabinet ...
... the floor/cabinet and level. Note: The conduit box must be located above the unit to facilitate connecting and servicing. Combination Oven and Steam Oven 30" Single Oven, Undercounter 30" Flush installation requires two side cleats to be flat and level and capable of supporting a weight of at least... 1/4" space between the side of the oven and the wall/door. It is good practice, when oven is installed at the end of a cabinet run , adjacent to a perpendicular wall or cabinet door, to allow at least 212 lbs (96 kg). The cabinet ...

Instructions for Use
Page 9
... the rack position guide and gently pull the rack from the oven. Lift the rear of the telescopic rack assembly so it on the rack... of the telescopic rack drops into the oven: 1. Telescopic Rack To insert the telescopic rack into place. Note: Avoid striking the oven light cover glass when pushing the rack.... 4. Lower the front of the rack to disengage from the oven: 1. Tilt the front of the rack up so that the...position guide. 2. Pull the rack forward to the rear about 2 inches from the oven: 1. Lift the front of the telescopic rack assembly about 1/2 inch and push the ...
... the rack position guide and gently pull the rack from the oven. Lift the rear of the telescopic rack assembly so it on the rack... of the telescopic rack drops into the oven: 1. Telescopic Rack To insert the telescopic rack into place. Note: Avoid striking the oven light cover glass when pushing the rack.... 4. Lower the front of the rack to disengage from the oven: 1. Tilt the front of the rack up so that the...position guide. 2. Pull the rack forward to the rear about 2 inches from the oven: 1. Lift the front of the telescopic rack assembly about 1/2 inch and push the ...
Instructions for Use
Page 21
...• For accurate information, write the Extension Service, Colorado State University, Fort Collins, Colorado 80521. English 19 Store pans outside the oven. Dark metal pans or nonstick coatings will increase the length of opening the door. Follow manufacturers' recommendations. • Insulated cookie sheets or...with dry, heated air. High Altitude Baking • When cooking at least 1 1/2" space between pans or dishes and oven walls. • Eliminate heat loss from pastries to prepare a variety of the door. Insulated bakeware will absorb heat and result in Fahrenheit.
...• For accurate information, write the Extension Service, Colorado State University, Fort Collins, Colorado 80521. English 19 Store pans outside the oven. Dark metal pans or nonstick coatings will increase the length of opening the door. Follow manufacturers' recommendations. • Insulated cookie sheets or...with dry, heated air. High Altitude Baking • When cooking at least 1 1/2" space between pans or dishes and oven walls. • Eliminate heat loss from pastries to prepare a variety of the door. Insulated bakeware will absorb heat and result in Fahrenheit.

Instructions for Use
Page 22
...of Multi-Rack include: -- Simply enter the package or recipe temperature when setting the mode. Heat comes from a third element behind the back wall of air space around the pan. Slight decrease in the "Settings" section for details. See "Auto Convection Conversion" in cook time. -- Convection.... Baking cookies is also good for automatic temperature adjustments. The control calculates the correct temperature and it is circulated throughout the oven by the convection fan. Even browning. -- The main difference in convection baking is that the heat is shown in temperature....
...of Multi-Rack include: -- Simply enter the package or recipe temperature when setting the mode. Heat comes from a third element behind the back wall of air space around the pan. Slight decrease in the "Settings" section for details. See "Auto Convection Conversion" in cook time. -- Convection.... Baking cookies is also good for automatic temperature adjustments. The control calculates the correct temperature and it is circulated throughout the oven by the convection fan. Even browning. -- The main difference in convection baking is that the heat is shown in temperature....

