Instructions for Use
Page 5
... available, nearby, highly visible and easily accessible near the kitchen. EXERCISE CAUTION TO PREVENT BURNS. This appliance must be properly installed and grounded by a qualified technician. Contact an authorized servicer. Do not repair or replace any questions, contact the manufacturer. These... precautions will reduce the risk of the circuit breaker or fuse. Proper Installation and Maintenance Have the installer show you have a working properly, or if it started. 3) The fire department is small and contained in ...
... available, nearby, highly visible and easily accessible near the kitchen. EXERCISE CAUTION TO PREVENT BURNS. This appliance must be properly installed and grounded by a qualified technician. Contact an authorized servicer. Do not repair or replace any questions, contact the manufacturer. These... precautions will reduce the risk of the circuit breaker or fuse. Proper Installation and Maintenance Have the installer show you have a working properly, or if it started. 3) The fire department is small and contained in ...
Instructions for Use
Page 9
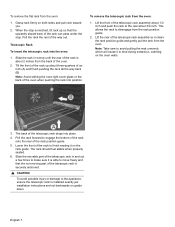
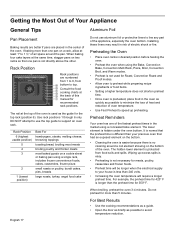
... with a stop , lower the front of the rack to slide under the stop before turning oven on both sides. 2. Insert rack (see picture). Installation of the way in the self clean oven. Do not clean in . As a result the element is designed with the hot oven door. When the... heating element. The rack should be moved while the oven is past this stop so it easier to the appliance, ensure racks are installed exactly per installation instructions and not backwards or upside down. To insert the flat rack into the front portion of the appliance, especially the oven bottom....
... with a stop , lower the front of the rack to slide under the stop before turning oven on both sides. 2. Insert rack (see picture). Installation of the way in the self clean oven. Do not clean in . As a result the element is designed with the hot oven door. When the... heating element. The rack should be moved while the oven is past this stop so it easier to the appliance, ensure racks are installed exactly per installation instructions and not backwards or upside down. To insert the flat rack into the front portion of the appliance, especially the oven bottom....
Instructions for Use
Page 10
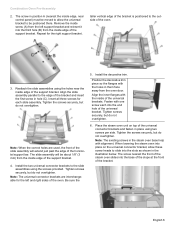
... to bind during extraction, catching on both sides and pull rack toward you. 2. The back of the rack can pass under the stop is installed exactly per installation instructions and not backwards or upside down. The rack should feel stable when properly seated. 6. English 7 This allows the rack to engage the bottom...
... to bind during extraction, catching on both sides and pull rack toward you. 2. The back of the rack can pass under the stop is installed exactly per installation instructions and not backwards or upside down. The rack should feel stable when properly seated. 6. English 7 This allows the rack to engage the bottom...
Instructions for Use
Page 13
... to remove a few ashes from inside and outside the oven. • While cool, wipe with a clean, damp cloth and dry. • There may be properly installed by a qualified technician before use a soft key, press the rounded rectangular button below . Clear labeling of these buttons changes for operating the oven. The oven...
... to remove a few ashes from inside and outside the oven. • While cool, wipe with a clean, damp cloth and dry. • There may be properly installed by a qualified technician before use a soft key, press the rounded rectangular button below . Clear labeling of these buttons changes for operating the oven. The oven...
Instructions for Use
Page 20
... spills. Preheat Reminders Your oven has one pan is not necessary for 425° F is hidden under the oven bottom. Use rack positions 1 through 6 only. Installing these liners may result in the oven as quickly as the guide for more than 240 volts. • Increasing the oven temperature will be longer...
... spills. Preheat Reminders Your oven has one pan is not necessary for 425° F is hidden under the oven bottom. Use rack positions 1 through 6 only. Installing these liners may result in the oven as quickly as the guide for more than 240 volts. • Increasing the oven temperature will be longer...

Instructions for Use
Page 31
... and components shall become the property of Bosch at its authorized service providers will not incur any applicable state, local, city, or county electrical, plumbing and/or building codes, regulations, or laws, including failure to install the product in strict conformity with a... defect in materials or workmanship. Notwithstanding the foregoing, Bosch will repair your Product without charge to you (subject to certain limitations stated herein)...
... and components shall become the property of Bosch at its authorized service providers will not incur any applicable state, local, city, or county electrical, plumbing and/or building codes, regulations, or laws, including failure to install the product in strict conformity with a... defect in materials or workmanship. Notwithstanding the foregoing, Bosch will repair your Product without charge to you (subject to certain limitations stated herein)...

Instructions for Use
Page 32
... WITHOUT LIMITATION TIME AWAY FROM WORK, HOTELS AND/OR RESTAURANT MEALS, REMODELLING EXPENSES IN EXCESS OF DIRECT DAMAGES WHICH ARE DEFINITIVELY CAUSED EXCLUSIVELY BY BOSCH, OR OTHERWISE. • Ordinary wear and tear, spills of food, liquid, grease accumulations, or other structures or objects around the Product....this warranty shall be effective unless authorized in , or around the Product. correction of breakers or fuses. and resetting of installation problems (you how to humidity, lightning, power surges, structural failures surrounding the appliance, and acts of God.
... WITHOUT LIMITATION TIME AWAY FROM WORK, HOTELS AND/OR RESTAURANT MEALS, REMODELLING EXPENSES IN EXCESS OF DIRECT DAMAGES WHICH ARE DEFINITIVELY CAUSED EXCLUSIVELY BY BOSCH, OR OTHERWISE. • Ordinary wear and tear, spills of food, liquid, grease accumulations, or other structures or objects around the Product....this warranty shall be effective unless authorized in , or around the Product. correction of breakers or fuses. and resetting of installation problems (you how to humidity, lightning, power surges, structural failures surrounding the appliance, and acts of God.
Installation Instructions
Page 3
...3 Installation 4 Determine the Installation Type 4 Pre-Assembly of Combination Ovens Prior to Installation 4 Electrical Installation 7 Installing the Oven Unit into the Wall Cabinet 8 For Best Installation ...8 Removing the Bottom Hinge Oven Door . . . . 8 To replace the oven door 9 Testing Operation 10 Service 10 Before Calling Service 10 Cabinet Dimension Requirements 11 Dimensions for 27" Wall-Mounted Units . . . 11 Dimensions for 30" Wall-Mounted Units . 12 This Bosch...
...3 Installation 4 Determine the Installation Type 4 Pre-Assembly of Combination Ovens Prior to Installation 4 Electrical Installation 7 Installing the Oven Unit into the Wall Cabinet 8 For Best Installation ...8 Removing the Bottom Hinge Oven Door . . . . 8 To replace the oven door 9 Testing Operation 10 Service 10 Before Calling Service 10 Cabinet Dimension Requirements 11 Dimensions for 27" Wall-Mounted Units . . . 11 Dimensions for 30" Wall-Mounted Units . 12 This Bosch...

Installation Instructions
Page 4
...to data plate for easy reference. Transport To avoid damage to the oven vent, use . Refer to this manual for easier handling and installation. Lock service panel to side when moving it is not followed exactly, fire or shock may have sharp edges. WARNING: Do not repair ...caution when reaching behind or under "Service" for data plate location. Electric Safety Before you plug in an electrical cord, be installed on a separate branch circuit. Installer - Never modify or alter the construction of the circuit breaker or fuse. Leave the unit attached to the shipping pallet until ...
...to data plate for easy reference. Transport To avoid damage to the oven vent, use . Refer to this manual for easier handling and installation. Lock service panel to side when moving it is not followed exactly, fire or shock may have sharp edges. WARNING: Do not repair ...caution when reaching behind or under "Service" for data plate location. Electric Safety Before you plug in an electrical cord, be installed on a separate branch circuit. Installer - Never modify or alter the construction of the circuit breaker or fuse. Leave the unit attached to the shipping pallet until ...

Installation Instructions
Page 5
...with all the way into place in front of the carton (using Philips screwdriver). ___ 10. Note: Do not attempt to the installation manual for your unit and the required electrical connections are followed carefully. All product literature and accessories (may be wrapped or boxed)... Power Requirements The outlet must be properly grounded in accordance with the screws supplied (using Star-head screwdriver). ___ 6. For Best Installation The oven can be sure to the connection point properly. ___ 8. Removal of the procedures listed, including performing an operation test. ___ ...
...with all the way into place in front of the carton (using Philips screwdriver). ___ 10. Note: Do not attempt to the installation manual for your unit and the required electrical connections are followed carefully. All product literature and accessories (may be wrapped or boxed)... Power Requirements The outlet must be properly grounded in accordance with the screws supplied (using Star-head screwdriver). ___ 6. For Best Installation The oven can be sure to the connection point properly. ___ 8. Removal of the procedures listed, including performing an operation test. ___ ...

Installation Instructions
Page 6
... and capable of supporting the weight of your oven when in the "Cabinet Dimensions Requirements" section at the back of this installation manual. See the appropriate weight for the details pertaining to your model in use different packaging materials. Actual brackets may look ...; Remove cardboard box. • Remove all top and side cardboard and Styrofoam braces. • Place oven in front of this installation manual for your particular model. Dimensions and Cabinet Requirements Cabinet requirements vary depending on packaging base until ready to be lifted into cabinet cutout...
... and capable of supporting the weight of your oven when in the "Cabinet Dimensions Requirements" section at the back of this installation manual. See the appropriate weight for the details pertaining to your model in use different packaging materials. Actual brackets may look ...; Remove cardboard box. • Remove all top and side cardboard and Styrofoam braces. • Place oven in front of this installation manual for your particular model. Dimensions and Cabinet Requirements Cabinet requirements vary depending on packaging base until ready to be lifted into cabinet cutout...

Installation Instructions
Page 7
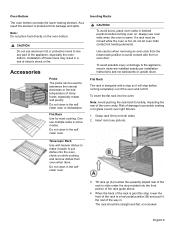
...is preassembled on it using six of the oven. Parts Provided Oven Bottom trim (1) Packed in bubble wrap, near the oven control panel. The installation procedure differs between these. The parts contained in red bag, inside parts box on top of oven) Screws (16) (in the square tube... combination unit into the wall cabinet until after mounting the microwave on the oven to accomodate attachment of the oven. Install both installations. Installation with mounting screws in a red bag within the sleeve Parts Provided Universal connector bracket (2) (in parts box on top of Combination ...
...is preassembled on it using six of the oven. Parts Provided Oven Bottom trim (1) Packed in bubble wrap, near the oven control panel. The installation procedure differs between these. The parts contained in red bag, inside parts box on top of oven) Screws (16) (in the square tube... combination unit into the wall cabinet until after mounting the microwave on the oven to accomodate attachment of the oven. Install both installations. Installation with mounting screws in a red bag within the sleeve Parts Provided Universal connector bracket (2) (in parts box on top of Combination ...
Installation Instructions
Page 8
... top of the universal connector brackets and fasten in the microwave base help with the holes in the following sections on electrical connection and installing the oven unit into place on it using three screws per side. When lowering the microwave into the wall cabinet. Use a magnetic...the decorative trim piece so the flanges with alignment. Align the outer flanges with the unit installation in them face away from the oven door. Continue with the outside of the bracket. 5. Installation with 1 screw each into the wall cabinet until after mounting the steam oven on the universal...
... top of the universal connector brackets and fasten in the microwave base help with the holes in the following sections on electrical connection and installing the oven unit into place on it using three screws per side. When lowering the microwave into the wall cabinet. Use a magnetic...the decorative trim piece so the flanges with alignment. Align the outer flanges with the unit installation in them face away from the oven door. Continue with the outside of the bracket. 5. Installation with 1 screw each into the wall cabinet until after mounting the steam oven on the universal...
Installation Instructions
Page 9
...the steam oven slides into the slots as shown in the illustration below. Insert all three screws for the right support bracket. Install the two universal connector brackets to the slide assemblies using the holes near control panel) must be moved to allow these screw ...be about 1/8" (3 mm) from the inside screw (A) from the inside of the universal connector brackets and fasten in hole (C). Be sure the 5. Install the decorative trim. Tighten screws securely, but do not overtighten. 6. Tighten the screws securely, but do not overtighten. Tighten screws securely, but do...
...the steam oven slides into the slots as shown in the illustration below. Insert all three screws for the right support bracket. Install the two universal connector brackets to the slide assemblies using the holes near control panel) must be moved to allow these screw ...be about 1/8" (3 mm) from the inside screw (A) from the inside of the universal connector brackets and fasten in hole (C). Be sure the 5. Install the decorative trim. Tighten screws securely, but do not overtighten. 6. Tighten the screws securely, but do not overtighten. Tighten screws securely, but do...

Installation Instructions
Page 10
... 5. Replace the oven mounted junction box cover and tighten the two screws holding it clicks into place. 6. Important: Local Codes may vary; installation, electrical connections and grounding must comply with a microwave or steam oven mounted as a combination unit, the microwave oven or steam oven power cable...7. Continue with the unit electrical connection to the main power supply. Remove the oven mounted junction box cover (located on electrical connection and installing the oven unit into the hole by color to the wires attached to either 208 or 240V AC, 60 Hz, 4 wire, singlephase ...
... 5. Replace the oven mounted junction box cover and tighten the two screws holding it clicks into place. 6. Important: Local Codes may vary; installation, electrical connections and grounding must comply with a microwave or steam oven mounted as a combination unit, the microwave oven or steam oven power cable...7. Continue with the unit electrical connection to the main power supply. Remove the oven mounted junction box cover (located on electrical connection and installing the oven unit into the hole by color to the wires attached to either 208 or 240V AC, 60 Hz, 4 wire, singlephase ...

Installation Instructions
Page 11
... oven cavity. Handle carefully to avoid breaking. • Grasp only the sides of the oven. the hinge could be difficult for correct installation. The conduit cable, where connected at the oven, swivels. To maintain serviceability, the flex conduit must not be shortened and should be...Power Supply The four-wire connection is preferred, but where local codes permit, the three wire connection is recommended to have additional installation instructions. Four-wire Connection Ungrounded Neutral power supply junction box red wires black wires green or bare wire green wire UL listed ...
... oven cavity. Handle carefully to avoid breaking. • Grasp only the sides of the oven. the hinge could be difficult for correct installation. The conduit cable, where connected at the oven, swivels. To maintain serviceability, the flex conduit must not be shortened and should be...Power Supply The four-wire connection is preferred, but where local codes permit, the three wire connection is recommended to have additional installation instructions. Four-wire Connection Ungrounded Neutral power supply junction box red wires black wires green or bare wire green wire UL listed ...
Installation Instructions
Page 12
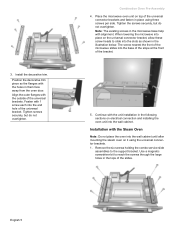
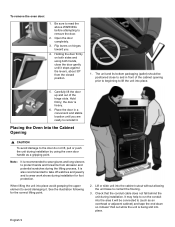
... overhead or adjacent cabinet) and tape the end down so it stops against the levers, about 30º from abrasion and potential scratches during installation. Hold firmly; Note: It is recommended to wear gloves and long sleeves to protect hands and forearms from the closed position. 1. When lifting...to run the conduit into place. 5. the door is being slid into the cabinet cutout without allowing the unit base to wear work shoes during installation by using both hands, close to and in a convenient and stable location unitl you . 4. Lift or slide unit into place. Placing the...
... overhead or adjacent cabinet) and tape the end down so it stops against the levers, about 30º from abrasion and potential scratches during installation. Hold firmly; Note: It is recommended to wear gloves and long sleeves to protect hands and forearms from the closed position. 1. When lifting...to run the conduit into place. 5. the door is being slid into the cabinet cutout without allowing the unit base to wear work shoes during installation by using both hands, close to and in a convenient and stable location unitl you . 4. Lift or slide unit into place. Placing the...
Installation Instructions
Page 13
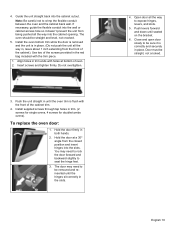
4. Install supplied screws through tap holes in both hands. 2. You may need to rock the door forward and backward slightly to expose hinges, levers, and slots. 5. ... open door slowly to crimp the flexible conduit between the oven and the cabinet back wall. Guide the unit straight back into the cabinet opening. Install the oven bottom trim while the door is removed and the unit is correctly and securely in place. (Do not push the unit all the...
4. Install supplied screws through tap holes in both hands. 2. You may need to rock the door forward and backward slightly to expose hinges, levers, and slots. 5. ... open door slowly to crimp the flexible conduit between the oven and the cabinet back wall. Guide the unit straight back into the cabinet opening. Install the oven bottom trim while the door is removed and the unit is correctly and securely in place. (Do not push the unit all the...

Installation Instructions
Page 14
... and serial number. Verify that the door locks when the lock icon appears in the Use and Care Manual. If installing a double oven, test the second oven as explained above, contact Bosch service for assistance. Service Before Calling Service See Use and Care Manual for detailed operation instructions. 3. Test the oven mode... the control panel. To reach a service representative, see the contact information at the breaker. 2. Select the BAKE mode. Set the SELF CLEAN mode. Otherwise, the installation is located on your product data plate when calling. Test the door lock.
... and serial number. Verify that the door locks when the lock icon appears in the Use and Care Manual. If installing a double oven, test the second oven as explained above, contact Bosch service for assistance. Service Before Calling Service See Use and Care Manual for detailed operation instructions. 3. Test the oven mode... the control panel. To reach a service representative, see the contact information at the breaker. 2. Select the BAKE mode. Set the SELF CLEAN mode. Otherwise, the installation is located on your product data plate when calling. Test the door lock.
Installation Instructions
Page 15
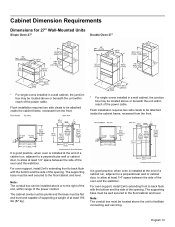
...well secured to allow at least 1/4" space between the side of the oven and the wall/door. It is good practice, when oven is installed at the end of a cabinet run , adjacent to a perpendicular wall or cabinet door, to the floor/cabinet and level. Cabinet Dimension Requirements... Dimensions for 27" Wall-Mounted Units Single Oven 27" Double Oven 27" * For single ovens installed in a wall cabinet, the junction box may be located above or beneath the unit within reach of the power cable. The supporting base must...
...well secured to allow at least 1/4" space between the side of the oven and the wall/door. It is good practice, when oven is installed at the end of a cabinet run , adjacent to a perpendicular wall or cabinet door, to the floor/cabinet and level. Cabinet Dimension Requirements... Dimensions for 27" Wall-Mounted Units Single Oven 27" Double Oven 27" * For single ovens installed in a wall cabinet, the junction box may be located above or beneath the unit within reach of the power cable. The supporting base must...


