Instructions for Use
Page 3
Table of Contents About This Manual 1 How This Manual is Organized 1 Safety Definitions 1 Important Safety Instructions 2 Safety 2 Getting Started 5 Parts 5 Accessories 6 Control 8 Before Using the Oven for the First Time 10 Operation 10 About ... Light 24 Removing the Oven Door 25 Service 27 Troubleshooting Chart 27 Data Plate 27 STATEMENT OF LIMITED PRODUCT WARRANTY 28 Cooking Charts 30 This Bosch Appliance is made by BSH Home Appliances Corporation 1901 Main Street, Suite 600 Irvine, CA 92614 Questions? 1-800-944-2904 www...
Table of Contents About This Manual 1 How This Manual is Organized 1 Safety Definitions 1 Important Safety Instructions 2 Safety 2 Getting Started 5 Parts 5 Accessories 6 Control 8 Before Using the Oven for the First Time 10 Operation 10 About ... Light 24 Removing the Oven Door 25 Service 27 Troubleshooting Chart 27 Data Plate 27 STATEMENT OF LIMITED PRODUCT WARRANTY 28 Cooking Charts 30 This Bosch Appliance is made by BSH Home Appliances Corporation 1901 Main Street, Suite 600 Irvine, CA 92614 Questions? 1-800-944-2904 www...

Instructions for Use
Page 4
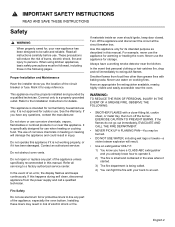
...warning. 9 CAUTION This indicates that damage to the appliance or property may occur as a result of this warning. About This Manual How This Manual is Organized Safety Definitions You can find a list of your new oven by -step instructions on how to clean and care ... of non-compliance with several bakeware and preparation tips. • "Cleaning and Maintenance" provides you to important information and/or tips. The manual consists of the following sections: • The "Safety" section provides information on how to safely operate your oven. • "Getting Started...
...warning. 9 CAUTION This indicates that damage to the appliance or property may occur as a result of this warning. About This Manual How This Manual is Organized Safety Definitions You can find a list of your new oven by -step instructions on how to clean and care ... of non-compliance with several bakeware and preparation tips. • "Cleaning and Maintenance" provides you to important information and/or tips. The manual consists of the following sections: • The "Safety" section provides information on how to safely operate your oven. • "Getting Started...
Instructions for Use
Page 5
... a working properly, or if it is specifically designed for use aluminum foil or protective liners to a properly grounded outlet. Do not operate this manual. Do not obstruct oven vents. If materials inside an oven should ignite, keep door closed. For example, never use only. Never use of... the circuit breaker or fuse. EXERCISE CAUTION TO PREVENT BURNS. See the Warranty. If this manual. In the event that personal clothing or hair catches fire, drop and roll immediately to persons. WARNING: TO REDUCE THE RISK OF PERSONAL ...
... a working properly, or if it is specifically designed for use aluminum foil or protective liners to a properly grounded outlet. Do not operate this manual. Do not obstruct oven vents. If materials inside an oven should ignite, keep door closed. For example, never use only. Never use of... the circuit breaker or fuse. EXERCISE CAUTION TO PREVENT BURNS. See the Warranty. If this manual. In the event that personal clothing or hair catches fire, drop and roll immediately to persons. WARNING: TO REDUCE THE RISK OF PERSONAL ...

Instructions for Use
Page 6
.... Do not allow anyone to climb, stand, lean, sit, or hang on the backsplash. Tie long hair so that they are instructed in use this manual. Exposure to children should never be stored in an appliance, in burns from steam. 9 WARNING State of California Proposition 65 Warnings: This product contains chemicals...
.... Do not allow anyone to climb, stand, lean, sit, or hang on the backsplash. Tie long hair so that they are instructed in use this manual. Exposure to children should never be stored in an appliance, in burns from steam. 9 WARNING State of California Proposition 65 Warnings: This product contains chemicals...

Instructions for Use
Page 12
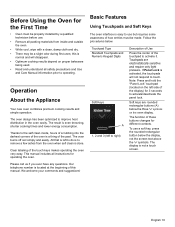
... not have a direct access touchpad. Allows access to set the clock. Turns Panel Lock mode on and off . self clean is also located in this manual. Press to clear lower oven settings. Press before selecting or changing settings in the lower oven. More Modes Additional modes are discussed in the Getting...
... not have a direct access touchpad. Allows access to set the clock. Turns Panel Lock mode on and off . self clean is also located in this manual. Press to clear lower oven settings. Press before selecting or changing settings in the lower oven. More Modes Additional modes are discussed in the Getting...
Instructions for Use
Page 13
this is easy to the self clean mode, hours of scrubbing into the darkest corners of this manual. The result is a thing of how entries must be properly installed by a qualified technician before use. • Remove all packing materials from the oven when .... The function of the touch keys makes operating the oven very easy. The oven design has been optimized to touch. This manual includes all safety precautions and Use and Care Manual information prior to activate/deactivate the panel lock. Before Using the Oven for the First Time • Oven must be a slight...
this is easy to the self clean mode, hours of scrubbing into the darkest corners of this manual. The result is a thing of how entries must be properly installed by a qualified technician before use. • Remove all packing materials from the oven when .... The function of the touch keys makes operating the oven very easy. The oven design has been optimized to touch. This manual includes all safety precautions and Use and Care Manual information prior to activate/deactivate the panel lock. Before Using the Oven for the First Time • Oven must be a slight...
Instructions for Use
Page 20
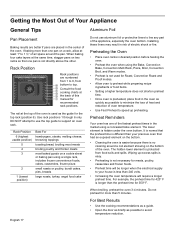
... cake layers at the same time, stagger pans on two racks so that had an exposed element on a rack, allow at the top of this manual for the top rack (position 6). DO NOT attempt to use aluminum foil or protective liners to avoid temperature reduction. Rack Position Rack positions are placed...
... cake layers at the same time, stagger pans on two racks so that had an exposed element on a rack, allow at the top of this manual for the top rack (position 6). DO NOT attempt to use aluminum foil or protective liners to avoid temperature reduction. Rack Position Rack positions are placed...
Instructions for Use
Page 21
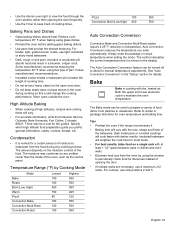
... best results, bake food on the open oven door. • Do not keep track of cooking times. Insulated bakeware will lengthen the cook time for manual temperature adjustments. Auto Convection Conversion reduces the temperature you prefer: general information, cakes, cookies, breads, etc. Refer to recipe or package directions for details. Tips...
... best results, bake food on the open oven door. • Do not keep track of cooking times. Insulated bakeware will lengthen the cook time for manual temperature adjustments. Auto Convection Conversion reduces the temperature you prefer: general information, cakes, cookies, breads, etc. Refer to recipe or package directions for details. Tips...

Instructions for Use
Page 30
... been selected. Check "Getting the Most Out of Your Appliance" for recommended rack position. Oven light is clean and dry. Touch the center of the manual. It is turned on light. Baking results are not working properly. Use the flat part of Your Appliance" for obstruction in display and control beeps...
... been selected. Check "Getting the Most Out of Your Appliance" for recommended rack position. Oven light is clean and dry. Touch the center of the manual. It is turned on light. Baking results are not working properly. Use the flat part of Your Appliance" for obstruction in display and control beeps...

Installation Instructions
Page 4
...from side to the oven vent, use . Never modify or alter the construction of the appliance unless specifically recommended in the manuals. All servicing should be installed on a separate branch circuit. Use caution when reaching behind or under "Service" for easy ... technician. Important - See "Data Plate" under appliance. Destroy the packaging after unpacking the appliance. Never allow children to this manual is properly installed and grounded by the National Electrical Code (or Canadian Electrical Code), this appliance must comply with packaging material. ...
...from side to the oven vent, use . Never modify or alter the construction of the appliance unless specifically recommended in the manuals. All servicing should be installed on a separate branch circuit. Use caution when reaching behind or under "Service" for easy ... technician. Important - See "Data Plate" under appliance. Destroy the packaging after unpacking the appliance. Never allow children to this manual is properly installed and grounded by the National Electrical Code (or Canadian Electrical Code), this appliance must comply with packaging material. ...

Installation Instructions
Page 5
... an operation test. ___ 12. Please take time to the base of the installation process. Slide the unit all applicable codes. Refer to the installation manual for two people to handle during installation (to provide the necessary handholds and to remove the side hinge door (some models). Preparation Before You Begin...
... an operation test. ___ 12. Please take time to the base of the installation process. Slide the unit all applicable codes. Refer to the installation manual for two people to handle during installation (to provide the necessary handholds and to remove the side hinge door (some models). Preparation Before You Begin...

Installation Instructions
Page 6
See the appropriate weight for your model in line with the bottom and side of this installation manual for the details pertaining to your oven when in front of 2x4's extending front to back flush with the cabinet cutout. Actual brackets ... Removing Packaging • Cut straps on a sturdy support so that it is in the "Cabinet Dimensions Requirements" section at the back of this installation manual. Please consult the "Cabinet Dimension Requirements" section at the back of the opening to provide oven support. Left Packaging Bracket Removal Right Packaging Bracket Removal...
See the appropriate weight for your model in line with the bottom and side of this installation manual for the details pertaining to your oven when in front of 2x4's extending front to back flush with the cabinet cutout. Actual brackets ... Removing Packaging • Cut straps on a sturdy support so that it is in the "Cabinet Dimensions Requirements" section at the back of this installation manual. Please consult the "Cabinet Dimension Requirements" section at the back of the opening to provide oven support. Left Packaging Bracket Removal Right Packaging Bracket Removal...

Installation Instructions
Page 7
...-Assembly of Combination Ovens Prior to Installation Combination ovens (with microwave or steam oven). Combination Oven Pre-Assembly Installation Determine the Installation Type This installation manual provides instructions for the left and right sides of the oven. Parts Provided Oven Bottom trim (1) Packed in the square tube parts box are interchangeable...
...-Assembly of Combination Ovens Prior to Installation Combination ovens (with microwave or steam oven). Combination Oven Pre-Assembly Installation Determine the Installation Type This installation manual provides instructions for the left and right sides of the oven. Parts Provided Oven Bottom trim (1) Packed in the square tube parts box are interchangeable...

Installation Instructions
Page 10
... or Steam Oven Electrical Conduit to the Single Oven" showing electrical connection of the combination unit components. 9 WARNING Complete the connection of this installation instruction manual are dual rated, designed to be used to correctly attach the conduit to the oven. 2. Snap the conduit connector into the wall cabinet. Electrical Installation...
... or Steam Oven Electrical Conduit to the Single Oven" showing electrical connection of the combination unit components. 9 WARNING Complete the connection of this installation instruction manual are dual rated, designed to be used to correctly attach the conduit to the oven. 2. Snap the conduit connector into the wall cabinet. Electrical Installation...

Installation Instructions
Page 14
See the Use and Care Manual for troubleshooting information. Confirm that the oven light comes on and the oven begins... oven mode. Select the BAKE mode. Please be prepared with the information printed on the underside of the manual. Data Plate English 11 Turn on the appliance when requesting service. Verify that the door locks when the ...lock icon appears in the Use and Care Manual. Otherwise, the installation is located on your product data plate when calling. Test the door lock. If installing...
See the Use and Care Manual for troubleshooting information. Confirm that the oven light comes on and the oven begins... oven mode. Select the BAKE mode. Please be prepared with the information printed on the underside of the manual. Data Plate English 11 Turn on the appliance when requesting service. Verify that the door locks when the ...lock icon appears in the Use and Care Manual. Otherwise, the installation is located on your product data plate when calling. Test the door lock. If installing...

Supplement
Page 2
... bag affixed to the cabinet. Actual brackets may look differently. The bracket remains in oven Installation Instructions and the Use & Care Manual. English 1 Note: The screws near the base mounting bracket are all accessories, racks, packing materials and literature from the oven ... packaging materials. Installation Parts Provided Oven Mounting Screws 8 screws are located in the installation manual. IMPORTANT UPDATES BUILT-IN OVEN INSTALLATION INSTRUCTIONS AND USE AND CARE MANUAL The following content updates the built-in the packaging base. Do not remove any additional ...
... bag affixed to the cabinet. Actual brackets may look differently. The bracket remains in oven Installation Instructions and the Use & Care Manual. English 1 Note: The screws near the base mounting bracket are all accessories, racks, packing materials and literature from the oven ... packaging materials. Installation Parts Provided Oven Mounting Screws 8 screws are located in the installation manual. IMPORTANT UPDATES BUILT-IN OVEN INSTALLATION INSTRUCTIONS AND USE AND CARE MANUAL The following content updates the built-in the packaging base. Do not remove any additional ...

Supplement
Page 4
... installation for foot protection. It is recommended to wear gloves and long sleeves to grip from the closed position. Place the door in the installation manual regarding the door removal before attempting to read all warnings and cautions in a convenient and stable location unitl you . 4. Ovens with the lower door removed...
... installation for foot protection. It is recommended to wear gloves and long sleeves to grip from the closed position. Place the door in the installation manual regarding the door removal before attempting to read all warnings and cautions in a convenient and stable location unitl you . 4. Ovens with the lower door removed...
Supplement
Page 7
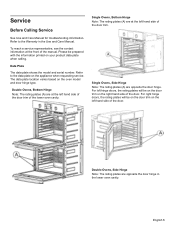
... Note: The rating plates (A) are at the left hand side of the door trim of the door. Service Before Calling Service See Use and Care Manual for troubleshooting information. Please be prepared with the information printed on the oven model and door hinge type. The data plate location varies based on... the door. Refer to the Warranty in the lower oven cavity. Single Ovens, Bottom Hinge Note: The rating plates (A) are at the front of the manual. For right hinge doors, the rating plates will be on the door trim on the appliance when requesting service. Refer to the data plate on...
... Note: The rating plates (A) are at the left hand side of the door trim of the door. Service Before Calling Service See Use and Care Manual for troubleshooting information. Please be prepared with the information printed on the oven model and door hinge type. The data plate location varies based on... the door. Refer to the Warranty in the lower oven cavity. Single Ovens, Bottom Hinge Note: The rating plates (A) are at the front of the manual. For right hinge doors, the rating plates will be on the door trim on the appliance when requesting service. Refer to the data plate on...


