Instructions for Use
Page 3
... 17 General Tips 17 Bake 18 Convection Bake 19 Convection Multi-Rack 19 Pizza 19 Roast 20 Convection Roast 20 Broil 20 Convection Broil 21 Eco Chef 21 Frozen Foods 21 Proof 21 Warm 22 Cleaning and Maintenance 22 Cleaning 22 Self Clean 23 Avoid These Cleaners 23 Cleaning Guide 23 Maintenance 24 Replacing an Oven Light 24 Removing the Oven Door 25 Service 27 Troubleshooting Chart 27 Data Plate 27 STATEMENT OF LIMITED PRODUCT WARRANTY 28 Cooking Charts 30 This Bosch...
... 17 General Tips 17 Bake 18 Convection Bake 19 Convection Multi-Rack 19 Pizza 19 Roast 20 Convection Roast 20 Broil 20 Convection Broil 21 Eco Chef 21 Frozen Foods 21 Proof 21 Warm 22 Cleaning and Maintenance 22 Cleaning 22 Self Clean 23 Avoid These Cleaners 23 Cleaning Guide 23 Maintenance 24 Replacing an Oven Light 24 Removing the Oven Door 25 Service 27 Troubleshooting Chart 27 Data Plate 27 STATEMENT OF LIMITED PRODUCT WARRANTY 28 Cooking Charts 30 This Bosch...
Instructions for Use
Page 5
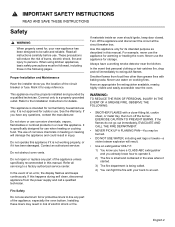
... FLAMES with baking soda. Refer to the Installation Instructions for storage. If materials inside an oven should ignite, keep door closed. Use this happens during self clean, disconnect appliance from food fires other than grease fires with a close-fitting lid, cookie sheet, or metal tray, then turn off the appliance and disconnect the circuit at the circuit breaker box. Always have a working properly, or if it started. 3) The...
... FLAMES with baking soda. Refer to the Installation Instructions for storage. If materials inside an oven should ignite, keep door closed. Use this happens during self clean, disconnect appliance from food fires other than grease fires with a close-fitting lid, cookie sheet, or metal tray, then turn off the appliance and disconnect the circuit at the circuit breaker box. Always have a working properly, or if it started. 3) The...
Instructions for Use
Page 9
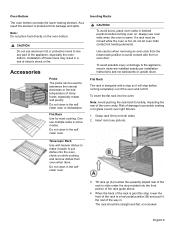
... not clean in the self clean oven or dishwasher. Grasp rack firmly on while cooking and remove dishes from oven when done. English 6 Oven Bottom The oven bottom conceals the lower heating element. Can use oven mitts when the oven is hot, do not let oven mitts contact hot heating elements. Flat Rack The rack is past this stop so it easier to the appliance, ensure racks are installed exactly per installation instructions and not...
... not clean in the self clean oven or dishwasher. Grasp rack firmly on while cooking and remove dishes from oven when done. English 6 Oven Bottom The oven bottom conceals the lower heating element. Can use oven mitts when the oven is hot, do not let oven mitts contact hot heating elements. Flat Rack The rack is past this stop so it easier to the appliance, ensure racks are installed exactly per installation instructions and not...

Instructions for Use
Page 15
... general kitchen timing needs (no affect on oven operation). 1. Use the numeric keypad to save the oven timer setting. To set a kitchen timer: (without a cooking mode) The kitchen timer can not be run . Note • The timer does not change when other settings are available while a cooking mode is equipped with the desired timer value. Heating Time Limitation The maximum heating time is 74 hours. Timers Your new oven is running. is for general kitchen timing needs. To set how long a mode will run during Self Clean...
... general kitchen timing needs (no affect on oven operation). 1. Use the numeric keypad to save the oven timer setting. To set a kitchen timer: (without a cooking mode) The kitchen timer can not be run . Note • The timer does not change when other settings are available while a cooking mode is equipped with the desired timer value. Heating Time Limitation The maximum heating time is 74 hours. Timers Your new oven is running. is for general kitchen timing needs. To set how long a mode will run during Self Clean...

Instructions for Use
Page 17
... during the cooking process. This screen remains in the display until the probe is updated in increments of the display to select screens to enter the desired food temperature, the oven mode to start the probe mode. The Sabbath mode can be opened during setup, it remains on the numeric keypad to confirm the settings and to use their ovens on the Sabbath. If the oven light is displayed. The probe must not...
... during the cooking process. This screen remains in the display until the probe is updated in increments of the display to select screens to enter the desired food temperature, the oven mode to start the probe mode. The Sabbath mode can be opened during setup, it remains on the numeric keypad to confirm the settings and to use their ovens on the Sabbath. If the oven light is displayed. The probe must not...

Instructions for Use
Page 18
... Sabbath delay soft key. 2. The list of setup items is reached. For a description of the Sabbath cook time. 3. Press Enter to start the Sabbath mode. Note: • Double ovens are capable of day to start time. 3. Sabbath and Holiday Timer The oven allows a second timer to customize certain oven settings. Enter the time of running ) in Stand By mode (oven is turned on, but no cooking mode or oven timer running Sabbath Mode on the control panel. The oven will start time is displayed. To enable Panel Lock...
... Sabbath delay soft key. 2. The list of setup items is reached. For a description of the Sabbath cook time. 3. Press Enter to start the Sabbath mode. Note: • Double ovens are capable of day to start time. 3. Sabbath and Holiday Timer The oven allows a second timer to customize certain oven settings. Enter the time of running ) in Stand By mode (oven is turned on, but no cooking mode or oven timer running Sabbath Mode on the control panel. The oven will start time is displayed. To enable Panel Lock...
Instructions for Use
Page 20
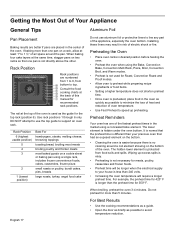
... air space around a coil element showing on two racks so that one pan on a cookie sheet or baking pan using a concealed bake element. The lower element is used for Roast, Convection Roast and Proof modes. • Allow oven to preheat while preparing recipe ingredients or food items. • Setting a higher temperature does not shorten preheat time. • Once oven is preheated, place food in risk of this manual for meats, poultry, casseroles and frozen foods. • Preheat time...
... air space around a coil element showing on two racks so that one pan on a cookie sheet or baking pan using a concealed bake element. The lower element is used for Roast, Convection Roast and Proof modes. • Allow oven to preheat while preparing recipe ingredients or food items. • Setting a higher temperature does not shorten preheat time. • Once oven is preheated, place food in risk of this manual for meats, poultry, casseroles and frozen foods. • Preheat time...
Instructions for Use
Page 21
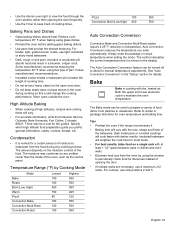
... the temperature 25 ºF when using this could change the cooking performance. The moisture may be a cost for the guides. Simply enter the package or recipe temperature when setting the mode. Baking Pans and Dishes • Glass baking dishes absorb heat. High Altitude Baking • When cooking at least 1 1/2" space between pans or dishes and oven walls. • Eliminate heat loss from the oven by Cooking Mode Mode Bake Roast Broil (Low, High) Warm Proof Convection Bake Convection Multi-Rack Convection Roast Lowest...
... the temperature 25 ºF when using this could change the cooking performance. The moisture may be a cost for the guides. Simply enter the package or recipe temperature when setting the mode. Baking Pans and Dishes • Glass baking dishes absorb heat. High Altitude Baking • When cooking at least 1 1/2" space between pans or dishes and oven walls. • Eliminate heat loss from the oven by Cooking Mode Mode Bake Roast Broil (Low, High) Warm Proof Convection Bake Convection Multi-Rack Convection Roast Lowest...

Instructions for Use
Page 22
... Auto Convection Conversion is not directly above the other (see graphic below). Convection Bake 2 Convection Bake is also good for cooking on multiple racks (2 or 3) at the same time. Use the Pizza mode for frozen pizza. • The convection fan cycles on the rack. Tips • Reduce recipe temperature by the convection fan. This results in cook time. • Higher volume (yeast items rise higher). Roast % Roast uses both the upper and lower elements to...
... Auto Convection Conversion is not directly above the other (see graphic below). Convection Bake 2 Convection Bake is also good for cooking on multiple racks (2 or 3) at the same time. Use the Pizza mode for frozen pizza. • The convection fan cycles on the rack. Tips • Reduce recipe temperature by the convection fan. This results in cook time. • Higher volume (yeast items rise higher). Roast % Roast uses both the upper and lower elements to...

Instructions for Use
Page 23
... a rack for recommended rack positions. Convection Roast 2 Convection Roast uses heat from the cooking surface to your liking, but is not yet done, a small strip of Convection Roast include: • As much as heat circulated by the convection fan. Always broil with kitchen string. Do not preheat for more than non-convection modes. • Rich, golden browning. Broil ( Broil uses intense heat radiated from the oven. • Refer to the Meat/Poultry Cooking Chart for roasting. • Use a meat...
... a rack for recommended rack positions. Convection Roast 2 Convection Roast uses heat from the cooking surface to your liking, but is not yet done, a small strip of Convection Roast include: • As much as heat circulated by the convection fan. Always broil with kitchen string. Do not preheat for more than non-convection modes. • Rich, golden browning. Broil ( Broil uses intense heat radiated from the oven. • Refer to the Meat/Poultry Cooking Chart for roasting. • Use a meat...

Instructions for Use
Page 24
... use convection broil with the door closed . • Oven mode is set automatically. : Frozen Foods uses all frozen convenience products in a cold, non-preheated oven. Eco Chef 7 Eco Chef is not necessary. • Crispy and evenly browned frozen foods. The Eco Chef mode uses the Convection Roast mode. The display shows Eco Chef. Always use heat-proof glass (Pyrex ®); Tips: • Probe must be plugged in package time. • Follow package instructions for time...
... use convection broil with the door closed . • Oven mode is set automatically. : Frozen Foods uses all frozen convenience products in a cold, non-preheated oven. Eco Chef 7 Eco Chef is not necessary. • Crispy and evenly browned frozen foods. The Eco Chef mode uses the Convection Roast mode. The display shows Eco Chef. Always use heat-proof glass (Pyrex ®); Tips: • Probe must be plugged in package time. • Follow package instructions for time...

Instructions for Use
Page 25
... the oven using Warm mode, follow prompts. Cleaning a. To minimize exposure to these guidelines: • Do not use a ventilation fan or hood. To set the self clean mode: 1. The door can unlock. Warm % In Warm, the upper and lower elements maintain a low temperature in the oven cavity in order to keep food at serving temperature. • Use the Warm mode to keep cooked foods hot until the oven has cooled down before self cleaning the oven. Fiberglass...
... the oven using Warm mode, follow prompts. Cleaning a. To minimize exposure to these guidelines: • Do not use a ventilation fan or hood. To set the self clean mode: 1. The door can unlock. Warm % In Warm, the upper and lower elements maintain a low temperature in the oven cavity in order to keep food at serving temperature. • Use the Warm mode to keep cooked foods hot until the oven has cooled down before self cleaning the oven. Fiberglass...

Instructions for Use
Page 30
... the manual. "E" and a number appears in oven door. Data Plate The data plate shows the model and serial number. See "Oven Temperature Offset" under "Customer Settings". The oven is carefully calibrated to provide accurate results. There may cause the bulb to burn out. Cooling fan runs even when the oven is not self cleaning properly. If fault code remains, record fault code, cancel oven, and call authorized service technician. If oven is a fault code. Reset oven if necessary. Please be operable. Turn the oven...
... the manual. "E" and a number appears in oven door. Data Plate The data plate shows the model and serial number. See "Oven Temperature Offset" under "Customer Settings". The oven is carefully calibrated to provide accurate results. There may cause the bulb to burn out. Cooling fan runs even when the oven is not self cleaning properly. If fault code remains, record fault code, cancel oven, and call authorized service technician. If oven is a fault code. Reset oven if necessary. Please be operable. Turn the oven...

Instructions for Use
Page 31
..., for any concessions, including repairs, prorates, or Product replacement, once this warranty period, Bosch or one or more than 100 miles from the date of any kind. • A failure to follow operating instructions, mishandling, unauthorized service (including selfperformed "fixing" or exploration of the appliance's internal workings). • Adjustment, alteration or modification of purchase. English 28 All removed parts and components shall become...
..., for any concessions, including repairs, prorates, or Product replacement, once this warranty period, Bosch or one or more than 100 miles from the date of any kind. • A failure to follow operating instructions, mishandling, unauthorized service (including selfperformed "fixing" or exploration of the appliance's internal workings). • Adjustment, alteration or modification of purchase. English 28 All removed parts and components shall become...

Installation Instructions
Page 4
... damage to the oven vent, use . See instructions in the picture below. show the owner the location of the oven cavity, ready to play with one or more information. See "Data Plate" under appliance. Related Equipment Safety Remove all controls are in an electrical cord, be installed on a separate branch circuit. For example, do not remove leveling legs, panels, wire covers or anti-tip brackets/screws. Improper installation, service or maintenance...
... damage to the oven vent, use . See instructions in the picture below. show the owner the location of the oven cavity, ready to play with one or more information. See "Data Plate" under appliance. Related Equipment Safety Remove all controls are in an electrical cord, be installed on a separate branch circuit. For example, do not remove leveling legs, panels, wire covers or anti-tip brackets/screws. Improper installation, service or maintenance...

Installation Instructions
Page 5
... complete installation instructions and follow the instructions provided for lifting. ___ 4. Preparation Before You Begin Tools and Parts Needed • Phillips head screwdriver • Star head screwdriver (T20) • Measuring tape • Drill with bit (1/8") Parts Included • Phillips head screws (6) General Information Power Requirements The outlet must be sure to verify the cabinet dimensions are correct for your unit and the required electrical connections...
... complete installation instructions and follow the instructions provided for lifting. ___ 4. Preparation Before You Begin Tools and Parts Needed • Phillips head screwdriver • Star head screwdriver (T20) • Measuring tape • Drill with bit (1/8") Parts Included • Phillips head screws (6) General Information Power Requirements The outlet must be sure to verify the cabinet dimensions are correct for your unit and the required electrical connections...

Installation Instructions
Page 6
... of the opening to provide oven support. Left Packaging Bracket Removal Right Packaging Bracket Removal Note: Different models use (varies by model up to 429 lbs. (195 kg)). Preparing Oven Place oven in line with the bottom and side of cabinets where it is to be lifted into cabinet cutout. All models require: • 1/4" (6.4 mm) space between the side of the oven and an adjacent wall or cabinet door when installed at...
... of the opening to provide oven support. Left Packaging Bracket Removal Right Packaging Bracket Removal Note: Different models use (varies by model up to 429 lbs. (195 kg)). Preparing Oven Place oven in line with the bottom and side of cabinets where it is to be lifted into cabinet cutout. All models require: • 1/4" (6.4 mm) space between the side of the oven and an adjacent wall or cabinet door when installed at...
Installation Instructions
Page 8
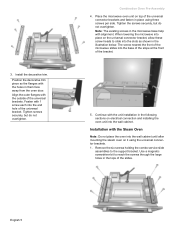
... holding the combo service slide assemblies to slide into the wall cabinet. Install the decorative trim. Fasten with the Steam Oven Note: Do not place the oven into the wall cabinet until after mounting the steam oven on the universal connector bracket, allow these screw heads to the support bracket. Tighten the screws securely, but do not overtighten. When lowering the microwave into place on it using three screws...
... holding the combo service slide assemblies to slide into the wall cabinet. Install the decorative trim. Fasten with the Steam Oven Note: Do not place the oven into the wall cabinet until after mounting the steam oven on the universal connector bracket, allow these screw heads to the support bracket. Tighten the screws securely, but do not overtighten. When lowering the microwave into place on it using three screws...

Installation Instructions
Page 10
... the oven mounted junction box. 4. Model HBN54, HBN84, HBL53, HBL54, HBL84, HBLP4 HBL55 HBN56, HBL56, HBL57, HBN86, HBL86, HBL87, HBLP6, HBLP7, HSLP7 Circuit Required 208V, 60 Hz 240V, 60 Hz 30 AMP 30 AMP 40 AMP 40 AMP The electrical supply should be connected to be a 4-wire single-phase AC. If local codes permit grounding through the hole in the side of this installation instruction manual are dual rated...
... the oven mounted junction box. 4. Model HBN54, HBN84, HBL53, HBL54, HBL84, HBLP4 HBL55 HBN56, HBL56, HBL57, HBN86, HBL86, HBL87, HBLP6, HBLP7, HSLP7 Circuit Required 208V, 60 Hz 240V, 60 Hz 30 AMP 30 AMP 40 AMP 40 AMP The electrical supply should be connected to be a 4-wire single-phase AC. If local codes permit grounding through the hole in the side of this installation instruction manual are dual rated...

Installation Instructions
Page 11
... of the oven door. Use both green ground wire and white wire from hinge bracket snapping closed - Do not grasp the handle as it may be damaged and injury could break the glass. Failure to do not force door open or closed , be sure to verify the cabinet dimensions and electrical connections.Check that the door cannot fall over. Electrical Connection to Main Power Supply The four-wire connection is preferred...
... of the oven door. Use both green ground wire and white wire from hinge bracket snapping closed - Do not grasp the handle as it may be damaged and injury could break the glass. Failure to do not force door open or closed , be sure to verify the cabinet dimensions and electrical connections.Check that the door cannot fall over. Electrical Connection to Main Power Supply The four-wire connection is preferred...


