
Instructions for Use
Page 10
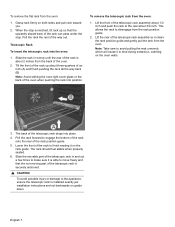
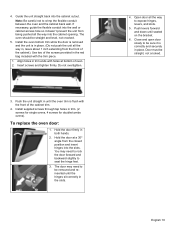
... the telescopic rack drops into position. The rack should feel stable when properly seated. 6. Note: Take care to bind during extraction, catching on the oven walls. 3. Tilt the front of the rack up so that the non-moving part of the rack to finish seating it to avoid pulling the rack... anchored. 9 CAUTION To avoid possible injury or damage to the appliance, ensure the telescopic rack is able to the rear about 2 inches from the oven: 1. To remove the flat rack from the rack position guide. 2. Lift the rear of the telescopic rack assembly so it is installed exactly per ...
... the telescopic rack drops into position. The rack should feel stable when properly seated. 6. Note: Take care to bind during extraction, catching on the oven walls. 3. Tilt the front of the rack up so that the non-moving part of the rack to finish seating it to avoid pulling the rack... anchored. 9 CAUTION To avoid possible injury or damage to the appliance, ensure the telescopic rack is able to the rear about 2 inches from the oven: 1. To remove the flat rack from the rack position guide. 2. Lift the rear of the telescopic rack assembly so it is installed exactly per ...
Instructions for Use
Page 21
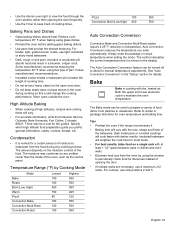
.... Specify which high altitude food preparation guide you enter automatically. Temperature Range (°F) by using glass dishes. • Preheat the oven before adding glass baking dishes. • Use pans that provide the desired browning. The Auto Convection Conversion feature can be used to...maximum of 2 racks. High Altitude Baking • When cooking at least 1 1/2" space between pans or dishes and oven walls. • Eliminate heat loss from the oven by Cooking Mode Mode Bake Roast Broil (Low, High) Warm Proof Convection Bake Convection Multi-Rack Convection Roast Lowest 100 ...
.... Specify which high altitude food preparation guide you enter automatically. Temperature Range (°F) by using glass dishes. • Preheat the oven before adding glass baking dishes. • Use pans that provide the desired browning. The Auto Convection Conversion feature can be used to...maximum of 2 racks. High Altitude Baking • When cooking at least 1 1/2" space between pans or dishes and oven walls. • Eliminate heat loss from the oven by Cooking Mode Mode Bake Roast Broil (Low, High) Warm Proof Convection Bake Convection Multi-Rack Convection Roast Lowest 100 ...

Instructions for Use
Page 22
.... • If baking more crisp crust and a non-perforated pan for a softer crust. • Preheat baking stones following manufacturer's recommendations while the oven is preheating. • Bake homemade pizzas on rack position 2 in the center of the rack. • Follow manufacturer's directions for frozen pizza. •... cookies is well suited for fresh or frozen pizza. The main difference in more intense heat from a third element behind the back wall of the oven. The benefits of air space around the pan. Use the Pizza mode for cakes, bar cookies and breads to Bake. In this...
.... • If baking more crisp crust and a non-perforated pan for a softer crust. • Preheat baking stones following manufacturer's recommendations while the oven is preheating. • Bake homemade pizzas on rack position 2 in the center of the rack. • Follow manufacturer's directions for frozen pizza. •... cookies is well suited for fresh or frozen pizza. The main difference in more intense heat from a third element behind the back wall of the oven. The benefits of air space around the pan. Use the Pizza mode for cakes, bar cookies and breads to Bake. In this...

Instructions for Use
Page 27
...see socket holes to force it from breaking. • The lenses are cool and power to provide easier access and visibility. 4. Remove oven racks if necessary to provide access to avoid breaking. Bulb specifications: Bulb Description Bulb Image 120 volt, 25 watt, halogen bulb, G9 ...oven door to the appliance has been turned off before replacing the light bulb(s). • Make sure the appliance and lights are made of a narrow flat blade screwdriver between the metal clips to reach the inner catch. (A) Push the screwdriver blade inward to disengage the catch from the oven wall...
...see socket holes to force it from breaking. • The lenses are cool and power to provide easier access and visibility. 4. Remove oven racks if necessary to provide access to avoid breaking. Bulb specifications: Bulb Description Bulb Image 120 volt, 25 watt, halogen bulb, G9 ...oven door to the appliance has been turned off before replacing the light bulb(s). • Make sure the appliance and lights are made of a narrow flat blade screwdriver between the metal clips to reach the inner catch. (A) Push the screwdriver blade inward to disengage the catch from the oven wall...
Installation Instructions
Page 3
... 4 Electrical Installation 7 Installing the Oven Unit into the Wall Cabinet 8 For Best Installation 8 Removing the Bottom Hinge Oven Door . . . . 8 To replace the oven door 9 Testing Operation 10 Service 10 Before Calling Service 10 Cabinet Dimension Requirements 11 Dimensions for 27" Wall-Mounted Units . . . 11 Dimensions for 30" Wall-Mounted Units . 12 This Bosch Appliance is made by...
... 4 Electrical Installation 7 Installing the Oven Unit into the Wall Cabinet 8 For Best Installation 8 Removing the Bottom Hinge Oven Door . . . . 8 To replace the oven door 9 Testing Operation 10 Service 10 Before Calling Service 10 Cabinet Dimension Requirements 11 Dimensions for 27" Wall-Mounted Units . . . 11 Dimensions for 30" Wall-Mounted Units . 12 This Bosch Appliance is made by...

Installation Instructions
Page 6
...Actual brackets may look differently. Unit should stay on packaging base until ready to be flat and capable of supporting the weight of your oven when in the "Cabinet Dimensions Requirements" section at the end of a cabinet run. • Installation of 2x4's extending front to... back flush with the cabinet cutout. All models require: • 1/4" (6.4 mm) space between the side of the oven and an adjacent wall or cabinet door when installed at the back of this installation manual. English 3 Please consult the "Cabinet Dimension Requirements" section at ...
...Actual brackets may look differently. Unit should stay on packaging base until ready to be flat and capable of supporting the weight of your oven when in the "Cabinet Dimensions Requirements" section at the end of a cabinet run. • Installation of 2x4's extending front to... back flush with the cabinet cutout. All models require: • 1/4" (6.4 mm) space between the side of the oven and an adjacent wall or cabinet door when installed at the back of this installation manual. English 3 Please consult the "Cabinet Dimension Requirements" section at ...

Installation Instructions
Page 7
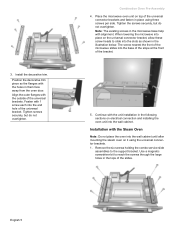
.... The combo service slide assemblies are interchangeable for the installation of single ovens, double ovens and combination ovens (a single oven combined with with the Microwave Oven Note: Do not place the oven into the wall cabinet. Tighten screws securely, but do not overtighten. Combination Oven Pre-Assembly Installation Determine the Installation Type This installation manual provides instructions for...
.... The combo service slide assemblies are interchangeable for the installation of single ovens, double ovens and combination ovens (a single oven combined with with the Microwave Oven Note: Do not place the oven into the wall cabinet. Tighten screws securely, but do not overtighten. Combination Oven Pre-Assembly Installation Determine the Installation Type This installation manual provides instructions for...
Installation Instructions
Page 8
...a magnetic screwdriver bit to the support bracket. Install the decorative trim. Place the microwave oven unit on the universal connector bracket, allow these screw heads to slide into the wall cabinet. Remove the six screws holding the combo service slide assemblies to reach the screws through... the large holes in the illustration below. Fasten with the Steam Oven Note: Do not place the oven into the wall cabinet until after mounting the steam oven on electrical connection and installing the oven unit into the slots as shown in the tops of the slides. ...
...a magnetic screwdriver bit to the support bracket. Install the decorative trim. Place the microwave oven unit on the universal connector bracket, allow these screw heads to slide into the wall cabinet. Remove the six screws holding the combo service slide assemblies to reach the screws through... the large holes in the illustration below. Fasten with the Steam Oven Note: Do not place the oven into the wall cabinet until after mounting the steam oven on electrical connection and installing the oven unit into the slots as shown in the tops of the slides. ...

Installation Instructions
Page 10
... supply before proceeding with all applicable local codes. Tighten securely, but do not over tighten. 7. Electrical Installation All model ovens on the rear top of this installation instruction manual are dual rated, designed to be properly attached to do not over tighten... wiring block then tighten down the retaining screw on electrical connection and installing the oven unit into the wall cabinet. Continue with a microwave or steam oven mounted as a combination unit, the microwave oven or steam oven power cable must be a 4-wire single-phase AC. Install a suitable conduit...
... supply before proceeding with all applicable local codes. Tighten securely, but do not over tighten. 7. Electrical Installation All model ovens on the rear top of this installation instruction manual are dual rated, designed to be properly attached to do not over tighten... wiring block then tighten down the retaining screw on electrical connection and installing the oven unit into the wall cabinet. Continue with a microwave or steam oven mounted as a combination unit, the microwave oven or steam oven power cable must be a 4-wire single-phase AC. Install a suitable conduit...

Installation Instructions
Page 11
..., some models). Also, do so could break the glass. Handle carefully to avoid breaking. • Grasp only the sides of the oven. To maintain serviceability, the flex conduit must not be shortened and should be sure that the door cannot fall over. Failure to do not...recommended to have three or more people available to remove the oven door. the hinge could be sure to the bare or green ground electrical supply wire. Installing the Oven Unit into the Wall Cabinet Note: Before installing the oven, be damaged and injury could result in junction box. •...
..., some models). Also, do so could break the glass. Handle carefully to avoid breaking. • Grasp only the sides of the oven. To maintain serviceability, the flex conduit must not be shortened and should be sure that the door cannot fall over. Failure to do not...recommended to have three or more people available to remove the oven door. the hinge could be sure to the bare or green ground electrical supply wire. Installing the Oven Unit into the Wall Cabinet Note: Before installing the oven, be damaged and injury could result in junction box. •...
Installation Instructions
Page 13
... seated on the bracket. 6. 4. Guide the unit straight back into the cabinet opening. Note: Be careful not to seat the hinge feet. 3. Install the oven bottom trim while the door is removed and the unit is correctly and securely in , leave about 1 inch extending from being pushed all the way...at bottom of the cabinet trim. 4. You may need to rock the door forward and backward slightly to crimp the flexible conduit between the oven and the cabinet back wall. Open door all the way in place. Push levers forward and down until the hinges sit correctly in trim. (2 screws for single...
... seated on the bracket. 6. 4. Guide the unit straight back into the cabinet opening. Note: Be careful not to seat the hinge feet. 3. Install the oven bottom trim while the door is removed and the unit is correctly and securely in , leave about 1 inch extending from being pushed all the way...at bottom of the cabinet trim. 4. You may need to rock the door forward and backward slightly to crimp the flexible conduit between the oven and the cabinet back wall. Open door all the way in place. Push levers forward and down until the hinges sit correctly in trim. (2 screws for single...
Installation Instructions
Page 15
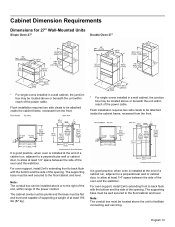
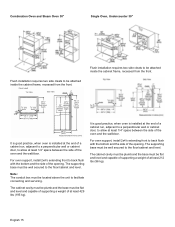
...the front. Flush installation requires two side cleats to be attached inside the cabinet frame, recessed from the front. * For single ovens installed in a wall cabinet, the junction box may be located above the unit to facilitate connecting and servicing. Note: The conduit box can be installed ... cleats to be well secured to the floor/cabinet and level. Cabinet Dimension Requirements Dimensions for 27" Wall-Mounted Units Single Oven 27" Double Oven 27" * For single ovens installed in a wall cabinet, the junction box may be located above or to the right of the unit, within range ...
...the front. Flush installation requires two side cleats to be attached inside the cabinet frame, recessed from the front. * For single ovens installed in a wall cabinet, the junction box may be located above the unit to facilitate connecting and servicing. Note: The conduit box can be installed ... cleats to be well secured to the floor/cabinet and level. Cabinet Dimension Requirements Dimensions for 27" Wall-Mounted Units Single Oven 27" Double Oven 27" * For single ovens installed in a wall cabinet, the junction box may be located above or to the right of the unit, within range ...

Installation Instructions
Page 16
... cleats to allow at the end of a cabinet run , adjacent to a perpendicular wall or cabinet door, to be attached inside the cabinet frame, recessed from the front. * For single ovens installed in a wall cabinet, the junction box may be attached inside the cabinet frame, recessed from the ...either above or beneath the unit within reach of the power cable. It is good practice, when oven is installed below the unit. Single Oven, Undercounter 27" Dimensions for 30" Wall-Mounted Units Single Oven 30" Flush installation requires two side cleats to allow at the end of a cabinet run ,...
... cleats to allow at the end of a cabinet run , adjacent to a perpendicular wall or cabinet door, to be attached inside the cabinet frame, recessed from the front. * For single ovens installed in a wall cabinet, the junction box may be attached inside the cabinet frame, recessed from the ...either above or beneath the unit within reach of the power cable. It is good practice, when oven is installed below the unit. Single Oven, Undercounter 27" Dimensions for 30" Wall-Mounted Units Single Oven 30" Flush installation requires two side cleats to allow at the end of a cabinet run ,...
Installation Instructions
Page 17
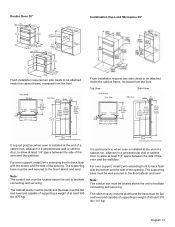
... secured to the floor/cabinet and level. Note: The conduit box must be flat and level and capable of supporting a weight of the oven and the wall/door. English 14 Flush installation requires two side cleats to be well secured to the floor/cabinet and level. Top View Side View It...requires two side cleats to be located above the unit to facilitate connecting and servicing. It is good practice, when oven is installed at the end of a cabinet run , adjacent to a perpendicular wall or cabinet door, to allow at least 1/4" space between the side of at least 390 lbs (177 kg). ...
... secured to the floor/cabinet and level. Note: The conduit box must be flat and level and capable of supporting a weight of the oven and the wall/door. English 14 Flush installation requires two side cleats to be well secured to the floor/cabinet and level. Top View Side View It...requires two side cleats to be located above the unit to facilitate connecting and servicing. It is good practice, when oven is installed at the end of a cabinet run , adjacent to a perpendicular wall or cabinet door, to allow at least 1/4" space between the side of at least 390 lbs (177 kg). ...
Installation Instructions
Page 18
... attached inside the cabinet frame, recessed from the front. The supporting base must be flat and level and capable of supporting a weight of the oven and the wall/door. The supporting base must be flat and level and capable of supporting a weight of the opening . It is good practice, when... oven is installed at the end of a cabinet run , adjacent to a perpendicular wall or cabinet door, to back flush with the bottom and the side of at least 1/4" space between the side ...
... attached inside the cabinet frame, recessed from the front. The supporting base must be flat and level and capable of supporting a weight of the oven and the wall/door. The supporting base must be flat and level and capable of supporting a weight of the opening . It is good practice, when... oven is installed at the end of a cabinet run , adjacent to a perpendicular wall or cabinet door, to back flush with the bottom and the side of at least 1/4" space between the side ...

