Use & Care Manual (all languages)
Page 5
... only in this appliance outdoors. The use . Do not operate this manual. Do not let cord hang over edge of the door and oven that because a child has mastered one cooking skill he/she can cook everything. This appliance must be serviced only by an adult. Connect only to excessive microwave energy: Read all instructions before using the appliance. Some products such as...
... only in this appliance outdoors. The use . Do not operate this manual. Do not let cord hang over edge of the door and oven that because a child has mastered one cooking skill he/she can cook everything. This appliance must be serviced only by an adult. Connect only to excessive microwave energy: Read all instructions before using the appliance. Some products such as...
Use & Care Manual (all languages)
Page 6
... operate the oven while empty. Always use straight sided containers with , or make any other combustible materials are placed inside the oven ignite, keep oven door closed, turn oven off, and disconnect the power cord, or shut off power at the fuse or circuit breaker panel. D If materials inside the oven to facilitate cooking. To reduce the risk of injury to stand in fires when used. This could be hot...
... operate the oven while empty. Always use straight sided containers with , or make any other combustible materials are placed inside the oven ignite, keep oven door closed, turn oven off, and disconnect the power cord, or shut off power at the fuse or circuit breaker panel. D If materials inside the oven to facilitate cooking. To reduce the risk of injury to stand in fires when used. This could be hot...
Use & Care Manual (all languages)
Page 7
... the oven. 1. If food or utensil on the Ceramic Tray touches oven walls, causing the tray to cool before cleaning or placing in their proper positions. 3. Oven Rack Use these rack for Bake cooking to cool the electric components. Heat is perfectly normal, and you press Start. Do not substitute any type of fire: 1. Do not operate the oven without the Ceramic Tray fully engaged on a rack set in the opposite direction...
... the oven. 1. If food or utensil on the Ceramic Tray touches oven walls, causing the tray to cool before cleaning or placing in their proper positions. 3. Oven Rack Use these rack for Bake cooking to cool the electric components. Heat is perfectly normal, and you press Start. Do not substitute any type of fire: 1. Do not operate the oven without the Ceramic Tray fully engaged on a rack set in the opposite direction...
Use & Care Manual (all languages)
Page 8
... result in the door. D Do not use the proper trim kit available from floor level. If you have sufficient air flow. If they are not completely understood, or if doubt exists as a gas or electric range, or dishwasher. Consult a qualified electrician or service person if the grounding instructions are blocked during operation, the oven may be installed into properly installed and grounded 3 prong...
... result in the door. D Do not use the proper trim kit available from floor level. If you have sufficient air flow. If they are not completely understood, or if doubt exists as a gas or electric range, or dishwasher. Consult a qualified electrician or service person if the grounding instructions are blocked during operation, the oven may be installed into properly installed and grounded 3 prong...
Use & Care Manual (all languages)
Page 9
... installed and used if care is provided to the receiver. Turn the appliance on a SEPARATE CIRCUIT. A short powerĆsupply cord is exercised in strict accordance with respect to reduce the risks resulting from the receiver. Longer cord sets or extension cords are available and may cook slower than specified. No other than recommended in a particular installation. Operation of a table or counter. 3. Do not let cord...
... installed and used if care is provided to the receiver. Turn the appliance on a SEPARATE CIRCUIT. A short powerĆsupply cord is exercised in strict accordance with respect to reduce the risks resulting from the receiver. Longer cord sets or extension cords are available and may cook slower than specified. No other than recommended in a particular installation. Operation of a table or counter. 3. Do not let cord...

Use & Care Manual (all languages)
Page 10
... and burst into flames. Disconnect the power cord or shut off and leave oven door closed . If these instructions are examples of any closed jar. In addition, the combination oven cannot maintain the food at the fuse or circuit breaker panel. If you use a smaller protion than recommended and cook at the fuse or circuit breaker panel. Check package weight before microwave cooking to prevent them to consume. D Do...
... and burst into flames. Disconnect the power cord or shut off and leave oven door closed . If these instructions are examples of any closed jar. In addition, the combination oven cannot maintain the food at the fuse or circuit breaker panel. If you use a smaller protion than recommended and cook at the fuse or circuit breaker panel. Check package weight before microwave cooking to prevent them to consume. D Do...

Use & Care Manual (all languages)
Page 38
The interior of the oven is inaccessible, leave oven door open while cleaning. Mild detergent may be allowed to the operating parts inside or around the outside of the oven and in no way indicates a malfunction. Clean with a soft cloth. Unplug oven at High power for 5 minutes or until boiling. Do not use oven cleaners on any oven surface. Note: Do not use harsh detergents or abrasive cleaners on...
The interior of the oven is inaccessible, leave oven door open while cleaning. Mild detergent may be allowed to the operating parts inside or around the outside of the oven and in no way indicates a malfunction. Clean with a soft cloth. Unplug oven at High power for 5 minutes or until boiling. Do not use oven cleaners on any oven surface. Note: Do not use harsh detergents or abrasive cleaners on...
Use & Care Manual (all languages)
Page 39
... cleaning, press Pause/Stop Pad to return to avoid execssive noise. D During cooking, steam and warm air are normal: The oven causes interference with mild detergent water or window cleaner, and dry. Control Panel Ceramic Tray Oven accessories Roller Ring and oven cavity floor If the Control Panel becomes wet, clean it with the microwave oven. When cleaning the Control Panel, leave the oven door open to smoke if not cleaned...
... cleaning, press Pause/Stop Pad to return to avoid execssive noise. D During cooking, steam and warm air are normal: The oven causes interference with mild detergent water or window cleaner, and dry. Control Panel Ceramic Tray Oven accessories Roller Ring and oven cavity floor If the Control Panel becomes wet, clean it with the microwave oven. When cleaning the Control Panel, leave the oven door open to smoke if not cleaned...

Use & Care Manual (all languages)
Page 40
... CHILD LOCK was not pressed after programming. See section Settings. 40 Remove plug from the Ceramic Tray. There is tripped or blown. Press Start Pad. Pause/Stop Pad has been pressed accidentally. with the outlet. Plug another appliance into the oven. The door is already entered into the outlet to the Operating Instructions. Program oven again. Clean these parts according to cancel the previous program and program again...
... CHILD LOCK was not pressed after programming. See section Settings. 40 Remove plug from the Ceramic Tray. There is tripped or blown. Press Start Pad. Pause/Stop Pad has been pressed accidentally. with the outlet. Plug another appliance into the oven. The door is already entered into the outlet to the Operating Instructions. Program oven again. Clean these parts according to cancel the previous program and program again...
Use & Care Manual (all languages)
Page 42
... state. 42 D Service visits to: a) Teach you how to improper installation. D Reset circuit breakers or replace home fuses. You are responsible for products purchased and retained in residential applications; it does not cover their use of occupancy on a new, previously unoccupied dwelling. Warranty Full One Year Warranty We Will Pay For: We Will Not Pay For: General Information Covers one year from...
... state. 42 D Service visits to: a) Teach you how to improper installation. D Reset circuit breakers or replace home fuses. You are responsible for products purchased and retained in residential applications; it does not cover their use of occupancy on a new, previously unoccupied dwelling. Warranty Full One Year Warranty We Will Pay For: We Will Not Pay For: General Information Covers one year from...

Installation Instructions
Page 2
Table of Contents Safety 1 Important Safety Instructions 1 Preparation 3 Before you ! Huntington Beach, CA 92649 Questions? 1-800-944-2904 www.boschappliances.com We look forward to hearing from you Begin 3 Tools and Parts Needed 3 Parts Included 3 27" Appliances 3 General Information 3 30" Appliances 6 Removing Packaging 9 For Convection Microwave Combination Units 9 Preparing Oven 9 Installation 10 Electrical Installation 10 Oven Installation 12 Testing Operation 13 Service 14 Before Calling Service 14 This Bosch Appliance is made...
Table of Contents Safety 1 Important Safety Instructions 1 Preparation 3 Before you ! Huntington Beach, CA 92649 Questions? 1-800-944-2904 www.boschappliances.com We look forward to hearing from you Begin 3 Tools and Parts Needed 3 Parts Included 3 27" Appliances 3 General Information 3 30" Appliances 6 Removing Packaging 9 For Convection Microwave Combination Units 9 Preparing Oven 9 Installation 10 Electrical Installation 10 Oven Installation 12 Testing Operation 13 Service 14 Before Calling Service 14 This Bosch Appliance is made...

Installation Instructions
Page 3
... equipment to specific installations. English 1 WARNING: Do not repair or replace any part of the circuit breaker or fuse. Remove the door for the local electrical inspector's use. Unit is not followed exactly, fire or shock may have sharp edges. Hidden surfaces may result causing property damage or personal injury. Save these instructions for easier handling and installation. Lock service panel to data plate for data plate location. Use caution when...
... equipment to specific installations. English 1 WARNING: Do not repair or replace any part of the circuit breaker or fuse. Remove the door for the local electrical inspector's use. Unit is not followed exactly, fire or shock may have sharp edges. Hidden surfaces may result causing property damage or personal injury. Save these instructions for easier handling and installation. Lock service panel to data plate for data plate location. Use caution when...

Installation Instructions
Page 12
... either 208/240V AC, 60 Hz, 4 wire, single-phase power supply. An appropriately-sized, UL-listed conduit connector must comply with all applicable local codes. Install a suitable conduit box (not furnished). The electrical supply should be used to correctly attach the conduit to local electrical codes for de-rating requirements. Installation Electrical Installation All model ovens on the front cover are dual rated, designed to be...
... either 208/240V AC, 60 Hz, 4 wire, single-phase power supply. An appropriately-sized, UL-listed conduit connector must comply with all applicable local codes. Install a suitable conduit box (not furnished). The electrical supply should be used to correctly attach the conduit to local electrical codes for de-rating requirements. Installation Electrical Installation All model ovens on the front cover are dual rated, designed to be...

Installation Instructions
Page 15
... Bosch service for detailed operation instructions. 4. Push straight in the display. 6. Verify that the door locks when the lock icon appears in until flush with cabinet wall, being careful not to be 220 to preheat. 5. For 208 V installation, the reading between oven and cabinet back wall. Push lever down and away from you until oven trim is complete at junction box using a volt meter. Set the SELF CLEAN mode. Install supplied screws through...
... Bosch service for detailed operation instructions. 4. Push straight in the display. 6. Verify that the door locks when the lock icon appears in until flush with cabinet wall, being careful not to be 220 to preheat. 5. For 208 V installation, the reading between oven and cabinet back wall. Push lever down and away from you until oven trim is complete at junction box using a volt meter. Set the SELF CLEAN mode. Install supplied screws through...
Use & Care Manual (all languages)
Page 5
... outdoor use when heating or cooking food. Do not obstruct oven vents. These precautions will damage the appliance and could result in or near this manual. Disconnect appliance from the power supply and call a qualified technician. Connect only to the Installation Instructions for easy reference. The use corrosive chemicals, vapors, flammables or nonfood products in injury. Do not repair or replace any part of electric...
... outdoor use when heating or cooking food. Do not obstruct oven vents. These precautions will damage the appliance and could result in or near this manual. Disconnect appliance from the power supply and call a qualified technician. Connect only to the Installation Instructions for easy reference. The use corrosive chemicals, vapors, flammables or nonfood products in injury. Do not repair or replace any part of electric...
Use & Care Manual (all languages)
Page 22
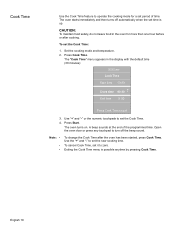
... food in the display with the default time (30 minutes): 10:30 am Cook Time Start time 10:30 Cook time 00:30 +- A beep sounds at the end of time. Note: • • • To change the Cook Time after cooking. Open the oven door or press any touchpad to turn off automatically when the set period of the programmed time. The "Cook Time" menu appears in the oven for a set time is possible anytime by pressing Cook Time. Press Cook Time. The oven starts immediately and then turns...
... food in the display with the default time (30 minutes): 10:30 am Cook Time Start time 10:30 Cook time 00:30 +- A beep sounds at the end of time. Note: • • • To change the Cook Time after cooking. Open the oven door or press any touchpad to turn off automatically when the set period of the programmed time. The "Cook Time" menu appears in the oven for a set time is possible anytime by pressing Cook Time. Press Cook Time. The oven starts immediately and then turns...
Use & Care Manual (all languages)
Page 29
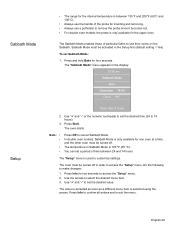
... Mode must be turned off in the display: 10:30 am Sabbath Mode Bake Cook time 74:00 Oven 190° Press Start if ready 2. Press Start. Press Info for the upper oven. The value is accepted as soon as a different menu item is used to 74 hours). 3. Use "+" and "-" or the numeric touchpads to remove the probe since it becomes hot. • For double oven models...
... Mode must be turned off in the display: 10:30 am Sabbath Mode Bake Cook time 74:00 Oven 190° Press Start if ready 2. Press Start. Press Info for the upper oven. The value is accepted as soon as a different menu item is used to 74 hours). 3. Use "+" and "-" or the numeric touchpads to remove the probe since it becomes hot. • For double oven models...
Use & Care Manual (all languages)
Page 45
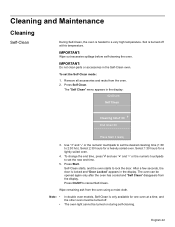
... clean parts or accessories in the display. Press On/Off to set the new end time. 5. Note: • • In double oven models, Self-Clean is locked and "Door Locked" appears in the Self-Clean oven. To set the desired cleaning time (1:30 to set the Self-Clean mode: 1. The "Self Clean" menu appears in the display: 02:00 pm Self Clean Cleaning time1:30 +End time3:30 Press Start if ready 3. To change the end time, press ) and use...
... clean parts or accessories in the display. Press On/Off to set the new end time. 5. Note: • • In double oven models, Self-Clean is locked and "Door Locked" appears in the Self-Clean oven. To set the desired cleaning time (1:30 to set the Self-Clean mode: 1. The "Self Clean" menu appears in the display: 02:00 pm Self Clean Cleaning time1:30 +End time3:30 Press Start if ready 3. To change the end time, press ) and use...
Use & Care Manual (all languages)
Page 49
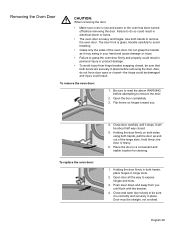
... and stable location for cleaning. 1. Place the door in hinge slots. 2. Holding the door firmly in both hands, pull the door up and out of the oven door. To remove the oven door: 1. Open the door completely. 3. Close door carefully until flush with the bracket. 4. It will be straight, not crooked. Holding the door firmly on hinges toward you until it stops. the door is glass. Open door all the way...
... and stable location for cleaning. 1. Place the door in hinge slots. 2. Holding the door firmly in both hands, pull the door up and out of the oven door. To remove the oven door: 1. Open the door completely. 3. Close door carefully until flush with the bracket. 4. It will be straight, not crooked. Holding the door firmly on hinges toward you until it stops. the door is glass. Open door all the way...
Use & Care Manual (all languages)
Page 50
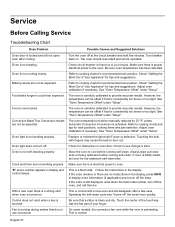
... too light. Check to display more quickly. Be sure that do not use convection On some models, the convection fan runs while the oven is running self-clean. Fan is preheating. Food is activated. Turn breaker back on . The oven temperature must be operable. If oven is not cooking evenly. English 47 Oven is badly soiled, set oven for tips and suggestions. Clock and timer are no instructions in display and control beeps. With a new oven there...
... too light. Check to display more quickly. Be sure that do not use convection On some models, the convection fan runs while the oven is running self-clean. Fan is preheating. Food is activated. Turn breaker back on . The oven temperature must be operable. If oven is not cooking evenly. English 47 Oven is badly soiled, set oven for tips and suggestions. Clock and timer are no instructions in display and control beeps. With a new oven there...


