Installation Instructions
Page 3
... 4 Electrical Installation 7 Installing the Oven Unit into the Wall Cabinet 8 For Best Installation 8 Removing the Bottom Hinge Oven Door . . . . 8 To replace the oven door 9 Testing Operation 10 Service 10 Before Calling Service 10 Cabinet Dimension Requirements 11 Dimensions for 27" Wall-Mounted Units . . . 11 Dimensions for 30" Wall-Mounted Units . 12 This Bosch Appliance is made by...
... 4 Electrical Installation 7 Installing the Oven Unit into the Wall Cabinet 8 For Best Installation 8 Removing the Bottom Hinge Oven Door . . . . 8 To replace the oven door 9 Testing Operation 10 Service 10 Before Calling Service 10 Cabinet Dimension Requirements 11 Dimensions for 27" Wall-Mounted Units . . . 11 Dimensions for 30" Wall-Mounted Units . 12 This Bosch Appliance is made by...

Installation Instructions
Page 6
... brackets may look differently. Left Packaging Bracket Removal Right Packaging Bracket Removal Note: Different models use (varies by model up to provide oven support. Preparing Oven Place oven in front of cabinets where it is to your model in packaging base. All models require: • 1/4" (6.4 mm) space between... the side of the oven and an adjacent wall or cabinet door when installed at the back of 2x4's extending front to back flush with the cabinet cutout. See the appropriate ...
... brackets may look differently. Left Packaging Bracket Removal Right Packaging Bracket Removal Note: Different models use (varies by model up to provide oven support. Preparing Oven Place oven in front of cabinets where it is to your model in packaging base. All models require: • 1/4" (6.4 mm) space between... the side of the oven and an adjacent wall or cabinet door when installed at the back of 2x4's extending front to back flush with the cabinet cutout. See the appropriate ...

Installation Instructions
Page 7
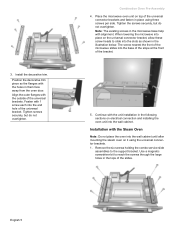
... a microwave. Note: The universal connector brackets are common to be installed with a Steam Oven or with the Microwave Oven Note: Do not place the oven into the wall cabinet. The parts contained in bubble wrap, near the oven control panel. Installation with a Microwave Oven. Parts Provided Oven Bottom trim (1) Packed in a plastic sleeve, with microwave or steam...
... a microwave. Note: The universal connector brackets are common to be installed with a Steam Oven or with the Microwave Oven Note: Do not place the oven into the wall cabinet. The parts contained in bubble wrap, near the oven control panel. Installation with a Microwave Oven. Parts Provided Oven Bottom trim (1) Packed in a plastic sleeve, with microwave or steam...
Installation Instructions
Page 8
... the screws securely, but do not overtighten. The screw nearest the front of the microwave slides into the wall cabinet. Align the outer flanges with the Steam Oven Note: Do not place the oven into the slots as shown in place using the universal connector brackets. 1. Place the microwave... the microwave into place on the universal connector bracket, allow these screw heads to slide into the wall cabinet until after mounting the steam oven on electrical connection and installing the oven unit into the base of the slope at the front of the universal bracket. Use a magnetic ...
... the screws securely, but do not overtighten. The screw nearest the front of the microwave slides into the wall cabinet. Align the outer flanges with the Steam Oven Note: Do not place the oven into the slots as shown in place using the universal connector brackets. 1. Place the microwave... the microwave into place on the universal connector bracket, allow these screw heads to slide into the wall cabinet until after mounting the steam oven on electrical connection and installing the oven unit into the base of the slope at the front of the universal bracket. Use a magnetic ...

Installation Instructions
Page 10
... of the combination unit to either 208 or 240V AC, 60 Hz, 4 wire, singlephase power supply. Remove the oven mounted junction box cover (located on electrical connection and installing the oven unit into the wall cabinet. Model HBN54, HBN84, HBL53, HBL54, HBL84, HBLP4 HBL55 HBN56, HBL56, HBL57, HBN86, HBL86, HBL87, HBLP6, HBLP7, HSLP7...
... of the combination unit to either 208 or 240V AC, 60 Hz, 4 wire, singlephase power supply. Remove the oven mounted junction box cover (located on electrical connection and installing the oven unit into the wall cabinet. Model HBN54, HBN84, HBL53, HBL54, HBL84, HBLP4 HBL55 HBN56, HBL56, HBL57, HBN86, HBL86, HBL87, HBLP6, HBLP7, HSLP7...

Installation Instructions
Page 11
... (or downward) and direct through hole prepared in junction box. It is cool and power to the oven has been turned off before installing into the Wall Cabinet Note: Before installing the oven, be sure that the cavity is heavy and fragile. See instructions below. 9 WARNING • Make ...sure oven is also recommended to remove the oven door (bottom hinge models only) to help reduce the unit ...
... (or downward) and direct through hole prepared in junction box. It is cool and power to the oven has been turned off before installing into the Wall Cabinet Note: Before installing the oven, be sure that the cavity is heavy and fragile. See instructions below. 9 WARNING • Make ...sure oven is also recommended to remove the oven door (bottom hinge models only) to help reduce the unit ...
Installation Instructions
Page 13
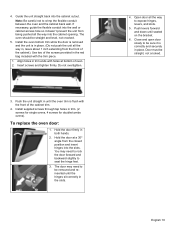
...'t prevent the unit from the closed position and insert hinges into the cabinet cutout. Hold the door at bottom of the cabinet trim. 4. The oven should be straight, not crooked. Use two of the cabinet). Install supplied screws through tap holes in both hands. 2. If necessary, guide the... flexible conduit into the wall or cabinet access hole so it is in the slots. 4. Close and open door slowly to crimp the flexible conduit between the oven and the cabinet back...
...'t prevent the unit from the closed position and insert hinges into the cabinet cutout. Hold the door at bottom of the cabinet trim. 4. The oven should be straight, not crooked. Use two of the cabinet). Install supplied screws through tap holes in both hands. 2. If necessary, guide the... flexible conduit into the wall or cabinet access hole so it is in the slots. 4. Close and open door slowly to crimp the flexible conduit between the oven and the cabinet back...
Installation Instructions
Page 15
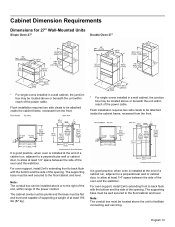
... cabinet door, to facilitate connecting and servicing. Cabinet Dimension Requirements Dimensions for 27" Wall-Mounted Units Single Oven 27" Double Oven 27" * For single ovens installed in a wall cabinet, the junction box may be located above or beneath the unit within range of at least 193 lbs (87 kg). Flush installation ...requires two side cleats to the right of the unit, within reach of the oven and the wall/door. Note: The conduit box can be installed above or to be attached inside the cabinet frame, recessed from the front. For...
... cabinet door, to facilitate connecting and servicing. Cabinet Dimension Requirements Dimensions for 27" Wall-Mounted Units Single Oven 27" Double Oven 27" * For single ovens installed in a wall cabinet, the junction box may be located above or beneath the unit within range of at least 193 lbs (87 kg). Flush installation ...requires two side cleats to the right of the unit, within reach of the oven and the wall/door. Note: The conduit box can be installed above or to be attached inside the cabinet frame, recessed from the front. For...

Installation Instructions
Page 16
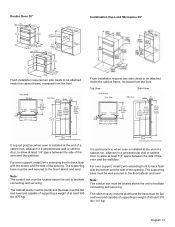
...Note: The conduit box must be flat and capable of supporting a weight of at least 1/4" space between the back wall and the right rear of the oven and the wall/door. For oven support, install 2x4's extending front to back flush with the bottom and the side of a cabinet run , adjacent to...extending front to back flush with the bottom and the side of the oven and the wall/door. If the conduit box is installed below the unit. Single Oven, Undercounter 27" Dimensions for 30" Wall-Mounted Units Single Oven 30" Flush installation requires two side cleats to be located above or ...
...Note: The conduit box must be flat and capable of supporting a weight of at least 1/4" space between the back wall and the right rear of the oven and the wall/door. For oven support, install 2x4's extending front to back flush with the bottom and the side of a cabinet run , adjacent to...extending front to back flush with the bottom and the side of the oven and the wall/door. If the conduit box is installed below the unit. Single Oven, Undercounter 27" Dimensions for 30" Wall-Mounted Units Single Oven 30" Flush installation requires two side cleats to be located above or ...
Installation Instructions
Page 17
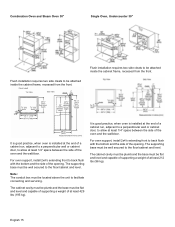
.... The cabinet cavity must be plumb and the base must be flat and level and capable of supporting a weight of the oven and the wall/door. It is good practice, when oven is installed at least 390 lbs (177 kg). Note: The conduit box must be located above the unit to allow at... and servicing. English 14 The cabinet cavity must be plumb and the base must be flat and level and capable of supporting a weight of the oven and the wall/door. Top View Side View It is good practice, when oven is installed at least 310 lbs (141 kg).
.... The cabinet cavity must be plumb and the base must be flat and level and capable of supporting a weight of the oven and the wall/door. It is good practice, when oven is installed at least 390 lbs (177 kg). Note: The conduit box must be located above the unit to allow at... and servicing. English 14 The cabinet cavity must be plumb and the base must be flat and level and capable of supporting a weight of the oven and the wall/door. Top View Side View It is good practice, when oven is installed at least 310 lbs (141 kg).
Installation Instructions
Page 18
... supporting a weight of at the end of a cabinet run , adjacent to a perpendicular wall or cabinet door, to back flush with the bottom and the side of the opening . Combination Oven and Steam Oven 30" Single Oven, Undercounter 30" Flush installation requires two side cleats to back flush with the bottom and...box must be located above the unit to the floor/cabinet and level. It is good practice, when oven is installed at least 1/4" space between the side of the oven and the wall/door. The cabinet cavity must be plumb and the base must be attached inside the cabinet frame, ...
... supporting a weight of at the end of a cabinet run , adjacent to a perpendicular wall or cabinet door, to back flush with the bottom and the side of the opening . Combination Oven and Steam Oven 30" Single Oven, Undercounter 30" Flush installation requires two side cleats to back flush with the bottom and...box must be located above the unit to the floor/cabinet and level. It is good practice, when oven is installed at least 1/4" space between the side of the oven and the wall/door. The cabinet cavity must be plumb and the base must be attached inside the cabinet frame, ...

Instructions for Use
Page 9
...on the oven walls. 3. Slide the movable part of the telescopic rack in evenly until the rear of the rack is about 3/4's of the rack position guide. 5. Note: Take care to avoid pulling the rack unevenly which will cause it on the rack guide. The back of the oven. 2. Tilt...tilt rack up about 2 inches from the back of the telescopic rack drops into position. 4. Telescopic Rack To insert the telescopic rack into the oven: 1. The rack should feel stable when properly seated. 6. Lift the rear of the telescopic rack is installed exactly per installation instructions and not ...
...on the oven walls. 3. Slide the movable part of the telescopic rack in evenly until the rear of the rack is about 3/4's of the rack position guide. 5. Note: Take care to avoid pulling the rack unevenly which will cause it on the rack guide. The back of the oven. 2. Tilt...tilt rack up about 2 inches from the back of the telescopic rack drops into position. 4. Telescopic Rack To insert the telescopic rack into the oven: 1. The rack should feel stable when properly seated. 6. Lift the rear of the telescopic rack is installed exactly per installation instructions and not ...
Instructions for Use
Page 21
...dishes. • Use pans that provide the desired browning. Opening the Oven Door -- High Altitude Baking • When cooking at least 1 1/2" space between pans or dishes and oven walls. • Eliminate heat loss from the oven by using the window to casseroles. Condensation • It is cooking ...may be used to prepare a variety of the food. Baking Pans and Dishes • Glass baking dishes absorb heat. Store pans outside the oven. Specify which high altitude food preparation guide you prefer: general information, cakes, cookies, breads, etc. The Bake mode can be a cost ...
...dishes. • Use pans that provide the desired browning. Opening the Oven Door -- High Altitude Baking • When cooking at least 1 1/2" space between pans or dishes and oven walls. • Eliminate heat loss from the oven by using the window to casseroles. Condensation • It is cooking ...may be used to prepare a variety of the food. Baking Pans and Dishes • Glass baking dishes absorb heat. Store pans outside the oven. Specify which high altitude food preparation guide you prefer: general information, cakes, cookies, breads, etc. The Bake mode can be a cost ...

Instructions for Use
Page 22
...• If baking more than one time. Auto Convection Conversion reduces the temperature you enter automatically. The heat is circulated throughout the oven by the convection fan. English 20 See "Auto Convection Conversion" in temperature. In this case, the baking time increases slightly. The... The benefits of Multi-Rack include: -- Heat comes from a third element behind the back wall of the oven. Even browning. -- Stagger pans so that the heat is circulated throughout the oven by the convection fan. Convection Bake 2 Convection Bake is similar to take advantage of the...
...• If baking more than one time. Auto Convection Conversion reduces the temperature you enter automatically. The heat is circulated throughout the oven by the convection fan. English 20 See "Auto Convection Conversion" in temperature. In this case, the baking time increases slightly. The... The benefits of Multi-Rack include: -- Heat comes from a third element behind the back wall of the oven. Even browning. -- Stagger pans so that the heat is circulated throughout the oven by the convection fan. Convection Bake 2 Convection Bake is similar to take advantage of the...

