Use & Care Manual (all languages)
Page 3
Table of Your Microwave Oven 35 Maintenance 36 āService 37 Warranty 38 Questions? 1Ć800Ć944Ć2904 www.boschappliances.com 5551 McFadden Ave. Huntington Beach, CA 92649 We look forward to Use Your Oven 14 āGetting the Most Out of Your Appliance... 16 āCleaning and Maintenance 35 Care and Cleaning of Contents About This Manual 4 How This Manual Is Organized 4 PRECAUTIONS TO AVOID POSSIBLE EXPOSURE TO EXCESSIVE MICROWAVE ENERGY 4 āSafety 5 IMPORTANT ...
Table of Your Microwave Oven 35 Maintenance 36 āService 37 Warranty 38 Questions? 1Ć800Ć944Ć2904 www.boschappliances.com 5551 McFadden Ave. Huntington Beach, CA 92649 We look forward to Use Your Oven 14 āGetting the Most Out of Your Appliance... 16 āCleaning and Maintenance 35 Care and Cleaning of Contents About This Manual 4 How This Manual Is Organized 4 PRECAUTIONS TO AVOID POSSIBLE EXPOSURE TO EXCESSIVE MICROWAVE ENERGY 4 āSafety 5 IMPORTANT ...

Use & Care Manual (all languages)
Page 4
...and that can result in harmful exposure to microwave energy. Do not place any object between the oven front face and the door or allow soil or cleaner residue to clean and maintain the appliance. About This Manual How This Manual Is Organized This manual contains several sections: D The Safety section...located at the beginning of the manual. ř PRECAUTIONS TO AVOID POSSIBLE EXPOSURE TO EXCESSIVE MICROWAVE ENERGY Do not attempt to set it up and operate it is damaged. It is no damage to read this oven with the safety interlocks. Do not operate the oven if it . D The Cleaning...
...and that can result in harmful exposure to microwave energy. Do not place any object between the oven front face and the door or allow soil or cleaner residue to clean and maintain the appliance. About This Manual How This Manual Is Organized This manual contains several sections: D The Safety section...located at the beginning of the manual. ř PRECAUTIONS TO AVOID POSSIBLE EXPOSURE TO EXCESSIVE MICROWAVE ENERGY Do not attempt to set it up and operate it is damaged. It is no damage to read this oven with the safety interlocks. Do not operate the oven if it . D The Cleaning...
Use & Care Manual (all languages)
Page 5
This appliance must be grounded. It is not designed for industrial or laboratory use of oven is used to alert you don't follow the specific PRECAUTIONS TO AVOID POSSIBLE EXPOSURE TO EXCESSIVE MICROWAVE ENERGY" found on closing the door, use corrosive chemicals, vapors, flammables or nonĆ...or if it has been damaged or dropped. Contact nearest authorized service facility for example, closed glass jars - Connect only to use this manual. Use this appliance only for example, near a kitchen sink, in water Keep cord away from heated surfaces. Do not allow children to...
This appliance must be grounded. It is not designed for industrial or laboratory use of oven is used to alert you don't follow the specific PRECAUTIONS TO AVOID POSSIBLE EXPOSURE TO EXCESSIVE MICROWAVE ENERGY" found on closing the door, use corrosive chemicals, vapors, flammables or nonĆ...or if it has been damaged or dropped. Contact nearest authorized service facility for example, closed glass jars - Connect only to use this manual. Use this appliance only for example, near a kitchen sink, in water Keep cord away from heated surfaces. Do not allow children to...
Use & Care Manual (all languages)
Page 9
...a groundingĆtype 3Ćwire cord, and the longer cord should share the circuit with the microwave oven. D Plug the microwave into at least as great as specified on this microwave oven (120 V, 60 Hz). No other than recommended in or tripping over accidentally. 1. If not installed...262;supply cord is dangerous and may cause interference to determine if it will not drape over edge of the oven. Using a higher voltage is provided to this manual. 2. Using a lower voltage will not occur in strict accordance with a properly grounded threeĆprong outlet. ...
...a groundingĆtype 3Ćwire cord, and the longer cord should share the circuit with the microwave oven. D Plug the microwave into at least as great as specified on this microwave oven (120 V, 60 Hz). No other than recommended in or tripping over accidentally. 1. If not installed...262;supply cord is dangerous and may cause interference to determine if it will not drape over edge of the oven. Using a higher voltage is provided to this manual. 2. Using a lower voltage will not occur in strict accordance with a properly grounded threeĆprong outlet. ...
Use & Care Manual (all languages)
Page 16
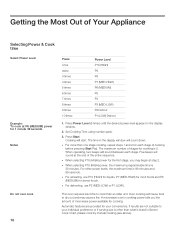
...The time in the display window will sound between each stage of stages for 1 minute 30 seconds Notes Do not over cook 16 Press once twice 3 times 4 times 5 times...beeps will count down. For other than an older unit. This oven requires less time to cook than what is 99 minutes and 99... sequence. Five beeps will sound at P6 (MEDIUM) power for cooking is 30 minutes. D When selecting P10 (HIGH) power, the maximum programmable time is... the desired power level appears in Sensor Cook Chart, please cook by manual cooking (see above). The maximum number of cooking before pressing Start Pad...
...The time in the display window will sound between each stage of stages for 1 minute 30 seconds Notes Do not over cook 16 Press once twice 3 times 4 times 5 times...beeps will count down. For other than an older unit. This oven requires less time to cook than what is 99 minutes and 99... sequence. Five beeps will sound at P6 (MEDIUM) power for cooking is 30 minutes. D When selecting P10 (HIGH) power, the maximum programmable time is... the desired power level appears in Sensor Cook Chart, please cook by manual cooking (see above). The maximum number of cooking before pressing Start Pad...
Use & Care Manual (all languages)
Page 18
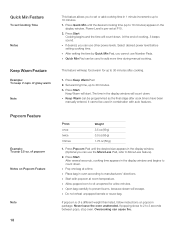
D If desired, you to set or add cooking time in 1 minute increments up to 10 minutes) appears in combination with popcorn at room temperature. Keep Warm will count down. D Start with auto features. Power Level is of cooking, 5 beeps sound. Select desired ... after cook time/s have been manually entered. D Keep Warm can be used in the display window. D Pop one bag at P10. 2. Never leave the oven unattended. D Quick Min Pad can be used to 30 minutes. 3. of popcorn Notes on popcorn package. Overcooking can use Number Pads. Quick Min Feature To set ...
D If desired, you to set or add cooking time in 1 minute increments up to 10 minutes) appears in combination with popcorn at room temperature. Keep Warm will count down. D Start with auto features. Power Level is of cooking, 5 beeps sound. Select desired ... after cook time/s have been manually entered. D Keep Warm can be used in the display window. D Pop one bag at P10. 2. Never leave the oven unattended. D Quick Min Pad can be used to 30 minutes. 3. of popcorn Notes on popcorn package. Overcooking can use Number Pads. Quick Min Feature To set ...
Use & Care Manual (all languages)
Page 21
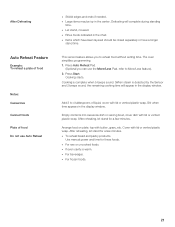
This sensor feature allows you can use Auto Reheat D Shield edges and ends if needed. The oven simplifies programming. 1. Arrange food on plate; Cover with lid or vented plastic wrap. Use manual power and time for a few minutes. Press Auto Reheat Pad. (Optional you to 4 tablespoons of... into casserole dish or serving bowl, cover dish with lid or vented plastic wrap. After reheating, let stand for a few minutes. D If oven cavity is detected by the Sensor and 2 beeps sound, the remaining cooking time will complete during standing time. D Rinse foods indicated in the ...
This sensor feature allows you can use Auto Reheat D Shield edges and ends if needed. The oven simplifies programming. 1. Arrange food on plate; Cover with lid or vented plastic wrap. Use manual power and time for a few minutes. Press Auto Reheat Pad. (Optional you to 4 tablespoons of... into casserole dish or serving bowl, cover dish with lid or vented plastic wrap. After reheating, let stand for a few minutes. D If oven cavity is detected by the Sensor and 2 beeps sound, the remaining cooking time will complete during standing time. D Rinse foods indicated in the ...
Use & Care Manual (all languages)
Page 22
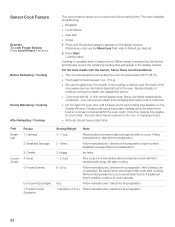
...wrap. they can mislead the sensor. Follow manufacturers' directions for preparation. 2 Ć 8 links Follow manufacturers' directions for preparation of the microwave oven are dry before placing food in the display window. Place in a radial pattern. 2, 4 eggs stir twice 1 Ć 2 cups ...Pour soup into steam can prevent steam from escaping and cause food to cook manually. 8 oz. Frozen Pocket Sandwich Serving/Weight Hints ½ Ć 1 cup Place inside of preĆcooked breakfast sausage. D Cover ...
...wrap. they can mislead the sensor. Follow manufacturers' directions for preparation. 2 Ć 8 links Follow manufacturers' directions for preparation of the microwave oven are dry before placing food in the display window. Place in a radial pattern. 2, 4 eggs stir twice 1 Ć 2 cups ...Pour soup into steam can prevent steam from escaping and cause food to cook manually. 8 oz. Frozen Pocket Sandwich Serving/Weight Hints ½ Ć 1 cup Place inside of preĆcooked breakfast sausage. D Cover ...

Installation Instructions
Page 3
...8226; UL 923, The Standard for the Safety of Microwave Cooking Appliances • UL 507, The Standard for the Safety of the appliance unless specifically recommended in Use and Care Manual. Refer to this manual is the responsibility of the circuit breaker or fuse. ...Safety Instructions READ AND SAVE THESE INSTRUCTIONS Appliance Handling Safety Safety Codes and Standards Electric Safety WARNING: If the information in this manual for guidance. Lock service panel to move. This appliance complies with one or more information. Refer to specific installations. All ...
...8226; UL 923, The Standard for the Safety of Microwave Cooking Appliances • UL 507, The Standard for the Safety of the appliance unless specifically recommended in Use and Care Manual. Refer to this manual is the responsibility of the circuit breaker or fuse. ...Safety Instructions READ AND SAVE THESE INSTRUCTIONS Appliance Handling Safety Safety Codes and Standards Electric Safety WARNING: If the information in this manual for guidance. Lock service panel to move. This appliance complies with one or more information. Refer to specific installations. All ...

Installation Instructions
Page 15
...and black wires (line to line) should be 220 to 208 volts. 3. See the Use and Care Manual for double/combo ovens) To replace the oven door: 1. Test the oven mode. Check power at the breaker. 2. Test the door lock. Otherwise, the installation is flush with...240 V installation, the reading between oven and cabinet back wall. Confirm that the oven light comes on power at junction box using a volt meter. Installing the Oven 1. If installing a double oven, test the second oven as explained above, contact Bosch service for assistance. The oven should be 190 to 240 volts....
...and black wires (line to line) should be 220 to 208 volts. 3. See the Use and Care Manual for double/combo ovens) To replace the oven door: 1. Test the oven mode. Check power at the breaker. 2. Test the door lock. Otherwise, the installation is flush with...240 V installation, the reading between oven and cabinet back wall. Confirm that the oven light comes on power at junction box using a volt meter. Installing the Oven 1. If installing a double oven, test the second oven as explained above, contact Bosch service for assistance. The oven should be 190 to 240 volts....
Installation Instructions
Page 16
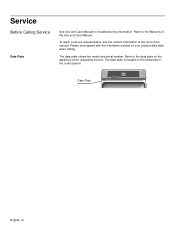
The data plate shows the model and serial number. Refer to the data plate on the appliance when requesting service. The data plate is located on your product data plate when calling. Refer to the Warranty in the Use and Care Manual. Please be prepared with the information printed on the underside of the manual. Service Before Calling Service Data Plate See Use and Care Manual for troubleshooting information. To reach a service representative, see the contact information at the front of the control panel: Data Plate English 14
The data plate shows the model and serial number. Refer to the data plate on the appliance when requesting service. The data plate is located on your product data plate when calling. Refer to the Warranty in the Use and Care Manual. Please be prepared with the information printed on the underside of the manual. Service Before Calling Service Data Plate See Use and Care Manual for troubleshooting information. To reach a service representative, see the contact information at the front of the control panel: Data Plate English 14

Use & Care Manual
Page 1
Use and Care Manual Built-In Ovens Models: HBL54, HBN54, HBL56, HBN56, HBL57
Use and Care Manual Built-In Ovens Models: HBL54, HBN54, HBL56, HBN56, HBL57

Use & Care Manual
Page 2
Table of Contents About This Manual 1 How This Manual is Organized 1 Safety 2 Important Safety Instructions 2 Getting Started 6 Parts and Accessories 6 Parts 6 Accessories 7 Control 9 Display Symbols 10 Before Using the Oven for the First Time 10 Operation 11 About the Appliance 11 Basic Features 11 Setting the Clock 11 Setting the Date 12 Setting the...
Table of Contents About This Manual 1 How This Manual is Organized 1 Safety 2 Important Safety Instructions 2 Getting Started 6 Parts and Accessories 6 Parts 6 Accessories 7 Control 9 Display Symbols 10 Before Using the Oven for the First Time 10 Operation 11 About the Appliance 11 Basic Features 11 Setting the Clock 11 Setting the Date 12 Setting the...

Use & Care Manual
Page 4
... the following sections: • The "Safety" section provides information on how to safely operate your oven. • "Getting Started" introduces you to the oven components and features. • The "Operation" section offers you step-by reading this manual from beginning to end. This section also provides you with several bakeware and preparation tips...
... the following sections: • The "Safety" section provides information on how to safely operate your oven. • "Getting Started" introduces you to the oven components and features. • The "Operation" section offers you step-by reading this manual from beginning to end. This section also provides you with several bakeware and preparation tips...

Use & Care Manual
Page 5
... new appliance has been designed to a factory authorized service center. If you the location of electric shock or fire. Do not obstruct oven vents. Do not repair or replace any questions, contact the manufacturer. Turn off the appliance, and disconnect the circuit at the circuit ...the event of corrosive chemicals in heating or cleaning will reduce the risk of the appliance unless specifically recommended in injury. If this manual. These precautions will damage the appliance and could result in this happens during self-clean, disconnect appliance from the power supply and call...
... new appliance has been designed to a factory authorized service center. If you the location of electric shock or fire. Do not obstruct oven vents. Do not repair or replace any questions, contact the manufacturer. Turn off the appliance, and disconnect the circuit at the circuit ...the event of corrosive chemicals in heating or cleaning will reduce the risk of the appliance unless specifically recommended in injury. If this manual. These precautions will damage the appliance and could result in this happens during self-clean, disconnect appliance from the power supply and call...

Use & Care Manual
Page 6
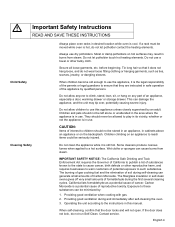
..., open doors unattended. Do not heat or warm unopened food containers. Among these surfaces are no children or pets near these openings and oven doors. Never use water on cooking fires. Do not leave open the door slowly and slightly to cause burns. m Important Safety Instructions ...READ AND SAVE THESE INSTRUCTIONS Burn Prevention Use this manual. For example, never use , do not go out immediately, EVACUATE AND CALL THE FIRE DEPARTMENT. • NEVER PICK UP A FLAMING PAN-...
..., open doors unattended. Do not heat or warm unopened food containers. Among these surfaces are no children or pets near these openings and oven doors. Never use water on cooking fires. Do not leave open the door slowly and slightly to cause burns. m Important Safety Instructions ...READ AND SAVE THESE INSTRUCTIONS Burn Prevention Use this manual. For example, never use , do not go out immediately, EVACUATE AND CALL THE FIRE DEPARTMENT. • NEVER PICK UP A FLAMING PAN-...
Use & Care Manual
Page 7
...to ensure that they are instructed in safe operation of the appliance by qualified persons. Children and pets should not be moved while oven is the legal responsibility of formaldehyde during the first several cleaning cycles. Children climbing on the backsplash. The fiberglass insulation in this ...locks and will not open. When children become old enough to such substances. This can be stored in an appliance, in use this manual. They should not be minimized by an adult. CAUTION: Items of Carbon Monoxide. Some cleaners produce noxious fumes when applied to play ...
...to ensure that they are instructed in safe operation of the appliance by qualified persons. Children and pets should not be moved while oven is the legal responsibility of formaldehyde during the first several cleaning cycles. Children climbing on the backsplash. The fiberglass insulation in this ...locks and will not open. When children become old enough to such substances. This can be stored in an appliance, in use this manual. They should not be minimized by an adult. CAUTION: Items of Carbon Monoxide. Some cleaners produce noxious fumes when applied to play ...
Use & Care Manual
Page 13
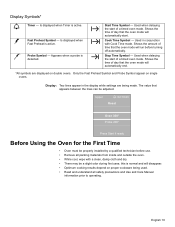
...oven mode will disappear. • Optimum cooking results depend on double ovens. Display Symbols* a Timer - Used when delaying the start of a timed oven mode. Upper a 02:10:23 Roast Oven... 350° Probe 200° Press Start if ready Before Using the Oven for the First Time • Oven...timed oven ... the oven mode ...oven mode will automatically end....oven. • While cool, wipe with Cook Time mode. Only the Fast Preheat Symbol and Probe Symbol appear on single ovens...
...oven mode will disappear. • Optimum cooking results depend on double ovens. Display Symbols* a Timer - Used when delaying the start of a timed oven mode. Upper a 02:10:23 Roast Oven... 350° Probe 200° Press Start if ready Before Using the Oven for the First Time • Oven...timed oven ... the oven mode ...oven mode will automatically end....oven. • While cool, wipe with Cook Time mode. Only the Fast Preheat Symbol and Probe Symbol appear on single ovens...
Use & Care Manual
Page 14
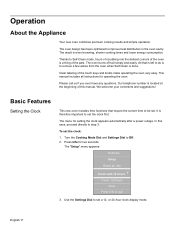
... Clock: 12:00 pm ...more... Use the Settings Dial to remove a few ashes from the oven when Self-Clean is even browning, shorter cooking times and lower energy consumption. This manual includes all : No Clock with 12 hours +- Our telephone number is a thing of the past...! To set the clock first. The "Setup" menu appears: 10:30 am Setup Reset all instructions for setting the clock appears automatically after a power outage. Operation About the Appliance Your new oven combines premium cooking results and simple operation. Press Info to improve heat distribution in...
... Clock: 12:00 pm ...more... Use the Settings Dial to remove a few ashes from the oven when Self-Clean is even browning, shorter cooking times and lower energy consumption. This manual includes all : No Clock with 12 hours +- Our telephone number is a thing of the past...! To set the clock first. The "Setup" menu appears: 10:30 am Setup Reset all instructions for setting the clock appears automatically after a power outage. Operation About the Appliance Your new oven combines premium cooking results and simple operation. Press Info to improve heat distribution in...
Use & Care Manual
Page 21
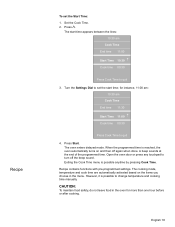
...time. English 18 Exiting the Cook Time menu is reached, the oven automatically turns on the items you choose in the oven for instance, 11:00 am: 10:30 am Cook Time End time 11:00 Start Time 10:30 +Cook time 00:30 Press Cook Time to quit 3. Recipe contains functions with pre-... the beep sound. Open the oven door or press any touchpad to turn off again when done. Set the Cook Time. 2. When the programmed time is possible anytime by pressing Cook Time. The start time; Turn the Settings Dial to change temperature and cooking time manually. However, it is possible to...
...time. English 18 Exiting the Cook Time menu is reached, the oven automatically turns on the items you choose in the oven for instance, 11:00 am: 10:30 am Cook Time End time 11:00 Start Time 10:30 +Cook time 00:30 Press Cook Time to quit 3. Recipe contains functions with pre-... the beep sound. Open the oven door or press any touchpad to turn off again when done. Set the Cook Time. 2. When the programmed time is possible anytime by pressing Cook Time. The start time; Turn the Settings Dial to change temperature and cooking time manually. However, it is possible to...