
Use & Care Manual (all languages)
Page 37
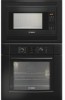
...of the control panel. FD No./No FD Date of Purchase Specifications Power Source Power Consumption Cooking Power* Outside Dimensions (H x W x D) Oven Cavity Dimensions (H x W x D) Operating Frequency Net Weight Trim Kit 27" Trim Kit 30" * IEC Test procedure Specifications subject to change without notice. 120 V, 60 Hz 1,460 W 1,200 W 14" x 23 7/8" x 19...HMT5020 for HMB5050 for HMB5060 for future reference. You should note the model number and the FD No./No FD of this oven in the space provided and retain this product may be found on the left side of your purchase for HMB5020 (Stainless...
...of the control panel. FD No./No FD Date of Purchase Specifications Power Source Power Consumption Cooking Power* Outside Dimensions (H x W x D) Oven Cavity Dimensions (H x W x D) Operating Frequency Net Weight Trim Kit 27" Trim Kit 30" * IEC Test procedure Specifications subject to change without notice. 120 V, 60 Hz 1,460 W 1,200 W 14" x 23 7/8" x 19...HMT5020 for HMB5050 for HMB5060 for future reference. You should note the model number and the FD No./No FD of this oven in the space provided and retain this product may be found on the left side of your purchase for HMB5020 (Stainless...
Installation Instructions
Page 13
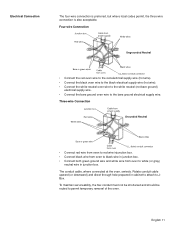
... cable upward (or downward) and direct through hole prepared in cabinet to attach to permit temporary removal of the oven. Three-wire Connection • Connect red wire from oven to red wire injunction box. • Connect black wire from oven to black wire in junction box. English 11 Four-wire Connection • Connect the red...
... cable upward (or downward) and direct through hole prepared in cabinet to attach to permit temporary removal of the oven. Three-wire Connection • Connect red wire from oven to red wire injunction box. • Connect black wire from oven to black wire in junction box. English 11 Four-wire Connection • Connect the red...

Installation Instructions
Page 15
... For 208 V installation, the reading between the red and black wires (line to line) should be straight, not crooked. Verify that the door locks when the lock icon appears in place. Confirm that the oven light comes on power at this time. Do not lift ...220 to 208 volts. 3. If installing a double oven, test the second oven as explained above, contact Bosch service for double/combo ovens) To replace the oven door: 1. English 13 Open door all the way to crimp flexible conduit between oven and cabinet back wall. Testing Operation 1. Test the door lock. Otherwise,...
... For 208 V installation, the reading between the red and black wires (line to line) should be straight, not crooked. Verify that the door locks when the lock icon appears in place. Confirm that the oven light comes on power at this time. Do not lift ...220 to 208 volts. 3. If installing a double oven, test the second oven as explained above, contact Bosch service for double/combo ovens) To replace the oven door: 1. English 13 Open door all the way to crimp flexible conduit between oven and cabinet back wall. Testing Operation 1. Test the door lock. Otherwise,...