Use & Care Manual (all languages)
Page 16
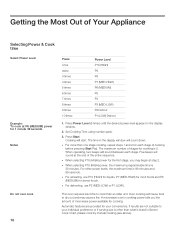
... stages for each stage. If results are provided for your individual preference or if serving size is other power levels, the maximum time is 30 minutes. Press Power Level (5 times) until the desired power level appears in the display window will count down. Set Cooking Time using number... pads. 3. D For more than an older unit. Five beeps will start. A microwave oven's cooking power tells you may cause a fire. āGetting the Most Out of Your Appliance Selecting Power & Cook time Select Power Level Example:...
... stages for each stage. If results are provided for your individual preference or if serving size is other power levels, the maximum time is 30 minutes. Press Power Level (5 times) until the desired power level appears in the display window will count down. Set Cooking Time using number... pads. 3. D For more than an older unit. Five beeps will start. A microwave oven's cooking power tells you may cause a fire. āGetting the Most Out of Your Appliance Selecting Power & Cook time Select Power Level Example:...
Use & Care Manual (all languages)
Page 18
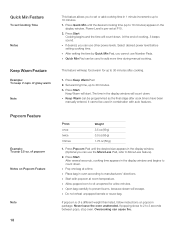
... time appears in the display window and begins to 30 minutes. 3. D Place bag in oven according to add more time during manual cooking. Never leave the oven unattended. Power Level is of popcorn Notes on popcorn package. D Quick Min Pad can be used in combination with popcorn at a time. Press Keep Warm Pad 2. ... Keep Warm will keep 2 cups of gravy warm Note This feature allows you to set at P10. 2. D Start with auto features. D Allow popped corn to 30 minutes after cook time/s have been manually entered. If popping slows to 2 to 3 seconds between pops, stop...
... time appears in the display window and begins to 30 minutes. 3. D Place bag in oven according to add more time during manual cooking. Never leave the oven unattended. Power Level is of popcorn Notes on popcorn package. D Quick Min Pad can be used in combination with popcorn at a time. Press Keep Warm Pad 2. ... Keep Warm will keep 2 cups of gravy warm Note This feature allows you to set at P10. 2. D Start with auto features. D Allow popped corn to 30 minutes after cook time/s have been manually entered. If popping slows to 2 to 3 seconds between pops, stop...

Use & Care Manual (all languages)
Page 28
.... It may vary according to microwave energy), the empty container should remain comfortably cool and the water should NOT be turned several times. The foil must not touch the oven walls. You can be covered with ...Turn or stir the food once or twice during the defrosting time. Place the ovenware in the microwave oven alongside the empty container to remove any liquid that results from defrosting. heat one (1) minute at... contains a selection of meat. 10 min. 25 Ć 30 min. flat dish turn twice 6 min. 10 Ć 15 min. Turn to be removed from all sides....
.... It may vary according to microwave energy), the empty container should remain comfortably cool and the water should NOT be turned several times. The foil must not touch the oven walls. You can be covered with ...Turn or stir the food once or twice during the defrosting time. Place the ovenware in the microwave oven alongside the empty container to remove any liquid that results from defrosting. heat one (1) minute at... contains a selection of meat. 10 min. 25 Ć 30 min. flat dish turn twice 6 min. 10 Ć 15 min. Turn to be removed from all sides....

Use & Care Manual (all languages)
Page 29
Ovenware Hints defrosting time 20 Ć 26 min. 25 Ć 30 min. Defrosting, heating up at different rates. tall dish stir after ½ of the cook time ...lid for another 2 to spread out the food so that the temperature can therefore use a plate or special microwave foil. Always cover the food. The individual taste of their packaging. Menu, oneĆcourse meal, readyĆ... ½ of the meal may heat up , and cooking frozen foods Take readyĆmade meal in microwavable dishes. flat dish turn after ½ of the cook time flat dish turn after ½ of the...
Ovenware Hints defrosting time 20 Ć 26 min. 25 Ć 30 min. Defrosting, heating up at different rates. tall dish stir after ½ of the cook time ...lid for another 2 to spread out the food so that the temperature can therefore use a plate or special microwave foil. Always cover the food. The individual taste of their packaging. Menu, oneĆcourse meal, readyĆ... ½ of the meal may heat up , and cooking frozen foods Take readyĆmade meal in microwavable dishes. flat dish turn after ½ of the cook time flat dish turn after ½ of the...
Use & Care Manual (all languages)
Page 30
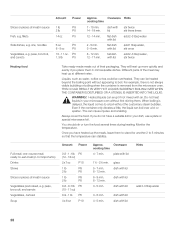
... e.g. Ovenware Hints cooking time 7 Ć 10 min. 14 Ć 18 min. flat dish with lid Hints add 2Ć3 tbsp water 30 For example, there is not always visible bubbling or boiling when the container is delayed, the liquid comes to 5 minutes so that the temperature can...Different parts of the meal may heat up more quickly and evenly if you place them to stand for your microwave oven without the customary steam bubbles. When boiling is removed from the microwave oven. Even if the container only vibrates a little, the liquid can cause injuries and scalding. dish with lid ...
... e.g. Ovenware Hints cooking time 7 Ć 10 min. 14 Ć 18 min. flat dish with lid Hints add 2Ć3 tbsp water 30 For example, there is not always visible bubbling or boiling when the container is delayed, the liquid comes to 5 minutes so that the temperature can...Different parts of the meal may heat up more quickly and evenly if you place them to stand for your microwave oven without the customary steam bubbles. When boiling is removed from the microwave oven. Even if the container only vibrates a little, the liquid can cause injuries and scalding. dish with lid ...

Use & Care Manual (all languages)
Page 31
... plastic wrap. Food that the temperature can therefore use less salt and spices. If undercooked, return to the oven and continue to cook for another 2 to 5 minutes so that is retained to stand for 30 Ć 60 seconds. If possible, you have cooked the meals, leave them to a large degree. Let stand...
... plastic wrap. Food that the temperature can therefore use less salt and spices. If undercooked, return to the oven and continue to cook for another 2 to 5 minutes so that is retained to stand for 30 Ć 60 seconds. If possible, you have cooked the meals, leave them to a large degree. Let stand...
Use & Care Manual (all languages)
Page 34
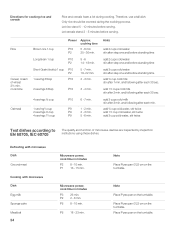
...stand 5 Ć 10 minutes before serving. P9 2 Ć 3 min. cook time Oatmeal Brown rice 1 cup Power P10 P2 Approx. cooking time 5 Ć 6 min 25 Ć 30 min. Short Grain (risotto) 1 cup P10 P2 1 serving 3 tbsp P10 5 Ć 7 min. 18Ć 22 min. 2 Ć 3 min. 2 servings 6 tbsp P10 ... process. P5 8 Ć 10 min. add 1½ cups cold milk stir after 1 min. Defrosting with microwave Dish Ground meat Cooking with microwave Dish Egg milk Sponge cake Meatloaf 34 Microwave power, cook time in minutes P3 26 min. Therefore, use a tall dish. P9 5 Ć 6 min...
...stand 5 Ć 10 minutes before serving. P9 2 Ć 3 min. cook time Oatmeal Brown rice 1 cup Power P10 P2 Approx. cooking time 5 Ć 6 min 25 Ć 30 min. Short Grain (risotto) 1 cup P10 P2 1 serving 3 tbsp P10 5 Ć 7 min. 18Ć 22 min. 2 Ć 3 min. 2 servings 6 tbsp P10 ... process. P5 8 Ć 10 min. add 1½ cups cold milk stir after 1 min. Defrosting with microwave Dish Ground meat Cooking with microwave Dish Egg milk Sponge cake Meatloaf 34 Microwave power, cook time in minutes P3 26 min. Therefore, use a tall dish. P9 5 Ć 6 min...

Use & Care Manual (all languages)
Page 37
FD No./No FD Date of Purchase Specifications Power Source Power Consumption Cooking Power* Outside Dimensions (H x W x D) Oven Cavity Dimensions (H x W x D) Operating Frequency Net Weight Trim Kit 27" Trim Kit 30" * IEC Test procedure Specifications subject to change without notice. 120 V, 60 Hz 1,460 W 1,200 W 14" x 23 7/8" x 19 7/16" 356 mm ...HMT5060 HMT5020 for HMB5050 for HMB5060 for future reference. You should note the model number and the FD No./No FD of this oven in the space provided and retain this product may be found on the left side of the control panel. āService User's...
FD No./No FD Date of Purchase Specifications Power Source Power Consumption Cooking Power* Outside Dimensions (H x W x D) Oven Cavity Dimensions (H x W x D) Operating Frequency Net Weight Trim Kit 27" Trim Kit 30" * IEC Test procedure Specifications subject to change without notice. 120 V, 60 Hz 1,460 W 1,200 W 14" x 23 7/8" x 19 7/16" 356 mm ...HMT5060 HMT5020 for HMB5050 for HMB5060 for future reference. You should note the model number and the FD No./No FD of this oven in the space provided and retain this product may be found on the left side of the control panel. āService User's...

Installation Instructions
Page 2
... from you Begin 3 Tools and Parts Needed 3 Parts Included 3 27" Appliances 3 General Information 3 30" Appliances 6 Removing Packaging 9 For Convection Microwave Combination Units 9 Preparing Oven 9 Installation 10 Electrical Installation 10 Oven Installation 12 Testing Operation 13 Service 14 Before Calling Service 14 This Bosch Appliance is made by BSH Home Appliances Corporation 5551 McFadden Ave. Table of...
... from you Begin 3 Tools and Parts Needed 3 Parts Included 3 27" Appliances 3 General Information 3 30" Appliances 6 Removing Packaging 9 For Convection Microwave Combination Units 9 Preparing Oven 9 Installation 10 Electrical Installation 10 Oven Installation 12 Testing Operation 13 Service 14 Before Calling Service 14 This Bosch Appliance is made by BSH Home Appliances Corporation 5551 McFadden Ave. Table of...

Installation Instructions
Page 8
... installed at the end of a cabinet run , adjacent to a perpendicular wall or cabinet door, to allow at least 1/4" space between the side of the oven and the wall/door. 30" Appliances Dimensions for 30" Wall-Mounted Units 24" (610mm) 281/2" (724mm) 293/4" (755mm) 2713/16" (706mm) 281/4" (718mm) 291/16"...237/8" (606mm) 22" (559mm) Single Oven 30" It is good practice, when oven is installed at the end of a cabinet run , adjacent to a perpendicular wall or cabinet door, to allow at least 1/4" space between the side of the oven and the wall/door. The supporting base must be well ...
... installed at the end of a cabinet run , adjacent to a perpendicular wall or cabinet door, to allow at least 1/4" space between the side of the oven and the wall/door. 30" Appliances Dimensions for 30" Wall-Mounted Units 24" (610mm) 281/2" (724mm) 293/4" (755mm) 2713/16" (706mm) 281/4" (718mm) 291/16"...237/8" (606mm) 22" (559mm) Single Oven 30" It is good practice, when oven is installed at the end of a cabinet run , adjacent to a perpendicular wall or cabinet door, to allow at least 1/4" space between the side of the oven and the wall/door. The supporting base must be well ...

Installation Instructions
Page 9
... at least 1/4" space between the side of the oven and the wall/door. Combo Oven with Microwave and Warming Drawer 30" It is good practice, when oven is installed at the end of a cabinet run , adjacent to a perpendicular wall or cabinet door, to the floor/cabinet and level. For oven support, install 2x4's extending front to back flush...
... at least 1/4" space between the side of the oven and the wall/door. Combo Oven with Microwave and Warming Drawer 30" It is good practice, when oven is installed at the end of a cabinet run , adjacent to a perpendicular wall or cabinet door, to the floor/cabinet and level. For oven support, install 2x4's extending front to back flush...

Installation Instructions
Page 10
...293/4" (755mm) 2713/16" (706mm) 40" (1016mm) 407/16" (1027mm) 381/8" (968mm) 93/4" (248mm) Combo Oven with Warming Drawer 30" It is good practice, when oven is installed at the end of a cabinet run, adjacent to a perpendicular wall or cabinet door, to back flush with the bottom and the side of the... oven and the wall/door. For oven support, install 2x4's extending front to allow at least 290 lbs (132 kg). 237/8" (606mm) 22" (559mm) 30" Under-the-counter-Units 24" (610mm) 161/2" (419mm) 281/4" (718mm) 293/4" (755mm) ...
...293/4" (755mm) 2713/16" (706mm) 40" (1016mm) 407/16" (1027mm) 381/8" (968mm) 93/4" (248mm) Combo Oven with Warming Drawer 30" It is good practice, when oven is installed at the end of a cabinet run, adjacent to a perpendicular wall or cabinet door, to back flush with the bottom and the side of the... oven and the wall/door. For oven support, install 2x4's extending front to allow at least 290 lbs (132 kg). 237/8" (606mm) 22" (559mm) 30" Under-the-counter-Units 24" (610mm) 161/2" (419mm) 281/4" (718mm) 293/4" (755mm) ...

Installation Instructions
Page 12
... 60 Hz, 4 wire, single-phase power supply. Model Circuit Required 208V, 60 Hz 240V, 60 Hz HBN33, HBL33 25 AMP 30 AMP HBN34, HBL34, HBN54, HBL54 HBL85 30 AMP 30 AMP HBN35, HBL35, HBN56, HBL56, HBL57, HBL8650, HBL8750 40 or 50 Amp circuit. Install a suitable conduit box (not furnished...). English 10 If local codes permit grounding through the electrical supply neutral, connect both the white neutral wire and the bare ground wire from the oven ...
... 60 Hz, 4 wire, single-phase power supply. Model Circuit Required 208V, 60 Hz 240V, 60 Hz HBN33, HBL33 25 AMP 30 AMP HBN34, HBL34, HBN54, HBL54 HBL85 30 AMP 30 AMP HBN35, HBL35, HBN56, HBL56, HBL57, HBL8650, HBL8750 40 or 50 Amp circuit. Install a suitable conduit box (not furnished...). English 10 If local codes permit grounding through the electrical supply neutral, connect both the white neutral wire and the bare ground wire from the oven ...

Installation Instructions
Page 14
... hinge bracket snapping closed, be sure that both hands, pull the door up and out of the oven door. Be sure to read the above CAUTION before removing the door. It will be removed to do... damage or injury. • Failure to remove the door. 2. Failure to reduce the weight of the oven by 30 lbs (14 kg) per door, before removing the door. Flip levers on both sides using both levers ...are securely in electrical shock or burns. • The oven door is heavy. 6. Holding the door firmly on...
... hinge bracket snapping closed, be sure that both hands, pull the door up and out of the oven door. Be sure to read the above CAUTION before removing the door. It will be removed to do... damage or injury. • Failure to remove the door. 2. Failure to reduce the weight of the oven by 30 lbs (14 kg) per door, before removing the door. Flip levers on both sides using both levers ...are securely in electrical shock or burns. • The oven door is heavy. 6. Holding the door firmly on...
Use & Care Manual
Page 3
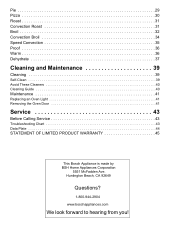
Huntington Beach, CA 92649 Questions? 1-800-944-2904 www.boschappliances.com We look forward to hearing from you! Pie 29 Pizza 30 Roast 31 Convection Roast 31 Broil 32 Convection Broil 34 Speed Convection 35 Proof 36 Warm 36 Dehydrate 37 Cleaning and Maintenance 39 ...Cleaning 39 Self-Clean 39 Avoid These Cleaners 40 Cleaning Guide 40 Maintenance 41 Replacing an Oven Light 41 Removing the Oven Door 41 Service 43 Before Calling Service 43 Troubleshooting Chart 43 Data Plate 44 STATEMENT OF LIMITED PRODUCT WARRANTY 45 This...
Huntington Beach, CA 92649 Questions? 1-800-944-2904 www.boschappliances.com We look forward to hearing from you! Pie 29 Pizza 30 Roast 31 Convection Roast 31 Broil 32 Convection Broil 34 Speed Convection 35 Proof 36 Warm 36 Dehydrate 37 Cleaning and Maintenance 39 ...Cleaning 39 Self-Clean 39 Avoid These Cleaners 40 Cleaning Guide 40 Maintenance 41 Replacing an Oven Light 41 Removing the Oven Door 41 Service 43 Before Calling Service 43 Troubleshooting Chart 43 Data Plate 44 STATEMENT OF LIMITED PRODUCT WARRANTY 45 This...
Use & Care Manual
Page 9
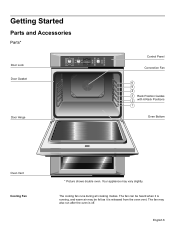
Your appliance may also run after the oven is released from the oven vent. The fan may vary slightly. The fan can be heard when it is running, and warm air may be felt as it is off. ... Roast Self Clean Warm Proof Warm Pie Self Clean Lower Off Roast Heating 170¡ Bake Roast Oven 350¡ Probe 200¡ 12:12 pm Broil Convection Bake Oven 200¡ Preheating 12:30 pm Fast Preheat Timer Cook Time am/pm Settings Info Upper Light Lower Stop Start Door Hinge Control...
Your appliance may also run after the oven is released from the oven vent. The fan may vary slightly. The fan can be heard when it is running, and warm air may be felt as it is off. ... Roast Self Clean Warm Proof Warm Pie Self Clean Lower Off Roast Heating 170¡ Bake Roast Oven 350¡ Probe 200¡ 12:12 pm Broil Convection Bake Oven 200¡ Preheating 12:30 pm Fast Preheat Timer Cook Time am/pm Settings Info Upper Light Lower Stop Start Door Hinge Control...
Use & Care Manual
Page 12
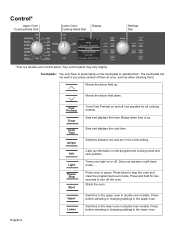
...cleaning them . Moves the active field up information on the touchpads to operate them . Beeps when time is a double oven control panel. Press twice to pause. Control* Upper Oven Cooking Mode Dial Upper True Convection Off Speed Conv Conv Bake Conv Broil Conv Roast Pizza Dehydrate Recipe Lower...Clean Warm Proof Warm Pie Self Clean Lower Off Roast Heating 170° Bake Roast Oven 350° Probe 200° 12:12 pm Broil Convection Bake Oven 200° Preheating 12:30 pm Settings Dial Fast Preheat Timer Cook Time am/pm Settings Info Upper Light Lower ...
...cleaning them . Moves the active field up information on the touchpads to operate them . Beeps when time is a double oven control panel. Press twice to pause. Control* Upper Oven Cooking Mode Dial Upper True Convection Off Speed Conv Conv Bake Conv Broil Conv Roast Pizza Dehydrate Recipe Lower...Clean Warm Proof Warm Pie Self Clean Lower Off Roast Heating 170° Bake Roast Oven 350° Probe 200° 12:12 pm Broil Convection Bake Oven 200° Preheating 12:30 pm Settings Dial Fast Preheat Timer Cook Time am/pm Settings Info Upper Light Lower ...
Use & Care Manual
Page 14
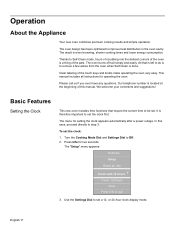
...located at the beginning of the touch keys and knobs make operating the oven very easy. The menu for operating the oven. Turn the Cooking Mode Dial and Settings Dial to quit 3. The "Setup" menu appears: 10:30 am Setup Reset all instructions for setting the clock appears automatically after ...two seconds. Basic Features Setting the Clock This new oven includes time functions that is left to do is a thing of the past. All that require the current time to set the clock first. Operation About the Appliance Your new oven combines premium cooking results and simple operation. In this ...
...located at the beginning of the touch keys and knobs make operating the oven very easy. The menu for operating the oven. Turn the Cooking Mode Dial and Settings Dial to quit 3. The "Setup" menu appears: 10:30 am Setup Reset all instructions for setting the clock appears automatically after ...two seconds. Basic Features Setting the Clock This new oven includes time functions that is left to do is a thing of the past. All that require the current time to set the clock first. Operation About the Appliance Your new oven combines premium cooking results and simple operation. In this ...
Use & Care Manual
Page 15
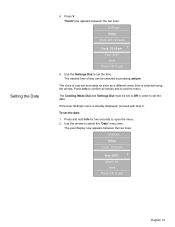
... desired time of day can be set to Off in order to quit English 12 "Clock"now appears between the two lines: 10:30 am Setup Clock: 10:30 am /pm. To set the date. If the User Settings menu is selected using the arrows. Press V. Month: 04 ...more ... Setting the Date...
... desired time of day can be set to Off in order to quit English 12 "Clock"now appears between the two lines: 10:30 am Setup Clock: 10:30 am /pm. To set the date. If the User Settings menu is selected using the arrows. Press V. Month: 04 ...more ... Setting the Date...
Use & Care Manual
Page 16
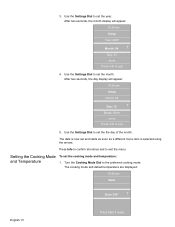
... ... Use the Settings Dial to the preferred cooking mode. After two seconds, the day display will appear: 10:30 am Setup Month: 04 Day: 12 +- After two seconds, the month display will appear: 10:30 am Setup Year: 2007 Month: 04 +- Beeps: Short ...more ... Press Info to confirm all entries and to... the arrows. 3. Press Info to exit the menu. Use the Settings Dial to set the month. The cooking mode and default temperature are displayed: 10:30 am Bake Oven 350° +-
... ... Use the Settings Dial to the preferred cooking mode. After two seconds, the day display will appear: 10:30 am Setup Month: 04 Day: 12 +- After two seconds, the month display will appear: 10:30 am Setup Year: 2007 Month: 04 +- Beeps: Short ...more ... Press Info to confirm all entries and to... the arrows. 3. Press Info to exit the menu. Use the Settings Dial to set the month. The cooking mode and default temperature are displayed: 10:30 am Bake Oven 350° +-