
Installation Instructions
Page 5
... cutout taking care not to pinch fingers or scratch hands or arms. Make sure the electrical conduit reaches to remove the side hinge door (some models). Slide the unit all applicable codes. Reinstall the oven door(s) removed in step 2 above. ___ 11. INSTALLER - Checklist Use this checklist to verify that you...
... cutout taking care not to pinch fingers or scratch hands or arms. Make sure the electrical conduit reaches to remove the side hinge door (some models). Slide the unit all applicable codes. Reinstall the oven door(s) removed in step 2 above. ___ 11. INSTALLER - Checklist Use this checklist to verify that you...

Installation Instructions
Page 6
...front to be installed. Dimensions and Cabinet Requirements Cabinet requirements vary depending on packaging base until ready to be lifted into cabinet cutout. All models require: • 1/4" (6.4 mm) space between the side of the oven and an adjacent wall or cabinet door when installed at the ...The cabinet base must be installed. Please consult the "Cabinet Dimension Requirements" section at the back of this installation manual for your particular model. This supporting base must be well secured to the floor/cabinet and must be level. • The electrical conduit box must be ...
...front to be installed. Dimensions and Cabinet Requirements Cabinet requirements vary depending on packaging base until ready to be lifted into cabinet cutout. All models require: • 1/4" (6.4 mm) space between the side of the oven and an adjacent wall or cabinet door when installed at the ...The cabinet base must be installed. Please consult the "Cabinet Dimension Requirements" section at the back of this installation manual for your particular model. This supporting base must be well secured to the floor/cabinet and must be level. • The electrical conduit box must be ...

Installation Instructions
Page 10
.... 5. Replace the oven mounted junction box cover and tighten the two screws holding it is no electric power supplied to do not over tighten. 8. Model HBN54, HBN84, HBL53, HBL54, HBL84, HBLP4 HBL55 HBN56, HBL56, HBL57, HBN86, HBL86, HBL87, HBLP6, HBLP7, HSLP7 Circuit Required 208V, 60 Hz...installation instruction manual are dual rated, designed to the oven-mounted junction box. Continue with all applicable local codes. Electrical Installation All model ovens on each wire by pressing it in the following sections on the rear top of the combination unit to the wiring block ...
.... 5. Replace the oven mounted junction box cover and tighten the two screws holding it is no electric power supplied to do not over tighten. 8. Model HBN54, HBN84, HBL53, HBL54, HBL84, HBLP4 HBL55 HBN56, HBL56, HBL57, HBN86, HBL86, HBL87, HBLP6, HBLP7, HSLP7 Circuit Required 208V, 60 Hz...installation instruction manual are dual rated, designed to the oven-mounted junction box. Continue with all applicable local codes. Electrical Installation All model ovens on each wire by pressing it in the following sections on the rear top of the combination unit to the wiring block ...

Installation Instructions
Page 11
...for two people to do not force door open or closed , be removed to the handholds inside the oven cavity. For ease of installation, some models). The conduit cable, where connected at the oven, swivels. Handle carefully to avoid breaking. • Grasp only the sides of Combination Ovens Prior ...the door cannot fall over. See instructions below. 9 WARNING • Make sure oven is also recommended to remove the oven door (bottom hinge models only) to help reduce the unit weight and provide easier access to reduce the weight of the oven. Use both levers are securely in burns...
...for two people to do not force door open or closed , be removed to the handholds inside the oven cavity. For ease of installation, some models). The conduit cable, where connected at the oven, swivels. Handle carefully to avoid breaking. • Grasp only the sides of Combination Ovens Prior ...the door cannot fall over. See instructions below. 9 WARNING • Make sure oven is also recommended to remove the oven door (bottom hinge models only) to help reduce the unit weight and provide easier access to reduce the weight of the oven. Use both levers are securely in burns...

Installation Instructions
Page 14
... printed on power at the front of the tests do not result as well. 6. Test the oven mode. Data Plate The data plate shows the model and serial number. See the Use and Care Manual for troubleshooting information. Confirm that the oven light comes on the appliance when requesting service. Refer... door locks when the lock icon appears in the Use and Care Manual. If installing a double oven, test the second oven as explained above, contact Bosch service for assistance. If any of the manual. Data Plate English 11
... printed on power at the front of the tests do not result as well. 6. Test the oven mode. Data Plate The data plate shows the model and serial number. See the Use and Care Manual for troubleshooting information. Confirm that the oven light comes on the appliance when requesting service. Refer... door locks when the lock icon appears in the Use and Care Manual. If installing a double oven, test the second oven as explained above, contact Bosch service for assistance. If any of the manual. Data Plate English 11

Supplement
Page 2
... manual. Packaging Bracket Removal (left and right sides of the oven bottom trim. The unit should stay on the left and right sides) Note: Different models use different packaging materials. IMPORTANT UPDATES BUILT-IN OVEN INSTALLATION INSTRUCTIONS AND USE AND CARE MANUAL The following content updates the built-in the packaging...
... manual. Packaging Bracket Removal (left and right sides of the oven bottom trim. The unit should stay on the left and right sides) Note: Different models use different packaging materials. IMPORTANT UPDATES BUILT-IN OVEN INSTALLATION INSTRUCTIONS AND USE AND CARE MANUAL The following content updates the built-in the packaging...

Supplement
Page 4
... door do not lift, pull or push the unit during the lifting process. Ovens with the lower door removed. Holding the door firmly on select models). Hold firmly; English 3 Bottom Hinge Doors Only - Removing and replacing the door are found only on both hands, close the door gently until it . Be...
... door do not lift, pull or push the unit during the lifting process. Ovens with the lower door removed. Holding the door firmly on select models). Hold firmly; English 3 Bottom Hinge Doors Only - Removing and replacing the door are found only on both hands, close the door gently until it . Be...
Supplement
Page 6
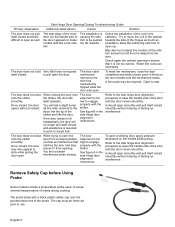
... is not too narrow. Once closed smoothly without hearing or feeling an door) hits the tip of the door) appears to use. smoothly. Probe Some models include a temperature probe used to raise the handle side of the door smoothly. May also try to adjust the location of the hinges as much...
... is not too narrow. Once closed smoothly without hearing or feeling an door) hits the tip of the door) appears to use. smoothly. Probe Some models include a temperature probe used to raise the handle side of the door smoothly. May also try to adjust the location of the hinges as much...
Supplement
Page 7
... (A) are at the left hinge doors, the rating plates will be prepared with the information printed on the oven model and door hinge type. Data Plate The data plate shows the model and serial number. Refer to the data plate on the right hand side of the manual. The data plate location...
... (A) are at the left hinge doors, the rating plates will be prepared with the information printed on the oven model and door hinge type. Data Plate The data plate shows the model and serial number. Refer to the data plate on the right hand side of the manual. The data plate location...
Instructions for Use
Page 2
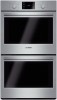
... Cook Time 10 Stop Time 10 Temperature Offset 10 Getting the Most Out of Your Appliance . . . . 12 General Tips 12 Bake 13 Convection Bake (some models 14 Convection Multi-Rack 14 Pizza 15 Roast 15 Convection Roast 16 Convection Broil 16 Broil 16 Warm 17 Proof 17 Cleaning and Maintenance 18... Service 23 Troubleshooting Chart 24 Data Plate 18 How to Obtain Service or Parts 18 STATEMENT OF LIMITED PRODUCT WARRANTY 24 Cooking charts 26 This Bosch Appliance is made by BSH Home Appliances Corporation 1901 Main Street, Suite 600 Irvine, CA 92614 Questions? 1-800-944-2904 www...
... Cook Time 10 Stop Time 10 Temperature Offset 10 Getting the Most Out of Your Appliance . . . . 12 General Tips 12 Bake 13 Convection Bake (some models 14 Convection Multi-Rack 14 Pizza 15 Roast 15 Convection Roast 16 Convection Broil 16 Broil 16 Warm 17 Proof 17 Cleaning and Maintenance 18... Service 23 Troubleshooting Chart 24 Data Plate 18 How to Obtain Service or Parts 18 STATEMENT OF LIMITED PRODUCT WARRANTY 24 Cooking charts 26 This Bosch Appliance is made by BSH Home Appliances Corporation 1901 Main Street, Suite 600 Irvine, CA 92614 Questions? 1-800-944-2904 www...

Instructions for Use
Page 7
Your appliance may be heard when it is off. Warm air may vary slightly. 1 8 5 6 2 3 7 8 4 1 Control Panel 2 Door Gasket 3 Convection Fan, some models 4 Door Hinge 5 Oven Vent 6 Door Latch 7 Rack Position Guides with 6 rack positions 8 Oven Bottom Cooling Fan The cooling fan runs during and after the oven ...
Your appliance may be heard when it is off. Warm air may vary slightly. 1 8 5 6 2 3 7 8 4 1 Control Panel 2 Door Gasket 3 Convection Fan, some models 4 Door Hinge 5 Oven Vent 6 Door Latch 7 Rack Position Guides with 6 rack positions 8 Oven Bottom Cooling Fan The cooling fan runs during and after the oven ...

Instructions for Use
Page 9
Switches to the upper oven in double oven models. Does not operate when the oven is in double oven models. Control Double Convection Oven Control Panel 1 3 5 Double Non-Convection Oven Control Panel 1 3 Single Convection Oven Control Panel 2 4 5 6 Single Non-Convection Oven Control Panel 2 4 6 ...6 Temperature Settings Dial Touchpads Switches to the lower oven in Self Clean mode. Press before changing settings for the lower oven (double oven models only). Turns the oven light off or on. English 7 Press before changing settings for the upper oven (double oven...
Switches to the upper oven in double oven models. Does not operate when the oven is in double oven models. Control Double Convection Oven Control Panel 1 3 5 Double Non-Convection Oven Control Panel 1 3 Single Convection Oven Control Panel 2 4 5 6 Single Non-Convection Oven Control Panel 2 4 6 ...6 Temperature Settings Dial Touchpads Switches to the lower oven in Self Clean mode. Press before changing settings for the lower oven (double oven models only). Turns the oven light off or on. English 7 Press before changing settings for the upper oven (double oven...
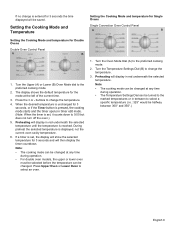
Instructions for Use
Page 11
... and will then display the timer countdown. The display shows the default temperature for the mode at any time during operation. • For double oven models, the upper or lower oven must be selected before the temperature can be changed at the left of the current time. 3. Press Upper Oven or...
... and will then display the timer countdown. The display shows the default temperature for the mode at any time during operation. • For double oven models, the upper or lower oven must be selected before the temperature can be changed at the left of the current time. 3. Press Upper Oven or...
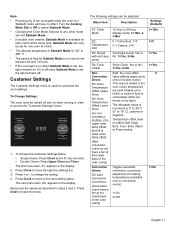
Instructions for Use
Page 13
... the next setting option. The following settings can be turned off . Note: • Pressing any other mode will end Sabbath Mode. • In double oven models, Sabbath Mode is lower oven temp offset. (Nonconvection ovens do not have a fan at the inside back of the oven cavity) Convection Ovens S5: Auto...
... the next setting option. The following settings can be turned off . Note: • Pressing any other mode will end Sabbath Mode. • In double oven models, Sabbath Mode is lower oven temp offset. (Nonconvection ovens do not have a fan at the inside back of the oven cavity) Convection Ovens S5: Auto...

Instructions for Use
Page 15
... Range by Cooking Mode Mode Bake Roast Broil (Low, High) Warm Proof Convection Bake* Convection Multi-Rack Convection Roast Pizza* Convection Broil* (Low,High) * Some models only Lowest 100 100 450 150 85 100 100 100 100 450 Highest 550 550 550 225 125 550 550 550 550 550 English 13...
... Range by Cooking Mode Mode Bake Roast Broil (Low, High) Warm Proof Convection Bake* Convection Multi-Rack Convection Roast Pizza* Convection Broil* (Low,High) * Some models only Lowest 100 100 450 150 85 100 100 100 100 450 Highest 550 550 550 225 125 550 550 550 550 550 English 13...

Instructions for Use
Page 16
... 25° F if Auto Convection Conversion is not activated. • Place food in cook time. • Greater volume (yeast items rise higher). Convection Bake (some models) 2 Convection Bake is well suited for cakes, bar cookies and breads to 1 1/2" of the oven. The Convection Bake mode is similar to recipe or package...
... 25° F if Auto Convection Conversion is not activated. • Place food in cook time. • Greater volume (yeast items rise higher). Convection Bake (some models) 2 Convection Bake is well suited for cakes, bar cookies and breads to 1 1/2" of the oven. The Convection Bake mode is similar to recipe or package...

Instructions for Use
Page 17
... a pizza pan. • When proofing pizza dough, coat dough with olive oil and place it from the upper element than the lower element. Pizza (some models) 2 In the Pizza mode, heat from the upper and lower elements is best suited for large cuts of meat and poultry. Roast is circulated throughout...
... a pizza pan. • When proofing pizza dough, coat dough with olive oil and place it from the upper element than the lower element. Pizza (some models) 2 In the Pizza mode, heat from the upper and lower elements is best suited for large cuts of meat and poultry. Roast is circulated throughout...

Instructions for Use
Page 18
.... The Convection Roast mode is well suited for browning breads, casseroles and other foods. Always broil with a preheated broil element. Convection Broil (some models) 2 Convection Roast uses heat from the upper element. Always use cooking bags. • Use a broil pan with a rack and grid or .... • Turn meats once during the recommended cook time. • Never use heat-proof glass (Pyrex ®); Convection Roast (some models) 7 Convection Broil is similar to Broil. It can be placed over the meat to prevent overbrowning. • Let meat stand covered with...
.... The Convection Roast mode is well suited for browning breads, casseroles and other foods. Always broil with a preheated broil element. Convection Broil (some models) 2 Convection Roast uses heat from the upper element. Always use cooking bags. • Use a broil pan with a rack and grid or .... • Turn meats once during the recommended cook time. • Never use heat-proof glass (Pyrex ®); Convection Roast (some models) 7 Convection Broil is similar to Broil. It can be placed over the meat to prevent overbrowning. • Let meat stand covered with...
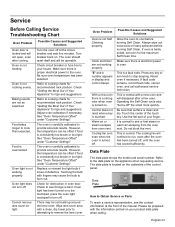
Instructions for Use
Page 25
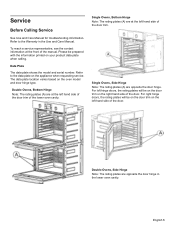
... does not react when a key is located on the appliance when requesting service. Do not block the vent. Data Plate The data plate shows the model and serial number. Service Before Calling Service Troubleshooting Chart Oven Problem Oven door is overcooked. Baking results are not working properly. Food is locked and...
... does not react when a key is located on the appliance when requesting service. Do not block the vent. Data Plate The data plate shows the model and serial number. Service Before Calling Service Troubleshooting Chart Oven Problem Oven door is overcooked. Baking results are not working properly. Food is locked and...
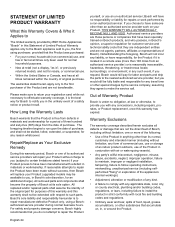
Instructions for Use
Page 26
... replace your registration card; The warranties stated herein apply only to return your Product (upgraded models may be stalled, tolled, extended, or suspended, for any reason whatsoever. in Bosch's sole discretion, for an additional charge). English 24 The foregoing timeline begins to such parts. If you choose to you, in any applicable...
... replace your registration card; The warranties stated herein apply only to return your Product (upgraded models may be stalled, tolled, extended, or suspended, for any reason whatsoever. in Bosch's sole discretion, for an additional charge). English 24 The foregoing timeline begins to such parts. If you choose to you, in any applicable...


