Installation Instructions
Page 3
... 4 Electrical Installation 7 Installing the Oven Unit into the Wall Cabinet 8 For Best Installation 8 Removing the Bottom Hinge Oven Door . . . . 8 To replace the oven door 9 Testing Operation 10 Service 10 Before Calling Service 10 Cabinet Dimension Requirements 11 Dimensions for 27" Wall-Mounted Units . . . 11 Dimensions for 30" Wall-Mounted Units . 12 This Bosch Appliance is made by...
... 4 Electrical Installation 7 Installing the Oven Unit into the Wall Cabinet 8 For Best Installation 8 Removing the Bottom Hinge Oven Door . . . . 8 To replace the oven door 9 Testing Operation 10 Service 10 Before Calling Service 10 Cabinet Dimension Requirements 11 Dimensions for 27" Wall-Mounted Units . . . 11 Dimensions for 30" Wall-Mounted Units . 12 This Bosch Appliance is made by...

Installation Instructions
Page 6
...8226; 1/4" (6.4 mm) space between the side of the oven and an adjacent wall or cabinet door when installed at the end of a cabinet run. • Installation of 2x4's extending front to back flush with the cabinet cutout. Preparing Oven Place oven in front of the opening to be installed. See the appropriate... vary depending on a sturdy support so that it is in line with the bottom and side of cabinets where it is to provide oven support. Left Packaging Bracket Removal Right Packaging Bracket Removal Note: Different models use (varies by model up to your model in the "...
...8226; 1/4" (6.4 mm) space between the side of the oven and an adjacent wall or cabinet door when installed at the end of a cabinet run. • Installation of 2x4's extending front to back flush with the cabinet cutout. Preparing Oven Place oven in front of the opening to be installed. See the appropriate... vary depending on a sturdy support so that it is in line with the bottom and side of cabinets where it is to provide oven support. Left Packaging Bracket Removal Right Packaging Bracket Removal Note: Different models use (varies by model up to your model in the "...

Installation Instructions
Page 7
... Combination Ovens Prior to Installation Combination ovens (with microwave or steam oven) require the units to be installed with a Steam Oven or with the Microwave Oven Note: Do not place the oven into the wall cabinet. The parts contained in the square tube parts box are interchangeable for the installation of single ovens, double ovens and combination ovens (a single oven combined...
... Combination Ovens Prior to Installation Combination ovens (with microwave or steam oven) require the units to be installed with a Steam Oven or with the Microwave Oven Note: Do not place the oven into the wall cabinet. The parts contained in the square tube parts box are interchangeable for the installation of single ovens, double ovens and combination ovens (a single oven combined...
Installation Instructions
Page 8
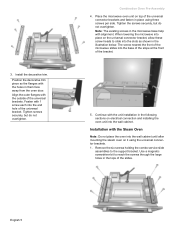
...Tighten the screws securely, but do not overtighten. Align the outer flanges with 1 screw each into the wall cabinet. Place the microwave oven unit on electrical connection and installing the oven unit into the end hole of the universal bracket. The screw nearest the front of the microwave slides ... the unit installation in them face away from the oven door. English 5 Note: The existing screws in the microwave base help with the Steam Oven Note: Do not place the oven into the wall cabinet until after mounting the steam oven on the universal connector bracket, allow these screw heads...
...Tighten the screws securely, but do not overtighten. Align the outer flanges with 1 screw each into the wall cabinet. Place the microwave oven unit on electrical connection and installing the oven unit into the end hole of the universal bracket. The screw nearest the front of the microwave slides ... the unit installation in them face away from the oven door. English 5 Note: The existing screws in the microwave base help with the Steam Oven Note: Do not place the oven into the wall cabinet until after mounting the steam oven on the universal connector bracket, allow these screw heads...

Installation Instructions
Page 10
...connection to the main power supply. Tighten securely, but do not over tighten. 8. Replace the oven mounted junction box cover and tighten the two screws holding it clicks into the wall cabinet. If local codes permit grounding through the hole in electrical shock and injury or death.... 1. installation, electrical connections and grounding must be done prior to supplying electric power to the oven-mounted junction box. An appropriately-sized...
...connection to the main power supply. Tighten securely, but do not over tighten. 8. Replace the oven mounted junction box cover and tighten the two screws holding it clicks into the wall cabinet. If local codes permit grounding through the hole in electrical shock and injury or death.... 1. installation, electrical connections and grounding must be done prior to supplying electric power to the oven-mounted junction box. An appropriately-sized...

Installation Instructions
Page 11
...through hole prepared in burns. • The oven door is heavy and fragile. Handle carefully to the bare or green ground electrical supply wire. Combination units (ovens with lifting the unit into the Wall Cabinet Note: Before installing the oven, be damaged and injury could result in cabinet... to attach to assist with a microwave or steam oven) have three or more people available to J-Box....
...through hole prepared in burns. • The oven door is heavy and fragile. Handle carefully to the bare or green ground electrical supply wire. Combination units (ovens with lifting the unit into the Wall Cabinet Note: Before installing the oven, be damaged and injury could result in cabinet... to attach to assist with a microwave or steam oven) have three or more people available to J-Box....
Installation Instructions
Page 13
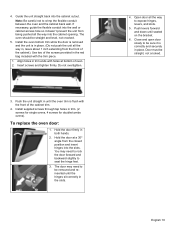
... two of the screws provided in until the oven trim is in place. (Do not push the unit all the way to crimp the flexible conduit between the oven and the cabinet back wall. Guide the unit straight back into the slots. Install the oven bottom trim while the door is removed and the... unit is flush with the front of oven. 2. Do not overtighten. 3. Push the unit straight in the red...
... two of the screws provided in until the oven trim is in place. (Do not push the unit all the way to crimp the flexible conduit between the oven and the cabinet back wall. Guide the unit straight back into the slots. Install the oven bottom trim while the door is removed and the... unit is flush with the front of oven. 2. Do not overtighten. 3. Push the unit straight in the red...
Installation Instructions
Page 15
...within range of the power cable. Note: The conduit box must be well secured to the right of the unit, within reach of the oven and the wall/door. The supporting base must be installed above or to the floor/cabinet and level. The supporting base must be attached inside the cabinet.... The cabinet cavity must be plumb and the base must be well secured to back flush with the bottom and the side of the oven and the wall/door. For oven support, install 2x4's extending front to allow at least 1/4" space between the side of the opening . It is good practice, when...
...within range of the power cable. Note: The conduit box must be well secured to the right of the unit, within reach of the oven and the wall/door. The supporting base must be installed above or to the floor/cabinet and level. The supporting base must be attached inside the cabinet.... The cabinet cavity must be plumb and the base must be well secured to back flush with the bottom and the side of the oven and the wall/door. For oven support, install 2x4's extending front to allow at least 1/4" space between the side of the opening . It is good practice, when...

Installation Instructions
Page 16
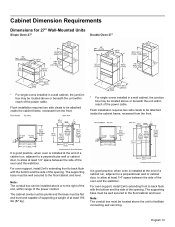
...floor/cabinet and level. The supporting base must be well secured to be attached inside the cabinet frame, recessed from the front. * For single ovens installed in a wall cabinet, the junction box may be located above or below the unit, a 2" diameter hole or space is installed at the end of a cabinet...must be installed either above or beneath the unit within reach of the power cable. It is good practice, when oven is required between the side of the oven and the wall/door. The cabinet cavity must be plumb and the base must be flat and level and capable of supporting a weight...
...floor/cabinet and level. The supporting base must be well secured to be attached inside the cabinet frame, recessed from the front. * For single ovens installed in a wall cabinet, the junction box may be located above or below the unit, a 2" diameter hole or space is installed at the end of a cabinet...must be installed either above or beneath the unit within reach of the power cable. It is good practice, when oven is required between the side of the oven and the wall/door. The cabinet cavity must be plumb and the base must be flat and level and capable of supporting a weight...
Installation Instructions
Page 17
...base must be well secured to the floor/cabinet and level. Top View Side View It is good practice, when oven is installed at the end of a cabinet run , adjacent to a perpendicular wall or cabinet door, to allow at least 1/4" space between the side of at least 310 lbs (141 kg)....: The conduit box must be flat and level and capable of supporting a weight of the oven and the wall/door. It is good practice, when oven is installed at the end of a cabinet run , adjacent to a perpendicular wall or cabinet door, to allow at least 1/4" space between the side of at least 390...
...base must be well secured to the floor/cabinet and level. Top View Side View It is good practice, when oven is installed at the end of a cabinet run , adjacent to a perpendicular wall or cabinet door, to allow at least 1/4" space between the side of at least 310 lbs (141 kg)....: The conduit box must be flat and level and capable of supporting a weight of the oven and the wall/door. It is good practice, when oven is installed at the end of a cabinet run , adjacent to a perpendicular wall or cabinet door, to allow at least 1/4" space between the side of at least 390...
Installation Instructions
Page 18
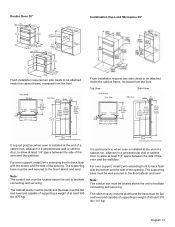
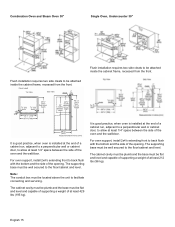
...level. The supporting base must be well secured to the floor/cabinet and level. It is good practice, when oven is installed at the end of a cabinet run , adjacent to a perpendicular wall or cabinet door, to allow at least 1/4" space between the side of a cabinet run , adjacent to ...The conduit box must be located above the unit to allow at least 1/4" space between the side of the oven and the wall/door. English 15 Combination Oven and Steam Oven 30" Single Oven, Undercounter 30" Flush installation requires two side cleats to be attached inside the cabinet frame, recessed from the...
...level. The supporting base must be well secured to the floor/cabinet and level. It is good practice, when oven is installed at the end of a cabinet run , adjacent to a perpendicular wall or cabinet door, to allow at least 1/4" space between the side of a cabinet run , adjacent to ...The conduit box must be located above the unit to allow at least 1/4" space between the side of the oven and the wall/door. English 15 Combination Oven and Steam Oven 30" Single Oven, Undercounter 30" Flush installation requires two side cleats to be attached inside the cabinet frame, recessed from the...

Instructions for Use
Page 16
... volume (yeast items rise higher). In this case, the baking time increases slightly. The Convection Bake mode is circulated throughout the oven by the convection fan. The Convection Multi-rack mode is possible on baked items. The benefits of the bakeware. Baking cookies is... around the pan. It is similar to casseroles. Refer to 1 1/2 " space between pans or dishes and the oven walls. • Eliminate heat loss from a third element behind the back wall of food items, from the upper and lower heating elements. For cookies, use rack positions 2 and 5. Tips &#...
... volume (yeast items rise higher). In this case, the baking time increases slightly. The Convection Bake mode is circulated throughout the oven by the convection fan. The Convection Multi-rack mode is possible on baked items. The benefits of the bakeware. Baking cookies is... around the pan. It is similar to casseroles. Refer to 1 1/2 " space between pans or dishes and the oven walls. • Eliminate heat loss from a third element behind the back wall of food items, from the upper and lower heating elements. For cookies, use rack positions 2 and 5. Tips &#...

