Use & Care Manual
Page 20
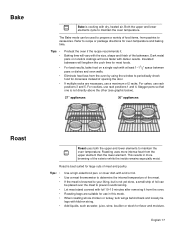
...in this mode. If the meat is browned to your liking, but is not directly above the other (see graphic below). 27" appliances: 30" appliances: Roast Roast uses both the upper and lower elements to recipe or package directions for use a maximum of the exterior while the inside... suited for flavor and moisture. For best results, bake food on a single rack with dry, heated air. Roast is cooking with at least 1-11/2" space between pans or dishes and oven walls. Use a meat thermometer to maintain the oven temperature. Add liquids, such as water, juice, wine, bouillon or stock...
...in this mode. If the meat is browned to your liking, but is not directly above the other (see graphic below). 27" appliances: 30" appliances: Roast Roast uses both the upper and lower elements to recipe or package directions for use a maximum of the exterior while the inside... suited for flavor and moisture. For best results, bake food on a single rack with dry, heated air. Roast is cooking with at least 1-11/2" space between pans or dishes and oven walls. Use a meat thermometer to maintain the oven temperature. Add liquids, such as water, juice, wine, bouillon or stock...

Installation Instructions
Page 5
...16" (738mm) 27" (686mm) min. 43/4" (121mm) max. 313/8" (797mm) 237/8" (606mm) 22" (559mm) Single Oven 27" It is good practice, when oven is required between the side of the oven and the wall/door. Preparation Before you Begin Tools and Parts Needed Parts Included 27" Appliances • Phillips head screwdriver •...and the side of the opening. For oven support, install 2x4's extending front to allow at least 210 lbs (95 kg). The supporting base must be flat and capable of supporting a weight of at least 1/4" space between the back wall and the right rear of a cabinet run...
...16" (738mm) 27" (686mm) min. 43/4" (121mm) max. 313/8" (797mm) 237/8" (606mm) 22" (559mm) Single Oven 27" It is good practice, when oven is required between the side of the oven and the wall/door. Preparation Before you Begin Tools and Parts Needed Parts Included 27" Appliances • Phillips head screwdriver •...and the side of the opening. For oven support, install 2x4's extending front to allow at least 210 lbs (95 kg). The supporting base must be flat and capable of supporting a weight of at least 1/4" space between the back wall and the right rear of a cabinet run...

Installation Instructions
Page 6
...2413/16" (630mm) 491/2" (1257mm) 483/8" (1229mm) 191/2" (500mm) 237/8" (606mm) 22" (559mm) Double Oven 27" It is good practice, when oven is installed at the end of a cabinet run , adjacent to a perpendicular wall or cabinet door, to back flush with the bottom and the side of the opening . Combo... Oven with Microwave 27" It is good practice, when oven is installed at the end of a cabinet run , adjacent to a perpendicular wall or cabinet door, to allow at least 1/4" space between the side of the oven and the wall/door. For oven support, install 2x4's ...
...2413/16" (630mm) 491/2" (1257mm) 483/8" (1229mm) 191/2" (500mm) 237/8" (606mm) 22" (559mm) Double Oven 27" It is good practice, when oven is installed at the end of a cabinet run , adjacent to a perpendicular wall or cabinet door, to back flush with the bottom and the side of the opening . Combo... Oven with Microwave 27" It is good practice, when oven is installed at the end of a cabinet run , adjacent to a perpendicular wall or cabinet door, to allow at least 1/4" space between the side of the oven and the wall/door. For oven support, install 2x4's ...

Installation Instructions
Page 7
The cabinet base must be flat and capable of supporting a weight of at least 1/4" space between the side of the oven and the wall/door. Note: The conduit box must be located above the unit to facilitate connecting and servicing. 24" (610mm) 251/2" (648mm) 263/4" (680mm) 2413.../16" (630mm) 603/4" (1543mm) 613/8" (1559mm) 595/8" (1514mm) 93/4" (248mm) Combo Oven with the bottom and the side of the opening. The ...
The cabinet base must be flat and capable of supporting a weight of at least 1/4" space between the side of the oven and the wall/door. Note: The conduit box must be located above the unit to facilitate connecting and servicing. 24" (610mm) 251/2" (648mm) 263/4" (680mm) 2413.../16" (630mm) 603/4" (1543mm) 613/8" (1559mm) 595/8" (1514mm) 93/4" (248mm) Combo Oven with the bottom and the side of the opening. The ...

Installation Instructions
Page 8
.../8" (1299mm) 493/4" (1264mm) 93/4" (248mm) 237/8" (606mm) 22" (559mm) Single Oven 30" It is good practice, when oven is installed at the end of a cabinet run , adjacent to a perpendicular wall or cabinet door, to allow at least 1/4" space between the side of the oven and the wall/door. Note: The conduit box must be installed either above...
.../8" (1299mm) 493/4" (1264mm) 93/4" (248mm) 237/8" (606mm) 22" (559mm) Single Oven 30" It is good practice, when oven is installed at the end of a cabinet run , adjacent to a perpendicular wall or cabinet door, to allow at least 1/4" space between the side of the oven and the wall/door. Note: The conduit box must be installed either above...

Installation Instructions
Page 9
.../8" (606mm) 22" (559mm) Combo Oven with Microwave 30" It is good practice, when oven is installed at the end of a cabinet run , adjacent to a perpendicular wall or cabinet door, to allow at least 1/4" space between the side of the oven and the wall/door. For oven support, install 2x4's extending front to... allow at least 290 lbs (132 kg). For oven support, install 2x4's extending front to back flush with Microwave and Warming Drawer 30" It is good practice, when oven is installed at the ...
.../8" (606mm) 22" (559mm) Combo Oven with Microwave 30" It is good practice, when oven is installed at the end of a cabinet run , adjacent to a perpendicular wall or cabinet door, to allow at least 1/4" space between the side of the oven and the wall/door. For oven support, install 2x4's extending front to... allow at least 290 lbs (132 kg). For oven support, install 2x4's extending front to back flush with Microwave and Warming Drawer 30" It is good practice, when oven is installed at the ...

Installation Instructions
Page 10
... least 1/4" space between the side of the oven and the wall/door. 24" (610mm) 281/2" (724mm) 293/4" (755mm) 2713/16" (706mm) 40" (1016mm) 407/16" (1027mm) 381/8" (968mm) 93/4" (248mm) Combo Oven with Warming Drawer 30" It is good practice, when oven is installed at the end of a cabinet run..., adjacent to a perpendicular wall or cabinet door, to back flush with the bottom and the side of the opening.
... least 1/4" space between the side of the oven and the wall/door. 24" (610mm) 281/2" (724mm) 293/4" (755mm) 2713/16" (706mm) 40" (1016mm) 407/16" (1027mm) 381/8" (968mm) 93/4" (248mm) Combo Oven with Warming Drawer 30" It is good practice, when oven is installed at the end of a cabinet run..., adjacent to a perpendicular wall or cabinet door, to back flush with the bottom and the side of the opening.

Installation Instructions
Page 15
...Verify that the door locks when the lock icon appears in until flush with cabinet wall, being careful not to 208 volts. 3. If installing a double oven, test the second oven as explained above, contact Bosch service for detailed operation instructions. 4. For 240 V installation, the reading between ...cabinet cutout. Holding the door firmly in both hands, place hinges in trim. (2 screws for single ovens, 4 screws for double/combo ovens) To replace the oven door: 1. Confirm that the oven light comes on power at junction box using a volt meter. See the Use and Care Manual...
...Verify that the door locks when the lock icon appears in until flush with cabinet wall, being careful not to 208 volts. 3. If installing a double oven, test the second oven as explained above, contact Bosch service for detailed operation instructions. 4. For 240 V installation, the reading between ...cabinet cutout. Holding the door firmly in both hands, place hinges in trim. (2 screws for single ovens, 4 screws for double/combo ovens) To replace the oven door: 1. Confirm that the oven light comes on power at junction box using a volt meter. See the Use and Care Manual...

