
Use and Care Manual
Page 3
... to avoid electrical shock hazards. ■ Do not operate the brush on or next to pick up flammable or combustible liquids, such as gasoline, or use without dust bag and/or filters in areas where they may reduce air flow. ■ Do not use to people or animals or let the tube or nozzles get close a door on cord. Do not run appliance over cord. Unplug...
... to avoid electrical shock hazards. ■ Do not operate the brush on or next to pick up flammable or combustible liquids, such as gasoline, or use without dust bag and/or filters in areas where they may reduce air flow. ■ Do not use to people or animals or let the tube or nozzles get close a door on cord. Do not run appliance over cord. Unplug...
Use and Care Manual
Page 4
...; Hold plug when rewinding onto cord reel. SAVE THESE INSTRUCTIONS! 4 Use only manufacturer's recommended attachments. ■ To reduce the risk of all controls before unplugging. ■ Use extra care when cleaning on the identification plate. ■ Do protect the vacuum cleaner from external weather conditions, dampness and heat sources. ■ Do switch off and unplug the appliance before any assembly, cleaning and before servicing. ■...
...; Hold plug when rewinding onto cord reel. SAVE THESE INSTRUCTIONS! 4 Use only manufacturer's recommended attachments. ■ To reduce the risk of all controls before unplugging. ■ Use extra care when cleaning on the identification plate. ■ Do protect the vacuum cleaner from external weather conditions, dampness and heat sources. ■ Do switch off and unplug the appliance before any assembly, cleaning and before servicing. ■...

Use and Care Manual
Page 5
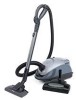
... accessory 3 Suction hose 4 ON/OFF button 5 Power indicator* 6 Change dust bag indicator, 7 Suction adjustment 8 Exhaust filter 9 Parking aid (with automatic OFF*) 10 Frame for exhaust filter 11 Dust compartment cover 12 Exhaust grille latch 13 Exhaust grille 14 Power cord 15 Parking aid (on unit Underside) 16 Motor protection filter 17 Filter bracket 18 MEGAfilteplus dust bag 19 Dual action nozzle with carpet lifter* 20 Dual action nozzle with carpet lifter and...
... accessory 3 Suction hose 4 ON/OFF button 5 Power indicator* 6 Change dust bag indicator, 7 Suction adjustment 8 Exhaust filter 9 Parking aid (with automatic OFF*) 10 Frame for exhaust filter 11 Dust compartment cover 12 Exhaust grille latch 13 Exhaust grille 14 Power cord 15 Parking aid (on unit Underside) 16 Motor protection filter 17 Filter bracket 18 MEGAfilteplus dust bag 19 Dual action nozzle with carpet lifter* 20 Dual action nozzle with carpet lifter and...

Use and Care Manual
Page 6
Push the handle into the suction opening until it engages. Starting up Insert the suction hose connector into the telescopic tube until it engages. *Depending on version Connect the floor nozzle and the telescopic tube together. 6 Connect the handle and the telescopic tube together.
Push the handle into the suction opening until it engages. Starting up Insert the suction hose connector into the telescopic tube until it engages. *Depending on version Connect the floor nozzle and the telescopic tube together. 6 Connect the handle and the telescopic tube together.
Use and Care Manual
Page 7
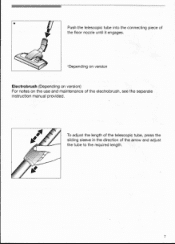
To adjust the length of the telescopic tube, press the sliding sleeve in the direction of the electrobrush, see the separate instruction manual provided. Push the telescopic tube into the connecting piece of the floor nozzle until it engages. •Depending on version Electrobrush (Depending on version) For notes on the use and maintenance of the arrow and adjust the tube to the required length. 7
To adjust the length of the telescopic tube, press the sliding sleeve in the direction of the electrobrush, see the separate instruction manual provided. Push the telescopic tube into the connecting piece of the floor nozzle until it engages. •Depending on version Electrobrush (Depending on version) For notes on the use and maintenance of the arrow and adjust the tube to the required length. 7

Use and Care Manual
Page 8
... an electronically operated power cord reel, the Power indicator now lights up green. *Depending on version To switch your vacuum cleaner on and off, press the ON/Off button in a wall socket. Grasp the plug and pull the power cord to the required level. ■ Low suction range: For cleaning delicate fabrics, such as curtains. ■ Middle suction range: For daily cleaning of the arrow. Use the suction adjuster...
... an electronically operated power cord reel, the Power indicator now lights up green. *Depending on version To switch your vacuum cleaner on and off, press the ON/Off button in a wall socket. Grasp the plug and pull the power cord to the required level. ■ Low suction range: For cleaning delicate fabrics, such as curtains. ■ Middle suction range: For daily cleaning of the arrow. Use the suction adjuster...
Use and Care Manual
Page 9
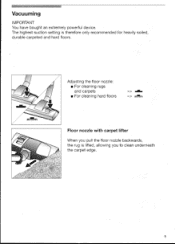
The highest suction setting is lifted, allowing you pull the floor nozzle backwards, the rug is therefore only recommended for heavily soiled, durable carpeted and hard floors. Vacuuming IMPORTANT You have bought an extremely powerful device. Adjusting the floor nozzle: „ . ■ For cleaning rugs and carpets => ■ For cleaning hard floors => rdifirm Floor nozzle with carpet lifter When you to clean underneath the carpet edge. A 9
The highest suction setting is lifted, allowing you pull the floor nozzle backwards, the rug is therefore only recommended for heavily soiled, durable carpeted and hard floors. Vacuuming IMPORTANT You have bought an extremely powerful device. Adjusting the floor nozzle: „ . ■ For cleaning rugs and carpets => ■ For cleaning hard floors => rdifirm Floor nozzle with carpet lifter When you to clean underneath the carpet edge. A 9
Use and Care Manual
Page 10
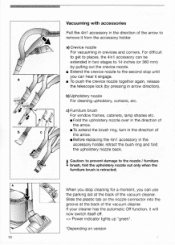
... direction of the vacuum cleaner. Slide the plastic tab on version a) Crevice nozzle For vacuuming in the direction of the vacuum cleaner. b)Upholstery nozzle For cleaning upholstery, curtains, etc. If your cleaner has the automatic Off function, it from the accessory holder. When you stop until you can hear it engage. I Caution: to prevent damage to remove it will now switch itself off. => Power indicator lights...
... direction of the vacuum cleaner. Slide the plastic tab on version a) Crevice nozzle For vacuuming in the direction of the vacuum cleaner. b)Upholstery nozzle For cleaning upholstery, curtains, etc. If your cleaner has the automatic Off function, it from the accessory holder. When you stop until you can hear it engage. I Caution: to prevent damage to remove it will now switch itself off. => Power indicator lights...

Use and Care Manual
Page 11
... power cord. Place the vacuum cleaner upright. The power cord then winds itself up automatically. ■ On vacuum cleaners with an electronically operated power cord reel, the power cord is automatically wound up . Slide the plastic tab on the floor nozzle into the groove on the cleaner's underside. After work D ■ Switch the vacuum cleaner off and unplug the power cord. ■ Tug the power cord and let go. To deactivate the power cord brake, quickly tug the power cord. => The power cord...
... power cord. Place the vacuum cleaner upright. The power cord then winds itself up automatically. ■ On vacuum cleaners with an electronically operated power cord reel, the power cord is automatically wound up . Slide the plastic tab on the floor nozzle into the groove on the cleaner's underside. After work D ■ Switch the vacuum cleaner off and unplug the power cord. ■ Tug the power cord and let go. To deactivate the power cord brake, quickly tug the power cord. => The power cord...

Use and Care Manual
Page 12
To release the connection, press the snap connector and pull the handle out. 1:1 4 *Depending on version To release the connection, press the snap connector and pull the telescopic tube out. *Depending on version 12
To release the connection, press the snap connector and pull the handle out. 1:1 4 *Depending on version To release the connection, press the snap connector and pull the telescopic tube out. *Depending on version 12
Use and Care Manual
Page 13
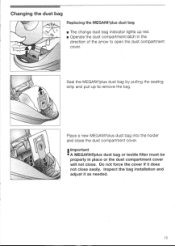
... dust compartment cover will not close. Changing the dust bag r \ Replacing the MEGAfilteplus dust bag ■ The change dust bag indicator lights up to open the dust compartment cover. properly in the direction of the arrow to remove the bag. 23 Place a new MEGAfiltplus dust bag into the holder and close easily. Inspect the bag installation and adjust it does not close the dust compartment cover. I Important • A MEGAfilt®plus dust bag or textile filter...
... dust compartment cover will not close. Changing the dust bag r \ Replacing the MEGAfilteplus dust bag ■ The change dust bag indicator lights up to open the dust compartment cover. properly in the direction of the arrow to remove the bag. 23 Place a new MEGAfiltplus dust bag into the holder and close easily. Inspect the bag installation and adjust it does not close the dust compartment cover. I Important • A MEGAfilt®plus dust bag or textile filter...

Use and Care Manual
Page 14
... Replacing the motor protection filter You should change the microsan filter with each new replacement dust bag pack (at least after every five dust bags). ■ Open the dust compartment cover. ■ Pull the filter holder out in the direction of the arrow to unlatch the exhaust grille and open it. ■ Dispose of the motor protection filter and fit a new motor protection filter. ■ Close the filter support, slide into the vacuum cleaner and...
... Replacing the motor protection filter You should change the microsan filter with each new replacement dust bag pack (at least after every five dust bags). ■ Open the dust compartment cover. ■ Pull the filter holder out in the direction of the arrow to unlatch the exhaust grille and open it. ■ Dispose of the motor protection filter and fit a new motor protection filter. ■ Close the filter support, slide into the vacuum cleaner and...
Use and Care Manual
Page 15
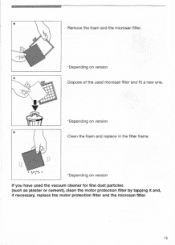
t• WWI *Depending on version Dispose of the used microsan filter and fit a new one. *Depending on version Clean the foam and replace in the filter frame. • (( )) *Depending on version If you have used the vacuum cleaner for fine dust particles (such as plaster or cement), clean the motor protection filter by tapping it and, if necessary, replace the motor protection filter and the microsan filter. 15 Remove the foam and the microsan filter.
t• WWI *Depending on version Dispose of the used microsan filter and fit a new one. *Depending on version Clean the foam and replace in the filter frame. • (( )) *Depending on version If you have used the vacuum cleaner for fine dust particles (such as plaster or cement), clean the motor protection filter by tapping it and, if necessary, replace the motor protection filter and the microsan filter. 15 Remove the foam and the microsan filter.

Use and Care Manual
Page 16
Remove the activated carbon filter by pulling the tab and dispose of it as normal *Depending on version ■ Slide the filter frame under the two retaining ribs and turn in the direction of the arrow until it engages. ■ Close the exhaust grille. 16 vi leolik 140 31„,„ .. - • 1111 ,./4' ,.. *Depending on version Fit a new activated carbon filter.
Remove the activated carbon filter by pulling the tab and dispose of it as normal *Depending on version ■ Slide the filter frame under the two retaining ribs and turn in the direction of the arrow until it engages. ■ Close the exhaust grille. 16 vi leolik 140 31„,„ .. - • 1111 ,./4' ,.. *Depending on version Fit a new activated carbon filter.

Use and Care Manual
Page 17
Replacing the activated carbon fitter (Depending on version) Vt's,NNz-' If your vacuum cleaner is equipped with a HEPA filter, you need to replace this filter once a year. Replacing the HEPA filter (Depending on version) v/
Replacing the activated carbon fitter (Depending on version) Vt's,NNz-' If your vacuum cleaner is equipped with a HEPA filter, you need to replace this filter once a year. Replacing the HEPA filter (Depending on version) v/

Use and Care Manual
Page 18
... only be used in conjunction with the European standard for all floors. Turbo brush for adapting roller speed to floor type. Good pick-up dust, dirt from cracks and crevices. 18 Purifies the discharge air so that it is cleaner than the normal ambient air. Side air control for floors BBZ 101TBUC Brushes and vacuums simultaneously. The brush roller is restored. contains : 5 MEGAfilt* plus replacement dust bags with auto-seal 1 Microsan filter 1 protective motor filter HEPA filter BBZ151HFUC Recommended...
... only be used in conjunction with the European standard for all floors. Turbo brush for adapting roller speed to floor type. Good pick-up dust, dirt from cracks and crevices. 18 Purifies the discharge air so that it is cleaner than the normal ambient air. Side air control for floors BBZ 101TBUC Brushes and vacuums simultaneously. The brush roller is restored. contains : 5 MEGAfilt* plus replacement dust bags with auto-seal 1 Microsan filter 1 protective motor filter HEPA filter BBZ151HFUC Recommended...
Use and Care Manual
Page 19
... consumer purchase and is the owner's responsibility to you . This warranty gives you specific legal rights amd you require service of normal use for repair. Specifically excluded from this warranty sets out your BOSCH small appliance, please contact customer service at no charge to return the appliance for commercial purposes. BOSCH Small Appliance Warranty BSH Home Appliances ("BOSCH») warrants all new small appliances to be...
... consumer purchase and is the owner's responsibility to you . This warranty gives you specific legal rights amd you require service of normal use for repair. Specifically excluded from this warranty sets out your BOSCH small appliance, please contact customer service at no charge to return the appliance for commercial purposes. BOSCH Small Appliance Warranty BSH Home Appliances ("BOSCH») warrants all new small appliances to be...
Use and Care Manual
Page 20
BSH Home Appliances Corporation 5551 McFadden Avenue Huntington Beach, CA 92649 USA Web site: www.boschvacuums.com Customer Service (toll free): 1-866-44BOSCH (1-866-442-6724) 5100 401 438 A 05.2002
BSH Home Appliances Corporation 5551 McFadden Avenue Huntington Beach, CA 92649 USA Web site: www.boschvacuums.com Customer Service (toll free): 1-866-44BOSCH (1-866-442-6724) 5100 401 438 A 05.2002

