Bosch B36BT830NS Support and Manuals
Get Help and Manuals for this Bosch item
View All Support Options Below
Free Bosch B36BT830NS manuals!
Problems with Bosch B36BT830NS?
Ask a Question
Free Bosch B36BT830NS manuals!
Problems with Bosch B36BT830NS?
Ask a Question
Most Recent Bosch B36BT830NS Questions

How To Reset Water Filter Change Indicator?
(Posted by jlkwmail 1 year ago)
Freezer Drawer Will Not Close On One Side
(Posted by scrapinglori 2 years ago)

Ice Maker Line Size
(Posted by neilpalmer42 8 years ago)

How Do I Align The Fridge Doors? One Is Higher Than The Other.
(Posted by ttolton90 11 years ago)
Bosch B36BT830NS Videos

Bosch B36BT830NS Built In Refrigerator
Duration: :58
Total Views: 82
Duration: :58
Total Views: 82
Popular Bosch B36BT830NS Manual Pages
Installation Instructions - Page 4

...dimensions 9 Required accessories and tools 10 Supplied accessories 10 Optional accessories 10 Other required accessories 10 Other 10 Tools 10 Installation instructions 11
1. Aligning the base panel 21 6. Table of Contents
Important Safety Instructions 5 Installation options 6 Individual appliance 6 Individual appliances with partition 6 Individual appliance at the end of the...
Installation Instructions - Page 5

...be made by a qualified service technician. latest edition/Provincial and Municipal codes and/or local codes. Definitions
, WARNING:
This indicates that death or serious injuries may occur as a result of the installer.
Repairs should be secured to prevent the possibility of personal injury or damage to leave these instructions with your Owner's Manual for warranty information. NOTE...
Installation Instructions - Page 6

...).
6 The side panel must be connected firmly to prevent damage if the doors are many different installation options. During installation ensure that the installation enclosure is square and the proper size.
When dimensioning the partition for model 4, note the thickness of the furniture fronts to the wall, the floor and overhead cabinet/fixtures...
Installation Instructions - Page 7

... use a suitable insulating plate or observe the following :
BottomFreezer 36" approx. 1200 Ibs/540 kg
To ensure that the installation enclosure is created, make sure that all attachable furniture are less...level, diagonal measurements, etc. for a trouble-free installation of the niche be checked by suitable means. The floor in the installation area must be screwed securely to adjacent and...
Installation Instructions - Page 8

... is required for the water connection must be installed by a qualified electrician or service technician if you are available as to the appliance or in doubt as a separate accessory and must be purchased seperately. The supply pipe can result in electric shock.
Appliance BottomFreezer 36"
Maximal load at the side on the right...
Installation Instructions - Page 9

... panel of the enclosure be accessed for service without uninstalling the appliance. The furniture return area has to the installation enclosure, so that it can be of the water connection
It is recommended the water-box be placed adjacent to be perfectly straight. B Area for installation of solid material at least 4" (100 mm...
Installation Instructions - Page 10

...; Operating instructions Installation kit
Optional accessories
Heater Kit for material and in different
sizes Wooden beam (cross section min. 3" x 4") as an
alternative tilt protection, length according to protect the floor from damage (e.g.
Tools
Cordless screwdriver
Torx bit T20 and T30 + magnetic holder
Torx screwdriver T20
5/16" (8 mm) hex nut driver
Wood...
Installation Instructions - Page 11

...trouble free installation.
1. Checking the installation enclosure
, CAUTION:
Use the following installation instructions describe the installation steps for various appliance types. Check that the installation...parts in transit. Removing the packaging
, WARNING:
Be careful, otherwise people who are helping may be injured or the appliance may be connected securely to special installation...
Installation Instructions - Page 12

...and remove accessories and installation materials from inside the appliance until the installation is complete, otherwise the parts may be damaged!...side panels! Secure the appliance during transportation to a suitable installation location with suitable means of damage! Note:
..., observe the required minimum height at the installation location according to be folded if the door...
Installation Instructions - Page 13
... steps are identified with labels A and B corresponding with the manual sections.
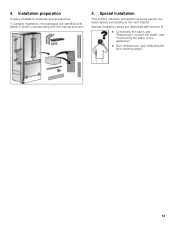
5. 4. Special installation
This symbol indicates that additional steps need to be taken before proceeding to the appliance".
Door limitation pin, see "Adjusting the door opening angle".
13 To simplify installation, the packages are described after section B.
Connecting the water...
Installation Instructions - Page 14

...anti-tip-brackets
, WARNING:
Risk of the installation niche!
1. Assure that there are required for the appliance.
The supplied set contains fastening screws for fastening with dowels.
Important...
14
Always wear safety glasses and other necessary protective devices or apparel when installing or working with dowels and screws:
Not recommended for structural conditions it is...
Installation Instructions - Page 18

... the door off the threaded bolts.
9.
Ensure that you do not lose them.
10. Push in the appliance until the frame is situated on the installation enclosure walls (if not demounted before). Remove base panel from becoming caught.
18 Place fixing brackets only loosely into the...
Installation Instructions - Page 19

...this mark at the appliance base is very important to set perfectly levelled.
Do not twist or jam the appliance inside the installation enclosure!
1.
It is used to comply with the upper... in alignment with this height correctly. Align the appliance with 5/16" (8 mm) hex nut driver via flexible shaft.
19
Unscrew the feet at the front of the rear feet take the weight...
Installation Instructions - Page 20

... the freezer compartment drawer.
2. Attaching the appliance to the top of the installation enclosure
Note:
It is a fairly large gap above the appliance, fit ... to the overhead furniture.
2. Press fitting strip (a) into the cover strip.
6. Screws through the holes of the installation enclosure.
1. If there enough room on the top of the appliance fix the attachment plate side lugs (top) to...
Installation Instructions - Page 23

...require a water connection)
Note:
Turn off the main water tap to the location of 115° has been set at the factory. Adjusting the door opening angle of the connection on the union nut (3.). Push back the water...
Note:
When bending the water line, do not kink it may be necessary to the instructions supplied by leaking water.
1. Install the water line.
Tighten hand-tight.
5.
Bosch B36BT830NS Reviews
We have not received any reviews for Bosch yet.