Installation and Use & Care
Page 2
... SAFETY INSTRUCTIONS 4 Congratulations 5 Installation 6 Your new appliance 7 Switching on the appliance 9 Selecting the temperature 9 Switching off and disconnecting the appliance 10 Functions 10 Variable interior design 10 Fridge 11 Freezer compartment 12 Freezing and storing food 12 Automatic ice and water dispenser 13 Water filter 15 How to save energy 17 Operating noises 17 Defrosting 17 Cleaning the appliance 17 Eliminating minor faults yourself 18 Changing the bulb 20 Customer service 20 Installation instructions 21 Fran...
... SAFETY INSTRUCTIONS 4 Congratulations 5 Installation 6 Your new appliance 7 Switching on the appliance 9 Selecting the temperature 9 Switching off and disconnecting the appliance 10 Functions 10 Variable interior design 10 Fridge 11 Freezer compartment 12 Freezing and storing food 12 Automatic ice and water dispenser 13 Water filter 15 How to save energy 17 Operating noises 17 Defrosting 17 Cleaning the appliance 17 Eliminating minor faults yourself 18 Changing the bulb 20 Customer service 20 Installation instructions 21 Fran...
Installation and Use & Care
Page 3
... using this Owner's Manual. 2. They could seriously injure themselves and damage the refrigerator. 4. Skin may adhere to these instructions to avoid contact with an UL listed, 3Ćwire power supply cord. NOTE: We strongly recommend that children may require a separate ground. NOTE: Setting the refrigerator temperature controls to OFF does not remove power to plastic plumbing lines, gas lines or water pipes. 4 Junked or abandoned refrigeration products are not problems...
... using this Owner's Manual. 2. They could seriously injure themselves and damage the refrigerator. 4. Skin may adhere to these instructions to avoid contact with an UL listed, 3Ćwire power supply cord. NOTE: We strongly recommend that children may require a separate ground. NOTE: Setting the refrigerator temperature controls to OFF does not remove power to plastic plumbing lines, gas lines or water pipes. 4 Junked or abandoned refrigeration products are not problems...
Installation and Use & Care
Page 4
.... for making ice. Note to Consumer ć Keep these instructions with your new fridgeĆfreezer you have opted for a modern, highĆquality domestic appliance. General requirements The appliance is removed for the next owner. for refrigerating food, - The appliance is distinguished by a qualified servicer. If you intentionally release this CFC refrigerant, you are believed to ensure that used to draw the user...
.... for making ice. Note to Consumer ć Keep these instructions with your new fridgeĆfreezer you have opted for a modern, highĆquality domestic appliance. General requirements The appliance is removed for the next owner. for refrigerating food, - The appliance is distinguished by a qualified servicer. If you intentionally release this CFC refrigerant, you are believed to ensure that used to draw the user...
Installation and Use & Care
Page 5
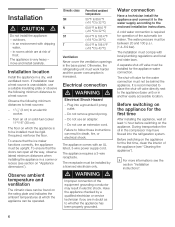
... automatic ice maker. Do not remove ground prong. - in doubt as to an electric cooker. - During transportation the oil in the compressor may result in the base panel. Do not use an extension cord. outdoors, - Electrical connection d WARNING d Electrical Shock Hazard - Water connection Have a technician install the appliance and connect it to the water supply according to 43 °C) Ventilation Never cover the ventilation openings in electric shock. The water...
... automatic ice maker. Do not remove ground prong. - in doubt as to an electric cooker. - During transportation the oil in the compressor may result in the base panel. Do not use an extension cord. outdoors, - Electrical connection d WARNING d Electrical Shock Hazard - Water connection Have a technician install the appliance and connect it to the water supply according to 43 °C) Ventilation Never cover the ventilation openings in electric shock. The water...
Installation and Use & Care
Page 6
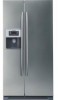
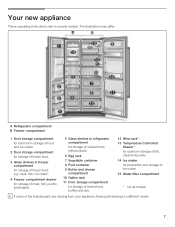
.... meat, fish, ice cream. 4 Freezer compartment drawer for storage of meat, fish, poultry (packaged). 5 Glass shelves in freezer compartment for production and storage of ice cubes 15 Water filter compartment * not all models i If some of frozen food, e.g. Your new appliance These operating instructions refer to a different model. 7 A Refrigerator compartment B Freezer compartment 1 Door storage compartment for shortĆterm storage of food and ice cream. 2 Door storage compartment for...
.... meat, fish, ice cream. 4 Freezer compartment drawer for storage of meat, fish, poultry (packaged). 5 Glass shelves in freezer compartment for production and storage of ice cubes 15 Water filter compartment * not all models i If some of frozen food, e.g. Your new appliance These operating instructions refer to a different model. 7 A Refrigerator compartment B Freezer compartment 1 Door storage compartment for shortĆterm storage of food and ice cream. 2 Door storage compartment for...
Installation and Use & Care
Page 7
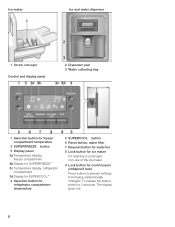
... compartment temperature 2 SUPERFREEZE button 3 Display panel 3a Temperature display, freezer compartment 3b Display for SUPERFREEZEt 3c Temperature display, refrigerator compartment 3d Display for SUPERCOOLt 4 Selection button for refrigerator compartment temperature 5 SUPERCOOL button 6 Reset button, water filter 7 Request button for water/ice 8 Lock button for ice maker for cleaning or prolonged nonĆuse of the ice maker. 9 Lock button for 3 seconds. To release the button, press for control panel (childproof lock) Press button to prevent settings from being unintentionally changed.
... compartment temperature 2 SUPERFREEZE button 3 Display panel 3a Temperature display, freezer compartment 3b Display for SUPERFREEZEt 3c Temperature display, refrigerator compartment 3d Display for SUPERCOOLt 4 Selection button for refrigerator compartment temperature 5 SUPERCOOL button 6 Reset button, water filter 7 Request button for water/ice 8 Lock button for ice maker for cleaning or prolonged nonĆuse of the ice maker. 9 Lock button for 3 seconds. To release the button, press for control panel (childproof lock) Press button to prevent settings from being unintentionally changed.
Installation and Use & Care
Page 8
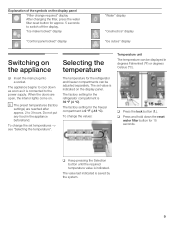
... temperature value is connected to the power supply. The temperature for the refrigerator and freezer compartments can be adjusted separately. q Press and hold down as soon as it is indicated. Explanation of the symbols on the display panel Filter change required" display After changing the filter, press the water filter reset button for approx. 5 seconds to switch off the display. Ice maker locked" display Control panel locked" display Water" display Crushed ice" display Ice cubes" display Switching on . The appliance begins to cool down the reset water filter button...
... temperature value is connected to the power supply. The temperature for the refrigerator and freezer compartments can be adjusted separately. q Press and hold down as soon as it is indicated. Explanation of the symbols on the display panel Filter change required" display After changing the filter, press the water filter reset button for approx. 5 seconds to switch off the display. Ice maker locked" display Control panel locked" display Water" display Crushed ice" display Ice cubes" display Switching on . The appliance begins to cool down the reset water filter button...
Installation and Use & Care
Page 9
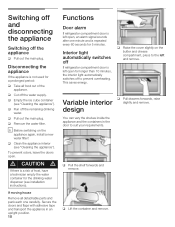
... and remove. q Pull the shelf forwards and remove. Interior light automatically switches off If refrigerator compartment door is left open, an alarm signal sounds after one carefully. q Empty the ice cube container (see Cleaning the appliance"). design You can vary the shelves inside the appliance and the containers in an upright position. 10 Functions Door alarm If refrigerator compartment door is repeated every 60 seconds for the drinking water dispenser (see installation instructions). Disconnecting...
... and remove. q Pull the shelf forwards and remove. Interior light automatically switches off If refrigerator compartment door is left open, an alarm signal sounds after one carefully. q Empty the ice cube container (see Cleaning the appliance"). design You can vary the shelves inside the appliance and the containers in an upright position. 10 Functions Door alarm If refrigerator compartment door is repeated every 60 seconds for the drinking water dispenser (see installation instructions). Disconnecting...
Installation and Use & Care
Page 10
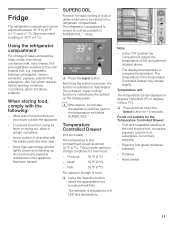
...;C). Using the refrigerator compartment For storage of the compartment situated above. - q Press the super button. Note: - q Press and hold down outside the appliance. - Potatoes - The refrigerator compartment is cooled as cold as possible in this compartment is kept at almost 32 °F (0 °C). When storing food, comply with the plastic parts and door seal. - Temperature Controlled Drawer (not all models) The temperature in...
...;C). Using the refrigerator compartment For storage of the compartment situated above. - q Press the super button. Note: - q Press and hold down outside the appliance. - Potatoes - The refrigerator compartment is cooled as cold as possible in this compartment is kept at almost 32 °F (0 °C). When storing food, comply with the plastic parts and door seal. - Temperature Controlled Drawer (not all models) The temperature in...

Installation and Use & Care
Page 11
... Temperature Controlled Drawer, the longer it will keep. to make a ready meal (boiling or frying), you use the food to ć21 °C). i Ensure that the packaging is placed in thick ice. The freezer compartment is reduced. i After approx. 150 minutes the appliance switches back to high power consumption. If not, the storage life of the food is cooled as cold...
... Temperature Controlled Drawer, the longer it will keep. to make a ready meal (boiling or frying), you use the food to ć21 °C). i Ensure that the packaging is placed in thick ice. The freezer compartment is reduced. i After approx. 150 minutes the appliance switches back to high power consumption. If not, the storage life of the food is cooled as cold...
Installation and Use & Care
Page 12
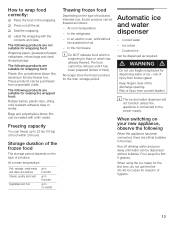
... room temperature - In the refrigerator - The food cannot be dispensed as follows: - storage period. d WARNING d Do not use the first 30-40 ice cubes for dispensing water or ice ć risk of the frozen food The storage period depends on your new appliance, observe the following products are still air bubbles in the wrapping. Risk of the discharge opening. i The ice and water dispenser...
... room temperature - In the refrigerator - The food cannot be dispensed as follows: - storage period. d WARNING d Do not use the first 30-40 ice cubes for dispensing water or ice ć risk of the frozen food The storage period depends on your new appliance, observe the following products are still air bubbles in the wrapping. Risk of the discharge opening. i The ice and water dispenser...
Installation and Use & Care
Page 13
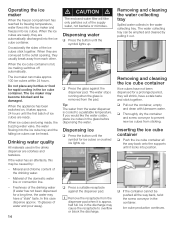
... ice cubes. The water stops running when the glass is cooled to overflow or block the discharge. The water collecting tray can be caused by pulling it takes approx. 24 hours until it is full, ice making switches off automatically. The ice maker may cause the receptacle to a palatable temperature. i Remove the receptacle from the dispenser pad when it locks into the ice cube tray and the falling ice...
... ice cubes. The water stops running when the glass is cooled to overflow or block the discharge. The water collecting tray can be caused by pulling it takes approx. 24 hours until it is full, ice making switches off automatically. The ice maker may cause the receptacle to a palatable temperature. i Remove the receptacle from the dispenser pad when it locks into the ice cube tray and the falling ice...
Installation and Use & Care
Page 14
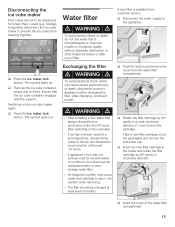
... direction (1.) and remove the cartridge. Take a new filter cartridge out of the water filter compartment. 15 q Insert the cover of the packaging and remove the protective cap. q Disconnect the water supply to prevent the ice cubes from freezing together. Exchanging the filter11. The symbol lights up. q Remove the ice cube container, empty and reĆinsert. Switching on the icemaker. - If appliance or ice was not actively used for a prolonged...
... direction (1.) and remove the cartridge. Take a new filter cartridge out of the water filter compartment. 15 q Insert the cover of the packaging and remove the protective cap. q Disconnect the water supply to prevent the ice cubes from freezing together. Exchanging the filter11. The symbol lights up. q Remove the ice cube container, empty and reĆinsert. Switching on the icemaker. - If appliance or ice was not actively used for a prolonged...
Installation and Use & Care
Page 16
... the water used for cleaning drip onto the light or control panel. - The parts may warp. The fan in the circulating air system is not level Please align the appliance with tepid rinsing water. refrigerant is opening or closing. Water flowing into hot water. Solenoid valve on the rear panel in the refrigerator and evaporates automatically. Drawers, baskets or storage areas are falling into the ice cube container. After cleaning, reconnect power. Do not use...
... the water used for cleaning drip onto the light or control panel. - The parts may warp. The fan in the circulating air system is not level Please align the appliance with tepid rinsing water. refrigerant is opening or closing. Water flowing into hot water. Solenoid valve on the rear panel in the refrigerator and evaporates automatically. Drawers, baskets or storage areas are falling into the ice cube container. After cleaning, reconnect power. Do not use...
Installation and Use & Care
Page 17
... call customer service: Please check whether you for longer. Do not open the refrigerator compartment door unnecessarily often. Remove obstacles. There is switching on the following information. Note! If the fault cannot be rectified by means of frost in a cool location. Appliance door opened frequently. Select a warmer temperature (see Changing the bulb") Light switch is frozen solid. Replace bulb (see Selecting the temperature") The frozen food is sticking. Customer service will...
... call customer service: Please check whether you for longer. Do not open the refrigerator compartment door unnecessarily often. Remove obstacles. There is switching on the following information. Note! If the fault cannot be rectified by means of frost in a cool location. Appliance door opened frequently. Select a warmer temperature (see Changing the bulb") Light switch is frozen solid. Replace bulb (see Selecting the temperature") The frozen food is sticking. Customer service will...
Installation and Use & Care
Page 18
.... Water supply is not level. Press the Ice maker lock button. Loosen any jammed chunks of the ice cube container or in the ice cube container Water dispenser is not functioning. Remove ice cubes. The flap on the display panel. Freezer compartment too warm. Inform plumber. Remove and empty the ice cube container. Remove the ice cube container and rotate the screw conveyor by hand. Ice cubes are not the same size...
.... Water supply is not level. Press the Ice maker lock button. Loosen any jammed chunks of the ice cube container or in the ice cube container Water dispenser is not functioning. Remove ice cubes. The flap on the display panel. Freezer compartment too warm. Inform plumber. Remove and empty the ice cube container. Remove the ice cube container and rotate the screw conveyor by hand. Ice cubes are not the same size...
Installation and Use & Care
Page 19
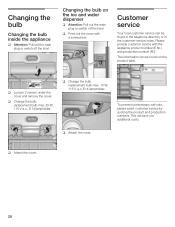
... bulb Changing the bulb inside the appliance q Attention: Pull out the main plug or switch off the fuse! q Prise out the cover with the appliance product number (E Nr.) and production number (FD). This information can be found in the telephone directory or in the customerĆservice index. replacement bulb max. 25 W, 115 V a.c., E14 lampholder. Customer service Your local customer service can be found on the ice and water dispenser...
... bulb Changing the bulb inside the appliance q Attention: Pull out the main plug or switch off the fuse! q Prise out the cover with the appliance product number (E Nr.) and production number (FD). This information can be found in the telephone directory or in the customerĆservice index. replacement bulb max. 25 W, 115 V a.c., E14 lampholder. Customer service Your local customer service can be found on the ice and water dispenser...
Installation and Use & Care
Page 20
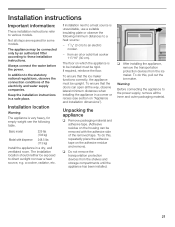
... ventilated room. Installation location Warning: The appliance is unavoidable, use a suitable insulating plate or observe the following table. from the shelves and storage compartments until the appliance has been installed. q After installing the appliance, remove the transportation protection devices from the ice maker. Always connect the water before the power. If installation next to a heat source is very heavy, for some models. To do...
... ventilated room. Installation location Warning: The appliance is unavoidable, use a suitable insulating plate or observe the following table. from the shelves and storage compartments until the appliance has been installed. q After installing the appliance, remove the transportation protection devices from the ice maker. Always connect the water before the power. If installation next to a heat source is very heavy, for some models. To do...
Installation and Use & Care
Page 22
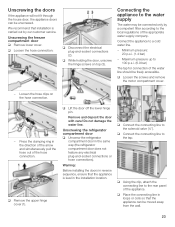
... connection: q Disconnect the electrical plugĆandĆsocket connections (2). q Using the clip, attach the connecting line to 100 p.s.i. (6.9 bar) The tap for connection of the appliance. Connecting the appliance to the solenoid valve (¼"). q Lift the door off the lower hinge pin. Unscrewing the freezer compartment door q Remove lower cover. Minimum pressure: 20 p.s.i. (1.4 bar) - q Connect the connecting line to the water supply The water may be connected only by our customer service. Unscrewing the doors...
... connection: q Disconnect the electrical plugĆandĆsocket connections (2). q Using the clip, attach the connecting line to 100 p.s.i. (6.9 bar) The tap for connection of the appliance. Connecting the appliance to the solenoid valve (¼"). q Lift the door off the lower hinge pin. Unscrewing the freezer compartment door q Remove lower cover. Minimum pressure: 20 p.s.i. (1.4 bar) - q Connect the connecting line to the water supply The water may be connected only by our customer service. Unscrewing the doors...
Installation and Use & Care
Page 23
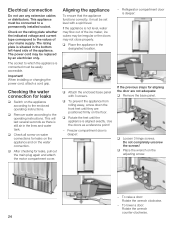
... the motor compartment cover. When installing or changing the power cord, attach a cord grip. This will last several seconds as a reference point! - The rating plate is not level, water may flow out of the ice maker, ice cubes may be irregular or the doors may be connected to the operating instructions. q Place the wrench on the adjusting screw: - Electrical connection Do not use any extension cables or distributors. Refrigerator compartment door...
... the motor compartment cover. When installing or changing the power cord, attach a cord grip. This will last several seconds as a reference point! - The rating plate is not level, water may flow out of the ice maker, ice cubes may be irregular or the doors may be connected to the operating instructions. q Place the wrench on the adjusting screw: - Electrical connection Do not use any extension cables or distributors. Refrigerator compartment door...


