

User Guide
Page 1
... and troubleshooting, videos, product registration, parts, and more. Quick Release™ 10.ReadyTools™ Dial Cord Wrap 11. Floor Nozzle 3. SmartMix Dial 11 13 1 2 3 4 5 6 9 10 12 Go online for first use, including setting up, using and maintaining your new purchase! This guide has everything you need to support.BISSELL.com. DirtLifter 5. 2-in -1 Tank 9 After-Cleaning Care 9 Storing Your Machine 10 Troubleshooting 10 Product View 1. PROHEAT® PET TURBO DEEP CLEANER MODEL 1799V What's in the Box 3 Cleaning Formulas 3 Assembly...
... and troubleshooting, videos, product registration, parts, and more. Quick Release™ 10.ReadyTools™ Dial Cord Wrap 11. Floor Nozzle 3. SmartMix Dial 11 13 1 2 3 4 5 6 9 10 12 Go online for first use, including setting up, using and maintaining your new purchase! This guide has everything you need to support.BISSELL.com. DirtLifter 5. 2-in -1 Tank 9 After-Cleaning Care 9 Storing Your Machine 10 Troubleshooting 10 Product View 1. PROHEAT® PET TURBO DEEP CLEANER MODEL 1799V What's in the Box 3 Cleaning Formulas 3 Assembly...

User Guide
Page 2
...; Keep appliance on cord. See the "Cleaning Formulas" section of the appliance and its accessories. » Turn OFF all parts of this user guide. If it is properly grounded. IMPORTANT INFORMATION » If your appliance has a motorized Brush Roll, do not leave machine running in this guide. When using an electrical appliance, basic precautions should be directed towards equipment containing electrical components. » Use only the type and...
...; Keep appliance on cord. See the "Cleaning Formulas" section of the appliance and its accessories. » Turn OFF all parts of this user guide. If it is properly grounded. IMPORTANT INFORMATION » If your appliance has a motorized Brush Roll, do not leave machine running in this guide. When using an electrical appliance, basic precautions should be directed towards equipment containing electrical components. » Use only the type and...
User Guide
Page 3
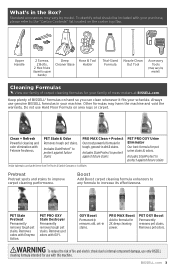
... to upper handle) Deep Cleaner Base Hose & Tool Holder Trial-Sized Nozzle Clean Formula Out Tool Accessory Tools (may vary by model. Upper Handle 2 Screws, 2 Bolts, 2 Hex Nuts (taped to formula for use Hard Floor Formula on the carton top flap. Do not use with OXY. What's in stains. Other formulas may vary by model) Cleaning Formulas View our family of mess-makers at BISSELL.com. Removes pet odors. BISSELL.com...
... to upper handle) Deep Cleaner Base Hose & Tool Holder Trial-Sized Nozzle Clean Formula Out Tool Accessory Tools (may vary by model. Upper Handle 2 Screws, 2 Bolts, 2 Hex Nuts (taped to formula for use Hard Floor Formula on the carton top flap. Do not use with OXY. What's in stains. Other formulas may vary by model) Cleaning Formulas View our family of mess-makers at BISSELL.com. Removes pet odors. BISSELL.com...
User Guide
Page 4
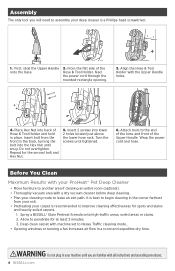
... lower 2 holes located just above the lower hose rack. Spray a BISSELL® Stain Pretreat formula onto high-traffic areas, soiled areas or stains. 2. Wrap the power cord and hose. Turn the screws until you will need to assemble your cleaning route to improve cleaning effectiveness for the second bolt and Hex Nut. 5. Before You Clean Maximum Results with your ProHeat® Pet Deep Cleaner • Move...
... lower 2 holes located just above the lower hose rack. Spray a BISSELL® Stain Pretreat formula onto high-traffic areas, soiled areas or stains. 2. Wrap the power cord and hose. Turn the screws until you will need to assemble your cleaning route to improve cleaning effectiveness for the second bolt and Hex Nut. 5. Before You Clean Maximum Results with your ProHeat® Pet Deep Cleaner • Move...
User Guide
Page 5
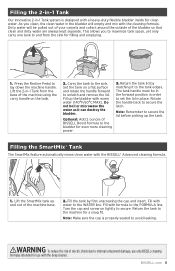
... component damage, use only BISSELL cleaning formulas intended for clean water. Fill up the bladder with a heavy-duty flexible bladder inside for use with the deep cleaner. Note: Remember to the sink. Lift the SmartMix tank up the tank. Fill with the BISSELL® Advanced cleaning formula. 1. Return...Tank The SmartMix feature automatically mixes clean water with water to the bladder for even more cleaning power. 3. Carry the tank to secure the lid before picking up and out of electric shock due to the machine for filling and emptying. 1. Set the tank on tightly to ...
... component damage, use only BISSELL cleaning formulas intended for clean water. Fill up the bladder with a heavy-duty flexible bladder inside for use with the deep cleaner. Note: Remember to the sink. Lift the SmartMix tank up the tank. Fill with the BISSELL® Advanced cleaning formula. 1. Return...Tank The SmartMix feature automatically mixes clean water with water to the bladder for even more cleaning power. 3. Carry the tank to secure the lid before picking up and out of electric shock due to the machine for filling and emptying. 1. Set the tank on tightly to ...

User Guide
Page 6
... to pick up appears clean. Choose a SmartMix® Setting. Plug the power cord into a properly grounded outlet. Cleaning Your Floors 1. Water Rinse: Will not put water and formula down . ATTENTION • To prevent damage to Floor Cleaning. 2. While pressing the trigger, make one slow pass forward and back to put cleaning formula on carpet. 3. Normal: For lightly soiled carpet. Each setting is secure and level. 6 BISSELL.com Set the...
... to pick up appears clean. Choose a SmartMix® Setting. Plug the power cord into a properly grounded outlet. Cleaning Your Floors 1. Water Rinse: Will not put water and formula down . ATTENTION • To prevent damage to Floor Cleaning. 2. While pressing the trigger, make one slow pass forward and back to put cleaning formula on carpet. 3. Normal: For lightly soiled carpet. Each setting is secure and level. 6 BISSELL.com Set the...
User Guide
Page 7
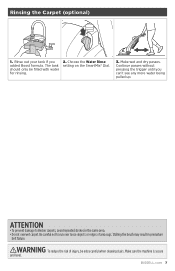
... with water for rinsing. 2. WARNING To reduce the risk of area rugs. Rinsing the Carpet (optional) 1. Rinse out your tank if you can't see any more water being pulled up. The tank should only be extra careful when cleaning stairs. Be careful not to Berber carpets, avoid repeated strokes in premature belt failure. Make wet and dry passes...
... with water for rinsing. 2. WARNING To reduce the risk of area rugs. Rinsing the Carpet (optional) 1. Rinse out your tank if you can't see any more water being pulled up. The tank should only be extra careful when cleaning stairs. Be careful not to Berber carpets, avoid repeated strokes in premature belt failure. Make wet and dry passes...
User Guide
Page 8
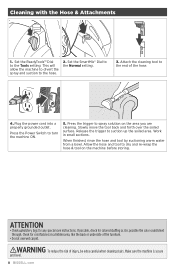
... hose and tool by suctioning warm water from a bowl. If possible, check for any special care instructions. Allow the hose and tool to turn the machine ON. 5. Plug the power cord into a properly grounded outlet. Press the Power Switch to dry and re-wrap the hose & tool on the area you are cleaning. Press the trigger to the end of the furniture. • Do not overwet carpet. Cleaning with the Hose & Attachments...
... hose and tool by suctioning warm water from a bowl. If possible, check for any special care instructions. Allow the hose and tool to turn the machine ON. 5. Plug the power cord into a properly grounded outlet. Press the Power Switch to dry and re-wrap the hose & tool on the area you are cleaning. Press the trigger to the end of the furniture. • Do not overwet carpet. Cleaning with the Hose & Attachments...

User Guide
Page 9
... help loosen hair or debris. 6. BISSELL.com 9 Remove the 2-in-1 Tank from electrical outlet before performing maintenance or troubleshooting. Rinse under and around the bladder. 3. Use the opposite side of fire, electric shock, or injury, turn power OFF and disconnect plug from the base by combing the bristles to lift the red rotor and white filter. Once your carpet. After-Cleaning Care 1. Insert the Nozzle Clean Out Tool...
... help loosen hair or debris. 6. BISSELL.com 9 Remove the 2-in-1 Tank from electrical outlet before performing maintenance or troubleshooting. Rinse under and around the bladder. 3. Use the opposite side of fire, electric shock, or injury, turn power OFF and disconnect plug from the base by combing the bristles to lift the red rotor and white filter. Once your carpet. After-Cleaning Care 1. Insert the Nozzle Clean Out Tool...
User Guide
Page 10
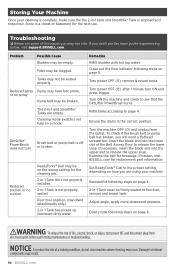
... Belt Access Door to function; Clean out the flow indicator following steps on page 8. Turn power OFF (O); Empty tank following steps on page 8. Troubleshooting Below are some of fire, electric shock, or injury, turn power OFF and disconnect plug from the outlet. Tanks may be seated properly. To check if the brush belt or pump belt has broken, you are empty. Examine the belt for replacement part...
... Belt Access Door to function; Clean out the flow indicator following steps on page 8. Turn power OFF (O); Empty tank following steps on page 8. Troubleshooting Below are some of fire, electric shock, or injury, turn power OFF and disconnect plug from the outlet. Tanks may be seated properly. To check if the brush belt or pump belt has broken, you are empty. Examine the belt for replacement part...

User Guide
Page 12
We're proud to your new product, including troubleshooting, product registration, parts, and more. Visit BISSELLsavespets.com to learn more ! BISSELL® proudly supports BISSELL Pet Foundation® and its mission to support.BISSELL.com. REGISTER INFO VIDEOS PARTS SUPPORT When you buy a BISSELL product, you help save homeless pets. But wait, there's more . Join us online for a complete guide to design products that help save pets, too. Go to help make pet messes, odors and pet homelessness disappear. We're Waggin' Our Tails!
We're proud to your new product, including troubleshooting, product registration, parts, and more. Visit BISSELLsavespets.com to learn more ! BISSELL® proudly supports BISSELL Pet Foundation® and its mission to support.BISSELL.com. REGISTER INFO VIDEOS PARTS SUPPORT When you buy a BISSELL product, you help save homeless pets. But wait, there's more . Join us online for a complete guide to design products that help save pets, too. Go to help make pet messes, odors and pet homelessness disappear. We're Waggin' Our Tails!


