
User's Guide
Page 3
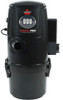
... including the following: READ ALL INSTRUCTIONS BEFORE USING YOUR GARAGE PRO VACUUM. This model is for any object into water, have ...bissell.com 800.237.7691 3 ug110-4025_18P0_208.indd 3 2/12/08 12:17:17 PM Always connect to install a proper outlet. To unplug, grasp the plug, not the cord. ■ Do not handle vacuum cleaner...■ Do not use without filters in place. ■ Keep appliance level. ■ Do not carry the vacuum cleaner while it is plugged in. ...extension cord. ■ Do not leave vacuum cleaner unattended when it is provided with wet hands. ■ Do not put any...
... including the following: READ ALL INSTRUCTIONS BEFORE USING YOUR GARAGE PRO VACUUM. This model is for any object into water, have ...bissell.com 800.237.7691 3 ug110-4025_18P0_208.indd 3 2/12/08 12:17:17 PM Always connect to install a proper outlet. To unplug, grasp the plug, not the cord. ■ Do not handle vacuum cleaner...■ Do not use without filters in place. ■ Keep appliance level. ■ Do not carry the vacuum cleaner while it is plugged in. ...extension cord. ■ Do not leave vacuum cleaner unattended when it is provided with wet hands. ■ Do not put any...
User's Guide
Page 7
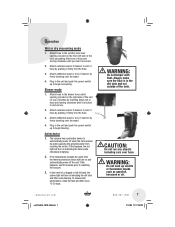
Operation Wet or dry vacuuming mode 1. Attach hose to end of hose and turning clockwise until it firmly into the hose. 3. Attach extension wand, if desired, to the wet/dry ...hose inlet opening (located on the right side of the unit on top of muffler) by inserting fitted end of hose by pushing it is in and secure. 2. Safety device 1. If this happens, the red light will turn on indicating the dirt tank and filter...firmly into the hose. Attach extension wand, if desired, to begin blowing. www.bissell.com 800.237.7691 7 ug110-4025_18P0_208.indd 7 2/12/08 12:17:20...
Operation Wet or dry vacuuming mode 1. Attach hose to end of hose and turning clockwise until it firmly into the hose. 3. Attach extension wand, if desired, to the wet/dry ...hose inlet opening (located on the right side of the unit on top of muffler) by inserting fitted end of hose by pushing it is in and secure. 2. Safety device 1. If this happens, the red light will turn on indicating the dirt tank and filter...firmly into the hose. Attach extension wand, if desired, to begin blowing. www.bissell.com 800.237.7691 7 ug110-4025_18P0_208.indd 7 2/12/08 12:17:20...
User's Guide
Page 8
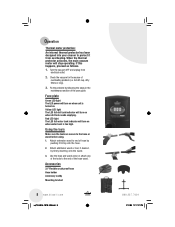
... of overheating problem (i.e. When the thermal protector activates, the main vacuum motor will turn on when dirt tank needs emptying. full dirt cup, dirty filters or clog). 3. Accessories 32" Flexible crush proof hose Hose holder Accessory caddy Mounting bracket 8 www.bissell.com ug110-4025_18P0_208.indd 8 800.237.7691 2/12/08 12:...the maintenance section of hose by firmly inserting onto the wand. 3. Operation Thermal motor protection: An internal thermal protector has been designed into your cleaner to protect it firmly onto the hose. 2. If this happens, proceed as follows. 1.
... of overheating problem (i.e. When the thermal protector activates, the main vacuum motor will turn on when dirt tank needs emptying. full dirt cup, dirty filters or clog). 3. Accessories 32" Flexible crush proof hose Hose holder Accessory caddy Mounting bracket 8 www.bissell.com ug110-4025_18P0_208.indd 8 800.237.7691 2/12/08 12:...the maintenance section of hose by firmly inserting onto the wand. 3. Operation Thermal motor protection: An internal thermal protector has been designed into your cleaner to protect it firmly onto the hose. 2. If this happens, proceed as follows. 1.
User's Guide
Page 10
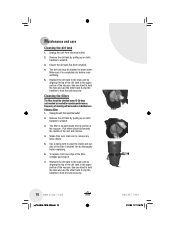
... clip the handles to the upper portion of the vacuum. Use one edge of cleaning will be washed in . 7. Frequency of the filter, collapse and snap in warm water. Unplug the unit from electrical outlet. 2. The filter is completely dry before replacing. 6. Use a damp cloth to wipe... the inside the top portion of the vacuum. To replace, hold one hand to hold the...
... clip the handles to the upper portion of the vacuum. Use one edge of cleaning will be washed in . 7. Frequency of the filter, collapse and snap in warm water. Unplug the unit from electrical outlet. 2. The filter is completely dry before replacing. 6. Use a damp cloth to wipe... the inside the top portion of the vacuum. To replace, hold one hand to hold the...
User's Guide
Page 11
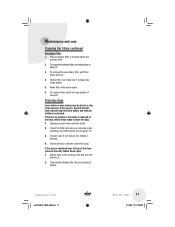
... steps: 1. Unplug vacuum from electrical outlet. 2. Check wet/dry or blower outlet for clogs. This should dislodge the clog by sucking in the vacuum. If this occurs, the LED full dirt tank indicator light will turn the power on page 10. 3. Check the filter and clean as necessary (see instructions on . 2. www.bissell.com ug110-4025_18P0_208...
... steps: 1. Unplug vacuum from electrical outlet. 2. Check wet/dry or blower outlet for clogs. This should dislodge the clog by sucking in the vacuum. If this occurs, the LED full dirt tank indicator light will turn the power on page 10. 3. Check the filter and clean as necessary (see instructions on . 2. www.bissell.com ug110-4025_18P0_208...
User's Guide
Page 13
... dirt container 4. www.bissell.com ug110-4025_18P0_208.indd 13 800.237.7691 13 2/12/08 12:17:28 PM Dirt container full 3. Check and clean filter 6. Contact us directly at 1-800-237-7691. Power cord not plugged in cleaner 4. Check/replace fuse or reset breaker 3. Empty tank and reattach Vacuum cleaner and tools won 't turn...
... dirt container 4. www.bissell.com ug110-4025_18P0_208.indd 13 800.237.7691 13 2/12/08 12:17:28 PM Dirt container full 3. Check and clean filter 6. Contact us directly at 1-800-237-7691. Power cord not plugged in cleaner 4. Check/replace fuse or reset breaker 3. Empty tank and reattach Vacuum cleaner and tools won 't turn...
User's Guide
Page 15
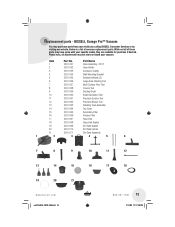
...12 203-0162 Precision Blower Tool 13 203-0163 Detailing Tools Assembly 14 203-0164 Top Cover 15 203-0165 Secondary Filter 16 203-0166 Primary Filter 17 203-0167 Hose Inlet 18 203-0168 Hose Inlet Gasket 19 203-0169 Dirt Tank Gasket 20 203-0170 Dirt... may not store on board your vacuum. Please note, all of common replacement parts. Below is a list of these parts may purchase parts from your specific model, they are available for purchase if desired. Item Part No. Replacement parts - BISSELL Garage Pro™ Vacuum You may have come with your retailer...
...12 203-0162 Precision Blower Tool 13 203-0163 Detailing Tools Assembly 14 203-0164 Top Cover 15 203-0165 Secondary Filter 16 203-0166 Primary Filter 17 203-0167 Hose Inlet 18 203-0168 Hose Inlet Gasket 19 203-0169 Dirt Tank Gasket 20 203-0170 Dirt... may not store on board your vacuum. Please note, all of common replacement parts. Below is a list of these parts may purchase parts from your specific model, they are available for purchase if desired. Item Part No. Replacement parts - BISSELL Garage Pro™ Vacuum You may have come with your retailer...
User's Guide
Page 16
... Grand Rapids, Michigan All rights reserved. Some states do not allow limitations on "If your warranty, contact BISSELL Consumer Services. BISSELL Garage Pro™ Vacuum This warranty gives you specific legal rights, and you . *EXCEPTIONS AND EXCLUSIONS FROM THE TERMS OF THE ...purchaser, for personal, and not commercial or rental service. Damage or malfunction caused by E-mail, telephone, or regular mail as filters, belts, or brushes. Website or E-mail: www.bissell.com Use the "Customer Services" tab. Friday 8 a.m. - 10 p.m. c o m 800.237.7691 ug110-4025_18P0_208.indd...
... Grand Rapids, Michigan All rights reserved. Some states do not allow limitations on "If your warranty, contact BISSELL Consumer Services. BISSELL Garage Pro™ Vacuum This warranty gives you specific legal rights, and you . *EXCEPTIONS AND EXCLUSIONS FROM THE TERMS OF THE ...purchaser, for personal, and not commercial or rental service. Damage or malfunction caused by E-mail, telephone, or regular mail as filters, belts, or brushes. Website or E-mail: www.bissell.com Use the "Customer Services" tab. Friday 8 a.m. - 10 p.m. c o m 800.237.7691 ug110-4025_18P0_208.indd...

