
User Guide
Page 1
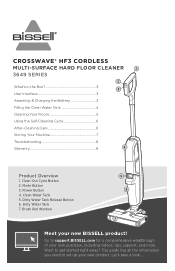
...Mode Button 3. Dirty Water Tank 7. This guide has all the information you need to set up your new purchase, including videos, tips, support, and more. Let's take a look... Go to get started right away? CROSSWAVE® HF3 CORDLESS MULTI-SURFACE HARD FLOOR CLEANER 1 3649 SERIES 2 What's in the Box 3 3 User Interface 3 Assembly & Charging the Battery 3 Filling the Clean Water Tank 4 Cleaning Your Floors 5 Using the Self-Cleaning Cycle 6 After-Cleaning Care 6 Storing Your Machine 7 Troubleshooting 8 Warranty 8 4 Product Overview 1. Power Button 4. Brush...
...Mode Button 3. Dirty Water Tank 7. This guide has all the information you need to set up your new purchase, including videos, tips, support, and more. Let's take a look... Go to get started right away? CROSSWAVE® HF3 CORDLESS MULTI-SURFACE HARD FLOOR CLEANER 1 3649 SERIES 2 What's in the Box 3 3 User Interface 3 Assembly & Charging the Battery 3 Filling the Clean Water Tank 4 Cleaning Your Floors 5 Using the Self-Cleaning Cycle 6 After-Cleaning Care 6 Storing Your Machine 7 Troubleshooting 8 Warranty 8 4 Product Overview 1. Power Button 4. Brush...
User Guide
Page 2
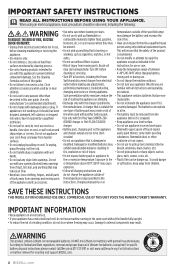
..., • Do not turn your appliance has a motorized brush roll, do not leave machine running in the same spot without filters in a fire. Turn OFF before it is required. For specific battery disposal instructions please contact Call2Recycle at SAVE THESE INSTRUCTIONS THIS MODEL IS FOR HOUSEHOLD USE ONLY. appliance except as a charger. • Do not use with vapors given off by cleaning process. • Risk...
..., • Do not turn your appliance has a motorized brush roll, do not leave machine running in the same spot without filters in a fire. Turn OFF before it is required. For specific battery disposal instructions please contact Call2Recycle at SAVE THESE INSTRUCTIONS THIS MODEL IS FOR HOUSEHOLD USE ONLY. appliance except as a charger. • Do not use with vapors given off by cleaning process. • Risk...
User Guide
Page 3
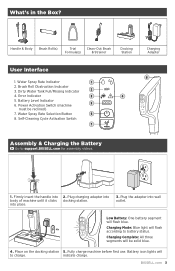
... machine before first use. Plug charging adapter into place. 3. Water Spray Rate Indicator 1 2. Plug the adapter into 2. Place on the docking station 5. indicate charge. Water Spray Rate Selection Button 6 8. Low Battery: One battery segment will flash blue. 4h Charging Mode: Blue light will be reclined) 7. Error Indicator 3 5. Firmly insert the handle into wall outlet. Battery Level Indicator 6. Battery icon lights will to support.BISSELL.com for assembly videos. 1. Handle & Body Brush Roll(s) Trial Clean-Out Brush...
... machine before first use. Plug charging adapter into place. 3. Water Spray Rate Indicator 1 2. Plug the adapter into 2. Place on the docking station 5. indicate charge. Water Spray Rate Selection Button 6 8. Low Battery: One battery segment will flash blue. 4h Charging Mode: Blue light will be reclined) 7. Error Indicator 3 5. Firmly insert the handle into wall outlet. Battery Level Indicator 6. Battery icon lights will to support.BISSELL.com for assembly videos. 1. Handle & Body Brush Roll(s) Trial Clean-Out Brush...
User Guide
Page 4
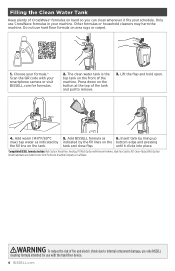
... due to remove. 3. Do not use CrossWave formulas in your smartphone camera or visit BISSELL.com for use only BISSELL cleaning formula intended for formulas. 2. The clean water tank is the top tank on hand so you can clean whenever it clicks into place. *Compatible BISSELL formulas include: Multi-Surface, Wood Floor, Area Rug, PET Multi-Surface with the hard floor device. 4 BISSELL.com tank and close flap. Press down on area rugs or carpet. 1. Add BISSELL formula...
... due to remove. 3. Do not use CrossWave formulas in your smartphone camera or visit BISSELL.com for use only BISSELL cleaning formula intended for formulas. 2. The clean water tank is the top tank on hand so you can clean whenever it clicks into place. *Compatible BISSELL formulas include: Multi-Surface, Wood Floor, Area Rug, PET Multi-Surface with the hard floor device. 4 BISSELL.com tank and close flap. Press down on area rugs or carpet. 1. Add BISSELL formula...
User Guide
Page 5
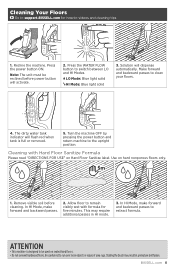
... in HI mode. 3. Use on Hard Floor Sanitize label. Cleaning with formula for how-to switch between LO and HI Modes. Allow floor to remain visibly wet with Hard Floor Sanitize Formula Please read "DIRECTIONS FOR USE" on hard nonporous floors only. 1. Recline the machine. Remove visible soil before power button will dispense automatically. Be careful not to the upright position. Press the WATER FLOW button to videos and cleaning tips. 1. Stalling the brush may...
... in HI mode. 3. Use on Hard Floor Sanitize label. Cleaning with formula for how-to switch between LO and HI Modes. Allow floor to remain visibly wet with Hard Floor Sanitize Formula Please read "DIRECTIONS FOR USE" on hard nonporous floors only. 1. Recline the machine. Remove visible soil before power button will dispense automatically. Be careful not to the upright position. Press the WATER FLOW button to videos and cleaning tips. 1. Stalling the brush may...
User Guide
Page 6
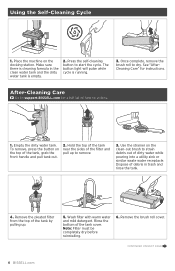
Using the Self-Cleaning Cycle 1. The button light will pulse while cycle is cleaning formula in trash and rinse the tank. 4. Dispose of the tank, grab the front handle and pull tank out. 2. Note: Filter must be completely dry before reinstalling. 6. Remove the brush roll cover. CONTINUED ON NEXT PAGE 6 BISSELL.com To remove, press the button on the top of debris in the clean water tank and the dirty water tank is empty. 2. Remove the...
Using the Self-Cleaning Cycle 1. The button light will pulse while cycle is cleaning formula in trash and rinse the tank. 4. Dispose of the tank, grab the front handle and pull tank out. 2. Note: Filter must be completely dry before reinstalling. 6. Remove the brush roll cover. CONTINUED ON NEXT PAGE 6 BISSELL.com To remove, press the button on the top of debris in the clean water tank and the dirty water tank is empty. 2. Remove the...
User Guide
Page 7
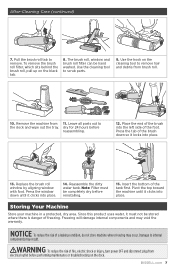
... foot. Note: Filter must not be hand washed. BISSELL.com 7 Use the cleaning tool to remove. Pivot the top toward the machine until it locks into the left side of freezing. Pull the brush roll tab to scrub parts. 9. Reassemble the dirty water tank. dry for 24 hours before reinstalling. 15. To remove the brush roll filter, which sits behind the brush roll, pull up on the cleaning tool to the...
... foot. Note: Filter must not be hand washed. BISSELL.com 7 Use the cleaning tool to remove. Pivot the top toward the machine until it locks into the left side of freezing. Pull the brush roll tab to scrub parts. 9. Reassemble the dirty water tank. dry for 24 hours before reinstalling. 15. To remove the brush roll filter, which sits behind the brush roll, pull up on the cleaning tool to the...
User Guide
Page 8
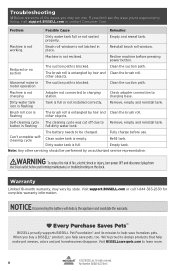
... the warranty. When you buy a BISSELL® product, you help save pets, too. All rights reserved. 8 Part Number 1631845 06/22 RevG Reinstall brush roll window. Reduced or no suction The suction path is full. other objects. Empty tank. We're proud to be performed by an authorized service representative. Fully charge before pressing power button. Clean the suction path. motor operation Clean the suction path. Self-cleaning cycle The cleaning...
... the warranty. When you buy a BISSELL® product, you help save pets, too. All rights reserved. 8 Part Number 1631845 06/22 RevG Reinstall brush roll window. Reduced or no suction The suction path is full. other objects. Empty tank. We're proud to be performed by an authorized service representative. Fully charge before pressing power button. Clean the suction path. motor operation Clean the suction path. Self-cleaning cycle The cleaning...


