

User Guide
Page 2
... making any other user servicing adjustments mentioned in an environmentally responsible fashion according to national guidelines. Do not use the BERNINA original stitch plate. Do not pull or push fabric while stitching, this manual. No grounding means is intended for... examination, repair, electrical or mechanical adjustment. 4. To disconnect, turn all instructions before using the embroidery module. 18. Use this sewing computer. Special care is marked with the sewing computer. 2. A double insulated product is required ...
... making any other user servicing adjustments mentioned in an environmentally responsible fashion according to national guidelines. Do not use the BERNINA original stitch plate. Do not pull or push fabric while stitching, this manual. No grounding means is intended for... examination, repair, electrical or mechanical adjustment. 4. To disconnect, turn all instructions before using the embroidery module. 18. Use this sewing computer. Special care is marked with the sewing computer. 2. A double insulated product is required ...

User Guide
Page 3
...creativity to keep you with the large embroidery area, the concise, easy-to-learn user interface and the many possibilities to customize your bernette Deco 340. In order to get the full benefit of available embroidery designs, educational publications and useful accessories we...to enhance your BERNINA dealer; P.Horisberger, Productmanager BERNINA International AG - 8266 Steckborn / Switzerland This product was designed and built to the highest standards in the BERNINA sewing family and we can support you will help , ideas and embroidery essentials, to buy the bernette Deco 340.
...creativity to keep you with the large embroidery area, the concise, easy-to-learn user interface and the many possibilities to customize your bernette Deco 340. In order to get the full benefit of available embroidery designs, educational publications and useful accessories we...to enhance your BERNINA dealer; P.Horisberger, Productmanager BERNINA International AG - 8266 Steckborn / Switzerland This product was designed and built to the highest standards in the BERNINA sewing family and we can support you will help , ideas and embroidery essentials, to buy the bernette Deco 340.

User Guide
Page 4
Contents 3 Important Safety Instructions 1 Welcome 2 Embroidery Computer Overview 4- 6 Getting Ready to Embroider 7- 20 Important Embroidery Information 21- 24 Key Operations 25- 35 Embroidery 36- 40 Lettering 41- 45 Editing and Combining Designs 46- 53 Design Transfer and Compatibility 54- 58 Care and Maintenance 59- 60 Troubleshooting 61 Index 62 Built-in Design Chart Appendix Table of Preset Colors Appendix
Contents 3 Important Safety Instructions 1 Welcome 2 Embroidery Computer Overview 4- 6 Getting Ready to Embroider 7- 20 Important Embroidery Information 21- 24 Key Operations 25- 35 Embroidery 36- 40 Lettering 41- 45 Editing and Combining Designs 46- 53 Design Transfer and Compatibility 54- 58 Care and Maintenance 59- 60 Troubleshooting 61 Index 62 Built-in Design Chart Appendix Table of Preset Colors Appendix
User Guide
Page 5
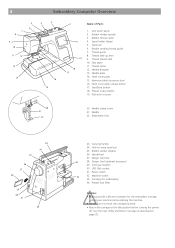
... Machine socket 33. Presser foot lifter Caution: • Always provide sufficient clearance for embroidery) 34. Thread tension dial 10. Design Card slot 34 28. Carriage (for the embroidery carriage behind your machine before starting the machine. • Do not force to move ...cover plate release button 17. Bobbin winder spindle 3. Extension table (accessory box) 16. Bobbin winding thread guide 7. Pocket for extra spool pin 25. 4 Embroidery Computer Overview 5 4 3 6 7 8 9 10 11 12 13 14 16 15 2 Name of Parts 1 19 18 17 1. Thread take-up ...
... Machine socket 33. Presser foot lifter Caution: • Always provide sufficient clearance for embroidery) 34. Thread tension dial 10. Design Card slot 34 28. Carriage (for the embroidery carriage behind your machine before starting the machine. • Do not force to move ...cover plate release button 17. Bobbin winder spindle 3. Extension table (accessory box) 16. Bobbin winding thread guide 7. Pocket for extra spool pin 25. 4 Embroidery Computer Overview 5 4 3 6 7 8 9 10 11 12 13 14 16 15 2 Name of Parts 1 19 18 17 1. Thread take-up ...
User Guide
Page 6
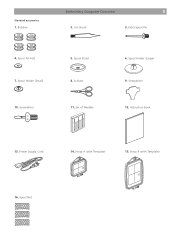
Spool Stand 8. Spool Pin Felt 7. Hoop A (with Template) 16. Standard accessories 1. Bobbins Embroidery Computer Overview 5 2. Set of Needles 6. Spool Net Lint Brush 3. Screwdriver 5. Hoop B (with Template) 15. Scissors 11. Extra Spool Pin 4. Screwdriver 12. Instruction Book 13. Power Supply Cord 14. Spool Holder (Large) 9. Spool Holder (Small) 10.
Spool Stand 8. Spool Pin Felt 7. Hoop A (with Template) 16. Standard accessories 1. Bobbins Embroidery Computer Overview 5 2. Set of Needles 6. Spool Net Lint Brush 3. Screwdriver 5. Hoop B (with Template) 15. Scissors 11. Extra Spool Pin 4. Screwdriver 12. Instruction Book 13. Power Supply Cord 14. Spool Holder (Large) 9. Spool Holder (Small) 10.
User Guide
Page 7
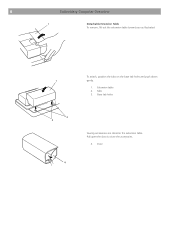
To attach, position the tabs on the base tab holes and push down 1 gently. 1. Tabs 3. 6 Embroidery Computer Overview 1 Detachable Extension Table To remove, lift out the extension table toward you as illustrated. Door Base tab holes 2 3 4 Sewing accessories are stored in the extension table. Extension table 2. Pull open the door to store the accessories. 4.
To attach, position the tabs on the base tab holes and push down 1 gently. 1. Tabs 3. 6 Embroidery Computer Overview 1 Detachable Extension Table To remove, lift out the extension table toward you as illustrated. Door Base tab holes 2 3 4 Sewing accessories are stored in the extension table. Extension table 2. Pull open the door to store the accessories. 4.
User Guide
Page 8
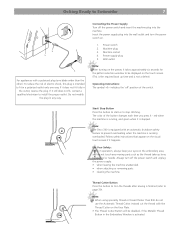
...Instead cut the thread with an automatic shutdown safety feature to fit in the Embroidery Window is running , and green when it - Power supply plug 5. Insert the power supply plug into the machine. Note: The Deco 340 is stopped. The color of the button changes each time you press it... is equipped with the Thread Cutter on the embroidery area, and do not use the Automatic Thread Cutter. Note: • When using...
...Instead cut the thread with an automatic shutdown safety feature to fit in the Embroidery Window is running , and green when it - Power supply plug 5. Insert the power supply plug into the machine. Note: The Deco 340 is stopped. The color of the button changes each time you press it... is equipped with the Thread Cutter on the embroidery area, and do not use the Automatic Thread Cutter. Note: • When using...
User Guide
Page 9
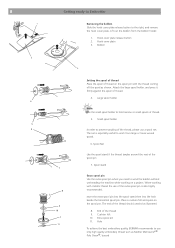
... on a project. End of thread on the spool pin with metallic thread the use only high quality embroidery thread such as Mettler Metrosene+® Poly Sheen®, Isacord Hole To achieve the best embroidery quality, BERNINA recommends to prevent tangling of thread. 4. Attach the large spool holder, and press it firmly against the...
... on a project. End of thread on the spool pin with metallic thread the use only high quality embroidery thread such as Mettler Metrosene+® Poly Sheen®, Isacord Hole To achieve the best embroidery quality, BERNINA recommends to prevent tangling of thread. 4. Attach the large spool holder, and press it firmly against the...
User Guide
Page 10
... automatically. When the bobbin is fully wound it will stop the machine then return the bobbin winder spindle to the right. To achieve the best embroidery quality, BERNINA recommends to the outside. Put the bobbin on the bobbin winder spindle. 2 Bobbin winder spindle Push the spindle to the left. Press the Start...
... automatically. When the bobbin is fully wound it will stop the machine then return the bobbin winder spindle to the right. To achieve the best embroidery quality, BERNINA recommends to the outside. Put the bobbin on the bobbin winder spindle. 2 Bobbin winder spindle Push the spindle to the left. Press the Start...
User Guide
Page 12
This will help you to its highest position. 1. Turn the handwheel counterclockwise to bring the needle to place the embroidery hoop under the thread guide plate (A). Thread guide plate The presser foot can be raised about 6 mm (1/4") higher than the normal up position. Presser foot ...
This will help you to its highest position. 1. Turn the handwheel counterclockwise to bring the needle to place the embroidery hoop under the thread guide plate (A). Thread guide plate The presser foot can be raised about 6 mm (1/4") higher than the normal up position. Presser foot ...

User Guide
Page 15
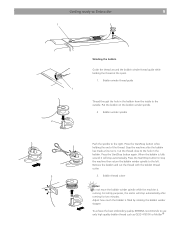
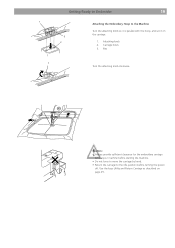
Draw the needle thread to the thread holder leaving an inch of free thread. 3. Hold the needle thread with your finger. 1. Loop of the bobbin thread Pass the needle thread through the hole in the embroidery foot and draw it up to bring up the Bobbin Thread Raise the presser foot lifter. Needle thread 1 2 Turn the handwheel one complete turn toward you. Thread holder 3 4 Hole 4. 14 1 Getting Ready to Embroider Drawing up a loop of the bobbin thread. 2.
Draw the needle thread to the thread holder leaving an inch of free thread. 3. Hold the needle thread with your finger. 1. Loop of the bobbin thread Pass the needle thread through the hole in the embroidery foot and draw it up to bring up the Bobbin Thread Raise the presser foot lifter. Needle thread 1 2 Turn the handwheel one complete turn toward you. Thread holder 3 4 Hole 4. 14 1 Getting Ready to Embroider Drawing up a loop of the bobbin thread. 2.
User Guide
Page 16
... most applications this adjustment will give suitable upper thread tension. The initial position for every project. Depending on the material and the thickness of the embroidery thread, as well as of the upper thread with the thread tension dial (9. Adjust the upper thread tension according to a lower number. 3 1. Reduce the 4 tension...
... most applications this adjustment will give suitable upper thread tension. The initial position for every project. Depending on the material and the thickness of the embroidery thread, as well as of the upper thread with the thread tension dial (9. Adjust the upper thread tension according to a lower number. 3 1. Reduce the 4 tension...
User Guide
Page 18
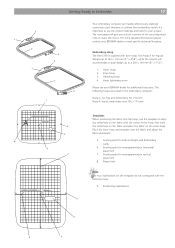
... the fabric and place the fabric on the template do not correspond with the reference lines. 9. Embroidery Hoop The Deco 340 is important to use the template to make this choice. Place the inner hoop and template over .../2"). 1. Inner hoop 3. Starting point for monogramming in designs and Embroidery cards. 6. Hoop tightening screw Please see your BERNINA dealer for built-in horizontal placement 7. Starting point for additional hoop sizes. Use hoop A for your BERNINA dealer or read specific technical literature. Attaching knob 4. Positioning indentations...
... the fabric and place the fabric on the template do not correspond with the reference lines. 9. Embroidery Hoop The Deco 340 is important to use the template to make this choice. Place the inner hoop and template over .../2"). 1. Inner hoop 3. Starting point for monogramming in designs and Embroidery cards. 6. Hoop tightening screw Please see your BERNINA dealer for built-in horizontal placement 7. Starting point for additional hoop sizes. Use hoop A for your BERNINA dealer or read specific technical literature. Attaching knob 4. Positioning indentations...
User Guide
Page 19
..., do not use of the outer hoop. 6 d) Push the inner hoop into the outer hoop e) Tighten the screw with the fabric onto the Deco 340. this is correctly placed. 18 Getting Ready to Embroider There are embroidering several pieces with the same fabric and stabilizer. 7 8 4 5 Important: ...When placing the fabric on the embroidery hoop, always place the outer hoop on a flat surface. c) Pick up the inner hoop and the fabric together and place them on the thickness...
..., do not use of the outer hoop. 6 d) Push the inner hoop into the outer hoop e) Tighten the screw with the fabric onto the Deco 340. this is correctly placed. 18 Getting Ready to Embroider There are embroidering several pieces with the same fabric and stabilizer. 7 8 4 5 Important: ...When placing the fabric on the embroidery hoop, always place the outer hoop on a flat surface. c) Pick up the inner hoop and the fabric together and place them on the thickness...
User Guide
Page 20
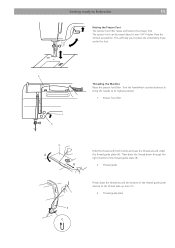
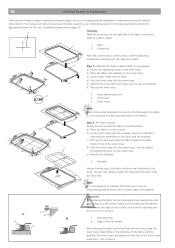
Carriage holes 3. Caution: • Always provide sufficient clearance for the embroidery carriage behind your machine before starting the machine. • Do not force to move the carriage by hand. • Return the carriage to the Machine Turn the attaching knob so it is parallel with the hoop, and set it on page 25. Attaching knob 2. Getting Ready to Embroider 19 1 3 2 Attaching the Embroidery Hoop to the idle position before turning the power off. Pins 1 Turn the attaching knob clockwise. Use the keys Utility and Return Carriage as described on the carriage. 1.
Carriage holes 3. Caution: • Always provide sufficient clearance for the embroidery carriage behind your machine before starting the machine. • Do not force to move the carriage by hand. • Return the carriage to the Machine Turn the attaching knob so it is parallel with the hoop, and set it on page 25. Attaching knob 2. Getting Ready to Embroider 19 1 3 2 Attaching the Embroidery Hoop to the idle position before turning the power off. Pins 1 Turn the attaching knob clockwise. Use the keys Utility and Return Carriage as described on the carriage. 1.

User Guide
Page 21
... stabilizer to wrong side of fabric for more stability • sparingly use spray adhesive and spray form a distance of the embroidery after stitching • stabilizer will remain under larger embroidered areas Application: For all stretchable fabrics Iron-on interfacing • must...8226; available in conjunction with temporary spray adhesive before hooping • carefully tear away excess stabilizer from the back of the embroidery after stitching • stabilizer will be embroidered onto the stabilizer. Smooth fabrics: to interfacing; Cutwork: to fix cut away ...
... stabilizer to wrong side of fabric for more stability • sparingly use spray adhesive and spray form a distance of the embroidery after stitching • stabilizer will remain under larger embroidered areas Application: For all stretchable fabrics Iron-on interfacing • must...8226; available in conjunction with temporary spray adhesive before hooping • carefully tear away excess stabilizer from the back of the embroidery after stitching • stabilizer will be embroidered onto the stabilizer. Smooth fabrics: to interfacing; Cutwork: to fix cut away ...
User Guide
Page 22
..., let dry or press gently with a thick or looped pile such as toweling. Water soluble stabilizer for fabric with a pile and lace embroidery • water soluble stabilizer looks like velvet Application: • ideal for toweling, velvet, bouclé knits, etc. • ideal for...side of the fabric Application: • ideal for fine, loosely woven fabrics, e.g. and heavyweight fabrics Embroidery test • always stitch an embroidery test on the project Important Embroidery Information 21 Spray starch for additional stiffening • spray starch is ideal for stiffening fine, soft ...
..., let dry or press gently with a thick or looped pile such as toweling. Water soluble stabilizer for fabric with a pile and lace embroidery • water soluble stabilizer looks like velvet Application: • ideal for toweling, velvet, bouclé knits, etc. • ideal for...side of the fabric Application: • ideal for fine, loosely woven fabrics, e.g. and heavyweight fabrics Embroidery test • always stitch an embroidery test on the project Important Embroidery Information 21 Spray starch for additional stiffening • spray starch is ideal for stiffening fine, soft ...
User Guide
Page 23
...cotton thread suitable for special effects in a wide range of colors for fine, delicate embroidery, or items that you purchase thread from a reputable BERNINA dealer in successful embroidery is particularly effective if you use of the Metallic Thread key. We strongly recommend that ...will be used with poor quality threads. 22 Important Embroidery Information Embroidery Threads One of the most important ...
...cotton thread suitable for special effects in a wide range of colors for fine, delicate embroidery, or items that you purchase thread from a reputable BERNINA dealer in successful embroidery is particularly effective if you use of the Metallic Thread key. We strongly recommend that ...will be used with poor quality threads. 22 Important Embroidery Information Embroidery Threads One of the most important ...
User Guide
Page 24
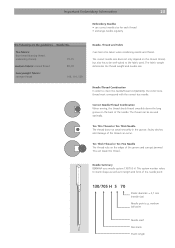
...the correct size thread must correspond with the correct size needle. This can occur. Needle Summary BERNINA uses needle system 130/705 H. fine fabrics: fine thread (darning thread, embroidery thread) 70-75 medium fabrics: normal thread 80-90 heavyweight fabrics: stronger thread 100, 110... Shank length Correct Needle/Thread Combination When sewing, the thread should travel smoothly in the groove. Important Embroidery Information 23 Embroidery Needles • use correct needle size for each thread • exchange needle regularly The following are the guidelines: Needle...
...the correct size thread must correspond with the correct size needle. This can occur. Needle Summary BERNINA uses needle system 130/705 H. fine fabrics: fine thread (darning thread, embroidery thread) 70-75 medium fabrics: normal thread 80-90 heavyweight fabrics: stronger thread 100, 110... Shank length Correct Needle/Thread Combination When sewing, the thread should travel smoothly in the groove. Important Embroidery Information 23 Embroidery Needles • use correct needle size for each thread • exchange needle regularly The following are the guidelines: Needle...
User Guide
Page 25
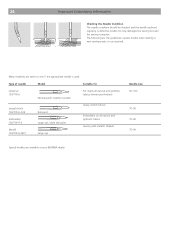
Many materials are available at your BERNINA dealer. Type of needle Model Suitable for Universal 130/705 H Normal point, slightly rounded For nearly all natural and synthetic fabrics (woven and knitted) Jersey/Stretch 130/705 H-SUK Embroidery 130/705 H-E Metafil 130/705 H-MET Ball point Large... eye, slight ball point Large eye Jersey, stretch fabrics Embroidery on all natural and synthetic fabrics sewing with metallic threads Needle size 60...
Many materials are available at your BERNINA dealer. Type of needle Model Suitable for Universal 130/705 H Normal point, slightly rounded For nearly all natural and synthetic fabrics (woven and knitted) Jersey/Stretch 130/705 H-SUK Embroidery 130/705 H-E Metafil 130/705 H-MET Ball point Large... eye, slight ball point Large eye Jersey, stretch fabrics Embroidery on all natural and synthetic fabrics sewing with metallic threads Needle size 60...


