

Instruction Manual
Page 9
... will fit in use . Caution: Always make sure that the machine is unplugged from power source and the main switch is on "O". Release the foot control to install the proper outlet. Use only foot controller type C-9000 manufactured by inserting the 2-hole plug into its connector ...connecting the power supply, make sure that the voltage and frequency shown on the rating plate is conforming with sewing machine model 20 and 25. 502020.75.28_021H2D0101_1010_IM_bernette 20 25_EN If it still does not fit, contact a qualified electrician to stop the sewing machine. Attention: Consult ...
... will fit in use . Caution: Always make sure that the machine is unplugged from power source and the main switch is on "O". Release the foot control to install the proper outlet. Use only foot controller type C-9000 manufactured by inserting the 2-hole plug into its connector ...connecting the power supply, make sure that the voltage and frequency shown on the rating plate is conforming with sewing machine model 20 and 25. 502020.75.28_021H2D0101_1010_IM_bernette 20 25_EN If it still does not fit, contact a qualified electrician to stop the sewing machine. Attention: Consult ...
Instruction Manual
Page 14
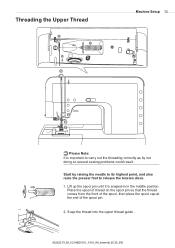
... of the spool, then place the spool cap at the end of the spool pin. 2. Lift up the spool pin until it is important to release the tension discs. 1. Snap the thread into the upper thread guide . 502020.75.28_021H2D0101_1010_IM_bernette 20 25_EN Threading the Upper Thread 2 1 3 3 5 Machine Setup 13 4 6 7 Please Note...
... of the spool, then place the spool cap at the end of the spool pin. 2. Lift up the spool pin until it is important to release the tension discs. 1. Snap the thread into the upper thread guide . 502020.75.28_021H2D0101_1010_IM_bernette 20 25_EN Threading the Upper Thread 2 1 3 3 5 Machine Setup 13 4 6 7 Please Note...

Instruction Manual
Page 16
Needle Threader Machine Setup 15 Raise the needle to the front of the needle Hold the thread loosely and release the lever slowly. Pull the thread through the needle eye forming a loop. The hook will turn and pass the thread through the needle eye. 502020....
Needle Threader Machine Setup 15 Raise the needle to the front of the needle Hold the thread loosely and release the lever slowly. Pull the thread through the needle eye forming a loop. The hook will turn and pass the thread through the needle eye. 502020....
Instruction Manual
Page 28
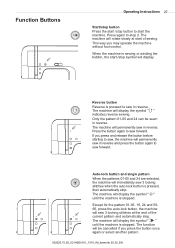
... will display the symbol " " until the machine is pressed to sew in reverse. The machine will permanently sew in reverse. This way you press and release the button before starting to sew forward. Only the pattern 01-05 and 24 can be cancelled if you press the button once again or...
... will display the symbol " " until the machine is pressed to sew in reverse. The machine will permanently sew in reverse. This way you press and release the button before starting to sew forward. Only the pattern 01-05 and 24 can be cancelled if you press the button once again or...

Instruction Manual
Page 35
Free arm Free-arm sewing is used to secure the threads at the beginning and at the end of a seam. 34 Basic Sewing Procedures Useful Skills Reverse Reverse stitching is convenient for sewing tubular areas such as pant hems and cuffs. 502020.75.28_021H2D0101_1010_IM_bernette 20 25_EN Press the reverse button and sew 4-5 stitches. The machine will sew forward when the button is released.
Free arm Free-arm sewing is used to secure the threads at the beginning and at the end of a seam. 34 Basic Sewing Procedures Useful Skills Reverse Reverse stitching is convenient for sewing tubular areas such as pant hems and cuffs. 502020.75.28_021H2D0101_1010_IM_bernette 20 25_EN Press the reverse button and sew 4-5 stitches. The machine will sew forward when the button is released.

Instruction Manual
Page 36
The black button releases automatically after sewing few stitches. Cardboard or thick fabric You also can place another piece of fabric with the same thickness at the beginning of a ...
The black button releases automatically after sewing few stitches. Cardboard or thick fabric You also can place another piece of fabric with the same thickness at the beginning of a ...


