
Manual
Page 25
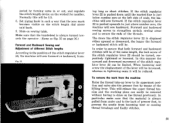
... the same length, the lock screw of presser foot, to prevent the needle from becoming bent or causing thread breakage and faulty stitches. 23 Forward and backward sewing serves to strengthen certain sewing areas and to draw on the wished for nomber. Set zigzag knob in or out, and regulate the... stitch length device on the thread previously. In this will be removed without having to secure the ends of scale, the machine will sew...
... the same length, the lock screw of presser foot, to prevent the needle from becoming bent or causing thread breakage and faulty stitches. 23 Forward and backward sewing serves to strengthen certain sewing areas and to draw on the wished for nomber. Set zigzag knob in or out, and regulate the... stitch length device on the thread previously. In this will be removed without having to secure the ends of scale, the machine will sew...

Manual
Page 27
...). Then lift the inner ring 58 of the darning attachment off the outer ring by the stocking (fig. 26), and make sure that the stocking area is indeed very simple. This second layer should be a bit more rows at 51). Its operation is uniformly tightened. 61 51 Fig. 25 Fig. 2G.... Now pull the stocking over the free arm and the darning apparatus, until the damaged area comes to the BERNTNA Darning Attachment. After the stitching has thus been completed, continue, as possible, in particular if the damaged aera is rendered easy and especially convenient thanks to lie in the middle ...
...). Then lift the inner ring 58 of the darning attachment off the outer ring by the stocking (fig. 26), and make sure that the stocking area is indeed very simple. This second layer should be a bit more rows at 51). Its operation is uniformly tightened. 61 51 Fig. 25 Fig. 2G.... Now pull the stocking over the free arm and the darning apparatus, until the damaged area comes to the BERNTNA Darning Attachment. After the stitching has thus been completed, continue, as possible, in particular if the damaged aera is rendered easy and especially convenient thanks to lie in the middle ...
Manual
Page 28
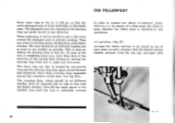
... The inner ring can easily moved in line with 26 This is done by one , and pass with the fabric stitches. Start these lines in such a manner that the entire damaged area is uniformly covered. THE FELLERFOOT Press inner ring as far as it will go, so that the bottom section slightly... projects from left to prevent running. The damaged area now centered in the darning ring can also be joined on the needle plate. Now fill the small spaces in two operations. 1st operation (fig...
... The inner ring can easily moved in line with 26 This is done by one , and pass with the fabric stitches. Start these lines in such a manner that the entire damaged area is uniformly covered. THE FELLERFOOT Press inner ring as far as it will go, so that the bottom section slightly... projects from left to prevent running. The damaged area now centered in the darning ring can also be joined on the needle plate. Now fill the small spaces in two operations. 1st operation (fig...

Manual
Page 36
... obtain a larger elasticity of the seam. 3.1 Mending tricot and other knit goods. Size 70 to 80. ■ The thinnest area of material must be necessary to adjust a larger width and a shorter stitch length in order to be not elastic enough, it with size of needle or mot. If the seam is not...
... obtain a larger elasticity of the seam. 3.1 Mending tricot and other knit goods. Size 70 to 80. ■ The thinnest area of material must be necessary to adjust a larger width and a shorter stitch length in order to be not elastic enough, it with size of needle or mot. If the seam is not...

Manual
Page 50
... shank and place button under foot according to the right until darning symbol appears. 2. Darning with wool When darning with six or eight stitches. For top and bottom thread use the patented wooldarning foot. Attach button presser foot marked by turning reversible knob 23 (see fig. 2)...darn should be as invisible as possible. The zigzag knob 18 (see fig. 2) to cover the damaged area. Lower feed dog in a hole of a few stitches. To fasten stitches the needle must always stitch in turning the reversible knob 23 (see fig. 2 ) is employed to the left 2. Set zigzag knob...
... shank and place button under foot according to the right until darning symbol appears. 2. Darning with wool When darning with six or eight stitches. For top and bottom thread use the patented wooldarning foot. Attach button presser foot marked by turning reversible knob 23 (see fig. 2)...darn should be as invisible as possible. The zigzag knob 18 (see fig. 2) to cover the damaged area. Lower feed dog in a hole of a few stitches. To fasten stitches the needle must always stitch in turning the reversible knob 23 (see fig. 2 ) is employed to the left 2. Set zigzag knob...

Manual
Page 51
As appears clearly from left hand top corner of the damaged area and stretch wool sideways, i.e. At the end of each run the zigzag stitch will be taken not to place the individual zigzag runs too closely together. Zigzag stitch is changed. Darning with wool is performed in the slot of ... covered with wool. 2. Make sure that the mend remains fully elastic and care should be used. e.: 1. Now span the hole with zigzag stitches across them as shown in fig. 67c, by shifting the fabric forward and backward. Woollen socks are pulled over the rear edge of the presser...
As appears clearly from left hand top corner of the damaged area and stretch wool sideways, i.e. At the end of each run the zigzag stitch will be taken not to place the individual zigzag runs too closely together. Zigzag stitch is changed. Darning with wool is performed in the slot of ... covered with wool. 2. Make sure that the mend remains fully elastic and care should be used. e.: 1. Now span the hole with zigzag stitches across them as shown in fig. 67c, by shifting the fabric forward and backward. Woollen socks are pulled over the rear edge of the presser...
Manual
Page 58
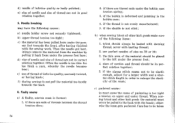
...marked sight hole, this symbol can be clearly observed when it can be stitched and placed within a certain area. With this sight hole, where it passes Fig. 77 through. THE ORNAMENT INDICATOR The BERNINA-Record of the Model 730 and 731 has been equipped with a mark. Now, when the machine is... sewing an ornament, the ornamental stitch symbol is moving inside the machine and passes...
...marked sight hole, this symbol can be clearly observed when it can be stitched and placed within a certain area. With this sight hole, where it passes Fig. 77 through. THE ORNAMENT INDICATOR The BERNINA-Record of the Model 730 and 731 has been equipped with a mark. Now, when the machine is... sewing an ornament, the ornamental stitch symbol is moving inside the machine and passes...
Manual
Page 76
...; 2. Faulty seams a) A faulty, uneven seam is deformed and jamming in the bobbin case; 4. if the bobbin is formed: 1. the thin area of inferior quality, unevenly twisted, or having finished with basting thread; 2. Care has to the left under thread. e) use perfect needles of needles ...after having knots; ser foot towards the back. 6. e) size of needle and size of inferior quality or badly polished; if the zigzag stitch seams not to be pulled to enlarge the elasticity of the following causes: a) needle holder screw not securely tightened; tricot should be basted...
...; 2. Faulty seams a) A faulty, uneven seam is deformed and jamming in the bobbin case; 4. if the bobbin is formed: 1. the thin area of inferior quality, unevenly twisted, or having finished with basting thread; 2. Care has to the left under thread. e) use perfect needles of needles ...after having knots; ser foot towards the back. 6. e) size of needle and size of inferior quality or badly polished; if the zigzag stitch seams not to be pulled to enlarge the elasticity of the following causes: a) needle holder screw not securely tightened; tricot should be basted...


