
Manual
Page 1
INSTRUCTION MANUAL MODEL BERNETTE 43/43D OFS=CP-5 - 5- 4 CP iii
INSTRUCTION MANUAL MODEL BERNETTE 43/43D OFS=CP-5 - 5- 4 CP iii
Manual
Page 2
DANGER-To REDUCE RISK OF ELECTRIC SHOCK An overlock machine should always be left needle see Page 14. Use only attachments recommended by the manufacturer as contained in for its intended use as described in the needle area, such as a toy. Return the overlock machine to the nearest authorized dealer or service center for instruction on removing left unattended when plugged in the instruction manual. 16. Do not use the proper needle plate. The wrong plate can cause the needle to make a narrow or rolled hem. 4. Always replace bulb with any air openings blocked. Your lower ...
DANGER-To REDUCE RISK OF ELECTRIC SHOCK An overlock machine should always be left needle see Page 14. Use only attachments recommended by the manufacturer as contained in for its intended use as described in the needle area, such as a toy. Return the overlock machine to the nearest authorized dealer or service center for instruction on removing left unattended when plugged in the instruction manual. 16. Do not use the proper needle plate. The wrong plate can cause the needle to make a narrow or rolled hem. 4. Always replace bulb with any air openings blocked. Your lower ...

Manual
Page 3
CONTENTS 1. NAMES AND FUNCTION 2. SEWING APPLICATIONS 15. SEWING APPLICATIONS 16. MAIN PARTS. PREPARATION FOR THREADING 5. ADJUSTING THREAD TENSIONS 8. CLEANING AND OILING 14. BLIND HEMMING 21. ADJUSTING STITCH LENGTH 11. THREADING YOUR MACHINE 6. CHART FOR TENSION ADJUSTMENT 9. REPLACING THE CUTTING BLADE 13. HOW TO MAKE NARROW OR ROLLED EDGE 18. SETTING UP YOUR MACHINE 4. REPLACING THE NEEDLES 12. TRIAL SEWING 7. DIFFERENTIAL FEED (DF-TYPE ONLY) 19. PROBLEMS AND CAUSES Page 2 3 4 5 6 8 9 11 12 13 14 15 16 17 18 19 20 21 22 23 24 GATHERING/...
CONTENTS 1. NAMES AND FUNCTION 2. SEWING APPLICATIONS 15. SEWING APPLICATIONS 16. MAIN PARTS. PREPARATION FOR THREADING 5. ADJUSTING THREAD TENSIONS 8. CLEANING AND OILING 14. BLIND HEMMING 21. ADJUSTING STITCH LENGTH 11. THREADING YOUR MACHINE 6. CHART FOR TENSION ADJUSTMENT 9. REPLACING THE CUTTING BLADE 13. HOW TO MAKE NARROW OR ROLLED EDGE 18. SETTING UP YOUR MACHINE 4. REPLACING THE NEEDLES 12. TRIAL SEWING 7. DIFFERENTIAL FEED (DF-TYPE ONLY) 19. PROBLEMS AND CAUSES Page 2 3 4 5 6 8 9 11 12 13 14 15 16 17 18 19 20 21 22 23 24 GATHERING/...

Manual
Page 4
The motor and handwheel turn the power switch to "off the overlook machine to avoid any parts. * When cleaning or adjusting the maachine. • BEFORE YOU USE.. 1. It willdo professional work on blouses, skirts, shirts, slacks, coats and trimming handkerchiefs, towels, tableclothes, and so on the sewing materials. 2. Do not touch the hand wheel, the knife or the needles when the machine is running. 2. Do trial sewing by using the same sewing materials you have finished your eyes on all kinds of fabric, both light and heavy, including cotton, wool, rayon, tricot, jersey, and ...
The motor and handwheel turn the power switch to "off the overlook machine to avoid any parts. * When cleaning or adjusting the maachine. • BEFORE YOU USE.. 1. It willdo professional work on blouses, skirts, shirts, slacks, coats and trimming handkerchiefs, towels, tableclothes, and so on the sewing materials. 2. Do not touch the hand wheel, the knife or the needles when the machine is running. 2. Do trial sewing by using the same sewing materials you have finished your eyes on all kinds of fabric, both light and heavy, including cotton, wool, rayon, tricot, jersey, and ...
Manual
Page 5
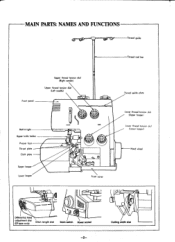
MAIN PARTS: NAMES AND FUNCTIONS Thread guide Thread reel bar Front panel Upper thread tension dial (Right needle) Upper thread tension dial (Left needle) Built in light Upper knife holder Presser foot Throat plate ----e Cloth plate Upper looper Lower looper • IYI /slime Front cover Thread guide plate Lower thread tension dial (Upper looper) Lower thread tension dial (Lower looper) Hand wheel 0 791/ 4 0 Differential feed adjustment dial (DF-type only) Stitch length dial Main switch Power socket -2- Cutting width dial
MAIN PARTS: NAMES AND FUNCTIONS Thread guide Thread reel bar Front panel Upper thread tension dial (Right needle) Upper thread tension dial (Left needle) Built in light Upper knife holder Presser foot Throat plate ----e Cloth plate Upper looper Lower looper • IYI /slime Front cover Thread guide plate Lower thread tension dial (Upper looper) Lower thread tension dial (Lower looper) Hand wheel 0 791/ 4 0 Differential feed adjustment dial (DF-type only) Stitch length dial Main switch Power socket -2- Cutting width dial
Manual
Page 6
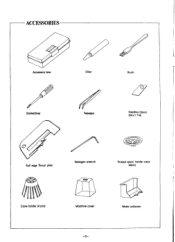
ACCESSORIES Accessory box Oiler Brush Screwdriver Tweezers Needles (3pcs) (HAxl #14) Roll edge Throat plate Hexagon wrench Thread spool holder caps (4pcs) Cone holder (4 pcs) Machine cover Waste collector -3-
ACCESSORIES Accessory box Oiler Brush Screwdriver Tweezers Needles (3pcs) (HAxl #14) Roll edge Throat plate Hexagon wrench Thread spool holder caps (4pcs) Cone holder (4 pcs) Machine cover Waste collector -3-
Manual
Page 7
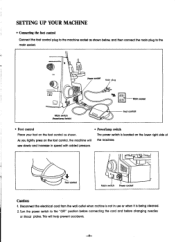
The power switch is located on the lower right side of As you lightly press on the foot control as shown below, and then connect the main plug to the "OFF" position before connecting the cord and before changing needles or throat plates. Foot control 0 0 0 Main switch PC:we,' socket Caution: 1. Turn the power switch to the main socket. This will the machine. Power socket Main plug 0 Main switch (AwedLamp Switch) CD Main socket Foot contrail • Foot control • Power/lamp switch Place your foot on the foot control, the machine will help prevent accidents. ...
The power switch is located on the lower right side of As you lightly press on the foot control as shown below, and then connect the main plug to the "OFF" position before connecting the cord and before changing needles or throat plates. Foot control 0 0 0 Main switch PC:we,' socket Caution: 1. Turn the power switch to the main socket. This will the machine. Power socket Main plug 0 Main switch (AwedLamp Switch) CD Main socket Foot contrail • Foot control • Power/lamp switch Place your foot on the foot control, the machine will help prevent accidents. ...

Manual
Page 8
C3, Place the domestic spool on the thread reel stand. (The thread notch on the spool should be used on the spool. HOW TO ATTACH THE WASTE CHIP BOX To catch the cut-off fabric as you sew and for keeping your working area clean, place the waste collector box between the machine and table. PREPARATION FOR THREADING • Thread reel bar Pull up thread reel bar to its highest point before threading. • Overlock thread It is advisable to use a good quality overlock thread when sewing with this machine. we Highest point I -I Overlock 1 / thread \ I Thread reel stand • For ...
C3, Place the domestic spool on the thread reel stand. (The thread notch on the spool should be used on the spool. HOW TO ATTACH THE WASTE CHIP BOX To catch the cut-off fabric as you sew and for keeping your working area clean, place the waste collector box between the machine and table. PREPARATION FOR THREADING • Thread reel bar Pull up thread reel bar to its highest point before threading. • Overlock thread It is advisable to use a good quality overlock thread when sewing with this machine. we Highest point I -I Overlock 1 / thread \ I Thread reel stand • For ...
Manual
Page 9
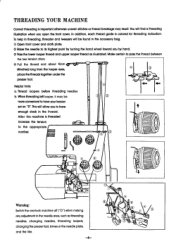
Make certain to the appropriate Prc: 1 number. In addition, each thread guide is Important otherwise uneven stitches or thread breakage may be found in threading, threader and tweezers will be more convenient to have your tension set on "0". To help in the accessory bag. 0 Open front cover and cloth plate. After the machine Is threaded increase the tension to pass the thread between the two tension discs. 0 Pull the thread end about 10cm (4inches) long from the looper eyes, C)) place the threads together under the presser foot. When threading left looper, it may...
Make certain to the appropriate Prc: 1 number. In addition, each thread guide is Important otherwise uneven stitches or thread breakage may be found in threading, threader and tweezers will be more convenient to have your tension set on "0". To help in the accessory bag. 0 Open front cover and cloth plate. After the machine Is threaded increase the tension to pass the thread between the two tension discs. 0 Pull the thread end about 10cm (4inches) long from the looper eyes, C)) place the threads together under the presser foot. When threading left looper, it may...
Manual
Page 10
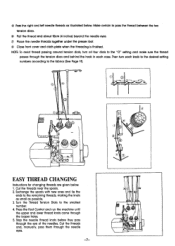
Make certain to the smallest number. 4. Cut the threads near the spools. 2. Turn the Thread Tension Dials to pass the thread between the two tension discs. ® Pull the thread end about 10cm (4 inches) beyond the needle eyes. (?) Place the needle threads together under the presser foot. ® Close front cover and cloth plate when the threading is finished. Exchange the spools with new ones and tie the ends to the remaining threads, making the knots as small as illustrated below . 1. Stop the needle thread knots before they pass through the looper holes. 5. r EASY THREAD ...
Make certain to the smallest number. 4. Cut the threads near the spools. 2. Turn the Thread Tension Dials to pass the thread between the two tension discs. ® Pull the thread end about 10cm (4 inches) beyond the needle eyes. (?) Place the needle threads together under the presser foot. ® Close front cover and cloth plate when the threading is finished. Exchange the spools with new ones and tie the ends to the remaining threads, making the knots as small as illustrated below . 1. Stop the needle thread knots before they pass through the looper holes. 5. r EASY THREAD ...
Manual
Page 11
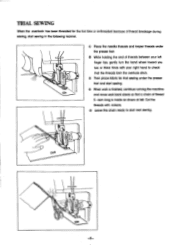
Cut the threads with your left . TRIAL SEWING When the overlook has been threaded for trial sewing under the presser foot. ® While holding the end of threads between your right hand to start sewing. ® When work is finished, continue running the machine and move work back slowly so that the threads form the overlock stitch. f, -8- O Then place fabric for the first time or re-threaded because of thread 5-6cm long Is made as shown at left finger tips gently turn the hand wheel toward you two or three times with scissors. ® Leave this chain ready to check that a ...
Cut the threads with your left . TRIAL SEWING When the overlook has been threaded for trial sewing under the presser foot. ® While holding the end of threads between your right hand to start sewing. ® When work is finished, continue running the machine and move work back slowly so that the threads form the overlock stitch. f, -8- O Then place fabric for the first time or re-threaded because of thread 5-6cm long Is made as shown at left finger tips gently turn the hand wheel toward you two or three times with scissors. ® Leave this chain ready to check that a ...

Manual
Page 12
ADJUSTING THREAD TENSIONS Right needle thread tension dial Left needle thread tension dial Thread tension differs with the type of fabric and the thickness and type of thread tensions should be made each time you sew. Adjust the tension dials using the upper and lower thread tensions while watching the stitch as illustrated. Thread tension is tightened by turning the applicable tension dial clockwise, and loosened by turning counter clockwise. 0 Upper looper thread tension dial Lower looper thread tension dial • Proper thread tension Right needle thread Back side Left needle ...
ADJUSTING THREAD TENSIONS Right needle thread tension dial Left needle thread tension dial Thread tension differs with the type of fabric and the thickness and type of thread tensions should be made each time you sew. Adjust the tension dials using the upper and lower thread tensions while watching the stitch as illustrated. Thread tension is tightened by turning the applicable tension dial clockwise, and loosened by turning counter clockwise. 0 Upper looper thread tension dial Lower looper thread tension dial • Proper thread tension Right needle thread Back side Left needle ...

Manual
Page 13
Back side Front side Tighten the right needle thread tension dial. -10- Front side Tighten the lower looper thread tension dial or loosen the upper looper thread tension dial. (D) Right needle thread tension is too loose. ADJUSTING THREAD TENSIONS (CONTINUED) (A) Lower looper thread tension is too tight or upper looper thread is too loose. (B) Upper looper thread tension is too tight or lower looper thread is too loose. Back side Back side Front side Tighten the upper looper thread tension dial or loosen the lower looper thread tension dial. (C) Left needle thread tension is...
Back side Front side Tighten the right needle thread tension dial. -10- Front side Tighten the lower looper thread tension dial or loosen the upper looper thread tension dial. (D) Right needle thread tension is too loose. ADJUSTING THREAD TENSIONS (CONTINUED) (A) Lower looper thread tension is too tight or upper looper thread is too loose. (B) Upper looper thread tension is too tight or lower looper thread is too loose. Back side Back side Front side Tighten the upper looper thread tension dial or loosen the lower looper thread tension dial. (C) Left needle thread tension is...

Manual
Page 14
CHART FOR TENSION ADJUSTMENT Fabrics Light-weight • Georgette • Organdy • Lawn • Voile • Crepe de chine • Silk Threads • Cotton • Spun polyester • Polyester Needle Stitch length 2.0 --3.5m/m Standard 2.5m/m Recommended tension settings 0 e e 8 Medium weight • Cotton • Poplin • Wool • Linen • Gingham • Corduroy • Suede • Satin • Fleece Heavy weight • Denirit • Tweed • Velour • Canvas • Upholstery • Cotton • Spun polyester • Polyester...
CHART FOR TENSION ADJUSTMENT Fabrics Light-weight • Georgette • Organdy • Lawn • Voile • Crepe de chine • Silk Threads • Cotton • Spun polyester • Polyester Needle Stitch length 2.0 --3.5m/m Standard 2.5m/m Recommended tension settings 0 e e 8 Medium weight • Cotton • Poplin • Wool • Linen • Gingham • Corduroy • Suede • Satin • Fleece Heavy weight • Denirit • Tweed • Velour • Canvas • Upholstery • Cotton • Spun polyester • Polyester...

Manual
Page 15
Use only the right needle and three threads. Turn power switch off. 2. Open the front cover and cloth plate. 3. Use only left needle. ADJUSTING OVERLOCK STITCH WIDTH This machine Is a two needle, three or four thread convertible overlock machine. Select your stitches according to what and how you )until the red stitch width indicator matches the desired width line in the front cover window. 1 1 wide 0 narrow 51_1_1 6 I Lif stitch t width Stitch width dial Stitch width dial -12- Turn the stitch width dial(away or toward you sew : (a) 3-thread overedge stitch, 5mm ...
Use only the right needle and three threads. Turn power switch off. 2. Open the front cover and cloth plate. 3. Use only left needle. ADJUSTING OVERLOCK STITCH WIDTH This machine Is a two needle, three or four thread convertible overlock machine. Select your stitches according to what and how you )until the red stitch width indicator matches the desired width line in the front cover window. 1 1 wide 0 narrow 51_1_1 6 I Lif stitch t width Stitch width dial Stitch width dial -12- Turn the stitch width dial(away or toward you sew : (a) 3-thread overedge stitch, 5mm ...
Manual
Page 16
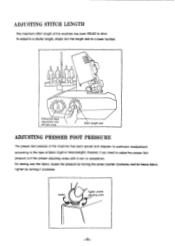
For sewing very thin fabric, loosen the pressure by turning the screw counter clockwise, and for heavy fabric, tighten by turning it clockwise. ADJUSTING STITCH LENGTH The maximum stitch length of this machine has been PRE-SET to a lower number. To adjust to a shorter length, simply turn the presser adjusting screw with a coin or screwdriver. However, if you need to the type of the machine has been pre-set and requires no particular readjustment according to adjust the presser foot pressure, turn the length dial to 3mm. Loosen Tighten presser adjusting screw -13- ra Ui ...
For sewing very thin fabric, loosen the pressure by turning the screw counter clockwise, and for heavy fabric, tighten by turning it clockwise. ADJUSTING STITCH LENGTH The maximum stitch length of this machine has been PRE-SET to a lower number. To adjust to a shorter length, simply turn the presser adjusting screw with a coin or screwdriver. However, if you need to the type of the machine has been pre-set and requires no particular readjustment according to adjust the presser foot pressure, turn the length dial to 3mm. Loosen Tighten presser adjusting screw -13- ra Ui ...

Manual
Page 17
O Open the front cover and lower the presser foot. 3 Using the hexagon wrench, loosen the needle clamp screws and remove the needles. GI) Make one complete turn of needle facing away from the power supply before replacing a needle. • Your needle system is cool. Do not attempt to change the bulb until it will go Into the needle clamp, flat side of hand wheel to check for as for proper clearance. C Loosen the light cover screw. • Pull out the light cover and remove the old bulb by turning the handwheel towards you are sewing. Using a bent or blunt needle may result in ...
O Open the front cover and lower the presser foot. 3 Using the hexagon wrench, loosen the needle clamp screws and remove the needles. GI) Make one complete turn of needle facing away from the power supply before replacing a needle. • Your needle system is cool. Do not attempt to change the bulb until it will go Into the needle clamp, flat side of hand wheel to check for as for proper clearance. C Loosen the light cover screw. • Pull out the light cover and remove the old bulb by turning the handwheel towards you are sewing. Using a bent or blunt needle may result in ...
Manual
Page 18
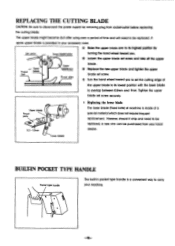
Upper blade Throat plate 0.5 -1.0mm Lower blade • Replacing the lower blade The lower blade (Fixed knife) of time and will need to be replaced, a new one can be replaced. The upper blade might become dull after using over a period of machine is a convenient way to carry your machine. -15- Loosen the upper blade set screw and take off the upper Presser foot Upper blade Upper •lade arm Throat plate blade. 2 Replace the new upper blade and tighten the upper blade set screw. (1) Turn the hand wheel toward you to set the cutting edge of a special material which ...
Upper blade Throat plate 0.5 -1.0mm Lower blade • Replacing the lower blade The lower blade (Fixed knife) of time and will need to be replaced, a new one can be replaced. The upper blade might become dull after using over a period of machine is a convenient way to carry your machine. -15- Loosen the upper blade set screw and take off the upper Presser foot Upper blade Upper •lade arm Throat plate blade. 2 Replace the new upper blade and tighten the upper blade set screw. (1) Turn the hand wheel toward you to set the cutting edge of a special material which ...

Manual
Page 19
Using the brush provided, remove dust and lint that has accumulated in the whole exposed area. Then apply a few drops of oil to each lubrication point. 0 0 0) (DF-type only) Always use a good qualify sewing machine oil (we suggest Mobil Velocite #10 or equivalent). CLEANING AND OILING To keep your machine running smoothly, it is necessary to keep it clean and lubricated at all time& First, disconnect machine from socket-outlet. Open both front and side covers. Portion to be lubricated ta-ro--0-Wv• • Apply one or two drops of oil to each lubrication point. • ...
Using the brush provided, remove dust and lint that has accumulated in the whole exposed area. Then apply a few drops of oil to each lubrication point. 0 0 0) (DF-type only) Always use a good qualify sewing machine oil (we suggest Mobil Velocite #10 or equivalent). CLEANING AND OILING To keep your machine running smoothly, it is necessary to keep it clean and lubricated at all time& First, disconnect machine from socket-outlet. Open both front and side covers. Portion to be lubricated ta-ro--0-Wv• • Apply one or two drops of oil to each lubrication point. • ...
Manual
Page 20
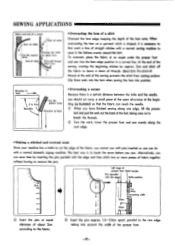
Overlap the stitch by about 2cm Chain-off thread about 2cm • Overcasting the hem of a skirt Overcast the hem edge, keeping the depth of threads about 5cm according to the fabric. © Insert the pins approx. 1.5-2.0cm apart, parallel to the raw edge taking care not to break the threads. To overcast, place the fabric at equal distances of about 2cm. At the end of the sewing, overlap the beginning stitches by inserting the pins parallel with the edge and then stitch two or more pieces of presser foot S itch border Pins (parallel with the edge) Knife position `a- 5cAm - This ...
Overlap the stitch by about 2cm Chain-off thread about 2cm • Overcasting the hem of a skirt Overcast the hem edge, keeping the depth of threads about 5cm according to the fabric. © Insert the pins approx. 1.5-2.0cm apart, parallel to the raw edge taking care not to break the threads. To overcast, place the fabric at equal distances of about 2cm. At the end of the sewing, overlap the beginning stitches by inserting the pins parallel with the edge and then stitch two or more pieces of presser foot S itch border Pins (parallel with the edge) Knife position `a- 5cAm - This ...
