
Manual
Page 2
... the overlock machine to the off (0) position, then remove plug from outlet. 9. Keep ventilation openings of the overlock machine and foot control free from the electrical outlet immediately after using and before cleaning. Do not operate where aerosol (spray) products are being administered... manufacturer as described in this manual. 3. This slot is being used as threading needles, changing needles, threading loopers, changing the presser foot, changing knives, changing the needle plate, and the like. 15. This overlock machine is required around the overlock machine needle. ...
... the overlock machine to the off (0) position, then remove plug from outlet. 9. Keep ventilation openings of the overlock machine and foot control free from the electrical outlet immediately after using and before cleaning. Do not operate where aerosol (spray) products are being administered... manufacturer as described in this manual. 3. This slot is being used as threading needles, changing needles, threading loopers, changing the presser foot, changing knives, changing the needle plate, and the like. 15. This overlock machine is required around the overlock machine needle. ...
Manual
Page 5
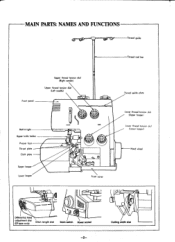
MAIN PARTS: NAMES AND FUNCTIONS Thread guide Thread reel bar Front panel Upper thread tension dial (Right needle) Upper thread tension dial (Left needle) Built in light Upper knife holder Presser foot Throat plate ----e Cloth plate Upper looper Lower looper • IYI /slime Front cover Thread guide plate Lower thread tension dial (Upper looper) Lower thread tension dial (Lower looper) Hand wheel 0 791/ 4 0 Differential feed adjustment dial (DF-type only) Stitch length dial Main switch Power socket -2- Cutting width dial
MAIN PARTS: NAMES AND FUNCTIONS Thread guide Thread reel bar Front panel Upper thread tension dial (Right needle) Upper thread tension dial (Left needle) Built in light Upper knife holder Presser foot Throat plate ----e Cloth plate Upper looper Lower looper • IYI /slime Front cover Thread guide plate Lower thread tension dial (Upper looper) Lower thread tension dial (Lower looper) Hand wheel 0 791/ 4 0 Differential feed adjustment dial (DF-type only) Stitch length dial Main switch Power socket -2- Cutting width dial
Manual
Page 9
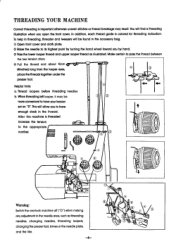
... the thread between the two tension discs. 0 Pull the thread end about 10cm (4inches) long from the looper eyes, C)) place the threads together under the presser foot. To help in the needle area, such as illustrated. After the machine Is threaded increase the tension to its highest point by turning the hand... find a threading illustration when you by hand. 0 Pass the lower looper thread and upper looper thread as threading needles, changing needles, threading loopers, changing the presser foot, knives or the needle plate, and the like. -6- 0 0 7
... the thread between the two tension discs. 0 Pull the thread end about 10cm (4inches) long from the looper eyes, C)) place the threads together under the presser foot. To help in the needle area, such as illustrated. After the machine Is threaded increase the tension to its highest point by turning the hand... find a threading illustration when you by hand. 0 Pass the lower looper thread and upper looper thread as threading needles, changing needles, threading loopers, changing the presser foot, knives or the needle plate, and the like. -6- 0 0 7
Manual
Page 10
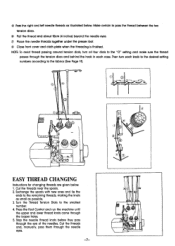
... 5. r EASY THREAD CHANGING Instructions for changing threads are given below . Then turn all four dials to the fabrics (See Page 11). Press the Foot Control and run the machine until the upper and lower thread knots come through the needle eyes. -7- 0 r 5 4 Cti) Stop the needle thread...the two tension discs. ® Pull the thread end about 10cm (4 inches) beyond the needle eyes. (?) Place the needle threads together under the presser foot. ® Close front cover and cloth plate when the threading is finished. NOTE: To assist thread passing around tension dials, turn each case. ...
... 5. r EASY THREAD CHANGING Instructions for changing threads are given below . Then turn all four dials to the fabrics (See Page 11). Press the Foot Control and run the machine until the upper and lower thread knots come through the needle eyes. -7- 0 r 5 4 Cti) Stop the needle thread...the two tension discs. ® Pull the thread end about 10cm (4 inches) beyond the needle eyes. (?) Place the needle threads together under the presser foot. ® Close front cover and cloth plate when the threading is finished. NOTE: To assist thread passing around tension dials, turn each case. ...
Manual
Page 11
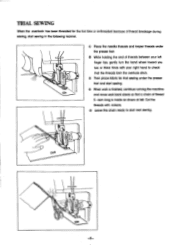
... during sewing, start sewing in the following manner. (D Place the needle threads and looper threads under the presser foot and start next sewing. f, -8- TRIAL SEWING When the overlook has been threaded for trial sewing under the presser foot. ® While holding the end of threads between your right hand to start sewing. ® When...
... during sewing, start sewing in the following manner. (D Place the needle threads and looper threads under the presser foot and start next sewing. f, -8- TRIAL SEWING When the overlook has been threaded for trial sewing under the presser foot. ® While holding the end of threads between your right hand to start sewing. ® When...
Manual
Page 16
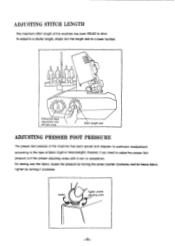
...set and requires no particular readjustment according to 3mm. However, if you need to adjust the presser foot pressure, turn the length dial to a shorter length, simply turn the presser adjusting screw with a coin or screwdriver. Loosen Tighten presser adjusting screw -13- For sewing very thin fabric, loosen the pressure by turning the screw... fabric, tighten by turning it clockwise. To adjust to a lower number. ra Ui Differential feed adjustment dial (DF-type only) Stitch length dial ADJUSTING PRESSER FOOT PRESSURE The presser foot pressure of fabric (light-or heavyweight).
...set and requires no particular readjustment according to 3mm. However, if you need to adjust the presser foot pressure, turn the length dial to a shorter length, simply turn the presser adjusting screw with a coin or screwdriver. Loosen Tighten presser adjusting screw -13- For sewing very thin fabric, loosen the pressure by turning the screw... fabric, tighten by turning it clockwise. To adjust to a lower number. ra Ui Differential feed adjustment dial (DF-type only) Stitch length dial ADJUSTING PRESSER FOOT PRESSURE The presser foot pressure of fabric (light-or heavyweight).

Manual
Page 17
... to use proper size needle for proper clearance. Replace withh a new bulb. () Reset the light cover screw. -14- O Open the front cover and lower the presser foot. 3 Using the hexagon wrench, loosen the needle clamp screws and remove the needles.
... to use proper size needle for proper clearance. Replace withh a new bulb. () Reset the light cover screw. -14- O Open the front cover and lower the presser foot. 3 Using the hexagon wrench, loosen the needle clamp screws and remove the needles.
Manual
Page 18
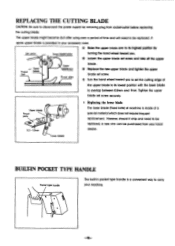
... chip and need to be purchased from socket-outlet before replacing the cutting blade. Loosen the upper blade set screw and take off the upper Presser foot Upper blade Upper •lade arm Throat plate blade. 2 Replace the new upper blade and tighten the upper blade set screw. (1) Turn the hand wheel...
... chip and need to be purchased from socket-outlet before replacing the cutting blade. Loosen the upper blade set screw and take off the upper Presser foot Upper blade Upper •lade arm Throat plate blade. 2 Replace the new upper blade and tighten the upper blade set screw. (1) Turn the hand wheel...
Manual
Page 20
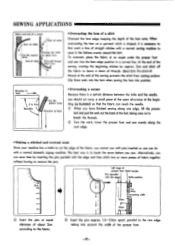
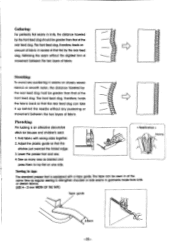
... to remove the pins. Overlap the stitch by inserting the pins parallel with the edge) Knife position `a- 5cAm - C) Turn the work, lower the presser foot and sew evenly along the next edge. • Making a stitched and overcast seam Since your machine has a knife to cut away a small piece ...sew with pins inserted as illustrated) so that the fabric can reach the needle. 0 When you have finished sewing along one edge, lift the presser foot and pull the work a line of straight stitches with a normal domestic zigzag machine. When overcasting the hem on a garment which is shaped, it...
... to remove the pins. Overlap the stitch by inserting the pins parallel with the edge) Knife position `a- 5cAm - C) Turn the work, lower the presser foot and sew evenly along the next edge. • Making a stitched and overcast seam Since your machine has a knife to cut away a small piece ...sew with pins inserted as illustrated) so that the fabric can reach the needle. 0 When you have finished sewing along one edge, lift the presser foot and pull the work a line of straight stitches with a normal domestic zigzag machine. When overcasting the hem on a garment which is shaped, it...
Manual
Page 21
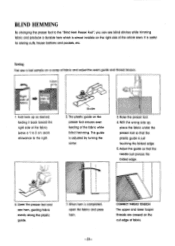
... lever toward the needle to release the lever. • How to change presser foot 1. Lower the presser bar until the groove on the shank connects with a screw driver. When you , and the foot will drop off . 2. Keep the presser bar up, loosen the shank set screw and the shank will drop off ... Side seam Lower edge seam • How to remove shank 1. raise the foot, pull the one -touch lever toward you replace the shank, tighten the set screw -18- center the desired presser foot under shank. Presser bar One touch lever 3 Shank set screw firmly with the small pin on...
... lever toward the needle to release the lever. • How to change presser foot 1. Lower the presser bar until the groove on the shank connects with a screw driver. When you , and the foot will drop off . 2. Keep the presser bar up, loosen the shank set screw and the shank will drop off ... Side seam Lower edge seam • How to remove shank 1. raise the foot, pull the one -touch lever toward you replace the shank, tighten the set screw -18- center the desired presser foot under shank. Presser bar One touch lever 3 Shank set screw firmly with the small pin on...
Manual
Page 22
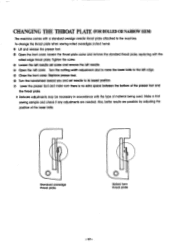
... Tighten the screw. Standard overedge throat plate Rolled hem throat plate -19- Replace presser toot. Make a trial sewing sample and check if any adjustments are possible by adjusting the position of the presser foot and the throat plate. * Delicate adjustments may be necessary In accordance with a ...knife to the left cover. To change the throat plate when sewing rolled overedges (rolled hems): O Lift and release the presser foot. TI Lower the presser foot and make sure there is no extra space between the bottom of the lower knife. Also, better results are needed. Loosen...
... Tighten the screw. Standard overedge throat plate Rolled hem throat plate -19- Replace presser toot. Make a trial sewing sample and check if any adjustments are possible by adjusting the position of the presser foot and the throat plate. * Delicate adjustments may be necessary In accordance with a ...knife to the left cover. To change the throat plate when sewing rolled overedges (rolled hems): O Lift and release the presser foot. TI Lower the presser foot and make sure there is no extra space between the bottom of the lower knife. Also, better results are needed. Loosen...
Manual
Page 25
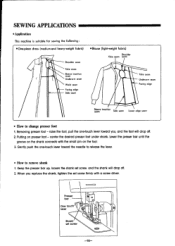
f Pinlucking Sewing in tape The standard presser foot is an attractive decorative stitch for blouses and children's wear. 1. The front feed dog, therefore, holds the fabric back so that the rear feed dog ...: To avoid any puckering or movement between the two layers of the rear feed dog. Adjust the plastic guide so that of fabric. Lower the presser foot and sew. 4. Sew as many rows as regular sewing to lay flat on closely woven fabric's or smooth nylon, the distance traveled by the rear...
f Pinlucking Sewing in tape The standard presser foot is an attractive decorative stitch for blouses and children's wear. 1. The front feed dog, therefore, holds the fabric back so that the rear feed dog ...: To avoid any puckering or movement between the two layers of the rear feed dog. Adjust the plastic guide so that of fabric. Lower the presser foot and sew. 4. Sew as many rows as regular sewing to lay flat on closely woven fabric's or smooth nylon, the distance traveled by the rear...
Manual
Page 26
... guide on a scrap of fabric and adjust the seam guide and thread tension. 1-2cm, Right side of fabric Wrong side of the fabric. Lower the presser foot and sew hem, guiding fabric evenly along the plastic guide. 7. It is completed, open the fabric and press hem. Fold hem up , place the ...fabric under the presser foot so that the needle just pierces the folded edge. 6. Adjust the guide so that the plastic guide is just touching the folded edge. 5. Raise the...
... guide on a scrap of fabric and adjust the seam guide and thread tension. 1-2cm, Right side of fabric Wrong side of the fabric. Lower the presser foot and sew hem, guiding fabric evenly along the plastic guide. 7. It is completed, open the fabric and press hem. Fold hem up , place the ...fabric under the presser foot so that the needle just pierces the folded edge. 6. Adjust the guide so that the plastic guide is just touching the folded edge. 5. Raise the...
Manual
Page 27
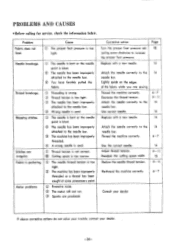
...® Wrong needle is blunt. © The needle has been improperly attached to increase the presser foot pressure. Thread the machine correctly. 6-7 Use the correct needle. Corrective action Turn the presser foot pressure adlusting screw clockwise to the needle bar. ® The machine has been improperly threaded. ...® A wrong needle is used . © The needle is bent or the needle point is used . Cause © The presser foot pressure is too tight. ® The machine has been improperly threaded or a thread has been caught at some unnecessary point. Replace with a ...
...® Wrong needle is blunt. © The needle has been improperly attached to increase the presser foot pressure. Thread the machine correctly. 6-7 Use the correct needle. Corrective action Turn the presser foot pressure adlusting screw clockwise to the needle bar. ® The machine has been improperly threaded. ...® A wrong needle is used . © The needle is bent or the needle point is used . Cause © The presser foot pressure is too tight. ® The machine has been improperly threaded or a thread has been caught at some unnecessary point. Replace with a ...


