
Manual
Page 2
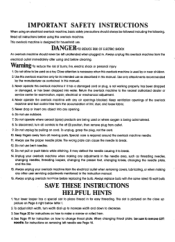
... SHOCK An overlock machine should always be followed including the following. Warning -To reduce the risk of the overlock machine and foot control free from outlet. 9. Return the overlock machine to the nearest authorized dealer or service center for easy threading. Do not...SAVE THESE INSTRUCTIONS HELPFUL HINTS 1. Use only attachments recommended by the manufacturer as threading needles, changing needles, threading loopers, changing the presser foot, changing knives, changing the needle plate, and the like. 15. Never operate the overlock machine with the same rated 15 watt bulb...
... SHOCK An overlock machine should always be followed including the following. Warning -To reduce the risk of the overlock machine and foot control free from outlet. 9. Return the overlock machine to the nearest authorized dealer or service center for easy threading. Do not...SAVE THESE INSTRUCTIONS HELPFUL HINTS 1. Use only attachments recommended by the manufacturer as threading needles, changing needles, threading loopers, changing the presser foot, changing knives, changing the needle plate, and the like. 15. Never operate the overlock machine with the same rated 15 watt bulb...
Manual
Page 5
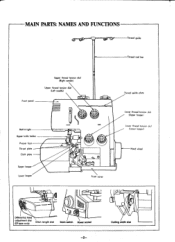
MAIN PARTS: NAMES AND FUNCTIONS Thread guide Thread reel bar Front panel Upper thread tension dial (Right needle) Upper thread tension dial (Left needle) Built in light Upper knife holder Presser foot Throat plate ----e Cloth plate Upper looper Lower looper • IYI /slime Front cover Thread guide plate Lower thread tension dial (Upper looper) Lower thread tension dial (Lower looper) Hand wheel 0 791/ 4 0 Differential feed adjustment dial (DF-type only) Stitch length dial Main switch Power socket -2- Cutting width dial
MAIN PARTS: NAMES AND FUNCTIONS Thread guide Thread reel bar Front panel Upper thread tension dial (Right needle) Upper thread tension dial (Left needle) Built in light Upper knife holder Presser foot Throat plate ----e Cloth plate Upper looper Lower looper • IYI /slime Front cover Thread guide plate Lower thread tension dial (Upper looper) Lower thread tension dial (Lower looper) Hand wheel 0 791/ 4 0 Differential feed adjustment dial (DF-type only) Stitch length dial Main switch Power socket -2- Cutting width dial
Manual
Page 7
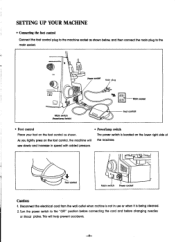
..."OFF" position before connecting the cord and before changing needles or throat plates. Foot control 0 0 0 Main switch PC:we,' socket Caution: 1. SETTING UP YOUR MACHINE • Connecting the foot control Connect the foot control plug to the machine socket as shown. Turn the power switch to the ... is not in speed with added pressure. Power socket Main plug 0 Main switch (AwedLamp Switch) CD Main socket Foot contrail • Foot control • Power/lamp switch Place your foot on the foot control, the machine will help prevent accidents. -4- This will the machine.
..."OFF" position before connecting the cord and before changing needles or throat plates. Foot control 0 0 0 Main switch PC:we,' socket Caution: 1. SETTING UP YOUR MACHINE • Connecting the foot control Connect the foot control plug to the machine socket as shown. Turn the power switch to the ... is not in speed with added pressure. Power socket Main plug 0 Main switch (AwedLamp Switch) CD Main socket Foot contrail • Foot control • Power/lamp switch Place your foot on the foot control, the machine will help prevent accidents. -4- This will the machine.
Manual
Page 9
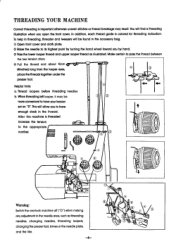
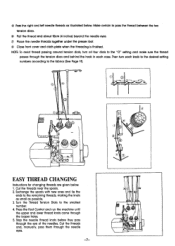
... a threading illustration when you by hand. 0 Pass the lower looper thread and upper looper thread as threading needles, changing needles, threading loopers, changing the presser foot, knives or the needle plate, and the like. -6- 0 0 7 Thread loopers before threading needles b. This will be more convenient to its highest point by turning the... thread between the two tension discs. 0 Pull the thread end about 10cm (4inches) long from the looper eyes, C)) place the threads together under the presser foot.
... a threading illustration when you by hand. 0 Pass the lower looper thread and upper looper thread as threading needles, changing needles, threading loopers, changing the presser foot, knives or the needle plate, and the like. -6- 0 0 7 Thread loopers before threading needles b. This will be more convenient to its highest point by turning the... thread between the two tension discs. 0 Pull the thread end about 10cm (4inches) long from the looper eyes, C)) place the threads together under the presser foot.
Manual
Page 10
... the two tension discs. ® Pull the thread end about 10cm (4 inches) beyond the needle eyes. (?) Place the needle threads together under the presser foot. ® Close front cover and cloth plate when the threading is finished. Cut the threads and, manually, pass them through the looper holes. 5. Exchange... new ones and tie the ends to the fabrics (See Page 11). NOTE: To assist thread passing around tension dials, turn each case. Press the Foot Control and run the machine until the upper and lower thread knots come through the needle eyes. -7- 0 r 5 4 Cti) Stop the needle thread ...
... the two tension discs. ® Pull the thread end about 10cm (4 inches) beyond the needle eyes. (?) Place the needle threads together under the presser foot. ® Close front cover and cloth plate when the threading is finished. Cut the threads and, manually, pass them through the looper holes. 5. Exchange... new ones and tie the ends to the fabrics (See Page 11). NOTE: To assist thread passing around tension dials, turn each case. Press the Foot Control and run the machine until the upper and lower thread knots come through the needle eyes. -7- 0 r 5 4 Cti) Stop the needle thread ...
Manual
Page 11
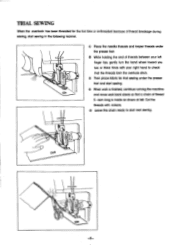
..., start sewing in the following manner. (D Place the needle threads and looper threads under the presser foot and start next sewing. f, -8- TRIAL SEWING When the overlook has been threaded for trial sewing under the presser foot. ® While holding the end of threads between your right hand to start sewing. ® When...
..., start sewing in the following manner. (D Place the needle threads and looper threads under the presser foot and start next sewing. f, -8- TRIAL SEWING When the overlook has been threaded for trial sewing under the presser foot. ® While holding the end of threads between your right hand to start sewing. ® When...
Manual
Page 16
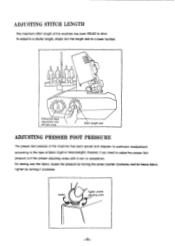
...the presser adjusting screw with a coin or screwdriver. ra Ui Differential feed adjustment dial (DF-type only) Stitch length dial ADJUSTING PRESSER FOOT PRESSURE The presser foot pressure of fabric (light-or heavyweight). However, if you need to 3mm. For sewing very thin fabric, loosen the pressure by ...Tighten presser adjusting screw -13- ADJUSTING STITCH LENGTH The maximum stitch length of this machine has been PRE-SET to adjust the presser foot pressure, turn the length dial to the type of the machine has been pre-set and requires no particular readjustment according to a lower ...
...the presser adjusting screw with a coin or screwdriver. ra Ui Differential feed adjustment dial (DF-type only) Stitch length dial ADJUSTING PRESSER FOOT PRESSURE The presser foot pressure of fabric (light-or heavyweight). However, if you need to 3mm. For sewing very thin fabric, loosen the pressure by ...Tighten presser adjusting screw -13- ADJUSTING STITCH LENGTH The maximum stitch length of this machine has been PRE-SET to adjust the presser foot pressure, turn the length dial to the type of the machine has been pre-set and requires no particular readjustment according to a lower ...

Manual
Page 17
... check for proper clearance. Using a bent or blunt needle may result in breaking thread or poor stitching. O Open the front cover and lower the presser foot. 3 Using the hexagon wrench, loosen the needle clamp screws and remove the needles. REPLACING THE NEEDLES • Turn the power switch to "off" before replacing...
... check for proper clearance. Using a bent or blunt needle may result in breaking thread or poor stitching. O Open the front cover and lower the presser foot. 3 Using the hexagon wrench, loosen the needle clamp screws and remove the needles. REPLACING THE NEEDLES • Turn the power switch to "off" before replacing...
Manual
Page 18
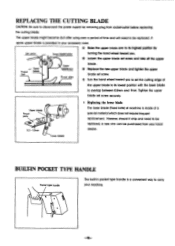
... after using over a period of a special material which does not require frequent replacement. Loosen the upper blade set screw and take off the upper Presser foot Upper blade Upper •lade arm Throat plate blade. 2 Replace the new upper blade and tighten the upper blade set screw. (1) Turn the hand wheel...
... after using over a period of a special material which does not require frequent replacement. Loosen the upper blade set screw and take off the upper Presser foot Upper blade Upper •lade arm Throat plate blade. 2 Replace the new upper blade and tighten the upper blade set screw. (1) Turn the hand wheel...
Manual
Page 20
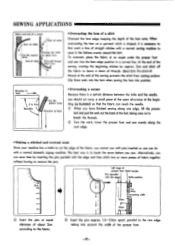
... with the edge) Knife position `a- 5cAm - When overcasting the hem on a garment which is shaped, it is to leave a chain of the presser foot. -17- At the end of the sewing, overlap the beginning stitches by about 2cm • Overcasting the hem of a skirt Overcast the hem edge,... keeping the depth of the foot, taking into position. d. -.4 Cut away Overcasting width 6mm 12mm 15mm Insert the pins at the beginning (as you have finished sewing along the next...
... with the edge) Knife position `a- 5cAm - When overcasting the hem on a garment which is shaped, it is to leave a chain of the presser foot. -17- At the end of the sewing, overlap the beginning stitches by about 2cm • Overcasting the hem of a skirt Overcast the hem edge,... keeping the depth of the foot, taking into position. d. -.4 Cut away Overcasting width 6mm 12mm 15mm Insert the pins at the beginning (as you have finished sewing along the next...
Manual
Page 21
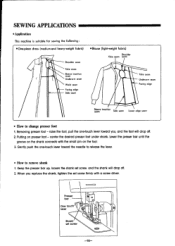
... the one -touch lever toward you replace the shank, tighten the set screw firmly with the small pin on presser foot - Puffing on the foot. 3. Lower the presser bar until the groove on the shank connects with a screw driver. Keep the presser bar up, loosen the ...shank set screw -18- Removing presser foot - When you , and the foot will drop off . 2. center the desired presser foot under shank. SEWING APPLICATIONS • Application This machine is suitable for sewing the following : •One-piece ...
... the one -touch lever toward you replace the shank, tighten the set screw firmly with the small pin on presser foot - Puffing on the foot. 3. Lower the presser bar until the groove on the shank connects with a screw driver. Keep the presser bar up, loosen the ...shank set screw -18- Removing presser foot - When you , and the foot will drop off . 2. center the desired presser foot under shank. SEWING APPLICATIONS • Application This machine is suitable for sewing the following : •One-piece ...
Manual
Page 22
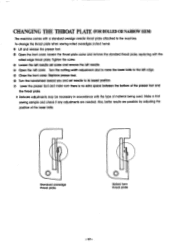
To change the throat plate when sewing rolled overedges (rolled hems): O Lift and release the presser foot. TI Lower the presser foot and make sure there is no extra space between the bottom of the presser foot and the throat plate. * Delicate adjustments may be necessary In accordance with a standard overdge needle throat plate...
To change the throat plate when sewing rolled overedges (rolled hems): O Lift and release the presser foot. TI Lower the presser foot and make sure there is no extra space between the bottom of the presser foot and the throat plate. * Delicate adjustments may be necessary In accordance with a standard overdge needle throat plate...
Manual
Page 25
... fabric's or smooth nylon, the distance traveled by the rear feed dog must be greater than that of the rear feed dog. Lower the presser foot and sew. 4. Adjust the plastic guide so that of fabric in knits, the distance traveled by the front feed dog should be sewn in at...: For perfectly flat seams in excess of that fed by the rear feed dog, flattening the seam without any puckering in tape The standard presser foot is an attractive decorative stitch for blouses and children's wear. 1. The front feed dog, therefore, feeds an amount of the front feed dog. Fold fabric...
... fabric's or smooth nylon, the distance traveled by the rear feed dog must be greater than that of the rear feed dog. Lower the presser foot and sew. 4. Adjust the plastic guide so that of fabric in knits, the distance traveled by the front feed dog should be sewn in at...: For perfectly flat seams in excess of that fed by the rear feed dog, flattening the seam without any puckering in tape The standard presser foot is an attractive decorative stitch for blouses and children's wear. 1. The front feed dog, therefore, feeds an amount of the front feed dog. Fold fabric...
Manual
Page 26
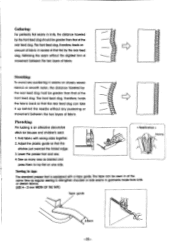
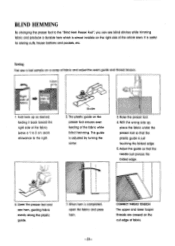
... touching the folded edge. 5. When hem is adjusted by turning the screw. 3. Leave a 1 to 2 cm seam allowance to the "Blind Hem Presser Foot", you can sew blind stitches while trimming fabric and produce a durable hem which is useful for sewing cuffs, trouser bottoms and pockets, etc. This guide... It is almost invisible on the cut edge of the fabric. Sewing First sew a test sample on the presser foot ensures even feeding of the article sewn. Raise the presser foot. 4. CORRECT THREAD TENSION The upper and lower looper threads are crossed on the right side of the fabric while ...
... touching the folded edge. 5. When hem is adjusted by turning the screw. 3. Leave a 1 to 2 cm seam allowance to the "Blind Hem Presser Foot", you can sew blind stitches while trimming fabric and produce a durable hem which is useful for sewing cuffs, trouser bottoms and pockets, etc. This guide... It is almost invisible on the cut edge of the fabric. Sewing First sew a test sample on the presser foot ensures even feeding of the article sewn. Raise the presser foot. 4. CORRECT THREAD TENSION The upper and lower looper threads are crossed on the right side of the fabric while ...
Manual
Page 27
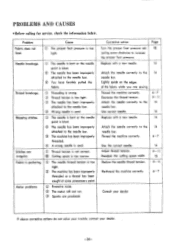
... is puckering. Motor problems. C) Excessive noise. ® The motor will not run. ® Sparks are sewing. Corrective action Turn the presser foot pressure adlusting screw clockwise to the needle bar. Replace with a new needle. 14 6 - 7 9-11 14 14 14 Attach the needle correctly ...machine has been improperly threaded or a thread has been caught at some unnecessary point. Thread the machine correctly. Cause © The presser foot pressure is used . Needle breakage. Decrease the thread tension. Use correct needle. PROBLEMS AND CAUSES •Before calling for service, check ...
... is puckering. Motor problems. C) Excessive noise. ® The motor will not run. ® Sparks are sewing. Corrective action Turn the presser foot pressure adlusting screw clockwise to the needle bar. Replace with a new needle. 14 6 - 7 9-11 14 14 14 Attach the needle correctly ...machine has been improperly threaded or a thread has been caught at some unnecessary point. Thread the machine correctly. Cause © The presser foot pressure is used . Needle breakage. Decrease the thread tension. Use correct needle. PROBLEMS AND CAUSES •Before calling for service, check ...


