
Manual
Page 2
...insulation (except USA/CANADA). Servicing a doubleinsulated product requires extreme care and knowledge of double insulated products. Keep ventilation openings of the sewing machine and foot controller free from the electrical outlet when removing covers, lubricating or when making any adjustments in the needle area, such ...deflect the needle causing it has been dropped or damaged or dropped into any air openings blocked. Switch the sewing machine off («0») position, then remove plug from all moving parts. WARNING To reduce the risk of grounding. Basically, the...
...insulation (except USA/CANADA). Servicing a doubleinsulated product requires extreme care and knowledge of double insulated products. Keep ventilation openings of the sewing machine and foot controller free from the electrical outlet when removing covers, lubricating or when making any adjustments in the needle area, such ...deflect the needle causing it has been dropped or damaged or dropped into any air openings blocked. Switch the sewing machine off («0») position, then remove plug from all moving parts. WARNING To reduce the risk of grounding. Basically, the...

Manual
Page 3
...Congratulations on the purchase of your new machine. If you require any further information about your overlocker or sewing in terms of use and quality. Our comprehensive instruction manual takes you will find a list of optional accessories and BERNINA services which fulfills every expectation in general,... will be delighted to help you with tips and suggestions for getting the most out of your BERNINA 2500DCET overlocker. We wish you years of an overlock sewing machine which provide even more scope for using Dear Customer the various overlock stitches, roll hem, cover ...
...Congratulations on the purchase of your new machine. If you require any further information about your overlocker or sewing in terms of use and quality. Our comprehensive instruction manual takes you will find a list of optional accessories and BERNINA services which fulfills every expectation in general,... will be delighted to help you with tips and suggestions for getting the most out of your BERNINA 2500DCET overlocker. We wish you years of an overlock sewing machine which provide even more scope for using Dear Customer the various overlock stitches, roll hem, cover ...
Manual
Page 4
... Cover stitch/ top & bottom cover stitch practical sewing 67 Chain stitch practical sewing 70 Maintenance 71 Trouble shooting 72 Index 74 Technical information 76 Optional Accessories 77 Bernina publications 78 2500_DCE_1_englisch_neu 09.10.2007 14:33 Uhr Seite 5 Contents 5 Details of the machine 6 Setting up the machine 11 Functions and general operating instructions 14 Needles...
... Cover stitch/ top & bottom cover stitch practical sewing 67 Chain stitch practical sewing 70 Maintenance 71 Trouble shooting 72 Index 74 Technical information 76 Optional Accessories 77 Bernina publications 78 2500_DCE_1_englisch_neu 09.10.2007 14:33 Uhr Seite 5 Contents 5 Details of the machine 6 Setting up the machine 11 Functions and general operating instructions 14 Needles...
Manual
Page 5
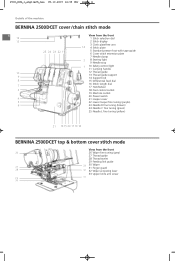
... Details of the machine BERNINA 2500DCET cover /chain stitch mode 6 12 13 10 9 8 7 3 4 5 6 25 24 23 22 11 View from the front 1 Stitch selection dial 2 Stitch display 3 Cloth plate/free arm 14 4 Stitch plate 5 Standard presser foot with tape guide 6 Cover stitch extension plate 7 Needle clamp 2 8 Sewing light 9 Needle ...18 Foot control socket 19 Machine socket 20 Power switch 21 Looper cover 22 Lower looper fine tuning (purple) 23 Needle R fine tuning (brown) 24 Needle C fine tuning (green) 25 Needle L fine tuning (yellow) 21 16 15 20 17 19 18 BERNINA 2500DCET top & bottom cover stitch...
... Details of the machine BERNINA 2500DCET cover /chain stitch mode 6 12 13 10 9 8 7 3 4 5 6 25 24 23 22 11 View from the front 1 Stitch selection dial 2 Stitch display 3 Cloth plate/free arm 14 4 Stitch plate 5 Standard presser foot with tape guide 6 Cover stitch extension plate 7 Needle clamp 2 8 Sewing light 9 Needle ...18 Foot control socket 19 Machine socket 20 Power switch 21 Looper cover 22 Lower looper fine tuning (purple) 23 Needle R fine tuning (brown) 24 Needle C fine tuning (green) 25 Needle L fine tuning (yellow) 21 16 15 20 17 19 18 BERNINA 2500DCET top & bottom cover stitch...
Manual
Page 6
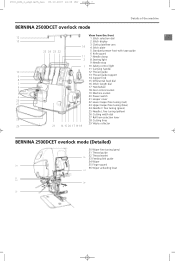
...:33 Uhr Seite 7 Details of the machine BERNINA 2500DCET overlock mode View from the front 7 12 1 Stitch selection dial 13 2 Stitch display 3 Cloth plate/free arm 14 4 Stitch plate 25 24 23 22 5 Standard presser foot with tape guide 6 Knife guard 11 7 Needle clamp 2 8 Sewing light 9 Needle stop 1 10 Safety ...yellow) 26 Cutting width dial 27 Roll hem selection lever 28 28 Cutting lines 29 Waste collector 29 21 16 15 20 17 19 18 BERNINA 2500DCET overlock mode (Detailed) 30 Wiper fine tuning (grey) 31 Thread guide 32 Thread eyelet 35 33 Feeding link guide 2 34 Wiper 30...
...:33 Uhr Seite 7 Details of the machine BERNINA 2500DCET overlock mode View from the front 7 12 1 Stitch selection dial 13 2 Stitch display 3 Cloth plate/free arm 14 4 Stitch plate 25 24 23 22 5 Standard presser foot with tape guide 6 Knife guard 11 7 Needle clamp 2 8 Sewing light 9 Needle stop 1 10 Safety ...yellow) 26 Cutting width dial 27 Roll hem selection lever 28 28 Cutting lines 29 Waste collector 29 21 16 15 20 17 19 18 BERNINA 2500DCET overlock mode (Detailed) 30 Wiper fine tuning (grey) 31 Thread guide 32 Thread eyelet 35 33 Feeding link guide 2 34 Wiper 30...
Manual
Page 10
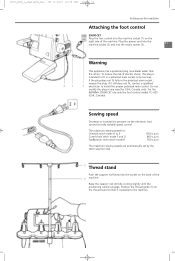
...install the proper polarized main socket. Sewing speed Decrease or increase the pressure on the electronic foot control for : Overlock stitch mode A to the machine. The maximum sewing speeds are automatically set by the stitch...sewing speed for fully variable speed control. Raise the support rod (4) fully, turning slightly until the positioning catches engage. 2500_DCE_1_englisch_neu 09.10.2007 14:33 Uhr Seite 11 Setting up the machine Attaching the foot control 2500DCET Plug the foot control into the machine socket (1) on the right side of the 4 machine. For the BERNINA 2500DCET...
...install the proper polarized main socket. Sewing speed Decrease or increase the pressure on the electronic foot control for : Overlock stitch mode A to the machine. The maximum sewing speeds are automatically set by the stitch...sewing speed for fully variable speed control. Raise the support rod (4) fully, turning slightly until the positioning catches engage. 2500_DCE_1_englisch_neu 09.10.2007 14:33 Uhr Seite 11 Setting up the machine Attaching the foot control 2500DCET Plug the foot control into the machine socket (1) on the right side of the 4 machine. For the BERNINA 2500DCET...

Manual
Page 11
...household spools, but secure the spools with large industrial spools, use the stabilizers upside down, i.e. It catches the cut-off fabric as you sew, keeping your BERNINA overlocker. Thread, cones, spools Cones or domestic spools in all sizes can be used on the spool pins when using thread cones. with the... wider edge at the top. 2500_DCE_1_englisch_neu 09.10.2007 14:33 Uhr Seite 12 Setting up the machine 12 Waste collector Hang the waste ...
...household spools, but secure the spools with large industrial spools, use the stabilizers upside down, i.e. It catches the cut-off fabric as you sew, keeping your BERNINA overlocker. Thread, cones, spools Cones or domestic spools in all sizes can be used on the spool pins when using thread cones. with the... wider edge at the top. 2500_DCE_1_englisch_neu 09.10.2007 14:33 Uhr Seite 12 Setting up the machine 12 Waste collector Hang the waste ...

Manual
Page 13
... Your Bernina overlocker is open , the electricity supply to E) is depressed, the safety control lamp will cut -out If overheating should occur, the motor will light up (4). Safety control lamp: The machine will stop for overlock stitches (positions A to the motor is generally down , sewing can ... also lights up , i.e. Needle stop: The Needle stop in front of the machine socket. when you turn the stitch selection dial while sewing, the control lamp will blink and the machine will not sew but the light remains on for cover and chain stitch (positions F/G/H) is automatically ...
... Your Bernina overlocker is open , the electricity supply to E) is depressed, the safety control lamp will cut -out If overheating should occur, the motor will light up (4). Safety control lamp: The machine will stop for overlock stitches (positions A to the motor is generally down , sewing can ... also lights up , i.e. Needle stop: The Needle stop in front of the machine socket. when you turn the stitch selection dial while sewing, the control lamp will blink and the machine will not sew but the light remains on for cover and chain stitch (positions F/G/H) is automatically ...
Manual
Page 14
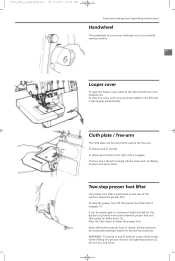
... attach press firmly to the right and tilt the cover towards you. Note: When the presser foot is positioned on a household 15 sewing machine. 15 15 Looper cover To open the looper cover, press to the right until it engages. Cloth plate / free-arm The cloth plate can be ... the lifter down to its highest position (2), do not use any force. WARNING: If sewing in this position to provide more space between presser foot and stitch plate for sewing tubular items such as on the rear of the machine above the presser foot. 2 To raise the presser foot, lift the presser foot...
... attach press firmly to the right and tilt the cover towards you. Note: When the presser foot is positioned on a household 15 sewing machine. 15 15 Looper cover To open the looper cover, press to the right until it engages. Cloth plate / free-arm The cloth plate can be ... the lifter down to its highest position (2), do not use any force. WARNING: If sewing in this position to provide more space between presser foot and stitch plate for sewing tubular items such as on the rear of the machine above the presser foot. 2 To raise the presser foot, lift the presser foot...

Manual
Page 15
...183; Lower the presser foot. The cover stitch presser foot (compensating foot - To position for sewing: · Push the foot from the clamp (2) and remove it easier to the left . Note: The machine will not run when the foot is used together with elastic, folded edges, seams and ribbings...until it out to needle(s) or machine. Lower the shank and the presser foot engages automatically. 2500_DCE_1_englisch_neu 09.10.2007 14:33 Uhr Seite 16 Functions and general operating instructions Swing-out presser foot 16 The swing-out foot (exclusive by BERNINA) provides easy access for work ...
...183; Lower the presser foot. The cover stitch presser foot (compensating foot - To position for sewing: · Push the foot from the clamp (2) and remove it easier to the left . Note: The machine will not run when the foot is used together with elastic, folded edges, seams and ribbings...until it out to needle(s) or machine. Lower the shank and the presser foot engages automatically. 2500_DCE_1_englisch_neu 09.10.2007 14:33 Uhr Seite 16 Functions and general operating instructions Swing-out presser foot 16 The swing-out foot (exclusive by BERNINA) provides easy access for work ...

Manual
Page 16
... the dial in 17 the direction desired. Note cover/chain stitch: Cover and chain stitches are fully raised when the machine is infinitely variable from 1- 4 mm and can be adjusted while sewing. Most cover stitch work is determined by the selected stitch length. 17 The stitch length is in use. The upper...
... the dial in 17 the direction desired. Note cover/chain stitch: Cover and chain stitches are fully raised when the machine is infinitely variable from 1- 4 mm and can be adjusted while sewing. Most cover stitch work is determined by the selected stitch length. 17 The stitch length is in use. The upper...

Manual
Page 22
..., rolled hems and cover stitch applications 2500_DCE_1_englisch_neu 09.10.2007 14:34 Uhr Seite 23 Needles, thread, fabric Needles and machine Your BERNINA overlocker is the BERNINA 2500DCET cover stitch or JLx2 needles 23 equipped with thread used. C made for cover and chain stitch 130/705 H (household...specially in a wide variety of types, duced exclusively for use decorative threads threads before starting to purchase are required. 23 types of sewing, system JLx2 system 130/705H needles for needles can occur if needles: A are bent B are damaged or blunt C have ...
..., rolled hems and cover stitch applications 2500_DCE_1_englisch_neu 09.10.2007 14:34 Uhr Seite 23 Needles, thread, fabric Needles and machine Your BERNINA overlocker is the BERNINA 2500DCET cover stitch or JLx2 needles 23 equipped with thread used. C made for cover and chain stitch 130/705 H (household...specially in a wide variety of types, duced exclusively for use decorative threads threads before starting to purchase are required. 23 types of sewing, system JLx2 system 130/705H needles for needles can occur if needles: A are bent B are damaged or blunt C have ...

Manual
Page 26
...seam with pre-set for cover stitch, G for chain stitch using standard overlock thread. Ideal for knits or woven fabrics. Neatening and sewing seams in fine to roll hem Raise the upper knife and upper knife arm Attach the cover stitch extension plate Lower the wiper and ... and children's wear and all fabrics. ■ Double sided edging. ■ Decorative seams on sheer and lightweight woven fabrics or jerseys. The machine must be converted (see page 60). 2500_DCE_1_englisch_neu 09.10.2007 14:34 Uhr Seite 27 Applications Exemples ■ Durable stretch seams in jerseys and ...
...seam with pre-set for cover stitch, G for chain stitch using standard overlock thread. Ideal for knits or woven fabrics. Neatening and sewing seams in fine to roll hem Raise the upper knife and upper knife arm Attach the cover stitch extension plate Lower the wiper and ... and children's wear and all fabrics. ■ Double sided edging. ■ Decorative seams on sheer and lightweight woven fabrics or jerseys. The machine must be converted (see page 60). 2500_DCE_1_englisch_neu 09.10.2007 14:34 Uhr Seite 27 Applications Exemples ■ Durable stretch seams in jerseys and ...
Manual
Page 29
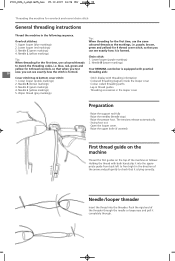
... · Open the looper cover. · Raise the upper knife (if wanted) First thread guide on the machine Thread the first guides on the top of the machine as the markings, i.e. Lower looper (purple markings) When threading for the first time, use coloured threads 2. Needle ...) Chain stitch: Tip: 1. blue, red, green and yellow for 4 thread cover stitch, so that when you test Your BERNINA overlocker is equipped with practical 30 sew, you 3. Lower looper (purple markings) 2. Upper looper (blue markings) coloured threads as follows: Holding the thread with threading ...
... · Open the looper cover. · Raise the upper knife (if wanted) First thread guide on the machine Thread the first guides on the top of the machine as the markings, i.e. Lower looper (purple markings) When threading for the first time, use coloured threads 2. Needle ...) Chain stitch: Tip: 1. blue, red, green and yellow for 4 thread cover stitch, so that when you test Your BERNINA overlocker is equipped with practical 30 sew, you 3. Lower looper (purple markings) 2. Upper looper (blue markings) coloured threads as follows: Holding the thread with threading ...
Manual
Page 33
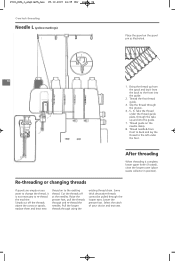
... the foot. Cut the threads off the threads above the cones or spools, replace them and knot new thread on to re-thread the machine. Thread needle L from the back to the left under the thread guide plate, through the looper eyes. Pull the looper threads through and... existing thread chain. Slip the thread through the groove. 4., 5., 6. Thread the first thread guide. 3. Select the stitch of your choice and test sew. Lower the presser foot. After threading 8 When threading is not necessary to the existing thread. Re-threading or changing threads If spools are empty or...
... the foot. Cut the threads off the threads above the cones or spools, replace them and knot new thread on to re-thread the machine. Thread needle L from the back to the left under the thread guide plate, through the looper eyes. Pull the looper threads through and... existing thread chain. Slip the thread through the groove. 4., 5., 6. Thread the first thread guide. 3. Select the stitch of your choice and test sew. Lower the presser foot. After threading 8 When threading is not necessary to the existing thread. Re-threading or changing threads If spools are empty or...

Manual
Page 35
Rayon No. 40: take threads through the deco guide without threading the first machine guide or tension slit. 3/4 thread overlock with medium to the needles. Test sew. Position the guide over the top of the machine over the lower looper tension. 3 thread overlock with decorative threads (see section Threads /Decorative thread page ... thread: position the guide over one of the thread slits (1) and tighten screw (2). 2500_DCE_1_englisch_neu 09.10.2007 14:35 Uhr Seite 36 Overlock sewing test and fine tuning 2 1 36 Deco guide The deco guide (in the accessory bag) is specially designed for...
Rayon No. 40: take threads through the deco guide without threading the first machine guide or tension slit. 3/4 thread overlock with medium to the needles. Test sew. Position the guide over the top of the machine over the lower looper tension. 3 thread overlock with decorative threads (see section Threads /Decorative thread page ... thread: position the guide over one of the thread slits (1) and tighten screw (2). 2500_DCE_1_englisch_neu 09.10.2007 14:35 Uhr Seite 36 Overlock sewing test and fine tuning 2 1 36 Deco guide The deco guide (in the accessory bag) is specially designed for...
Manual
Page 41
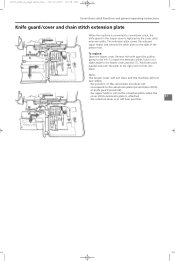
....2007 14:59 Uhr Seite 41 Cover/chain stitch functions and general operating instructions Knife guard /cover and chain stitch extension plate When the machine is converted to cover/chain stitch, the knife guard in the looper cover is in the raised position when the cover stitch extension plate...guard (overlock) · the upper knife is not in roll hem position. ▼ 1 ▲ Note: The looper cover will not close and the machine will not sew when: · the position of the presser foot. ▼ To replace: ▲ Open the looper cover. Remove the knife guard by the cover ...
....2007 14:59 Uhr Seite 41 Cover/chain stitch functions and general operating instructions Knife guard /cover and chain stitch extension plate When the machine is converted to cover/chain stitch, the knife guard in the looper cover is in the raised position when the cover stitch extension plate...guard (overlock) · the upper knife is not in roll hem position. ▼ 1 ▲ Note: The looper cover will not close and the machine will not sew when: · the position of the presser foot. ▼ To replace: ▲ Open the looper cover. Remove the knife guard by the cover ...
Manual
Page 48
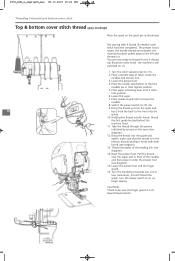
...the needle stop button to off «O». 9. Press needle stop button so that the thread is still switched on «l», begin sewing. Switch the power switch to lower the needles. 8. CAUTION: Check to «H». 2. Turn the stitch selection dial to be sure ...by pulling it under the needles and presser foot. 3. Raise the presser foot. Lower the wiper. 7. Test sewing with both hands, thread the first guide located behind the machine head. 11. 2500_DCE_2_englisch_neu 09.10.2007 15:00 Uhr Seite 48 Threading 5-thread top & bottom cover stitch ...
...the needle stop button to off «O». 9. Press needle stop button so that the thread is still switched on «l», begin sewing. Switch the power switch to lower the needles. 8. CAUTION: Check to «H». 2. Turn the stitch selection dial to be sure ...by pulling it under the needles and presser foot. 3. Raise the presser foot. Lower the wiper. 7. Test sewing with both hands, thread the first guide located behind the machine head. 11. 2500_DCE_2_englisch_neu 09.10.2007 15:00 Uhr Seite 48 Threading 5-thread top & bottom cover stitch ...

Manual
Page 49
See threading for the 4 thread top & bottom cover stitch. The machine is still switched on page 48. You are released, the material has been pulled away to thread for 5 thread top & bottom cover stitch on «l&#... cut. 2500_DCE_2_englisch_neu 09.10.2007 15:00 Uhr Seite 49 Threading 4-thread top & bottom cover stitch (5mm) Top & bottom cover stitch thread (grey markings) Test sewing with 3 thread (2-needles, 5mm) cover stitch has been completed.
See threading for the 4 thread top & bottom cover stitch. The machine is still switched on page 48. You are released, the material has been pulled away to thread for 5 thread top & bottom cover stitch on «l&#... cut. 2500_DCE_2_englisch_neu 09.10.2007 15:00 Uhr Seite 49 Threading 4-thread top & bottom cover stitch (5mm) Top & bottom cover stitch thread (grey markings) Test sewing with 3 thread (2-needles, 5mm) cover stitch has been completed.

Manual
Page 78
.... To help you use your BERNINA dealer! Contributions from your machines to the full, BERNINA regularly publishes sewing literature which deal with a variety of the trade ensure professional results. order your BERNINA overlocker and sewing machines is a real source of course report on a regular basis. We also of inspiration - BERNINA Creative Sewing, our international sewing magazine, is a range of booklets...
.... To help you use your BERNINA dealer! Contributions from your machines to the full, BERNINA regularly publishes sewing literature which deal with a variety of the trade ensure professional results. order your BERNINA overlocker and sewing machines is a real source of course report on a regular basis. We also of inspiration - BERNINA Creative Sewing, our international sewing magazine, is a range of booklets...


