
User Guide
Page 3
... household waste. This sewing computer is intended for any adjustments in this product with the words: «DoubleInsulation» or «double-insulated». In case of manufacturing. Turn power switch to «0» (off ), then remove the plug from the outlet. 13. SAVE THESE INSTRUCTIONS! Always unplug the sewing...a double-insulated product nor should only be identical to the original parts in an environmentally responsible way according to Electromagnetic Compatibility (EMC). Environmental Protection BERNINA is provided on the servicing of grounding.
... household waste. This sewing computer is intended for any adjustments in this product with the words: «DoubleInsulation» or «double-insulated». In case of manufacturing. Turn power switch to «0» (off ), then remove the plug from the outlet. 13. SAVE THESE INSTRUCTIONS! Always unplug the sewing...a double-insulated product nor should only be identical to the original parts in an environmentally responsible way according to Electromagnetic Compatibility (EMC). Environmental Protection BERNINA is provided on the servicing of grounding.
User Guide
Page 8
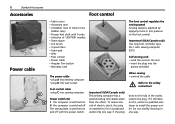
To red uce the risk of electric shock, this plug is intended to fit in a polarized outlet only one of them in the bobbin case) • Presser feet shaft with 5 soles • Selection of 130/705H needles • Seam ripper • Lint brush • 3 spool ... contact a qualified electrican to the safety instruction! 8 Standard Accessories Accessories Foot control Power cable D C A B • Fabric cover • Accessory case • 2 bobbins (one way. does not fit fully in any way. Important! (USA/Canada only) Use only foot controller type SR-1 with the power...
To red uce the risk of electric shock, this plug is intended to fit in a polarized outlet only one of them in the bobbin case) • Presser feet shaft with 5 soles • Selection of 130/705H needles • Seam ripper • Lint brush • 3 spool ... contact a qualified electrican to the safety instruction! 8 Standard Accessories Accessories Foot control Power cable D C A B • Fabric cover • Accessory case • 2 bobbins (one way. does not fit fully in any way. Important! (USA/Canada only) Use only foot controller type SR-1 with the power...

User Guide
Page 13
... power switch to «0» • open the bobbin cover • grasp the latch of the bobbin case • remove case To insert the bobbin case • hold the bobbin case latch • the finger on the case should point upwards • insert so that it clicks into place Bobbin thread cutter • insert the... bobbin case • take the thread over cutter A • thread is cut • close the bobbin cover Note: The bobbin thread does not have to be brought ...
... power switch to «0» • open the bobbin cover • grasp the latch of the bobbin case • remove case To insert the bobbin case • hold the bobbin case latch • the finger on the case should point upwards • insert so that it clicks into place Bobbin thread cutter • insert the... bobbin case • take the thread over cutter A • thread is cut • close the bobbin cover Note: The bobbin thread does not have to be brought ...

User Guide
Page 29
... foot sole No. 3 and the buttonhole symbol (the first step blinks on the display) • insert the lower thread in the finger of the bobbin case = thread tension is a little higher • mark the buttonhole length in the appropriate position Test sewing • test on the fabric and stabilizer you intend...
... foot sole No. 3 and the buttonhole symbol (the first step blinks on the display) • insert the lower thread in the finger of the bobbin case = thread tension is a little higher • mark the buttonhole length in the appropriate position Test sewing • test on the fabric and stabilizer you intend...

User Guide
Page 33
... cleaning and servicing Cleaning the hook • turn power switch to «0» (off) and pull out plug from electric outlet • remove the bobbin case • push the release lever to the left • push the locking lever to the left and fold down the hook race cover • remove... the hook race cover and secure with the locking lever, the locking pin must engage • check by turning the handwheel • insert the bobbin case Lubricating • squeeze 1-2 drops of solvent to clean the sewing computer!
... cleaning and servicing Cleaning the hook • turn power switch to «0» (off) and pull out plug from electric outlet • remove the bobbin case • push the release lever to the left • push the locking lever to the left and fold down the hook race cover • remove... the hook race cover and secure with the locking lever, the locking pin must engage • check by turning the handwheel • insert the bobbin case Lubricating • squeeze 1-2 drops of solvent to clean the sewing computer!

User Guide
Page 34
...The needle is blunt, bent or incorrectly inserted. • Push right to the top when inserting. • Needle inserted all the way to your BERNINA dealer. Faulty stitching • Remnants of behind presser foot. • When sewing over thick area, the fabric was pushed with foot down. •...• the sewing computer is correct - Upper thread breaks • The upper thread tension is jamming in the bobbin case. 34 Trouble shooting Trouble shooting In most cases you will be able to run or runs slowly • Plug not properly inserted. • Power switch in off ...
...The needle is blunt, bent or incorrectly inserted. • Push right to the top when inserting. • Needle inserted all the way to your BERNINA dealer. Faulty stitching • Remnants of behind presser foot. • When sewing over thick area, the fabric was pushed with foot down. •...• the sewing computer is correct - Upper thread breaks • The upper thread tension is jamming in the bobbin case. 34 Trouble shooting Trouble shooting In most cases you will be able to run or runs slowly • Plug not properly inserted. • Power switch in off ...
User Guide
Page 35
... stitch memory 8-11 8 21 B Balance Blind stitch Bobbin Bobbin case Bobbin thread cutter Buttonhole 20, 28, 30 23, 26 12-14 13 12, 13 29, 30 C Changing the presser foot sole 15 Changing the needle ...
... stitch memory 8-11 8 21 B Balance Blind stitch Bobbin Bobbin case Bobbin thread cutter Buttonhole 20, 28, 30 23, 26 12-14 13 12, 13 29, 30 C Changing the presser foot sole 15 Changing the needle ...


