
Manual
Page 4
Notes of the Bernina Dealer regarding instructions, service and delivery of parts Date Notes Instructions forusing the BERNINA Portable Sewing Machine Zigzag Model 125 FR. GEGAUF LIMITED Bernina Sewing Machine Factory STECKBORN Switzerland 4 5
Notes of the Bernina Dealer regarding instructions, service and delivery of parts Date Notes Instructions forusing the BERNINA Portable Sewing Machine Zigzag Model 125 FR. GEGAUF LIMITED Bernina Sewing Machine Factory STECKBORN Switzerland 4 5
Manual
Page 6
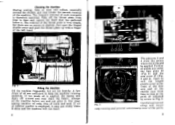
... Machine Oil the machine frequently, but not too heavily. Just open the hinged shuttle cover and push the throat plate up with a finger of the parts. 9 b. Cleaning the Machine During sewing, lints or dust will collect, especially around the shuttle, arid may get sticky when it dries and the machine will...
... Machine Oil the machine frequently, but not too heavily. Just open the hinged shuttle cover and push the throat plate up with a finger of the parts. 9 b. Cleaning the Machine During sewing, lints or dust will collect, especially around the shuttle, arid may get sticky when it dries and the machine will...
Manual
Page 7
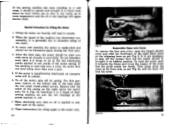
... cover at the two lubrication points marked in a warm room about an hour before use so that no oil is generally due to any other part of the cover into the two bearings at the points marked in its front side, as per Fig. 6a, and the latch will lead to...
... cover at the two lubrication points marked in a warm room about an hour before use so that no oil is generally due to any other part of the cover into the two bearings at the points marked in its front side, as per Fig. 6a, and the latch will lead to...
Manual
Page 13
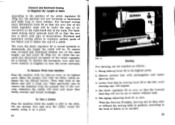
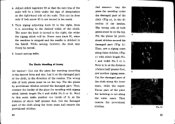
...14), by turning knob 28 to its highest point. Forward and backward sewing allows to reinforce certain parts of the fabric and to lengthen it, turn the screw outwards. Raise the presser foot with ...the longer the stitch will appear. 4. on the right-hand side of the scale. With the Bernina Portable, darning can be mended. 28 The more the stitch regulator 29 is still in motion without... fabric to the rear only, otherwise the needle will not be set the machine as a pivot. 22 BERNINA. Then take -up lever at its highest point. 2. Remove presser foot with or without need. 5....
...14), by turning knob 28 to its highest point. Forward and backward sewing allows to reinforce certain parts of the fabric and to lengthen it, turn the screw outwards. Raise the presser foot with ...the longer the stitch will appear. 4. on the right-hand side of the scale. With the Bernina Portable, darning can be mended. 28 The more the stitch regulator 29 is still in motion without... fabric to the rear only, otherwise the needle will not be set the machine as a pivot. 22 BERNINA. Then take -up lever at its highest point. 2. Remove presser foot with or without need. 5....

Manual
Page 15
... fill out the small interstices in the laddering direction by some more covering seams, until the damaged part is also possible to rotate the inner ring a quarter of the ring be well stretched. It ..., until the hole is at the toe or at different lengths into the outer ring, that the part of the stocking inside of a turn and to continue to prevent any direction. Begin sewing these covering... ring backwards and forwards. Make sure that is advisable to sew first a seam round the damaged part, in reverse by pressing the two finger-grips 35. Press the inner ring right down, so ...
... fill out the small interstices in the laddering direction by some more covering seams, until the damaged part is also possible to rotate the inner ring a quarter of the ring be well stretched. It ..., until the hole is at the toe or at different lengths into the outer ring, that the part of the stocking inside of a turn and to continue to prevent any direction. Begin sewing these covering... ring backwards and forwards. Make sure that is advisable to sew first a seam round the damaged part, in reverse by pressing the two finger-grips 35. Press the inner ring right down, so ...
Manual
Page 18
...b sew another zigzag seam. Insert sewing table. Lay it on the top. Next to the desired form and size. sional stitches around the damaged part. The Elastic Mending of Jersey fat manner: Cut out the piece for mending under the sign of the cloth, in too much. 5. The wrong... another one inside of it , at the distance of the meshes. While sewing, however, the knob may freely be a little under the damaged part of the piece for mending is stitched in the di- Then remove the provisional stitches. Then, oversew the border of the cloth (Fig. b). ...
...b sew another zigzag seam. Insert sewing table. Lay it on the top. Next to the desired form and size. sional stitches around the damaged part. The Elastic Mending of Jersey fat manner: Cut out the piece for mending under the sign of the cloth, in too much. 5. The wrong... another one inside of it , at the distance of the meshes. While sewing, however, the knob may freely be a little under the damaged part of the piece for mending is stitched in the di- Then remove the provisional stitches. Then, oversew the border of the cloth (Fig. b). ...

Manual
Page 19
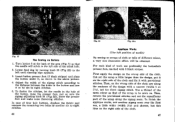
... until darning sign appears. 2. a I .1 Darning with Wool When darning with wool rows. 2. The darning with wool is covered with wool, use darning cotton. The damaged part is made too close as follows: 1. Begin at the darning foot. The colour of both the wool and the top and bottom threads will be... the same as the colour of the damaged part and stretch the wool from Ieft to right and in reverse, one to be mended, so that the darn will be made in the slit...
... until darning sign appears. 2. a I .1 Darning with Wool When darning with wool rows. 2. The darning with wool is covered with wool, use darning cotton. The damaged part is made too close as follows: 1. Begin at the darning foot. The colour of both the wool and the top and bottom threads will be... the same as the colour of the damaged part and stretch the wool from Ieft to right and in reverse, one to be mended, so that the darn will be made in the slit...

Manual
Page 20
.... 25 cerized cotton No. 50,2 ❑r 60,2. ton, coloured braid or by making a long stitch. 36 The Braiding For this zigzag seam cut the superfluous part of its edge, so that the sewing is not round but large, so to each other, the effect can be used for edging fine material.
.... 25 cerized cotton No. 50,2 ❑r 60,2. ton, coloured braid or by making a long stitch. 36 The Braiding For this zigzag seam cut the superfluous part of its edge, so that the sewing is not round but large, so to each other, the effect can be used for edging fine material.
Manual
Page 25
Then, remove the provisional stitches and cut the superfluous part of the cloth. Turn button 5 at the back of the arm (Fig. 7) so that of the scrap to eight stitches. 5. For such kind of work ...
Then, remove the provisional stitches and cut the superfluous part of the cloth. Turn button 5 at the back of the arm (Fig. 7) so that of the scrap to eight stitches. 5. For such kind of work ...
Manual
Page 26
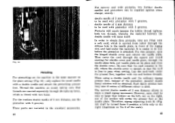
... on No.2 of the needles will strike the presser foot or the needle plate. only replace the usual needle with top and bottom threads. These parts are included in the slit, where the shuttle cover is opened, so that threads are filled with 3 grooves. It is easier to be obtained. Be...
... on No.2 of the needles will strike the presser foot or the needle plate. only replace the usual needle with top and bottom threads. These parts are included in the slit, where the shuttle cover is opened, so that threads are filled with 3 grooves. It is easier to be obtained. Be...
Manual
Page 28
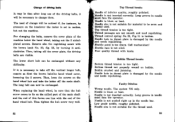
... main shaft. Needle hole in the needle bar. Change of driving belts It may be that the hub screw comes to lie on the milled part of the main shaft and the end of this forms one line with the end of the hand wheel hub. For changing the belts, remove...
... main shaft. Needle hole in the needle bar. Change of driving belts It may be that the hub screw comes to lie on the milled part of the main shaft and the end of this forms one line with the end of the hand wheel hub. For changing the belts, remove...
Manual
Page 30
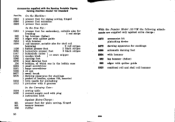
... cord with plug 1 instruction book Against Extra-Charge : 851 presser foot for plain sewing, hinged 861 narrow hemmer 866 ruffler 56 With the Popular Model 125 VM the following attachments are supplied only against extra charge: 5279 5878 UN 5964 862 863 5320 accessories kit pintucking device darning apparatus for stockings...
... cord with plug 1 instruction book Against Extra-Charge : 851 presser foot for plain sewing, hinged 861 narrow hemmer 866 ruffler 56 With the Popular Model 125 VM the following attachments are supplied only against extra charge: 5279 5878 UN 5964 862 863 5320 accessories kit pintucking device darning apparatus for stockings...


