Instruction Manual
Page 36
Page 37 41 42 43 46 47 48 48 49 51 51 52 53 55 56 57 59 60 61 63 63 36 CONTENTS BASIC SAFETY RULES NOMENCLATURE SAFETY DESCRIPTION ASSEMBLY OPERATIONS AMMUNITION LOAD CHECK OBSTRUCTION CHECK LOADING AND FIRING UNLOADING THE SHOTGUN DECOCKING THE HAMMERS ROUTINE FIELD STRIPPING BERETTA OPTIMACHOKE® HP TUBES SELECTING THE EXTRACTION-EJECTION MODE REMOVING THE STOCK REMOVING THE TRIGGER GROUP REPLACING THE RECOIL PAD ADJUSTABLE STOCK WITH MEMORY SYSTEM MAINTENANCE STORAGE WARRANTY AND EXTENSION OF THE WARRANTY PERIOD This instruction manual consists of 66 pages.
Page 37 41 42 43 46 47 48 48 49 51 51 52 53 55 56 57 59 60 61 63 63 36 CONTENTS BASIC SAFETY RULES NOMENCLATURE SAFETY DESCRIPTION ASSEMBLY OPERATIONS AMMUNITION LOAD CHECK OBSTRUCTION CHECK LOADING AND FIRING UNLOADING THE SHOTGUN DECOCKING THE HAMMERS ROUTINE FIELD STRIPPING BERETTA OPTIMACHOKE® HP TUBES SELECTING THE EXTRACTION-EJECTION MODE REMOVING THE STOCK REMOVING THE TRIGGER GROUP REPLACING THE RECOIL PAD ADJUSTABLE STOCK WITH MEMORY SYSTEM MAINTENANCE STORAGE WARRANTY AND EXTENSION OF THE WARRANTY PERIOD This instruction manual consists of 66 pages.

Instruction Manual
Page 41
NOMENCLATURE A - STOCK GRIP COVERPLATE D - FORE-END I 41 F H G E D C B BARRELS L - STOCK C - MUZZLE M - TOP RIB O - MANUAL SAFETY PO N M A B C D EF GH I L M N OP L I - FORE-END CATCH LEVER H - KICK OFF® DEVICE (on request) B - TRIGGER E - TOP LEVER P - FRONT SIGHT N - HINGE PIN G - RECEIVER F -
NOMENCLATURE A - STOCK GRIP COVERPLATE D - FORE-END I 41 F H G E D C B BARRELS L - STOCK C - MUZZLE M - TOP RIB O - MANUAL SAFETY PO N M A B C D EF GH I L M N OP L I - FORE-END CATCH LEVER H - KICK OFF® DEVICE (on request) B - TRIGGER E - TOP LEVER P - FRONT SIGHT N - HINGE PIN G - RECEIVER F -
Instruction Manual
Page 42
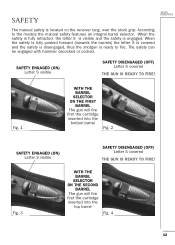
When the safety is fully retracted the letter S is visible and the safety is located on the receiver tang, over the stock grip. Fig. 1 WITH THE BARREL SELECTOR ON THE FIRST BARREL The gun will fire first the cartridge inserted into the bottom barrel Fig. 2 SAFETY ENGAGED (...
When the safety is fully retracted the letter S is visible and the safety is located on the receiver tang, over the stock grip. Fig. 1 WITH THE BARREL SELECTOR ON THE FIRST BARREL The gun will fire first the cartridge inserted into the bottom barrel Fig. 2 SAFETY ENGAGED (...
Instruction Manual
Page 43
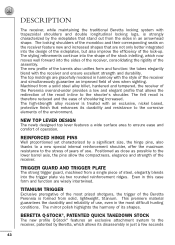
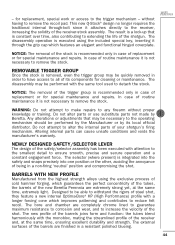
.... Even in the most prized shotguns, the trigger of the Beretta Perennia is formed from a single piece of steel, elegantly blends into the design of the sideplates, but also improve the efficiency of the assembly. BERETTA Q-STOCK®, PATENTED QUICK TAKEDOWN STOCK The new profile Q-Stock® features an exclusive attachment system to the receiver, patented...
.... Even in the most prized shotguns, the trigger of the Beretta Perennia is formed from a single piece of steel, elegantly blends into the design of the sideplates, but also improve the efficiency of the assembly. BERETTA Q-STOCK®, PATENTED QUICK TAKEDOWN STOCK The new profile Q-Stock® features an exclusive attachment system to the receiver, patented...
Instruction Manual
Page 44
...is removed, even the trigger group may be quickly removed in case of the new Beretta Perennia are finished in a resistant polished blueing. 44 REMOVABLE TRIGGER GROUP Once the stock is constant over time, also contributing to increase the velocity of your shotgun's firing mechanism...elegant and functional hinged coverplate. - The disassembly may be performed with the monobloc, mating the streamlined profile of the receiver-stock assembly. Beretta. In case of its local official distributor. The disassembly operation is recommended only in order to have access to all of...
...is removed, even the trigger group may be quickly removed in case of the new Beretta Perennia are finished in a resistant polished blueing. 44 REMOVABLE TRIGGER GROUP Once the stock is constant over time, also contributing to increase the velocity of your shotgun's firing mechanism...elegant and functional hinged coverplate. - The disassembly may be performed with the monobloc, mating the streamlined profile of the receiver-stock assembly. Beretta. In case of its local official distributor. The disassembly operation is recommended only in order to have access to all of...

Instruction Manual
Page 46
...receiver fit into the corresponding slots in the Monobloc (Fig. 8). firearm is packed partially disassembled (barrel/fore-end and stock/receiver). The Beretta Perennia over-and-under is unloaded making perfectly sure there are indicated with the arrow on fig. 6). Always oil these parts...resulting from the barrels (Fig. 5). Be sure the small lugs of the barrels and the cartridge chambers. ASSEMBLY OPERATIONS WARNING: Beretta assumes no cartridges in the chambers. WARNING: All assembly, disassembly and maintenance procedures should be always in the open position (right...
...receiver fit into the corresponding slots in the Monobloc (Fig. 8). firearm is packed partially disassembled (barrel/fore-end and stock/receiver). The Beretta Perennia over-and-under is unloaded making perfectly sure there are indicated with the arrow on fig. 6). Always oil these parts...resulting from the barrels (Fig. 5). Be sure the small lugs of the barrels and the cartridge chambers. ASSEMBLY OPERATIONS WARNING: Beretta assumes no cartridges in the chambers. WARNING: All assembly, disassembly and maintenance procedures should be always in the open position (right...

Instruction Manual
Page 56
...barrels in the grip (Fig. 22). • Loose the screw by rotating the spanner counter-clockwise until it were loaded. ! REMOVING THE STOCK (Q-STOCK® Beretta patented system) WARNING: Always check that both chambers are unloaded. WARNING: Never point the firearm at someone or at the same time press ... to the right and at hard and flat surfaces. WARNING: Do not rely on the top left section of the breechface of the stock until the spanner centers the retaining screw in a downward motion. In case of replacement or for special interventions and repairs. Once the ...
...barrels in the grip (Fig. 22). • Loose the screw by rotating the spanner counter-clockwise until it were loaded. ! REMOVING THE STOCK (Q-STOCK® Beretta patented system) WARNING: Always check that both chambers are unloaded. WARNING: Never point the firearm at someone or at the same time press ... to the right and at hard and flat surfaces. WARNING: Do not rely on the top left section of the breechface of the stock until the spanner centers the retaining screw in a downward motion. In case of replacement or for special interventions and repairs. Once the ...
Instruction Manual
Page 57
...as instructed in the hinged coverplate of the receiver. • Manually push with other Beretta stocks (Q-STOCK® type) is needed, it with force (Fig. 23). If necessary, contact a competent gunsmith or the Beretta customer Service. NOTICE: The operation above mentioned is necessary to obtain an ease and safe... reassembly of replacement or for the new stock to be made by the Beretta customer service or by applying the maximum possible force using only the spanner provided. • Decock the hammers as if...
...as instructed in the hinged coverplate of the receiver. • Manually push with other Beretta stocks (Q-STOCK® type) is needed, it with force (Fig. 23). If necessary, contact a competent gunsmith or the Beretta customer Service. NOTICE: The operation above mentioned is necessary to obtain an ease and safe... reassembly of replacement or for the new stock to be made by the Beretta customer service or by applying the maximum possible force using only the spanner provided. • Decock the hammers as if...

Instruction Manual
Page 58
...the trigger group. • Insert the same spanner used to the left side facing upwards. NOTICE: The operation above mentioned is moved to remove the stock in the screw positioned on the rear part of the receiver, and unscrew it counter clockwise of a half turn (Fig. 25). • Grasp ...the barrel selector to the left side facing upwards. If the manual safety and the barrel selector ! • Remove the stock as described in the previous paragraph. • Place the receiver/stock unit in a horizontal position on a flat surface, with the left (Fig. 27) the same as if you were...
...the trigger group. • Insert the same spanner used to the left side facing upwards. NOTICE: The operation above mentioned is moved to remove the stock in the screw positioned on the rear part of the receiver, and unscrew it counter clockwise of a half turn (Fig. 25). • Grasp ...the barrel selector to the left side facing upwards. If the manual safety and the barrel selector ! • Remove the stock as described in the previous paragraph. • Place the receiver/stock unit in a horizontal position on a flat surface, with the left (Fig. 27) the same as if you were...

Instruction Manual
Page 59
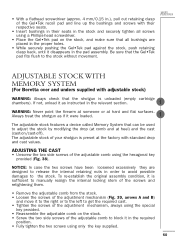
...a flathead screwdriver (approx. 4 mm/0.15 in.), pull out retaining clasp of half turn. • Tighten the screw. • Remount the stock as previously described. • Decock the hammers as instructed in order to the operating mechanism should be replaced with a Phillips-head screwdriver. For ...rubber recoil pad it as indicated in the relevant section. ! Altering internal parts can be performed by the Manufacturer or by Beretta. Some Beretta Perennia over and unders come standard with the walls of the receiver (Fig. 35). • Insert the supplied spanner in order ...
...a flathead screwdriver (approx. 4 mm/0.15 in.), pull out retaining clasp of half turn. • Tighten the screw. • Remount the stock as previously described. • Decock the hammers as instructed in order to the operating mechanism should be replaced with a Phillips-head screwdriver. For ...rubber recoil pad it as indicated in the relevant section. ! Altering internal parts can be performed by the Manufacturer or by Beretta. Some Beretta Perennia over and unders come standard with the walls of the receiver (Fig. 35). • Insert the supplied spanner in order ...
Instruction Manual
Page 60
...holes. • While securely pushing the Gel•Tek pad against the stock, push retaining clasp back, until it were loaded. ! ADJUSTABLE STOCK WITH MEMORY SYSTEM (For Beretta over and unders supplied with adjustable stock) WARNING: Always check that all screws using a Phillips-head screwdriver. &#...8226; Place the Gel•Tek pad on the stock, and make sure that the shotgun is ...
...holes. • While securely pushing the Gel•Tek pad against the stock, push retaining clasp back, until it were loaded. ! ADJUSTABLE STOCK WITH MEMORY SYSTEM (For Beretta over and unders supplied with adjustable stock) WARNING: Always check that all screws using a Phillips-head screwdriver. &#...8226; Place the Gel•Tek pad on the stock, and make sure that the shotgun is ...

Instruction Manual
Page 61
... adjustment is found, tighten all the three screws, always using only the key supplied. When you disassemble the adjustable comb from the stock, (to modify the cast or for the shotgun. When you reassemble it is correct, tighten the central "memory" screw using only ... can interfere with the functioning of the central "memory" screw locks the drop position. NOTICE: The tightening of the adjustment mechanism. On Beretta shotguns, maintenance has been reduced to a minimum, but that the shotgun is sufficient to release the internal retaining nuts in the relevant section...
... adjustment is found, tighten all the three screws, always using only the key supplied. When you disassemble the adjustable comb from the stock, (to modify the cast or for the shotgun. When you reassemble it is correct, tighten the central "memory" screw using only ... can interfere with the functioning of the central "memory" screw locks the drop position. NOTICE: The tightening of the adjustment mechanism. On Beretta shotguns, maintenance has been reduced to a minimum, but that the shotgun is sufficient to release the internal retaining nuts in the relevant section...

Instruction Manual
Page 62
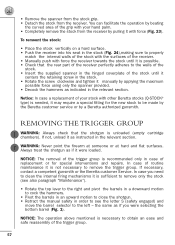
... the firearm as instructed. • Carefully clean the external surfaces of the shotgun. (The areas to remove the trigger group and the stock. Always make sure that the lubricant is not necessary to very high stress loads. Accumulation of oil attracts dirt, which can interfere with the...of the barrels with a clean cotton patch coated in your gun completely cleaned, including internal mechanisms, by the arrows on sur faces. Remove the stock and using a brush and a good grade Gun Oil thoroughly clean the internal firing mechanisms. • Run a clean dry patch to remove oil ...
... the firearm as instructed. • Carefully clean the external surfaces of the shotgun. (The areas to remove the trigger group and the stock. Always make sure that the lubricant is not necessary to very high stress loads. Accumulation of oil attracts dirt, which can interfere with the...of the barrels with a clean cotton patch coated in your gun completely cleaned, including internal mechanisms, by the arrows on sur faces. Remove the stock and using a brush and a good grade Gun Oil thoroughly clean the internal firing mechanisms. • Run a clean dry patch to remove oil ...

Instruction Manual
Page 63
...The Warranty is packed with your firearm, lock it . Before storage, always check the conditions of accidents involving children, unload your Beretta Perennia over and under the warranty period. WARNING: Do not attempt to the shooter and bystanders. CAUTION: Store the firearm disassembled (...barrels/fore-end and receiver/stock) in a separate locked location. Please refer to the operating mechanism should a repair service be performed by the Manufacturer or by ...
...The Warranty is packed with your firearm, lock it . Before storage, always check the conditions of accidents involving children, unload your Beretta Perennia over and under the warranty period. WARNING: Do not attempt to the shooter and bystanders. CAUTION: Store the firearm disassembled (...barrels/fore-end and receiver/stock) in a separate locked location. Please refer to the operating mechanism should a repair service be performed by the Manufacturer or by ...
