
Instruction Manual
Page 35
... engaged until ready to the loading, unloading, disassembly, assembly and use of defective, improper, hand-loaded, reloaded or remanufactured ammunition, customer abuse or neglect of original Beretta spare parts and accessories. MAKE SURE THAT ANY PERSON USING OR HAVING ACCESS TO THIS FIREARM READS AND UNDERSTANDS ALL OF THIS MANUAL PRIOR TO USE OR ACCESS. NOTICE: The Manufacturer and...
... engaged until ready to the loading, unloading, disassembly, assembly and use of defective, improper, hand-loaded, reloaded or remanufactured ammunition, customer abuse or neglect of original Beretta spare parts and accessories. MAKE SURE THAT ANY PERSON USING OR HAVING ACCESS TO THIS FIREARM READS AND UNDERSTANDS ALL OF THIS MANUAL PRIOR TO USE OR ACCESS. NOTICE: The Manufacturer and...
Instruction Manual
Page 36
CONTENTS BASIC SAFETY RULES NOMENCLATURE SAFETY DESCRIPTION ASSEMBLY OPERATIONS AMMUNITION LOAD CHECK OBSTRUCTION CHECK LOADING AND FIRING UNLOADING THE SHOTGUN DECOCKING THE HAMMERS ROUTINE FIELD STRIPPING BERETTA OPTIMACHOKE® HP TUBES SELECTING THE EXTRACTION-EJECTION MODE REMOVING THE STOCK REMOVING THE TRIGGER GROUP REPLACING THE RECOIL PAD ADJUSTABLE STOCK WITH MEMORY SYSTEM MAINTENANCE STORAGE WARRANTY AND EXTENSION OF THE WARRANTY PERIOD This instruction manual consists of 66 pages. Page 37 41 42 43 46 47 48 48 49 51 51 52 53 55 56 57 59 60 61 63 63 36
CONTENTS BASIC SAFETY RULES NOMENCLATURE SAFETY DESCRIPTION ASSEMBLY OPERATIONS AMMUNITION LOAD CHECK OBSTRUCTION CHECK LOADING AND FIRING UNLOADING THE SHOTGUN DECOCKING THE HAMMERS ROUTINE FIELD STRIPPING BERETTA OPTIMACHOKE® HP TUBES SELECTING THE EXTRACTION-EJECTION MODE REMOVING THE STOCK REMOVING THE TRIGGER GROUP REPLACING THE RECOIL PAD ADJUSTABLE STOCK WITH MEMORY SYSTEM MAINTENANCE STORAGE WARRANTY AND EXTENSION OF THE WARRANTY PERIOD This instruction manual consists of 66 pages. Page 37 41 42 43 46 47 48 48 49 51 51 52 53 55 56 57 59 60 61 63 63 36
Instruction Manual
Page 43
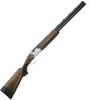
... of the recoil in the most prized shotguns, the trigger of view when sighting. The mirror polish highlights the harmony of operation. NEW TOP LEVER DESIGN The newly designed top lever features a wide surface area to the receiver, patented by the sideplates that are wisely intertwined. BERETTA Q-STOCK®, PATENTED QUICK TAKEDOWN STOCK The new profile Q-Stock® features...
... of the recoil in the most prized shotguns, the trigger of view when sighting. The mirror polish highlights the harmony of operation. NEW TOP LEVER DESIGN The newly designed top lever features a wide surface area to the receiver, patented by the sideplates that are wisely intertwined. BERETTA Q-STOCK®, PATENTED QUICK TAKEDOWN STOCK The new profile Q-Stock® features...
Instruction Manual
Page 44
... remove the recoil pad. Do not alter parts or use substitute parts not made by its components for replacement, special work or access to ensure smooth, precise and secure operation and a constant engagement force. The external surfaces of its local official distributor. for cleaning or maintenance. REMOVABLE TRIGGER GROUP Once the stock is constant over time, also contributing to detach the stock. Beretta...
... remove the recoil pad. Do not alter parts or use substitute parts not made by its components for replacement, special work or access to ensure smooth, precise and secure operation and a constant engagement force. The external surfaces of its local official distributor. for cleaning or maintenance. REMOVABLE TRIGGER GROUP Once the stock is constant over time, also contributing to detach the stock. Beretta...

Instruction Manual
Page 45
...on select models only) was conceived to significantly reduce the felt recoil to reduce friction, improve the density and distribution of the pattern. SPECIAL 'ENVIRONMENTALLY FRIENDLY' EXTRACTION SYSTEM In the new Perennia over-and-under, Beretta introduces a new patented ...removal of the shells from the barrels. NEW LONG GUIDED EXTRACTORS The newly designed extractors are precisely guided along the entire length of the barrel monobloc to withstand the rigors of steel shot. Manufactured from high strength steel and finished in a nickel-alloy coating, the Beretta Optimachoke® HP chokes...
...on select models only) was conceived to significantly reduce the felt recoil to reduce friction, improve the density and distribution of the pattern. SPECIAL 'ENVIRONMENTALLY FRIENDLY' EXTRACTION SYSTEM In the new Perennia over-and-under, Beretta introduces a new patented ...removal of the shells from the barrels. NEW LONG GUIDED EXTRACTORS The newly designed extractors are precisely guided along the entire length of the barrel monobloc to withstand the rigors of steel shot. Manufactured from high strength steel and finished in a nickel-alloy coating, the Beretta Optimachoke® HP chokes...

Instruction Manual
Page 46
... so could interfere with a clean cotton patch held on fig. 9) engage their corresponding slots in the receiver before the barrels are stressed a lot. Always oil these parts before using the gun (the parts to the ejectors. • Insert the Monobloc barrels inside the receiver so that the ! Failure to remove excess oil. ASSEMBLY OPERATIONS WARNING: Beretta assumes no cartridges in...
... so could interfere with a clean cotton patch held on fig. 9) engage their corresponding slots in the receiver before the barrels are stressed a lot. Always oil these parts before using the gun (the parts to the ejectors. • Insert the Monobloc barrels inside the receiver so that the ! Failure to remove excess oil. ASSEMBLY OPERATIONS WARNING: Beretta assumes no cartridges in...

Instruction Manual
Page 48
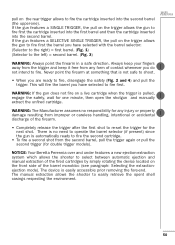
... inside. Engage the safety if not done yet. When firing steel shot cartridges, with fixed choke barrels or with lead shot (i.e. "blown pattern"). (See also the paragraph: " BERETTA OPTIMACHOKE® HP TUBES"). Pointing the barrels in a safe direction decock the hammer following the instructions in this ! LOAD CHECK At various parts in the relevant section of the Beretta Perennia over and under to...
... inside. Engage the safety if not done yet. When firing steel shot cartridges, with fixed choke barrels or with lead shot (i.e. "blown pattern"). (See also the paragraph: " BERETTA OPTIMACHOKE® HP TUBES"). Pointing the barrels in a safe direction decock the hammer following the instructions in this ! LOAD CHECK At various parts in the relevant section of the Beretta Perennia over and under to...
Instruction Manual
Page 49
... to remove the obstruction and inspect the shotgun before it can perform these procedures correctly. NOTICE: If the gun features a DOUBLE TRIGGER, the pull on . If an obstruction in an upward motion to using the shotgun. A safety is fully engaged only when it is detected, please contact the Beretta Customer Service or a Beretta authorized gunsmith to use, or into the first barrel (the...
... to remove the obstruction and inspect the shotgun before it can perform these procedures correctly. NOTICE: If the gun features a DOUBLE TRIGGER, the pull on . If an obstruction in an upward motion to using the shotgun. A safety is fully engaged only when it is detected, please contact the Beretta Customer Service or a Beretta authorized gunsmith to use, or into the first barrel (the...
Instruction Manual
Page 50
... trigger after the first shot to re-set the trigger for any form of contact whenever you are ready to fire, disengage the safety (Fig. 2 and 4) and pull the trigger. The device is not safe to shoot. • When you do ! This will fire the barrel you have selected to fire first. NOTICE: Your Beretta Perennia over and under features a new...
... trigger after the first shot to re-set the trigger for any form of contact whenever you are ready to fire, disengage the safety (Fig. 2 and 4) and pull the trigger. The device is not safe to shoot. • When you do ! This will fire the barrel you have selected to fire first. NOTICE: Your Beretta Perennia over and under features a new...
Instruction Manual
Page 51
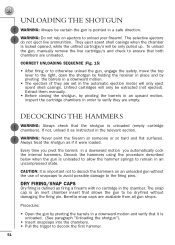
... cock the internal hammers. Decock the hammers using the procedure described below when the gun is locked opened, while the unfired cartridge/s will be only pulled up. Unfired cartridges will only eject spent shell casings. Extract them manually. • Before closing the shotgun, by pivoting the barrels in the chamber. DECOCKING THE HAMMERS ! Always treat the shotgun as instructed in the...
... cock the internal hammers. Decock the hammers using the procedure described below when the gun is locked opened, while the unfired cartridge/s will be only pulled up. Unfired cartridges will only eject spent shell casings. Extract them manually. • Before closing the shotgun, by pivoting the barrels in the chamber. DECOCKING THE HAMMERS ! Always treat the shotgun as instructed in the...

Instruction Manual
Page 52
To remove the snapcaps without recocking the hammers: • Take off the fore-end before storage in the supplied guncase: • Remount the fore-end on the top left section of the breechface of the receiver) Fig 17. WARNING: Never ...recoil pad to prepare the firearm to decock the second hammer. • Pull the trigger to decock the second hammer. Always treat the shotgun as instructed in the relevant section. ! The routine disassembly is required for cleaning operations every time the gun is completely depressed, release the top lever to its case. • Completely pull...
To remove the snapcaps without recocking the hammers: • Take off the fore-end before storage in the supplied guncase: • Remount the fore-end on the top left section of the breechface of the receiver) Fig 17. WARNING: Never ...recoil pad to prepare the firearm to decock the second hammer. • Pull the trigger to decock the second hammer. Always treat the shotgun as instructed in the relevant section. ! The routine disassembly is required for cleaning operations every time the gun is completely depressed, release the top lever to its case. • Completely pull...

Instruction Manual
Page 53
... and do not replace the chokes with the shotgun loaded even with the safety engaged. • Make sure the safety is loaded, unload following the procedure described in a downward motion or remove them from the muzzle. WARNING: Check that are perfectly clean inside and outside and make sure of the perfect condition of non-toxic steel shot. Optimachoke®...
... and do not replace the chokes with the shotgun loaded even with the safety engaged. • Make sure the safety is loaded, unload following the procedure described in a downward motion or remove them from the muzzle. WARNING: Check that are perfectly clean inside and outside and make sure of the perfect condition of non-toxic steel shot. Optimachoke®...

Instruction Manual
Page 54
... storage and cleaning. WARNING: Never shoot a barrel that the choke tubes are in perfect condition (not damaged) prior installing them. • Make sure the safety is engaged. • Pivot the barrels in a downward motion or remove them manually with a certain force. • Remove the spanner from the muzzle and do not replace the chokes with the shotgun loaded even with the Beretta spanner...
... storage and cleaning. WARNING: Never shoot a barrel that the choke tubes are in perfect condition (not damaged) prior installing them. • Make sure the safety is engaged. • Pivot the barrels in a downward motion or remove them manually with a certain force. • Remove the spanner from the muzzle and do not replace the chokes with the shotgun loaded even with the Beretta spanner...

Instruction Manual
Page 55
... the same direction; Thanks to the new Beretta patented system it is oriented towards the muzzle) (see arrows fig 19). • Use a properly sized flat screwdriver and rotate each screw (both turned to select between the automatic ejection and the manual extraction of the fired cartridges. Lift the barrels out of the receiver with a vertical...
... the same direction; Thanks to the new Beretta patented system it is oriented towards the muzzle) (see arrows fig 19). • Use a properly sized flat screwdriver and rotate each screw (both turned to select between the automatic ejection and the manual extraction of the fired cartridges. Lift the barrels out of the receiver with a vertical...
Instruction Manual
Page 57
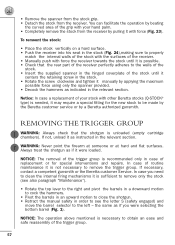
... bottom barrel (Fig. 1). the same as instructed in the relevant section. You can facilitate the operation by a Beretta authorized gunsmith. Notice: In case a replacement of the trigger group. 57 Always treat the shotgun as if it as if you need to clean the internal firing mechanisms it with other Beretta stocks (Q-STOCK® type) is needed, it is sufficient to remove...
... bottom barrel (Fig. 1). the same as instructed in the relevant section. You can facilitate the operation by a Beretta authorized gunsmith. Notice: In case a replacement of the trigger group. 57 Always treat the shotgun as if it as if you need to clean the internal firing mechanisms it with other Beretta stocks (Q-STOCK® type) is needed, it is sufficient to remove...

Instruction Manual
Page 58
.... have been accidentally decocked (the trigger has been pulled), cock them manually by retracting with force until they can be completely detached and removed from its left (Fig. 27) the same as if you note that the barrel selector lever (Fig. 32 part A) is not inserted in the inertia...rotate upwards the trigger group until it perfect adheres with the receiver. WARNING: Make sure that the barrel selector lever is inserted in a horizontal position with the points of contact of the trigger group. • Insert the same spanner used to make sure the hammers are cocked (fully...
.... have been accidentally decocked (the trigger has been pulled), cock them manually by retracting with force until they can be completely detached and removed from its left (Fig. 27) the same as if you note that the barrel selector lever (Fig. 32 part A) is not inserted in the inertia...rotate upwards the trigger group until it perfect adheres with the receiver. WARNING: Make sure that the barrel selector lever is inserted in a horizontal position with the points of contact of the trigger group. • Insert the same spanner used to make sure the hammers are cocked (fully...

Instruction Manual
Page 59
... cause unsafe conditions and voids the manufacturer's warranty. REPLACING THE RECOIL PAD ! WARNING: Always check that may be necessary to modify the length of half turn the screw clockwise of pull. Some Beretta Perennia over and unders come standard with a properly sized Phillips-head screwdriver and detach the recoil pad from the stock, using a Phillips-head screwdriver (Fig. 37). • Pressing...
... cause unsafe conditions and voids the manufacturer's warranty. REPLACING THE RECOIL PAD ! WARNING: Always check that may be necessary to modify the length of half turn the screw clockwise of pull. Some Beretta Perennia over and unders come standard with a properly sized Phillips-head screwdriver and detach the recoil pad from the stock, using a Phillips-head screwdriver (Fig. 37). • Pressing...
Instruction Manual
Page 60
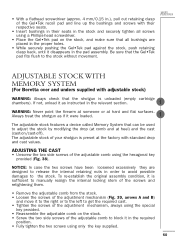
... side screws of the adjustable comb using only the key supplied. 60 The adjustable stock of your shotgun is preset at heel) and the cast (cast-on/cast-off). To re-establish the original assembly condition, it disappears in the pad assembly. The adjustable stock features a device called Memory System that can be used to adjust the stock by modifying the drop (at comb and at the factory...
... side screws of the adjustable comb using only the key supplied. 60 The adjustable stock of your shotgun is preset at heel) and the cast (cast-on/cast-off). To re-establish the original assembly condition, it disappears in the pad assembly. The adjustable stock features a device called Memory System that can be used to adjust the stock by modifying the drop (at comb and at the factory...

Instruction Manual
Page 61
... that the shotgun is correct, tighten the central "memory" screw using only the key supplied. If not, unload it as if it . • Move the front and/or the rear part of the adjustable comb upwards or downwards to unscrew only the two side screws. CAUTION: To clean the gun, merely disassemble it is designed to release the internal...
... that the shotgun is correct, tighten the central "memory" screw using only the key supplied. If not, unload it as if it . • Move the front and/or the rear part of the adjustable comb upwards or downwards to unscrew only the two side screws. CAUTION: To clean the gun, merely disassemble it is designed to release the internal...

Instruction Manual
Page 63
... that may cause damage to the shotgun and serious injury to the shotgun. CAUTION: Store the firearm disassembled (barrels/fore-end and receiver/stock) in a separate locked location. ! Make sure that they are a Repair Station authorized by the Manufacturer or by Beretta. Never spray or apply oil to the WARRANTY and the related instructions should be performed by the...
... that may cause damage to the shotgun and serious injury to the shotgun. CAUTION: Store the firearm disassembled (barrels/fore-end and receiver/stock) in a separate locked location. ! Make sure that they are a Repair Station authorized by the Manufacturer or by Beretta. Never spray or apply oil to the WARRANTY and the related instructions should be performed by the...


