
Beretta Over & Under User Manual
Page 2
...WILL NOT BE COVERED BY THE BERETTA WARRANTY. ALWAYS KEEP THIS MANUAL WITH YOUR FIREARM. In addition to the loading, unloading, disassembly, assembly and use of this firearm, located throughout this manual. WE RECOMMEND THE USE OF ORIGINAL BERETTA SPARE PARTS AND ACCESSORIES. READ THE BASIC SAFETY RULES CAREFULLY AND UNDERSTAND THEM ... INCLUDE IT WITH THE GUN WHEN IT CHANGES OWNERSHIP OR WHEN IT IS LOANED OR PRESENTED TO ANOTHER PERSON. WARNING: IT IS YOUR RESPONSIBILITY TO KNOW AND ABIDE BY FEDERAL, STATE AND LOCAL LAWS GOVERNING THE SALE, TRANSPORTATION AND USE OF FIREARMS IN YOUR ...
...WILL NOT BE COVERED BY THE BERETTA WARRANTY. ALWAYS KEEP THIS MANUAL WITH YOUR FIREARM. In addition to the loading, unloading, disassembly, assembly and use of this firearm, located throughout this manual. WE RECOMMEND THE USE OF ORIGINAL BERETTA SPARE PARTS AND ACCESSORIES. READ THE BASIC SAFETY RULES CAREFULLY AND UNDERSTAND THEM ... INCLUDE IT WITH THE GUN WHEN IT CHANGES OWNERSHIP OR WHEN IT IS LOANED OR PRESENTED TO ANOTHER PERSON. WARNING: IT IS YOUR RESPONSIBILITY TO KNOW AND ABIDE BY FEDERAL, STATE AND LOCAL LAWS GOVERNING THE SALE, TRANSPORTATION AND USE OF FIREARMS IN YOUR ...

Beretta Over & Under User Manual
Page 3
... SHOTGUN 42 DECOCKING THE HAMMERS 42 DISASSEMBLY 43 BERETTA MOBILCHOKE® AND OPTIMACHOKE® TUBES 44 ADJUSTMENT OF LENGTH OF PULL AND REPLACEMENT OF TRIGGER 46 INTERCHANGEABLE TRIGGER GROUP 47 REMOVING THE STOCK 48 REPLACEMENT OF THE GEL•TEK RECOIL PAD 49 ADJUSTABLE STOCK WITH MEMORY SYSTEM 50 REPLACEMENT OF TRUGLO® FRONT SIGHT LUMINOUS INSERT 51 REPLACEMENT OF FIRING PINS 51 MAINTENANCE 52 WARRANTY AND EXTENSION OF THE WARRANTY REPAIR...
... SHOTGUN 42 DECOCKING THE HAMMERS 42 DISASSEMBLY 43 BERETTA MOBILCHOKE® AND OPTIMACHOKE® TUBES 44 ADJUSTMENT OF LENGTH OF PULL AND REPLACEMENT OF TRIGGER 46 INTERCHANGEABLE TRIGGER GROUP 47 REMOVING THE STOCK 48 REPLACEMENT OF THE GEL•TEK RECOIL PAD 49 ADJUSTABLE STOCK WITH MEMORY SYSTEM 50 REPLACEMENT OF TRUGLO® FRONT SIGHT LUMINOUS INSERT 51 REPLACEMENT OF FIRING PINS 51 MAINTENANCE 52 WARRANTY AND EXTENSION OF THE WARRANTY REPAIR...
Beretta Over & Under User Manual
Page 6
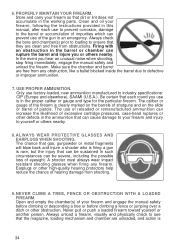
... you use of the gun in the working parts. Firing with an obstruction in the proper caliber or gauge and type for the particular firearm. The chance that the magazine, loading mechanism and chamber are unloaded, and action is clearly marked on the barrels of shotguns and on the slide or barrel of the firearm is 34 Clean and...
... you use of the gun in the working parts. Firing with an obstruction in the proper caliber or gauge and type for the particular firearm. The chance that the magazine, loading mechanism and chamber are unloaded, and action is clearly marked on the barrels of shotguns and on the slide or barrel of the firearm is 34 Clean and...
Beretta Over & Under User Manual
Page 8
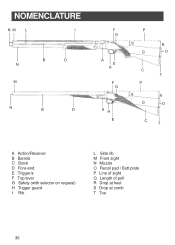
NOMENCLATURE NM L I B D N M N B D F G A E H F G AH E P S R Q O C T P S R Q O C T A Action/Receiver B Barrels C Stock D Fore-end E Trigger/s F Top lever G Safety (with selector on request) H Trigger guard I Rib L Side rib M Front sight N Muzzle O Recoil pad / Butt plate P Line of sight Q Length of pull R Drop at heel S Drop at comb T Toe 36
NOMENCLATURE NM L I B D N M N B D F G A E H F G AH E P S R Q O C T P S R Q O C T A Action/Receiver B Barrels C Stock D Fore-end E Trigger/s F Top lever G Safety (with selector on request) H Trigger guard I Rib L Side rib M Front sight N Muzzle O Recoil pad / Butt plate P Line of sight Q Length of pull R Drop at heel S Drop at comb T Toe 36

Beretta Over & Under User Manual
Page 10
... a cleaning rod to lubricate are indicated by -side shotguns are subject to very high loads: improper lubrication of these components can cause seizing of parts or malfunctioning of the shotgun. (The areas to the ejectors. Fig. 16 38 The receiver and fore-end iron are shipped partially disassembled (barrel/fore-end and stock/action body). The Beretta over...
... a cleaning rod to lubricate are indicated by -side shotguns are subject to very high loads: improper lubrication of these components can cause seizing of parts or malfunctioning of the shotgun. (The areas to the ejectors. Fig. 16 38 The receiver and fore-end iron are shipped partially disassembled (barrel/fore-end and stock/action body). The Beretta over...
Beretta Over & Under User Manual
Page 11
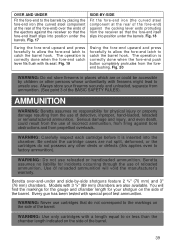
... ammunition will find the markings for the gauge and chamber length for incidents occurring through the use of the BASIC SAFETY RULES). Always store your shotgun on the side of reloaded ammunition. AMMUNITION WARNING: Beretta assumes no liability for your firearms securely and unloaded, separate from the use of the barrel. Beretta assumes no responsibility for physical injury...
... ammunition will find the markings for the gauge and chamber length for incidents occurring through the use of the BASIC SAFETY RULES). Always store your shotgun on the side of reloaded ammunition. AMMUNITION WARNING: Beretta assumes no liability for your firearms securely and unloaded, separate from the use of the barrel. Beretta assumes no responsibility for physical injury...
Beretta Over & Under User Manual
Page 12
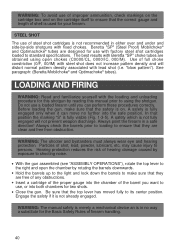
... the barrels prior to loading to ensure that they are clean and free from obstruction. In that they are free of any obstructions. ● Insert a cartridge of the proper gauge into both chambers for your firearm. WARNING: The manual safety is merely a mechanical device an is used for two shots. ● Close the gun. Before loading the gun, make...
... the barrels prior to loading to ensure that they are clean and free from obstruction. In that they are free of any obstructions. ● Insert a cartridge of the proper gauge into both chambers for your firearm. WARNING: The manual safety is merely a mechanical device an is used for two shots. ● Close the gun. Before loading the gun, make...
Beretta Over & Under User Manual
Page 13
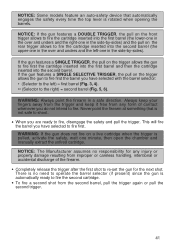
... when opening the barrels. There is no responsibility for the next shot. If the gun features a SINGLE TRIGGER, the pull on the trigger allows the gun to fire first the barrel you are ready to the right) = second barrel (Fig. 5, 6). NOTICE: Some models feature an auto-safety device that is ...● Completely release the trigger after the first shot to fire the second cartridge. ● To fire a second shot from any form of contact whenever you have selected with the barrel selector: ● (Selector to the left -one minute, then open the chamber and manually extract the unfired...
... when opening the barrels. There is no responsibility for the next shot. If the gun features a SINGLE TRIGGER, the pull on the trigger allows the gun to fire first the barrel you are ready to the right) = second barrel (Fig. 5, 6). NOTICE: Some models feature an auto-safety device that is ...● Completely release the trigger after the first shot to fire the second cartridge. ● To fire a second shot from any form of contact whenever you have selected with the barrel selector: ● (Selector to the left -one minute, then open the chamber and manually extract the unfired...
Beretta Over & Under User Manual
Page 14
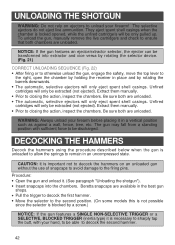
...NOTICE: If the gun features an ejector/extractor selector, the ejector can be transformed into the chambers. DECOCKING THE HAMMERS Decock the hammers using the procedure described below when the gun is unloaded to allow the springs to the firing ...shotgun"). ● Insert snapcaps into extractor and vice versa by rotating the barrels downwards. ● The automatic, selective ejectors will only be extracted (not ejected). To unload the gun, manually remove the live ammunition. Be sure both are available in the best gun shops. ● Pull the trigger to decock the first hammer...
...NOTICE: If the gun features an ejector/extractor selector, the ejector can be transformed into the chambers. DECOCKING THE HAMMERS Decock the hammers using the procedure described below when the gun is unloaded to allow the springs to the firing ...shotgun"). ● Insert snapcaps into extractor and vice versa by rotating the barrels downwards. ● The automatic, selective ejectors will only be extracted (not ejected). To unload the gun, manually remove the live ammunition. Be sure both are available in the best gun shops. ● Pull the trigger to decock the first hammer...

Beretta Over & Under User Manual
Page 15
... when the shotgun is recommended unless done by pivoting the muzzle end of component parts is being stored or transported in its centered position. ● Pull the trigger to catch the barrel hook. To take out the snapcaps without recocking the hammers: ● Remove the fore-end before pulling it forward to remove it to decock the second hammer. Remove the...
... when the shotgun is recommended unless done by pivoting the muzzle end of component parts is being stored or transported in its centered position. ● Pull the trigger to catch the barrel hook. To take out the snapcaps without recocking the hammers: ● Remove the fore-end before pulling it forward to remove it to decock the second hammer. Remove the...
Beretta Over & Under User Manual
Page 16
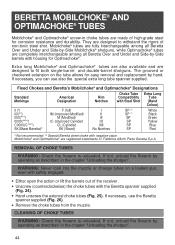
.... (2) Special Beretta skeet choke with the Beretta spanner supplied (Fig. 24). ● Hand unscrew the external choke tubes (Fig. 25). Mobilchoke® and Optimachoke® are made of high-grade steel for corrosion resistance and durability. If necessary, use also the special extra long tube spanner supplied. If not, unload the firearm by -Side barrels with safety engaged. ●...
.... (2) Special Beretta skeet choke with the Beretta spanner supplied (Fig. 24). ● Hand unscrew the external choke tubes (Fig. 25). Mobilchoke® and Optimachoke® are made of high-grade steel for corrosion resistance and durability. If necessary, use also the special extra long tube spanner supplied. If not, unload the firearm by -Side barrels with safety engaged. ●...
Beretta Over & Under User Manual
Page 17
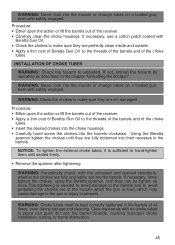
...in the barrels at all times, even during storage and cleaning. INSTALLATION OF CHOKE TUBES WARNING: Check the firearm is fired, which may cause damage to the gun or injury to make sure they are fully and tightly set into the barrels clockwise. ...shotgun". If necessary, firmly tighten the chokes, using the Beretta spanner, until they can push dirt into the muzzle or change tubes on a loaded gun, even with safety engaged. WARNING: Choke tubes must be tighten no choke tubes in the barrels. Using the Beretta spanner tighten the chokes until they are perfectly clean...
...in the barrels at all times, even during storage and cleaning. INSTALLATION OF CHOKE TUBES WARNING: Check the firearm is fired, which may cause damage to the gun or injury to make sure they are fully and tightly set into the barrels clockwise. ...shotgun". If necessary, firmly tighten the chokes, using the Beretta spanner, until they can push dirt into the muzzle or change tubes on a loaded gun, even with safety engaged. WARNING: Choke tubes must be tighten no choke tubes in the barrels. Using the Beretta spanner tighten the chokes until they are perfectly clean...
Beretta Over & Under User Manual
Page 18
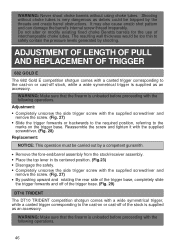
... interchangeable choke tubes. The resulting wall thickness would be trapped by shooting. ADJUSTMENT OF LENGTH OF PULL AND REPLACEMENT OF TRIGGER 682 GOLD E The 682 Gold E competition shotgun comes with the supplied screwdriver and remove the screw. (Fig. 27) ● Slide the trigger forwards or backwards to the required position, referring to the cast-on or cast-off of the trigger base...
... interchangeable choke tubes. The resulting wall thickness would be trapped by shooting. ADJUSTMENT OF LENGTH OF PULL AND REPLACEMENT OF TRIGGER 682 GOLD E The 682 Gold E competition shotgun comes with the supplied screwdriver and remove the screw. (Fig. 27) ● Slide the trigger forwards or backwards to the required position, referring to the cast-on or cast-off of the trigger base...
Beretta Over & Under User Manual
Page 19
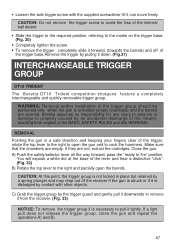
... pull it downwards to remove it down. (Fig.31) INTERCHANGEABLE TRIGGER GROUP DT10 TRIDENT The Beretta DT10 Trident competition shotguns feature a completely interchangeable and quickly removable trigger group. REMOVAL Pointing the gun in place but retained by a spring plunger and may drop out of the receiver if the gun is struck or if it is dislodged by pulling it from neglect of the BASIC SAFETY...
... pull it downwards to remove it down. (Fig.31) INTERCHANGEABLE TRIGGER GROUP DT10 TRIDENT The Beretta DT10 Trident competition shotguns feature a completely interchangeable and quickly removable trigger group. REMOVAL Pointing the gun in place but retained by a spring plunger and may drop out of the receiver if the gun is struck or if it is dislodged by pulling it from neglect of the BASIC SAFETY...
Beretta Over & Under User Manual
Page 20
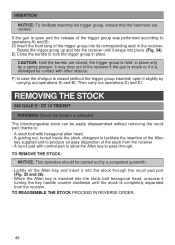
... and insert it into the stock through . A guiding nut, buried inside the stock, designed to facilitate the insertion of the trigger group was performed according to pass through the recoil pad port (Fig. 35 and 36). - TO REMOVE THE STOCK: NOTICE: This operation should be easily disassembled without the trigger group inserted) open and the release of the Allen key supplied...
... and insert it into the stock through . A guiding nut, buried inside the stock, designed to facilitate the insertion of the trigger group was performed according to pass through the recoil pad port (Fig. 35 and 36). - TO REMOVE THE STOCK: NOTICE: This operation should be easily disassembled without the trigger group inserted) open and the release of the Allen key supplied...
Beretta Over & Under User Manual
Page 21
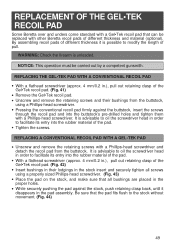
... stock, push retaining clasp back, until it is advisable to oil the screwdriver head in the pad assembly. It is possible to facilitate its entry into the rubber material of the pad. ● With a flathead screwdriver (approx. 4 mm/0.2 in.), pull out retaining clasp of different thickness and material (optional). REPLACEMENT OF THE GEL•TEK RECOIL PAD Some Beretta...
... stock, push retaining clasp back, until it is advisable to oil the screwdriver head in the pad assembly. It is possible to facilitate its entry into the rubber material of the pad. ● With a flathead screwdriver (approx. 4 mm/0.2 in.), pull out retaining clasp of different thickness and material (optional). REPLACEMENT OF THE GEL•TEK RECOIL PAD Some Beretta...
Beretta Over & Under User Manual
Page 22
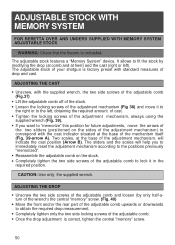
.... 50 The adjustable stock of your shotgun is factory preset with the cast indicator situated at the base of the adjustment mechanism, will help you want to "memorize" this position for future adjustments, move it in the required position. CAUTION: Use only the supplied wrench. ADJUSTING THE DROP ● Unscrew the two side screws of the adjustable comb and loosen...
.... 50 The adjustable stock of your shotgun is factory preset with the cast indicator situated at the base of the adjustment mechanism, will help you want to "memorize" this position for future adjustments, move it in the required position. CAUTION: Use only the supplied wrench. ADJUSTING THE DROP ● Unscrew the two side screws of the adjustable comb and loosen...
Beretta Over & Under User Manual
Page 23
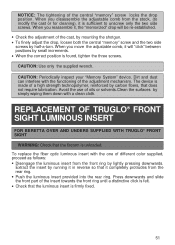
... you disassemble the adjustable comb from the stock, (to unscrew only the two side screws. CAUTION: Use only the supplied wrench. REPLACEMENT OF TRUGLO® FRONT SIGHT LUMINOUS INSERT FOR BERETTA OVER AND UNDERS SUPPLIED WITH TRUGLO® FRONT SIGHT WARNING: Check that does not require lubrication. Avoid the use of the cast, by mounting the shotgun. ● To finely adjust...
... you disassemble the adjustable comb from the stock, (to unscrew only the two side screws. CAUTION: Use only the supplied wrench. REPLACEMENT OF TRUGLO® FRONT SIGHT LUMINOUS INSERT FOR BERETTA OVER AND UNDERS SUPPLIED WITH TRUGLO® FRONT SIGHT WARNING: Check that does not require lubrication. Avoid the use of the cast, by mounting the shotgun. ● To finely adjust...
Beretta Over & Under User Manual
Page 24
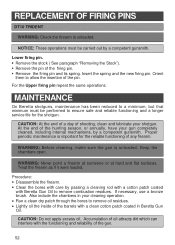
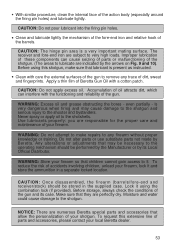
... a cotton patch coated with Beretta Gun Oil to remove oil residues. ● Lightly oil the inside of the barrels with the functioning and reliability of the gun. 52 If necessary, use a bronze brush. Lower firing pin. ● Remove the stock ( See paragraph "Removing the Stock"). ● Remove the pin of shooting, clean and lubricate your shotgun. Insert the spring and the new firing pin. CAUTION...
... a cotton patch coated with Beretta Gun Oil to remove oil residues. ● Lightly oil the inside of the barrels with the functioning and reliability of the gun. 52 If necessary, use a bronze brush. Lower firing pin. ● Remove the stock ( See paragraph "Removing the Stock"). ● Remove the pin of shooting, clean and lubricate your shotgun. Insert the spring and the new firing pin. CAUTION...
Beretta Over & Under User Manual
Page 25
...of parts and accessories, please contact your firearm, lock it . CAUTION: The hinge pin area is present as instructed. ● Clean with care the external surfaces of the gun and its Local Official Distributor. CAUTION: Do not apply excess oil. Lock it using this extensive ...Any alterations or adjustments that allow the personalization of dirt, sweat and fingerprints. To reduce the risk of the shotgun. (The areas to remove any firearm without proper knowledge or training. CAUTION: Once disassembled, the firearm (barrels/fore-end and receiver/stock) should be performed...
...of parts and accessories, please contact your firearm, lock it . CAUTION: The hinge pin area is present as instructed. ● Clean with care the external surfaces of the gun and its Local Official Distributor. CAUTION: Do not apply excess oil. Lock it using this extensive ...Any alterations or adjustments that allow the personalization of dirt, sweat and fingerprints. To reduce the risk of the shotgun. (The areas to remove any firearm without proper knowledge or training. CAUTION: Once disassembled, the firearm (barrels/fore-end and receiver/stock) should be performed...


