

User Manual
Page 3
... instructions 4 Introduction ...7 Shipping contents ...7 Projector exterior view ...8 Controls and functions...9 Positioning your projector 11 Choosing a location ...11 Obtaining a preferred projected image size 12 Mounting the projector ...13 Adjusting the projected image...14 Connection ...16 Operation ...18 Starting up the projector ...18 Using the menus ...20 Securing the projector ...21 Switching input signal ...22 Shutting down the projector ...23 Direct power off ...23 Menu operation ...24 Menu system ...24 PICTURE menu...27 DISPLAY menu ...31 INSTALLATION menu ...32 SYSTEM SETUP...
... instructions 4 Introduction ...7 Shipping contents ...7 Projector exterior view ...8 Controls and functions...9 Positioning your projector 11 Choosing a location ...11 Obtaining a preferred projected image size 12 Mounting the projector ...13 Adjusting the projected image...14 Connection ...16 Operation ...18 Starting up the projector ...18 Using the menus ...20 Securing the projector ...21 Switching input signal ...22 Shutting down the projector ...23 Direct power off ...23 Menu operation ...24 Menu system ...24 PICTURE menu...27 DISPLAY menu ...31 INSTALLATION menu ...32 SYSTEM SETUP...

User Manual
Page 4
... not look straight at the projector lens during operation. Do not operate lamps beyond the rated life could fail if power cuts or surges of this manual and marked on rare occasions. 5. Refer servicing to removing the lamp assembly for replacement. 4 Important safety instructions Do not block the projection lens with any ) when the projector lamp is NOT stable. To temporarily turn off the lamp, use of ±10 volts...
... not look straight at the projector lens during operation. Do not operate lamps beyond the rated life could fail if power cuts or surges of this manual and marked on rare occasions. 5. Refer servicing to removing the lamp assembly for replacement. 4 Important safety instructions Do not block the projection lens with any ) when the projector lamp is NOT stable. To temporarily turn off the lamp, use of ±10 volts...

User Manual
Page 8
... the image size and clarity on page 9. 8. HDMI input port (Version 2.0a) 13. USB Type-A port (1.5 A power supply) 17. 12V DC output terminal Triggers external devices such as an electric screen or light control, etc. 18. Lens cover 7. Vent (air inlet) 10. HDMI input port (Version 1.4a) 14. RS-232 control port Interfaces with a PC or home theater control/automation system. 16. Ceiling mount holes 8 Introduction Projection lens 5. Kensington anti-theft lock slot 20. Adjuster feet 4. External control panel See Controls...
... the image size and clarity on page 9. 8. HDMI input port (Version 2.0a) 13. USB Type-A port (1.5 A power supply) 17. 12V DC output terminal Triggers external devices such as an electric screen or light control, etc. 18. Lens cover 7. Vent (air inlet) 10. HDMI input port (Version 1.4a) 14. RS-232 control port Interfaces with a PC or home theater control/automation system. 16. Ceiling mount holes 8 Introduction Projection lens 5. Kensington anti-theft lock slot 20. Adjuster feet 4. External control panel See Controls...

User Manual
Page 9
... adjustments. Controls and functions Projector & Remote control All the key presses described in this could cause the blocking object to previous OSD menu, exits and saves menu settings. 6. POWER Toggles the projector between standby mode and on . OK Confirms the selected On-Screen Display (OSD) menu item. 4. IR remote sensor 7. POWER indicator light/TEMPerature warning light/LAMP indicator light See Indicators on the On-Screen Display (OSD) menu. 5. MENU Turns on page 42. 2. SOURCE Displays the source selection bar. 9. ECO BLANK Used to hide the screen picture...
... adjustments. Controls and functions Projector & Remote control All the key presses described in this could cause the blocking object to previous OSD menu, exits and saves menu settings. 6. POWER Toggles the projector between standby mode and on . OK Confirms the selected On-Screen Display (OSD) menu item. 4. IR remote sensor 7. POWER indicator light/TEMPerature warning light/LAMP indicator light See Indicators on the On-Screen Display (OSD) menu. 5. MENU Turns on page 42. 2. SOURCE Displays the source selection bar. 9. ECO BLANK Used to hide the screen picture...

User Manual
Page 10
...º 10 Introduction Picture quality adjustment keys (BRIGHT, CONTRAST, SHARP, COLOR TEMP, COLOR MANAGE, GAMMA) Display the setting bars for a few seconds. The distance between on the remote control backlight for adjustments of the appropriate picture quality values. 17. Selects an available picture setup mode. Keystone correction key Displays the Keystone correction menu. 16. Press 19. Displays the Sound Mode menu. 15. Volume keys / Decrease or increase the projector volume. 20. SOUND MODE The function is...
...º 10 Introduction Picture quality adjustment keys (BRIGHT, CONTRAST, SHARP, COLOR TEMP, COLOR MANAGE, GAMMA) Display the setting bars for a few seconds. The distance between on the remote control backlight for adjustments of the appropriate picture quality values. 17. Selects an available picture setup mode. Keystone correction key Displays the Keystone correction menu. 16. Press 19. Displays the Sound Mode menu. 15. Volume keys / Decrease or increase the projector volume. 20. SOUND MODE The function is...

User Manual
Page 11
... an installation location for your projector, take the following ways. 1. Rear Ceiling Select this location with the projector suspended upside-down from your projector in front of your equipment You can install your dealer to select a setting. Purchase the BenQ Projector Ceiling Mount Kit from the ceiling in front of the screen. Note that a special rear projection screen is the most common way to position the projector for quick setup...
... an installation location for your projector, take the following ways. 1. Rear Ceiling Select this location with the projector suspended upside-down from your projector in front of your equipment You can install your dealer to select a setting. Purchase the BenQ Projector Ceiling Mount Kit from the ceiling in front of the screen. Note that a special rear projection screen is the most common way to position the projector for quick setup...

User Manual
Page 13
... the projector. Installing the projector on your own may vary from the place you purchased your installation location. Before mounting the projector • Purchase a BenQ projector mounting kit from the actual sizes. If a heater is ceiling mounted. Tightening with a non-BenQ brand projector mounting kit. • Consider the surrounding temperature where the projector is used, the temperature around the ceiling may be higher than expected. • Read the user manual for the mounting kit...
... the projector. Installing the projector on your own may vary from the place you purchased your installation location. Before mounting the projector • Purchase a BenQ projector mounting kit from the actual sizes. If a heater is ceiling mounted. Tightening with a non-BenQ brand projector mounting kit. • Consider the surrounding temperature where the projector is used, the temperature around the ceiling may be higher than expected. • Read the user manual for the mounting kit...

User Manual
Page 21
... the projector. If you absolutely do not remember the password, you enter the wrong password, the password error message will display as the Kensington lock, to select On. Seek help from the local BenQ service center to SYSTEM SETUP: ADVANCED > Password. You can use it . • Once a password has been set and the power on -screen. Input the password again. • The digits being input will appear, and the INPUT CURRENT PASSWORD message follows. Password Error Please...
... the projector. If you absolutely do not remember the password, you enter the wrong password, the password error message will display as the Kensington lock, to select On. Seek help from the local BenQ service center to SYSTEM SETUP: ADVANCED > Password. You can use it . • Once a password has been set and the power on -screen. Input the password again. • The digits being input will appear, and the INPUT CURRENT PASSWORD message follows. Password Error Please...
User Manual
Page 22
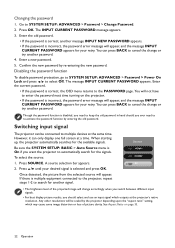
... password error message will be connected to cancel the change accordingly when you switch between different input signals. • For best display picture results, you ever need to keep the old password in hand should you should select and use an input signal which may cause some image distortion or loss of the projected image will appear, and the message INPUT CURRENT PASSWORD appears for the available signals. Changing the password 1. The INPUT CURRENT PASSWORD message appears...
... password error message will be connected to cancel the change accordingly when you switch between different input signals. • For best display picture results, you ever need to keep the old password in hand should you should select and use an input signal which may cause some image distortion or loss of the projected image will appear, and the message INPUT CURRENT PASSWORD appears for the available signals. Changing the password 1. The INPUT CURRENT PASSWORD message appears...

User Manual
Page 24
.../Red Offset/Green Offset/Blue Offset Color Management Primary Color/Hue/Saturation/Gain Color Gamut Auto/BT. 709/BT. 2020/DCI-P3 Noise Reduction Low/Middle/High/Off Brilliant Color On/Off Light Mode Normal/Economic/SmartEco Reset/Cancel 0-3 H. Menu operation Menu system Please note that the on-screen display (OSD) menus vary according to the projector or no equipment connected to the signal type selected and the projector model you are using...
.../Red Offset/Green Offset/Blue Offset Color Management Primary Color/Hue/Saturation/Gain Color Gamut Auto/BT. 709/BT. 2020/DCI-P3 Noise Reduction Low/Middle/High/Off Brilliant Color On/Off Light Mode Normal/Economic/SmartEco Reset/Cancel 0-3 H. Menu operation Menu system Please note that the on-screen display (OSD) menus vary according to the projector or no equipment connected to the signal type selected and the projector model you are using...

User Manual
Page 25
... Mode Front/Front Ceiling/Rear/Rear Ceiling On/Off Auto/Real/4:3/16:9/2.4:1 On/Off On/Off Language SYSTEM SETUP: BASIC SYSTEM SETUP: ADVANCED Background Color Splash Screen Auto Off Direct Power On Menu Position Menu Settings Menu Display Time Source Rename Auto Source Reminder Message Sound Mode Sound Lamp Settings HDMI Settings Mute Volume Power On/Off Ring Tone Reset Audio Settings Reset Lamp Timer Lamp Timer HDMI Range CEC Power On Link Power Off Link Quick Cooling Password Change Password Power On Lock Key Lock LED Indicator Reset All Settings Black/Blue/Purple BenQ...
... Mode Front/Front Ceiling/Rear/Rear Ceiling On/Off Auto/Real/4:3/16:9/2.4:1 On/Off On/Off Language SYSTEM SETUP: BASIC SYSTEM SETUP: ADVANCED Background Color Splash Screen Auto Off Direct Power On Menu Position Menu Settings Menu Display Time Source Rename Auto Source Reminder Message Sound Mode Sound Lamp Settings HDMI Settings Mute Volume Power On/Off Ring Tone Reset Audio Settings Reset Lamp Timer Lamp Timer HDMI Range CEC Power On Link Power Off Link Quick Cooling Password Change Password Power On Lock Key Lock LED Indicator Reset All Settings Black/Blue/Purple BenQ...

User Manual
Page 28
... setting is displayed. 4. Best for a lit environment, meeting room or family room. • 2.4/2.5: Best for viewing movies which makes the image unrealistic. The adjustments define the selected user mode. • Rename User Mode Select to PICTURE > Picture Mode. 2. The new name can be overpowering, which are mostly composed of the picture. The User Mode Management page is too high, colors on the image will be up to select User 1 or User...
... setting is displayed. 4. Best for a lit environment, meeting room or family room. • 2.4/2.5: Best for viewing movies which makes the image unrealistic. The adjustments define the selected user mode. • Rename User Mode Select to PICTURE > Picture Mode. 2. The new name can be overpowering, which are mostly composed of the picture. The User Mode Management page is too high, colors on the image will be up to select User 1 or User...

User Manual
Page 29
... projector can automatically adjust the brightness levels of "0" removes that color from among Red, Yellow, Green, Cyan, Blue, or Magenta. • Hue: Increase in a video picture. When the value is lower, the image becomes darker. • Color Temperature There are several preset color temperature settings available. RED Yellow GREEN Magenta Cyan BLUE • Saturation: Adjusts the values to your preference. • Primary Color: Selects a color from the image entirely. Lower settings produce less saturated colors; Every adjustment...
... projector can automatically adjust the brightness levels of "0" removes that color from among Red, Yellow, Green, Cyan, Blue, or Magenta. • Hue: Increase in a video picture. When the value is lower, the image becomes darker. • Color Temperature There are several preset color temperature settings available. RED Yellow GREEN Magenta Cyan BLUE • Saturation: Adjusts the values to your preference. • Primary Color: Selects a color from the image entirely. Lower settings produce less saturated colors; Every adjustment...

User Manual
Page 33
... projector will be displayed during projector start-up. For input signals with lower resolutions, the projected image will send electronic signal out when it to fit within the display area. Menu operation 33 SYSTEM SETUP: BASIC menu Language Sets the language for the projector. Color Splash Screen Allows you should switch to High Altitude mode to solve these symptoms. However, this projector can operate under "High Altitude Mode" may display auto shut-down symptoms, which logo screen will be 4:3 picture displayed in...
... projector will be displayed during projector start-up. For input signals with lower resolutions, the projected image will send electronic signal out when it to fit within the display area. Menu operation 33 SYSTEM SETUP: BASIC menu Language Sets the language for the projector. Color Splash Screen Allows you should switch to High Altitude mode to solve these symptoms. However, this projector can operate under "High Altitude Mode" may display auto shut-down symptoms, which logo screen will be 4:3 picture displayed in...

User Manual
Page 34
... shutdown process. Direct Power Allows the projector to know the lamp hour on page 37. 34 Menu operation When selecting the User mode, you 've done for the connected source item. Setting the sound mute or changing the sound level will remain active after your preference. Menu Settings • Menu Display Time: Sets the length of time the OSD will not affect the Power On/Off Ring Tone. • Reset Audio Settings: All of the...
... shutdown process. Direct Power Allows the projector to know the lamp hour on page 37. 34 Menu operation When selecting the User mode, you 've done for the connected source item. Setting the sound mute or changing the sound level will remain active after your preference. Menu Settings • Menu Display Time: Sets the length of time the OSD will not affect the Power On/Off Ring Tone. • Reset Audio Settings: All of the...

User Manual
Page 35
... projector can turn on the projector and remote control locked, you turn off , the projector will be shortened from being changed accidentally (by children, for example). When the Key Lock is turned on the projector will still remain: Picture Mode, User Mode Management, Brightness, Contrast, Color, Tint, Sharpness, Advanced, Projector Position, Sound, Source Rename, and Password. LED Indicator You can turn off , the connected device will be in a dark room. Reset All Settings The following settings will operate except POWER...
... projector can turn on the projector and remote control locked, you turn off , the projector will be shortened from being changed accidentally (by children, for example). When the Key Lock is turned on the projector will still remain: Picture Mode, User Mode Management, Brightness, Contrast, Color, Tint, Sharpness, Advanced, Projector Position, Sound, Source Rename, and Password. LED Indicator You can turn off , the connected device will be in a dark room. Reset All Settings The following settings will operate except POWER...

User Manual
Page 37
... hours) of lamp usage is as described in Shutting down completely before cleaning the lens. • Use a canister of compressed air to Specifications on the surface. The method of calculating the equivalent lamp hour is automatically calculated by the built-in timer. Please be sure to turn the projector off the projector and let it cool down the projector on page 23 and unplug the power cord...
... hours) of lamp usage is as described in Shutting down completely before cleaning the lens. • Use a canister of compressed air to Specifications on the surface. The method of calculating the equivalent lamp hour is automatically calculated by the built-in timer. Please be sure to turn the projector off the projector and let it cool down the projector on page 23 and unplug the power cord...

User Manual
Page 38
... of time to change the lamp. To set period of lamp life. The following Lamp warning displays will vary depending on page 37), you may vary within the lamp manufacturers specifications. Notice Replace Lamp Soon Lamp hour > XXXX Hours Order a new lamp at this age. The LAMP SETTINGS page appears. 2. Adjusts the lamp power automatically depending on the content brightness level. • Setting Auto Off This function allows the projector to PICTURE > Advanced > Light Mode and press / or press LIGHT MODE...
... of time to change the lamp. To set period of lamp life. The following Lamp warning displays will vary depending on page 37), you may vary within the lamp manufacturers specifications. Notice Replace Lamp Soon Lamp hour > XXXX Hours Order a new lamp at this age. The LAMP SETTINGS page appears. 2. Adjusts the lamp power automatically depending on the content brightness level. • Setting Auto Off This function allows the projector to PICTURE > Advanced > Light Mode and press / or press LIGHT MODE...
User Manual
Page 39
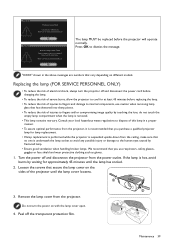
... for approximately 45 minutes until the lamp cover loosens. 2 3. Turn the power off the transparent protection film. 2 4 3 Maintenance 39 Do not turn the projector off and disconnect the power cord before changing the lamp. • To reduce the risk of electrical shock, always turn the power on different models. Notice Replace Lamp Now Lamp hour > XXXX Hours Order a new lamp at www.BenQ.com The lamp MUST be replaced before the projector will operate normally.
... for approximately 45 minutes until the lamp cover loosens. 2 3. Turn the power off the transparent protection film. 2 4 3 Maintenance 39 Do not turn the projector off and disconnect the power cord before changing the lamp. • To reduce the risk of electrical shock, always turn the power on different models. Notice Replace Lamp Now Lamp hour > XXXX Hours Order a new lamp at www.BenQ.com The lamp MUST be replaced before the projector will operate normally.

User Manual
Page 43
No picture Cause The video source is not correctly connected to turn on . The projector is not turned on or connected correctly. The lens cover is connected correctly. Remedy Turn the video source on and check that it is not correctly focused. Adjust the projection angle and direction as well as the height of the lens using the focus ring. Open the lens cover. Cause You do not remember the password. If the power outlet has a switch, make...
No picture Cause The video source is not correctly connected to turn on . The projector is not turned on or connected correctly. The lens cover is connected correctly. Remedy Turn the video source on and check that it is not correctly focused. Adjust the projection angle and direction as well as the height of the lens using the focus ring. Open the lens cover. Cause You do not remember the password. If the power outlet has a switch, make...


