
Palette Master Element How to Use Guide
Page 2
...as the compatibility of the computer and the monitor. I. XX Check to see that colorimeter is certified by purchased model. XX Before monitor calibration, turn on the icon in power save mode and the screen saver will not in the Dock Palette Master Element Attention XX Check to see... monitor. XX Disable the power management functions of the converters/adapters in SW series monitors and fully supports X-Rite / Datacolor colorimeters. 2 Proprietary Calibration Software Palette Master Element software simplifies calibration and reliably produces accurate color results.
...as the compatibility of the computer and the monitor. I. XX Check to see that colorimeter is certified by purchased model. XX Before monitor calibration, turn on the icon in power save mode and the screen saver will not in the Dock Palette Master Element Attention XX Check to see... monitor. XX Disable the power management functions of the converters/adapters in SW series monitors and fully supports X-Rite / Datacolor colorimeters. 2 Proprietary Calibration Software Palette Master Element software simplifies calibration and reliably produces accurate color results.

Palette Master Element How to Use Guide
Page 5
5 XX If your OS is Windows 10, Windows 8, or Windows 7, and the Windows Display Calibration function is enabled, please follow the steps below to maximize compatibility with other software (e.g., Photoshop), choose V2 in Profile Version, and Matrix in Profile Type.... For details on changing the settings, see the user manual of the displayed dialog box. 3. Uncheck Use Windows display calibration check box. XX When multiple monitors are connected, each monitor should display an independent screen. Click Change system defaults and select the Advanced tab of...
5 XX If your OS is Windows 10, Windows 8, or Windows 7, and the Windows Display Calibration function is enabled, please follow the steps below to maximize compatibility with other software (e.g., Photoshop), choose V2 in Profile Version, and Matrix in Profile Type.... For details on changing the settings, see the user manual of the displayed dialog box. 3. Uncheck Use Windows display calibration check box. XX When multiple monitors are connected, each monitor should display an independent screen. Click Change system defaults and select the Advanced tab of...

Palette Master Element How to Use Guide
Page 7
XX Select Calibration 1, Calibration 2, or Calibration 3 to save the calibration result into the monitor, then click Start Measurement to your demand (see Profiles and Scenarios on page 17 for details). After setting, click Next. This will take around 7 minutes. In Basic Mode 7 XX Select the desired Default profile, White Point and Luminance. You can choose the Photographer (Adobe RGB), Web Design (sRGB), Graphics (Adobe RGB), Cinema (DCI-P3), Designer (Display P3), or Video Editing (Rec.709) profile according to calibrate the monitor.
XX Select Calibration 1, Calibration 2, or Calibration 3 to save the calibration result into the monitor, then click Start Measurement to your demand (see Profiles and Scenarios on page 17 for details). After setting, click Next. This will take around 7 minutes. In Basic Mode 7 XX Select the desired Default profile, White Point and Luminance. You can choose the Photographer (Adobe RGB), Web Design (sRGB), Graphics (Adobe RGB), Cinema (DCI-P3), Designer (Display P3), or Video Editing (Rec.709) profile according to calibrate the monitor.

Palette Master Element How to Use Guide
Page 8
8 Step 1 Step 2 XX Before calibrating, tilt the monitor up to open the sensor for i1 Display Pro. XX Follow the instructions to ensure that the colorimeter snaps onto the monitor. NOTE: The illustration is for calibration, then click Continue. Instructions vary by device. In Basic Mode
8 Step 1 Step 2 XX Before calibrating, tilt the monitor up to open the sensor for i1 Display Pro. XX Follow the instructions to ensure that the colorimeter snaps onto the monitor. NOTE: The illustration is for calibration, then click Continue. Instructions vary by device. In Basic Mode

Palette Master Element How to Use Guide
Page 9
XX Once calibration finishes, you can be accessed from the following: Win: C:\Windows\System32\spool\drivers\colors Mac: /Users/[User Name]/Library/ColorSync/Profiles In Basic Mode NOTE: The ICC profile after calibration can see a brief calibration report of luminance, color temperature, and Delta E. 9 XX Put the colorimeter on the screen and match the colorimeter image to get the best calibration result, then click Continue to start calibration.
XX Once calibration finishes, you can be accessed from the following: Win: C:\Windows\System32\spool\drivers\colors Mac: /Users/[User Name]/Library/ColorSync/Profiles In Basic Mode NOTE: The ICC profile after calibration can see a brief calibration report of luminance, color temperature, and Delta E. 9 XX Put the colorimeter on the screen and match the colorimeter image to get the best calibration result, then click Continue to start calibration.

Palette Master Element How to Use Guide
Page 14
... the colorimeter snaps onto the monitor. After all settings finish, click Start Measurement to save the calibration result into the monitor. Yet it will take more precise result, change the patch size to calibrate. Note: • Be sure you want to get more time to Medium or Large. If... profile on the operating system. • If you wish to ensure that the colorimeter snaps onto the monitor. In Advanced Mode Before calibrating, tilt the monitor up to maximize compatibility with other software (e.g., Photoshop), choose V2 in Profile Version, and Matrix in Profile Type.
... the colorimeter snaps onto the monitor. After all settings finish, click Start Measurement to save the calibration result into the monitor. Yet it will take more precise result, change the patch size to calibrate. Note: • Be sure you want to get more time to Medium or Large. If... profile on the operating system. • If you wish to ensure that the colorimeter snaps onto the monitor. In Advanced Mode Before calibrating, tilt the monitor up to maximize compatibility with other software (e.g., Photoshop), choose V2 in Profile Version, and Matrix in Profile Type.

Palette Master Element How to Use Guide
Page 15
In Advanced Mode XX Put the colorimeter on the screen and match the colorimeter image to get the best calibration result, then click Continue to open the sensor for i1 Display Pro. Instructions vary by device. 15 XX Follow the instructions to start calibration. NOTE: The illustration is for calibration, then click Continue.
In Advanced Mode XX Put the colorimeter on the screen and match the colorimeter image to get the best calibration result, then click Continue to open the sensor for i1 Display Pro. Instructions vary by device. 15 XX Follow the instructions to start calibration. NOTE: The illustration is for calibration, then click Continue.

Palette Master Element How to Use Guide
Page 16
XX You can see the brief calibration report of luminance and color temperature. 16 XX Once calibration finishes, you can setup the desired Delta E value range then click Validate Calibration for further validation. In Advanced Mode
XX You can see the brief calibration report of luminance and color temperature. 16 XX Once calibration finishes, you can setup the desired Delta E value range then click Validate Calibration for further validation. In Advanced Mode

Palette Master Element How to Use Guide
Page 17
NOTE: The ICC profile after calibration can know if the calibration result meets the desired Delta E range. 17 XX After validation, you can export the report into HTML format. If needed, you can be accessed from the following: Win: C:\Windows\System32\spool\drivers\colors Mac: /Users/[User Name]/Library/ColorSync/Profiles In Advanced Mode
NOTE: The ICC profile after calibration can know if the calibration result meets the desired Delta E range. 17 XX After validation, you can export the report into HTML format. If needed, you can be accessed from the following: Win: C:\Windows\System32\spool\drivers\colors Mac: /Users/[User Name]/Library/ColorSync/Profiles In Advanced Mode

Palette Master Element How to Use Guide
Page 19
... Pro, i1 Pro2, i1Pro 3 Plus, i1 Display Pro, i1Display Pro Plus, i1 Display 2, i1 Studio, ColorMunki Photo Spyder 4, Spyder 5, Spyder X NOTE: • (*): When you color calibrate with Palette Master Element, HDR needs to remain off HDR on by region, please visit your local stores for informational purposes only. System Requirements OS... • Intel® Core 2 Duo or AMD Athlon™ 64 X2 or better CPU • 2GB of their respective companies, and are subject to Support.BenQ.com > Palette Master Element > Q&A.
... Pro, i1 Pro2, i1Pro 3 Plus, i1 Display Pro, i1Display Pro Plus, i1 Display 2, i1 Studio, ColorMunki Photo Spyder 4, Spyder 5, Spyder X NOTE: • (*): When you color calibrate with Palette Master Element, HDR needs to remain off HDR on by region, please visit your local stores for informational purposes only. System Requirements OS... • Intel® Core 2 Duo or AMD Athlon™ 64 X2 or better CPU • 2GB of their respective companies, and are subject to Support.BenQ.com > Palette Master Element > Q&A.

User Manual
Page 8
Visit BenQ website for your region.) Video Cable: DP (Optional accessory) Video Cable: DP to mini DP Video Cable: HDMI (Optional accessory) Video Cable: DVI-DL (Optional accessory) USB Cable Shading hood (Optional. Sold separately. Factory Calibration Report Power Cord (Picture may differ from product supplied for information on SH240.) Lt Rt L2 L1 R2 R1 8 Getting started
Visit BenQ website for your region.) Video Cable: DP (Optional accessory) Video Cable: DP to mini DP Video Cable: HDMI (Optional accessory) Video Cable: DVI-DL (Optional accessory) USB Cable Shading hood (Optional. Sold separately. Factory Calibration Report Power Cord (Picture may differ from product supplied for information on SH240.) Lt Rt L2 L1 R2 R1 8 Getting started

User Manual
Page 21
... illustrated. Prepare for portrait installation: Lt L1 L2 R2 R1 Rt 1. Slide plate (R2) to complete the installation and calibration process. Follow the instruction manuals of the colorimeter you intend to calibrate the display's color by a colorimeter, slide to assemble your monitor hardware 21 Install the right hoods. If you purchased and...
... illustrated. Prepare for portrait installation: Lt L1 L2 R2 R1 Rt 1. Slide plate (R2) to complete the installation and calibration process. Follow the instruction manuals of the colorimeter you intend to calibrate the display's color by a colorimeter, slide to assemble your monitor hardware 21 Install the right hoods. If you purchased and...

User Manual
Page 23
How to open the cover on the top plate so the colorimeter can be installed. If you purchased and the provided software (e.g., Palette Master Element) to complete the installation and calibration process. Follow the instruction manuals of the colorimeter you intend to calibrate the display's color by a colorimeter, slide to assemble your monitor hardware 23 7.
How to open the cover on the top plate so the colorimeter can be installed. If you purchased and the provided software (e.g., Palette Master Element) to complete the installation and calibration process. Follow the instruction manuals of the colorimeter you intend to calibrate the display's color by a colorimeter, slide to assemble your monitor hardware 23 7.

User Manual
Page 38
...Custom Key 2 Custom Key 3 Adobe RGB sRGB Darkroom (Menu) > System > Color Mode Adobe RGB sRGB B+W Rec. 709 DCI-P3 DICOM Darkroom Calibration 1 Customizing the hot keys There are 3 custom keys (indicated as hot keys to provide direct access to bring up message will appear, showing that can...4. You can be accessed by selecting HotKey. Color Mode HotKey Setting Adobe RGB sRGB B+W Adobe RGB sRGB B+W Rec. 709 DCI-P3 DICOM Darkroom Calibration 1 Alternatively, you can do one of the control keys to pre-defined functions. Go to System. (Menu) to adjust your monitor Adjusting the ...
...Custom Key 2 Custom Key 3 Adobe RGB sRGB Darkroom (Menu) > System > Color Mode Adobe RGB sRGB B+W Rec. 709 DCI-P3 DICOM Darkroom Calibration 1 Customizing the hot keys There are 3 custom keys (indicated as hot keys to provide direct access to bring up message will appear, showing that can...4. You can be accessed by selecting HotKey. Color Mode HotKey Setting Adobe RGB sRGB B+W Adobe RGB sRGB B+W Rec. 709 DCI-P3 DICOM Darkroom Calibration 1 Alternatively, you can do one of the control keys to pre-defined functions. Go to System. (Menu) to adjust your monitor Adjusting the ...
User Manual
Page 39
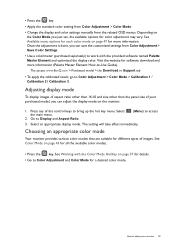
The access: www.BenQ.com > Purchased model > the Download or Support tab • To apply the calibrated result, go to access 3. Go to Display and Aspect Ratio. (Menu) to Color Adjustment > Color Mode > Calibration 1 / Calibration 2 / Calibration 3. Select an appropriate display mode. The setting will take effect immediately. See Available menu options for each color mode on...
The access: www.BenQ.com > Purchased model > the Download or Support tab • To apply the calibrated result, go to access 3. Go to Display and Aspect Ratio. (Menu) to Color Adjustment > Color Mode > Calibration 1 / Calibration 2 / Calibration 3. Select an appropriate display mode. The setting will take effect immediately. See Available menu options for each color mode on...

User Manual
Page 44
... abbreviation of Digital Imaging and Communications in 0 to -Use Guide). 3 The access: www.BenQ.com > Purchased model > the Download or Support tab Custom 1 Applies a combination of shades and shows more information Calibration (Palette Master Element How-to 10 the image. 44 Navigating the main menu Item Function Rec... representation with Standard Rec. 709. This mode enhances the sharpness and clarity of color settings defined Custom 2 by the 1 provided calibration software named Palette Calibration 2 Master Element and your colorimeter (purchased separately).
... abbreviation of Digital Imaging and Communications in 0 to -Use Guide). 3 The access: www.BenQ.com > Purchased model > the Download or Support tab Custom 1 Applies a combination of shades and shows more information Calibration (Palette Master Element How-to 10 the image. 44 Navigating the main menu Item Function Rec... representation with Standard Rec. 709. This mode enhances the sharpness and clarity of color settings defined Custom 2 by the 1 provided calibration software named Palette Calibration 2 Master Element and your colorimeter (purchased separately).

User Manual
Page 47
Color modes and the available display options are as follows: SW240 Color Mode Brightness Contrast Adobe RGB V V sRGB V V Sharpness V V Color Temp. 5000K / 6500K 5000K / 6500K B+W (*) V V V N/A Rec. 709 V V V 6500K DCI-P3 V V V x=0.314, y=0.351 DICOM V V V 7500K Darkroom V V V N/A Calibration 1 N/A N/A V N/A Calibration 2 N/A N/A V N/A Calibration 3 N/A N/A V N/A Custom 1 V V V V Custom 2 V V V V • V: all options are not available for adjustment. • *: 3 levels are available for adjustment. Settings...
Color modes and the available display options are as follows: SW240 Color Mode Brightness Contrast Adobe RGB V V sRGB V V Sharpness V V Color Temp. 5000K / 6500K 5000K / 6500K B+W (*) V V V N/A Rec. 709 V V V 6500K DCI-P3 V V V x=0.314, y=0.351 DICOM V V V 7500K Darkroom V V V N/A Calibration 1 N/A N/A V N/A Calibration 2 N/A N/A V N/A Calibration 3 N/A N/A V N/A Custom 1 V V V V Custom 2 V V V V • V: all options are not available for adjustment. • *: 3 levels are available for adjustment. Settings...

User Manual
Page 49
... 49 The language options displayed on your region. HDMI RGB PC Determines the range of the power key. Reminder Sets to remind you when monitor calibration is • ON recommended. Display Time Adjusts the display time of the OSD menu. • English • Français • Deutsch • Italiano •...
... 49 The language options displayed on your region. HDMI RGB PC Determines the range of the power key. Reminder Sets to remind you when monitor calibration is • ON recommended. Display Time Adjusts the display time of the OSD menu. • English • Français • Deutsch • Italiano •...

User Manual
Page 50
... function to be accessed by custom key 3. • Adobe RGB • sRGB • B+W • Rec. 709 • DCI-P3 • DICOM • Darkroom • Calibration 1 • Calibration 2 • Calibration 3 • Custom 1 • Custom 2 • Brightness • Contrast • Input • Color Mode • Color Temp. • Gamma • Color Gamut 50 Navigating the...
... function to be accessed by custom key 3. • Adobe RGB • sRGB • B+W • Rec. 709 • DCI-P3 • DICOM • Darkroom • Calibration 1 • Calibration 2 • Calibration 3 • Custom 1 • Custom 2 • Brightness • Contrast • Input • Color Mode • Color Temp. • Gamma • Color Gamut 50 Navigating the...
