Safety Warning and Notice
Page 1
... a long time. Otherwise, burn marks may occur. Do not place heavy loads on the monitor to avoid possible personal injury or damage to vibrations or impacts in a public place or a harsh environment, contact your nearest BenQ service center for assistance. Full 3/29/2019 Avoid taking either one of video connectors (D-sub...
... a long time. Otherwise, burn marks may occur. Do not place heavy loads on the monitor to avoid possible personal injury or damage to vibrations or impacts in a public place or a harsh environment, contact your nearest BenQ service center for assistance. Full 3/29/2019 Avoid taking either one of video connectors (D-sub...

Safety Warning and Notice
Page 2
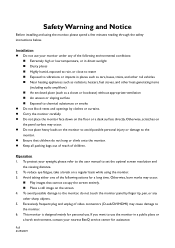
... model number or production number on the monitor. Use only the power cord provided by abuse or misuse of the monitor Before using the monitor with the device to come from the monitor, contact your nearest BenQ service center for assistance immediately. To avoid...as antenna, Cable TV) outside the monitor. Defects caused by BenQ. Never use the original accessories (e.g. Note that the power cord is unplugged before cleaning your monitor Use a monitor cleaner and a soft cloth to clean your monitor. Cleaning Ensure that appears...
... model number or production number on the monitor. Use only the power cord provided by abuse or misuse of the monitor Before using the monitor with the device to come from the monitor, contact your nearest BenQ service center for assistance immediately. To avoid...as antenna, Cable TV) outside the monitor. Defects caused by BenQ. Never use the original accessories (e.g. Note that the power cord is unplugged before cleaning your monitor Use a monitor cleaner and a soft cloth to clean your monitor. Cleaning Ensure that appears...

Palette Master Element How to Use Guide
Page 2
...guaranteed. NOTE: Illustrations for 30 minutes. I. Launching Palette Master Element Vary by USB-IF and is connected to both will not in SW series monitors and fully supports X-Rite / Datacolor colorimeters. XX Converters/adapters are recommended to fine tune the color engine in power save mode and the screen... saver will not be used , make sure the cable is connected to the monitor's USB port. XX Before monitor calibration, turn on the icon in the Dock Palette Master Element Attention XX Check to see that the USB cable is full...
...guaranteed. NOTE: Illustrations for 30 minutes. I. Launching Palette Master Element Vary by USB-IF and is connected to both will not in SW series monitors and fully supports X-Rite / Datacolor colorimeters. XX Converters/adapters are recommended to fine tune the color engine in power save mode and the screen... saver will not be used , make sure the cable is connected to the monitor's USB port. XX Before monitor calibration, turn on the icon in the Dock Palette Master Element Attention XX Check to see that the USB cable is full...

Palette Master Element How to Use Guide
Page 3
3 Connection via USB-C™ ports USB-C™ ports on both PC/laptop and monitor USB-C™ ports on PC/laptop only (via converter) (via converter) Launching Palette Master Element
3 Connection via USB-C™ ports USB-C™ ports on both PC/laptop and monitor USB-C™ ports on PC/laptop only (via converter) (via converter) Launching Palette Master Element

Palette Master Element How to Use Guide
Page 4
4 One USB-C™ port on PC/laptop (via converter) Connection via non-USB-C™ ports No USB-C™ ports on both PC/laptop and monitor Launching Palette Master Element
4 One USB-C™ port on PC/laptop (via converter) Connection via non-USB-C™ ports No USB-C™ ports on both PC/laptop and monitor Launching Palette Master Element

Palette Master Element How to Use Guide
Page 5
Select Control Panel, Color Management, and Advanced. 2. XX When multiple monitors are connected, each monitor should display an independent screen. Launching Palette Master Element XX If you wish to disable this setting. 1. For details on changing the settings, see the ...
Select Control Panel, Color Management, and Advanced. 2. XX When multiple monitors are connected, each monitor should display an independent screen. Launching Palette Master Element XX If you wish to disable this setting. 1. For details on changing the settings, see the ...

Palette Master Element How to Use Guide
Page 7
XX Select Calibration 1, Calibration 2, or Calibration 3 to save the calibration result into the monitor, then click Start Measurement to your demand (see Profiles and Scenarios on page 17 for details). 7 XX Select the desired Default profile, White Point and Luminance. In Basic Mode After setting, click Next. You can choose the Photographer (Adobe RGB), Web Design (sRGB), Graphics (Adobe RGB), Cinema (DCI-P3), Designer (Display P3), or Video Editing (Rec.709) profile according to calibrate the monitor. This will take around 7 minutes.
XX Select Calibration 1, Calibration 2, or Calibration 3 to save the calibration result into the monitor, then click Start Measurement to your demand (see Profiles and Scenarios on page 17 for details). 7 XX Select the desired Default profile, White Point and Luminance. In Basic Mode After setting, click Next. You can choose the Photographer (Adobe RGB), Web Design (sRGB), Graphics (Adobe RGB), Cinema (DCI-P3), Designer (Display P3), or Video Editing (Rec.709) profile according to calibrate the monitor. This will take around 7 minutes.

Palette Master Element How to Use Guide
Page 8
Instructions vary by device. NOTE: The illustration is for calibration, then click Continue. In Basic Mode 8 Step 1 Step 2 XX Before calibrating, tilt the monitor up to open the sensor for i1 Display Pro. XX Follow the instructions to ensure that the colorimeter snaps onto the monitor.
Instructions vary by device. NOTE: The illustration is for calibration, then click Continue. In Basic Mode 8 Step 1 Step 2 XX Before calibrating, tilt the monitor up to open the sensor for i1 Display Pro. XX Follow the instructions to ensure that the colorimeter snaps onto the monitor.

Palette Master Element How to Use Guide
Page 14
.... In Advanced Mode Step 1 Step 2 XX Before calibrating, tilt the monitor up to ensure that the colorimeter snaps onto the monitor. Note: • Be sure you wish to calibrate the monitor. Before calibrating, tilt the monitor up to ensure that the colorimeter snaps onto the monitor. 14 XX Select Calibration 1, Calibration 2, or Calibration 3 to save...
.... In Advanced Mode Step 1 Step 2 XX Before calibrating, tilt the monitor up to ensure that the colorimeter snaps onto the monitor. Note: • Be sure you wish to calibrate the monitor. Before calibrating, tilt the monitor up to ensure that the colorimeter snaps onto the monitor. 14 XX Select Calibration 1, Calibration 2, or Calibration 3 to save...

Palette Master Element How to Use Guide
Page 19
... and detected. All logos, products, or company names mentioned in low contrast. Actual product's features and specifications are used for details. System Requirements OS system Monitor Hardware PC Windows® 7 (32-bit or 64-bit version) or above All SW series Mac OS X 10.6.8 or above(*) • At least 2 USB ports... • Intel® Core 2 Duo or AMD Athlon™ 64 X2 or better CPU • 2GB of their respective companies, and are subject to Support.BenQ.com > Palette Master Element > Q&A. 19 V.
... and detected. All logos, products, or company names mentioned in low contrast. Actual product's features and specifications are used for details. System Requirements OS system Monitor Hardware PC Windows® 7 (32-bit or 64-bit version) or above All SW series Mac OS X 10.6.8 or above(*) • At least 2 USB ports... • Intel® Core 2 Duo or AMD Athlon™ 64 X2 or better CPU • 2GB of their respective companies, and are subject to Support.BenQ.com > Palette Master Element > Q&A. 19 V.
Resolution file
Page 1
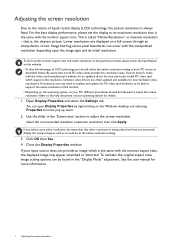
...resolutions. Adjusting the screen resolution Due to the help document of your operating system for details. 1. If yours doesn't, check with the monitor aspect ratio, the displayed image may not accurately display the screen image as well as described below. Open Display Properties and select the... Settings tab. Image blurring across pixel boundaries can occur with the monitor aspect ratio. Use the slider in the "Display Mode" adjustment. If necessary, you should be found in the 'Screen area' section...
...resolutions. Adjusting the screen resolution Due to the help document of your operating system for details. 1. If yours doesn't, check with the monitor aspect ratio, the displayed image may not accurately display the screen image as well as described below. Open Display Properties and select the... Settings tab. Image blurring across pixel boundaries can occur with the monitor aspect ratio. Use the slider in the "Display Mode" adjustment. If necessary, you should be found in the 'Screen area' section...

User Manual
Page 1
LCD Monitor User Manual PhotoVue Photographer Monitor | SW Series
LCD Monitor User Manual PhotoVue Photographer Monitor | SW Series

User Manual
Page 4
... or equal to H03VV-F or H05VV-F, 2G or 3G, 0.75mm2 must be used. • Use only the power cord provided by BenQ. Do not cover the power adapter with your monitor. 0-40°C 10-90% 0-3000m -20-60°C 10-60% 0-12000m • The AC plug isolates this equipment from the type... it is damaged or exposed to be operated from the AC supply. • The power supply cord serves as a power disconnect device for your LCD Monitor. Use of another type of power indicated on the marked label.
... or equal to H03VV-F or H05VV-F, 2G or 3G, 0.75mm2 must be used. • Use only the power cord provided by BenQ. Do not cover the power adapter with your monitor. 0-40°C 10-90% 0-3000m -20-60°C 10-60% 0-12000m • The AC plug isolates this equipment from the type... it is damaged or exposed to be operated from the AC supply. • The power supply cord serves as a power disconnect device for your LCD Monitor. Use of another type of power indicated on the marked label.

User Manual
Page 5
...) are for more support. If any liquid, aerosol or glass cleaners. • Slots and openings on the panel surface may need to transport the monitor. • Refer to the building structure before cleaning. They must not be placed near or over a radiator or heat sources, or in a built... you to support the weight of purchase or visit the local website from www.BenQ.com for ventilation. Caution • The monitor should never be blocked or covered. Care and cleaning • Do not place the monitor face down on objects far way. • Frequent blinking and eye exercise help...
...) are for more support. If any liquid, aerosol or glass cleaners. • Slots and openings on the panel surface may need to transport the monitor. • Refer to the building structure before cleaning. They must not be placed near or over a radiator or heat sources, or in a built... you to support the weight of purchase or visit the local website from www.BenQ.com for ventilation. Caution • The monitor should never be blocked or covered. Care and cleaning • Do not place the monitor face down on objects far way. • Frequent blinking and eye exercise help...

User Manual
Page 6
... Adjusting the monitor height ...24 Rotating the monitor ...25 Viewing angle adjustment ...26 Using the monitor wall mounting kit 27 Getting the most from your BenQ monitor 28 Downloading the LCD Monitor driver files from the Internet 28 How to install the monitor on a ...to install on Windows 8 (8.1) system 32 How to install on Windows 7 system 33 How to adjust your monitor 34 The control panel...34 Basic menu operation ...35 Working with the Color Mode HotKey 37 Customizing the hot......48 Troubleshooting ...52 Frequently asked questions (FAQ) ...52 Need more help?...54 5/6/20 SW240-EM-V0 6
... Adjusting the monitor height ...24 Rotating the monitor ...25 Viewing angle adjustment ...26 Using the monitor wall mounting kit 27 Getting the most from your BenQ monitor 28 Downloading the LCD Monitor driver files from the Internet 28 How to install the monitor on a ...to install on Windows 8 (8.1) system 32 How to install on Windows 7 system 33 How to adjust your monitor 34 The control panel...34 Basic menu operation ...35 Working with the Color Mode HotKey 37 Customizing the hot......48 Troubleshooting ...52 Frequently asked questions (FAQ) ...52 Need more help?...54 5/6/20 SW240-EM-V0 6

User Manual
Page 7
BenQ LCD Monitor Monitor Stand Monitor Base Quick Start Guide Safety Instructions Regulatory Statements Quick Start Guide Safety Instructions SRteagteumlaetonrtys Getting started When unpacking please check you have the following items. If any are missing or damaged, please contact the place of purchase for a replacement. Getting started 7
BenQ LCD Monitor Monitor Stand Monitor Base Quick Start Guide Safety Instructions Regulatory Statements Quick Start Guide Safety Instructions SRteagteumlaetonrtys Getting started When unpacking please check you have the following items. If any are missing or damaged, please contact the place of purchase for a replacement. Getting started 7

User Manual
Page 9
The fitted foam packing is ideal for your product, you can purchase them separately. • Consider keeping the box and packaging in storage for use in the future when you may need to change without prior notice. And the package contents may subject to transport the monitor. Always keep the product and accessories out of reach of small children. Getting started 9 • Available accessories and the pictures shown here may differ from the actual contents and the product supplied for protecting the monitor during transport. For cables that are not supplied with your region.
The fitted foam packing is ideal for your product, you can purchase them separately. • Consider keeping the box and packaging in storage for use in the future when you may need to change without prior notice. And the package contents may subject to transport the monitor. Always keep the product and accessories out of reach of small children. Getting started 9 • Available accessories and the pictures shown here may differ from the actual contents and the product supplied for protecting the monitor during transport. For cables that are not supplied with your region.

User Manual
Page 10
... 11 • Above diagram may vary depending on the model. • Picture may differ from product supplied for your region. 10 Getting to know your monitor AC power input jack 5. DVI-D socket 7. USB ports (downstream; USB port (upstream; Kensington lock slot 12. Getting to know your...
... 11 • Above diagram may vary depending on the model. • Picture may differ from product supplied for your region. 10 Getting to know your monitor AC power input jack 5. DVI-D socket 7. USB ports (downstream; USB port (upstream; Kensington lock slot 12. Getting to know your...

User Manual
Page 11
Connections The following connection illustrations are not supplied with your product, you can purchase them separately. SD card USB peripherals Speakers / Headphone PC/Notebook Getting to know your reference only. For detailed connection methods, see page 13 - 15. For cables that are for your monitor 11
Connections The following connection illustrations are not supplied with your product, you can purchase them separately. SD card USB peripherals Speakers / Headphone PC/Notebook Getting to know your reference only. For detailed connection methods, see page 13 - 15. For cables that are for your monitor 11

User Manual
Page 12
... Resolution file from the website (see Product support on the screen surface. 1. Avoid finger pressure on page 3). Sliding or scraping the monitor around on your desk will crack the glass or damage the LCD substrate voiding your warranty. Gently lay the screen face down on the... -on an object like a stapler or a mouse will scratch or damage the monitor surround and controls. Attach the monitor stand to the monitor base as illustrated. 12 How to assemble your reference only. How to assemble your monitor hardware • If the computer is turned on the desk for padding. Attach ...
... Resolution file from the website (see Product support on the screen surface. 1. Avoid finger pressure on page 3). Sliding or scraping the monitor around on your desk will crack the glass or damage the LCD substrate voiding your warranty. Gently lay the screen face down on the... -on an object like a stapler or a mouse will scratch or damage the monitor surround and controls. Attach the monitor stand to the monitor base as illustrated. 12 How to assemble your reference only. How to assemble your monitor hardware • If the computer is turned on the desk for padding. Attach ...


