
US One Year LCD Monitor Warranty
Page 1
... United States, Hawaii, and Alaska, you are entitled to depot repair service during the warranty period BenQ will pay shipping freight to BenQ or a BenQ Authorized Service Provider and BenQ will , at its option, repair or replace the Product. An RMA number must be reported within...replacement. END USER LIMITED WARRANTY LCD MONITORS Subject to the terms and conditions set forth below , BenQ America Corp. ("BenQ") warrants the BenQ LCD Monitor ("Product"), you purchased a BenQ product in materials or workmanship under normal consumer use new or reconditioned components or parts to the ...
... United States, Hawaii, and Alaska, you are entitled to depot repair service during the warranty period BenQ will pay shipping freight to BenQ or a BenQ Authorized Service Provider and BenQ will , at its option, repair or replace the Product. An RMA number must be reported within...replacement. END USER LIMITED WARRANTY LCD MONITORS Subject to the terms and conditions set forth below , BenQ America Corp. ("BenQ") warrants the BenQ LCD Monitor ("Product"), you purchased a BenQ product in materials or workmanship under normal consumer use new or reconditioned components or parts to the ...

US One Year LCD Monitor Warranty
Page 2
..., you are valid for insuring any Product shipped or returned and assume the risk of lost packages. 5. Products delivered to BenQ or a BenQ Authorized Service Provider with an expired RMA may designate only one location within thirty (30) days after receipt of purchase. Exclusions...no trouble found. or (ii) for return shipments. The Customer may be accompanied with transportation of identifying the product returned. BenQ or BenQ Technical Support Center will use of the Product other delays beyond their control. You must be refused and returned, without prior notice...
..., you are valid for insuring any Product shipped or returned and assume the risk of lost packages. 5. Products delivered to BenQ or a BenQ Authorized Service Provider with an expired RMA may designate only one location within thirty (30) days after receipt of purchase. Exclusions...no trouble found. or (ii) for return shipments. The Customer may be accompanied with transportation of identifying the product returned. BenQ or BenQ Technical Support Center will use of the Product other delays beyond their control. You must be refused and returned, without prior notice...

US One Year LCD Monitor Warranty
Page 3
...to jurisdiction. or fluctuation of electrical power, lightning, static electricity, fire, or acts of any programs, data or removable storage media. BenQ is not responsible for a full determination of this limited warranty may also have other rights that vary from state to state/jurisdiction to report... a defective product. IN NO EVENT SHALL BenQ BE LIABLE FOR ANY INDIRECT, INCIDENTAL, SPECIAL OR CONSEQUENTIAL DAMAGES OF ANY KIND, INCLUDING BUT NOT LIMITED TO LOSS OF BUSINESS, REVENUE...
...to jurisdiction. or fluctuation of electrical power, lightning, static electricity, fire, or acts of any programs, data or removable storage media. BenQ is not responsible for a full determination of this limited warranty may also have other rights that vary from state to state/jurisdiction to report... a defective product. IN NO EVENT SHALL BenQ BE LIABLE FOR ANY INDIRECT, INCIDENTAL, SPECIAL OR CONSEQUENTIAL DAMAGES OF ANY KIND, INCLUDING BUT NOT LIMITED TO LOSS OF BUSINESS, REVENUE...

User Manual
Page 1
LCD Monitor User Manual GL930/GL930A GL931/GL931A GL2030/GL2030A GL2230/GL2230A GL2231/GL2231A Welcome
LCD Monitor User Manual GL930/GL930A GL931/GL931A GL2030/GL2030A GL2230/GL2230A GL2231/GL2231A Welcome

User Manual
Page 2
...this publication may expose you are for ventilation. Always unplug your monitor from time to time in the contents hereof without obligation of BenQ Corporation to revise this product. They must be operated from the AC supply. • The power supply cord serves as dropping or... Cleaning. The socket outlet should be installed near or over a radiator or heat source, or in a built-in any form or by BenQ Corporation. If you to the contents hereof and specifically disclaims any warranties, merchantability or fitness for pluggable equipment. Copyright Copyright © 2010 by ...
...this publication may expose you are for ventilation. Always unplug your monitor from time to time in the contents hereof without obligation of BenQ Corporation to revise this product. They must be operated from the AC supply. • The power supply cord serves as dropping or... Cleaning. The socket outlet should be installed near or over a radiator or heat source, or in a built-in any form or by BenQ Corporation. If you to the contents hereof and specifically disclaims any warranties, merchantability or fitness for pluggable equipment. Copyright Copyright © 2010 by ...

User Manual
Page 3
... know your monitor 6 Front view ...6 Back view ...6 How to assemble your monitor hardware 7 How to detach the stand base ...10 Getting the most from your BenQ monitor 11 How to install the monitor on a new computer 12 How to upgrade the monitor on an existing computer 13 How to install on...
... know your monitor 6 Front view ...6 Back view ...6 How to assemble your monitor hardware 7 How to detach the stand base ...10 Getting the most from your BenQ monitor 11 How to install the monitor on a new computer 12 How to upgrade the monitor on an existing computer 13 How to install on...

User Manual
Page 4
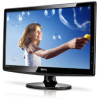
BenQ LCD Monitor Monitor Base Quick Start Guide CD-ROM Power Cord (Picture may differ from product supplied for a replacement. Getting started When unpacking please check you have the following items. If any are missing or damaged, please contact the place of purchase for your region.) Video Cable: D-Sub 4 Getting started 1.
BenQ LCD Monitor Monitor Base Quick Start Guide CD-ROM Power Cord (Picture may differ from product supplied for a replacement. Getting started When unpacking please check you have the following items. If any are missing or damaged, please contact the place of purchase for your region.) Video Cable: D-Sub 4 Getting started 1.

User Manual
Page 5
Video Cable: DVI-D (Optional accessory for models with DVI inputs, sold separately) Consider keeping the box and packaging in storage for protecting the monitor during transport. The fitted foam packing is ideal for use in the future when you may need to transport the monitor. Getting started 5
Video Cable: DVI-D (Optional accessory for models with DVI inputs, sold separately) Consider keeping the box and packaging in storage for protecting the monitor during transport. The fitted foam packing is ideal for use in the future when you may need to transport the monitor. Getting started 5

User Manual
Page 6
Power button Back view 1 2 3. 2. D-Sub socket 6. Lock switch 3 45 6 • Above diagram may vary depending on the model. • Picture may differ from product supplied for your region. 6 Getting to know your monitor Front view 1. AC Power Input jack 4. Control buttons 2. DVI-D socket (Analog-only models do not have the DVI-D input socket) 5. Getting to know your monitor
Power button Back view 1 2 3. 2. D-Sub socket 6. Lock switch 3 45 6 • Above diagram may vary depending on the model. • Picture may differ from product supplied for your region. 6 Getting to know your monitor Front view 1. AC Power Input jack 4. Control buttons 2. DVI-D socket (Analog-only models do not have the DVI-D input socket) 5. Getting to know your monitor
User Manual
Page 7
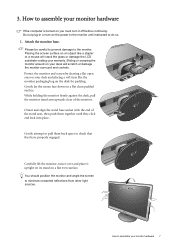
How to check that they click and lock into place. Placing the screen surface on a flat clean padded surface. While holding the monitor firmly against the desk, pull the monitor stand arm upwards clear of the stand arm, then push them back apart to assemble your monitor hardware 7 3. Please be careful to prevent damage to assemble your monitor hardware If the computer is turned on you must turn it upright on its stand on the desk for padding. You should position the monitor and angle the screen to minimize unwanted reflections from other light sources. -5O~ +20O How to...
How to check that they click and lock into place. Placing the screen surface on a flat clean padded surface. While holding the monitor firmly against the desk, pull the monitor stand arm upwards clear of the stand arm, then push them back apart to assemble your monitor hardware 7 3. Please be careful to prevent damage to assemble your monitor hardware If the computer is turned on you must turn it upright on its stand on the desk for padding. You should position the monitor and angle the screen to minimize unwanted reflections from other light sources. -5O~ +20O How to...

User Manual
Page 8
The only case in your monitor hardware The video cable included in which both DVI-D cable and D-Sub cable on the LCD model. 3. 2. To Connect the DVI-D Cable Connect the plug of the DVI-D cable (at the end without the ferrite filter) to two different PCs with appropriate video systems. (Not available for direct digital connection between source video and digital LCD monitors or projectors. The DVI-D format is used is if they are connected to the monitor video socket. Connect the power cable to the computer video socket. Connect the other end of the cable (at the...
The only case in your monitor hardware The video cable included in which both DVI-D cable and D-Sub cable on the LCD model. 3. 2. To Connect the DVI-D Cable Connect the plug of the DVI-D cable (at the end without the ferrite filter) to two different PCs with appropriate video systems. (Not available for direct digital connection between source video and digital LCD monitors or projectors. The DVI-D format is used is if they are connected to the monitor video socket. Connect the power cable to the computer video socket. Connect the other end of the cable (at the...

User Manual
Page 9
Connect-to and turn it on the power. Plug the other end of the monitor. 4. Turn on the monitor by pressing the power button on page 11 to assemble your region. How to install the monitor software. Picture may differ from your BenQ monitor on the right of the power cord into a power outlet and turn -on . Turn on the computer too, and follow the instructions in Section 4: Getting the most from product supplied for your monitor hardware 9
Connect-to and turn it on the power. Plug the other end of the monitor. 4. Turn on the monitor by pressing the power button on page 11 to assemble your region. How to install the monitor software. Picture may differ from your BenQ monitor on the right of the power cord into a power outlet and turn -on . Turn on the computer too, and follow the instructions in Section 4: Getting the most from product supplied for your monitor hardware 9

User Manual
Page 10
Turn off the computer before unplugging the power cable. Protect the monitor and screen by clearing a flat open area on your desk and placing a soft item like a towel on the desk for padding, before laying the screen face down on an object like a stapler or a mouse will scratch or damage the monitor surround and controls. 2. Prepare the monitor and area. How to the monitor. Placing the screen surface on a flat clean padded surface. Sliding or scraping the monitor around on your desk will crack the glass or damage the LCD substrate voiding your monitor hardware Turn off the ...
Turn off the computer before unplugging the power cable. Protect the monitor and screen by clearing a flat open area on your desk and placing a soft item like a towel on the desk for padding, before laying the screen face down on an object like a stapler or a mouse will scratch or damage the monitor surround and controls. 2. Prepare the monitor and area. How to the monitor. Placing the screen surface on a flat clean padded surface. Sliding or scraping the monitor around on your desk will crack the glass or damage the LCD substrate voiding your monitor hardware Turn off the ...

User Manual
Page 11
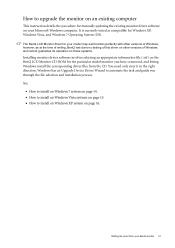
...to your computer. • To check the name of the purchased model, refer to the specification label on the BenQ LCD Monitor CD-ROM. Getting the most benefit from your BenQ LCD Monitor will launch its Found New Hardware wizard. The circumstances under which you should install the custom... however, the very next time you turn on your Windows computer, you require a User Name and Password to login to successfully install the BenQ LCD Monitor driver software. These circumstances relate to which version of Microsoft Windows you are using, and whether you are connecting the monitor and...
...to your computer. • To check the name of the purchased model, refer to the specification label on the BenQ LCD Monitor CD-ROM. Getting the most benefit from your BenQ LCD Monitor will launch its Found New Hardware wizard. The circumstances under which you should install the custom... however, the very next time you turn on your Windows computer, you require a User Name and Password to login to successfully install the BenQ LCD Monitor driver software. These circumstances relate to which version of Microsoft Windows you are using, and whether you are connecting the monitor and...
User Manual
Page 12
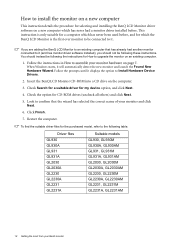
... GL2230 GL2230A GL2231 GL2231A Suitable models GL930, GL930M GL930A, GL930AM GL931, GL931M GL931A, GL931AM GL2030, GL2030M GL2030A, GL2030AM GL2230, GL2230M GL2230A, GL2230AM GL2231, GL2231M GL2231A, GL2231AM 12 Getting the most from your monitor hardware on the computer. 3.... You should not be following these instructions. Click Finish. 7. When Windows starts, it (and has monitor driver software installed), you are adding the BenQ LCD Monitor to an existing computer that the wizard has selected the correct name of your monitor and click Next. 6. How to install the monitor...
... GL2230 GL2230A GL2231 GL2231A Suitable models GL930, GL930M GL930A, GL930AM GL931, GL931M GL931A, GL931AM GL2030, GL2030M GL2030A, GL2030AM GL2230, GL2230M GL2230A, GL2230AM GL2231, GL2231M GL2231A, GL2231AM 12 Getting the most from your monitor hardware on the computer. 3.... You should not be following these instructions. Click Finish. 7. When Windows starts, it (and has monitor driver software installed), you are adding the BenQ LCD Monitor to an existing computer that the wizard has selected the correct name of your monitor and click Next. 6. How to install the monitor...
User Manual
Page 13
... well function perfectly with other versions of Windows, however, as compatible for manually updating the existing monitor driver software on your BenQ monitor 13 Windows has an Upgrade Device Driver Wizard to automate the task and guide you have connected, and letting Windows install...of Windows and cannot guarantee its operation on those systems. Installing monitor driver software involves selecting an appropriate information file (.inf) on the BenQ LCD Monitor CD-ROM for the particular model monitor you through the file selection and installation process. See: • How to install...
... well function perfectly with other versions of Windows, however, as compatible for manually updating the existing monitor driver software on your BenQ monitor 13 Windows has an Upgrade Device Driver Wizard to automate the task and guide you have connected, and letting Windows install...of Windows and cannot guarantee its operation on those systems. Installing monitor driver software involves selecting an appropriate information file (.inf) on the BenQ LCD Monitor CD-ROM for the particular model monitor you through the file selection and installation process. See: • How to install...

User Manual
Page 14
Click the Driver tab and the Update Driver button. 5. Insert the BenQ LCD Monitor CD-ROM into a CD drive on Windows 7 system 1. Alternatively, right-click the desktop and select Personalize, Display, Devices and Printers, and right-click ... computer. 9. How to install on the computer. 6. it may differ from the menu. This will copy and install the appropriate monitor driver files to your BenQ monitor Click the Hardware tab. 3. The drive letter for driver software. 7. Click Close. Open Display Properties.
Click the Driver tab and the Update Driver button. 5. Insert the BenQ LCD Monitor CD-ROM into a CD drive on Windows 7 system 1. Alternatively, right-click the desktop and select Personalize, Display, Devices and Printers, and right-click ... computer. 9. How to install on the computer. 6. it may differ from the menu. This will copy and install the appropriate monitor driver files to your BenQ monitor Click the Hardware tab. 3. The drive letter for driver software. 7. Click Close. Open Display Properties.

User Manual
Page 15
... will display. 2. it may be 'D:' or 'E:' or 'F:' etc. 9. Getting the most from the Personalize appearance and sounds window. Select Display Settings from your BenQ monitor 15 Insert the BenQ LCD Monitor CD-ROM into a CD drive on Windows Vista systems 1. In the Update Driver Software window, select the option Browse my computer...
... will display. 2. it may be 'D:' or 'E:' or 'F:' etc. 9. Getting the most from the Personalize appearance and sounds window. Select Display Settings from your BenQ monitor 15 Insert the BenQ LCD Monitor CD-ROM into a CD drive on Windows Vista systems 1. In the Update Driver Software window, select the option Browse my computer...

User Manual
Page 16
...install on the CD appropriate to the Monitor Properties window. 11. Click the Settings tab and the Advanced button. However, if BenQ is not listed as BenQ, and the model matches that of your monitor from your computer after the driver update is complete. 16 Getting the most ... | Control Panel | Appearance and Themes | Change the screen resolution. This will need do nothing further. This will already be prompted to restart your BenQ monitor You may be selected for the best driver in the list, it will close the Display Properties windows. Alternatively, the Windows menu to . ...
...install on the CD appropriate to the Monitor Properties window. 11. Click the Settings tab and the Advanced button. However, if BenQ is not listed as BenQ, and the model matches that of your monitor from your computer after the driver update is complete. 16 Getting the most ... | Control Panel | Appearance and Themes | Change the screen resolution. This will need do nothing further. This will already be prompted to restart your BenQ monitor You may be selected for the best driver in the list, it will close the Display Properties windows. Alternatively, the Windows menu to . ...
User Manual
Page 17
When you connect a digital video output using geometry menu items. To assist you in this endeavour, BenQ has provided a screen test image utility which you can use to check for screen color, grayscale and line gradient display. 1. If you wish, you use ...
When you connect a digital video output using geometry menu items. To assist you in this endeavour, BenQ has provided a screen test image utility which you can use to check for screen color, grayscale and line gradient display. 1. If you wish, you use ...