

User Manual
Page 5
Signal Cable: DVI-D (optional accessory for models with DVI inputs, sold separately) Consider keeping the box and packaging in storage for protecting the monitor during transport. Getting started 5 The fitted foam packing is ideal for use in the future when you may need to transport the monitor.
Signal Cable: DVI-D (optional accessory for models with DVI inputs, sold separately) Consider keeping the box and packaging in storage for protecting the monitor during transport. Getting started 5 The fitted foam packing is ideal for use in the future when you may need to transport the monitor.
User Manual
Page 6
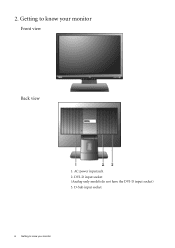
DVI-D input socket (Analog-only models do not have the DVI-D input socket) 3. D-Sub input socket 6 Getting to know your monitor Front view Back view 1. AC power input jack 2. Getting to know your monitor 2.
DVI-D input socket (Analog-only models do not have the DVI-D input socket) 3. D-Sub input socket 6 Getting to know your monitor Front view Back view 1. AC power input jack 2. Getting to know your monitor 2.

User Manual
Page 8
... systems. (Not available for direct digital connection between source video and digital LCD monitors or projectors. Connect the plug of the D-Sub cable (at the end without the ferrite filter) to the monitor D-Sub socket. Plug one end of the monitor. 2. The only case in which both DVI-D cable and D-Sub cable...falling out during use both cables can be used is used for analog-only models) Connect one end of the power cord into the socket labelled 'POWER IN' on the rear of the DVI-D cable to the monitor DVI-D socket and the other end to the computer video D-Sub socket. ...
... systems. (Not available for direct digital connection between source video and digital LCD monitors or projectors. Connect the plug of the D-Sub cable (at the end without the ferrite filter) to the monitor D-Sub socket. Plug one end of the monitor. 2. The only case in which both DVI-D cable and D-Sub cable...falling out during use both cables can be used is used for analog-only models) Connect one end of the power cord into the socket labelled 'POWER IN' on the rear of the DVI-D cable to the monitor DVI-D socket and the other end to the computer video D-Sub socket. ...

User Manual
Page 11
..., network policy settings may prevent you from your Windows computer, you need to select a monitor model. Furthermore, if your BenQ LCD Monitor will launch its Found New Hardware wizard. Follow the wizard instructions until it asks you turn on your BenQ monitor 11 Further details and step-by-step instructions for both an automatic (new) or upgrade...
..., network policy settings may prevent you from your Windows computer, you need to select a monitor model. Furthermore, if your BenQ LCD Monitor will launch its Found New Hardware wizard. Follow the wizard instructions until it asks you turn on your BenQ monitor 11 Further details and step-by-step instructions for both an automatic (new) or upgrade...
User Manual
Page 13
...other versions of Windows and cannot guarantee its operation on those systems. Installing monitor driver software involves selecting an appropriate information file (.inf) on the BenQ LCD Monitor CD-ROM for the particular model monitor you through the file selection and installation process. See: • How to...right direction. How to upgrade the monitor on an existing computer This instruction details the procedure for manually updating the existing monitor driver software on your BenQ monitor 13 It is currently tested as at the time of writing, BenQ has done no testing of Windows, ...
...other versions of Windows and cannot guarantee its operation on those systems. Installing monitor driver software involves selecting an appropriate information file (.inf) on the BenQ LCD Monitor CD-ROM for the particular model monitor you through the file selection and installation process. See: • How to...right direction. How to upgrade the monitor on an existing computer This instruction details the procedure for manually updating the existing monitor driver software on your BenQ monitor 13 It is currently tested as at the time of writing, BenQ has done no testing of Windows, ...
User Manual
Page 15
... window will display. Cancel out of view is selected for you need to Display Properties is through the Windows desktop. Insert the BenQ LCD Monitor CD-ROM into a CD drive on the CD, and click the Next button. Check the option 'Install from the popup menu...the BenQ LCD Monitor CD inserted in step 6. Click Finish. Getting the most from provided driver list on the computer you attached the monitor to your computer. 10. The quickest shortcut to restart Windows XP, as BenQ, and the model matches that of your monitor from your monitor model. 9. Click the Monitor tab ...
... window will display. Cancel out of view is selected for you need to Display Properties is through the Windows desktop. Insert the BenQ LCD Monitor CD-ROM into a CD drive on the CD, and click the Next button. Check the option 'Install from the popup menu...the BenQ LCD Monitor CD inserted in step 6. Click Finish. Getting the most from provided driver list on the computer you attached the monitor to your computer. 10. The quickest shortcut to restart Windows XP, as BenQ, and the model matches that of your monitor from your monitor model. 9. Click the Monitor tab ...
User Manual
Page 17
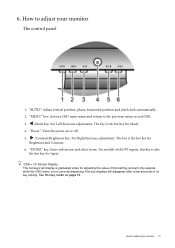
... On Screen Display. The hot-keys will display a graduated scale for Mode. 4. How to adjust your monitor The control panel 1. "Power": Turn the power on page 19. 6. "MENU" key: Activate OSD main menu and return to... adjust your monitor 17 The key is the hot key for Input. Hot-key displays will only operate while the OSD... position and pixel clock automatically. 2. "ENTER" key: Enter sub menus and select items. For models with DVI inputs, this key is not currently displaying.
... On Screen Display. The hot-keys will display a graduated scale for Mode. 4. How to adjust your monitor The control panel 1. "Power": Turn the power on page 19. 6. "MENU" key: Activate OSD main menu and return to... adjust your monitor 17 The key is the hot key for Input. Hot-key displays will only operate while the OSD... position and pixel clock automatically. 2. "ENTER" key: Enter sub menus and select items. For models with DVI inputs, this key is not currently displaying.
User Manual
Page 18
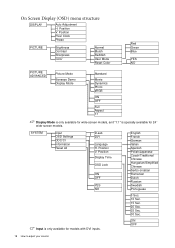
...OFF Full Aspect 1:1 Display Mode is only available for wide-screen models, and "1:1" is only available for 24'' wide-screen models. Position Display Time OSD Lock ON OFF YES NO Input is specially available for models with DVI inputs. English French German Italian Spanish Polish/Japanese Czech.../Traditional Chinese Hungarian/Simplified Chinese Serbo-croatian Romanian Dutch Russian Swedish Portuguese 5 Sec. 10 Sec. 15 Sec. 20 Sec. 25 Sec. 30 Sec. ON OFF 18 How to adjust your monitor Position ...
...OFF Full Aspect 1:1 Display Mode is only available for wide-screen models, and "1:1" is only available for 24'' wide-screen models. Position Display Time OSD Lock ON OFF YES NO Input is specially available for models with DVI inputs. English French German Italian Spanish Polish/Japanese Czech.../Traditional Chinese Hungarian/Simplified Chinese Serbo-croatian Romanian Dutch Russian Swedish Portuguese 5 Sec. 10 Sec. 15 Sec. 20 Sec. 25 Sec. 30 Sec. ON OFF 18 How to adjust your monitor Position ...
User Manual
Page 19
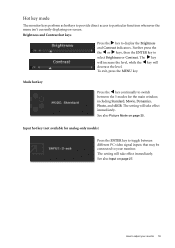
Hot key mode The monitor keys perform as hotkeys to provide direct access to particular functions whenever the menu isn't currently displaying on page...27. Mode hot key Press the W key continually to switch between different PC video signal inputs that may be connected to your monitor 19 The setting will decrease the level. Brightness and Contrast hot keys Press the X key to select Brightness or Contrast. How...Movie, Dynamics, Photo, and sRGB. To exit, press the MENU key. Input hot key (not available for analog-only models) Press the ENTER key to adjust your monitor.
Hot key mode The monitor keys perform as hotkeys to provide direct access to particular functions whenever the menu isn't currently displaying on page...27. Mode hot key Press the W key continually to switch between different PC video signal inputs that may be connected to your monitor 19 The setting will decrease the level. Brightness and Contrast hot keys Press the X key to select Brightness or Contrast. How...Movie, Dynamics, Photo, and sRGB. To exit, press the MENU key. Input hot key (not available for analog-only models) Press the ENTER key to adjust your monitor.

User Manual
Page 25
... • sRGB How to make adjustments or selections. 5. Item Picture Mode Function Selects a picture mode that item. 4. for wide-screen models. 1. Picture Advanced menu Display Mode is only available for viewing videos. • Dynamics - for better color matching representation with the peripheral ...etc. for viewing still images. • sRGB - for basic PC application. • Movie - Press the W or X keys to adjust your monitor 25 for viewing landscape-specific videos and playing games. • Photo - Press the MENU key to enter the menu. 3. Press the W or...
... • sRGB How to make adjustments or selections. 5. Item Picture Mode Function Selects a picture mode that item. 4. for wide-screen models. 1. Picture Advanced menu Display Mode is only available for viewing videos. • Dynamics - for better color matching representation with the peripheral ...etc. for viewing still images. • sRGB - for basic PC application. • Movie - Press the W or X keys to adjust your monitor 25 for viewing landscape-specific videos and playing games. • Photo - Press the MENU key to enter the menu. 3. Press the W or...
User Manual
Page 26
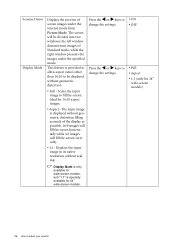
...8226; Full • Aspect • 1:1 (only for 24'' wide-screen models) Display Mode is only available for wide-screen models, and "1:1" is specially available for 16:10 aspect images. • Aspect - Press the W or X keys to adjust your monitor Scales the input image to be divided into two windows; .... 16:9 images will fill the screen horizontally while 4:3 images will be displayed without geometric distortion. • Full - Ideal for 24'' wide-screen models. 26 How to change the settings. The input image is provided to allow aspect ratio's other than 16:10 to fill the...
...8226; Full • Aspect • 1:1 (only for 24'' wide-screen models) Display Mode is only available for wide-screen models, and "1:1" is specially available for 16:10 aspect images. • Aspect - Press the W or X keys to adjust your monitor Scales the input image to be divided into two windows; .... 16:9 images will fill the screen horizontally while 4:3 images will be displayed without geometric distortion. • Full - Ideal for 24'' wide-screen models. 26 How to change the settings. The input image is provided to allow aspect ratio's other than 16:10 to fill the...
User Manual
Page 27
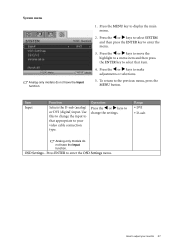
... D-sub (analog) or DVI (digital) input. Use this to change the settings. Range • DVI • D-sub Analog-only models do not have the Input function. How to your monitor 27 Press the W or X keys to enter the OSD Settings menu. Press ENTER to make adjustments or selections. 5. To return to... the MENU button. Press the W or X keys to select SYSTEM and then press the ENTER key to display the main menu. 2. System menu Analog-only models do not have the Input function. 1. Press the MENU key to enter the menu. 3. OSD Settings - Press the W or X keys to move the ...
... D-sub (analog) or DVI (digital) input. Use this to change the settings. Range • DVI • D-sub Analog-only models do not have the Input function. How to your monitor 27 Press the W or X keys to enter the OSD Settings menu. Press ENTER to make adjustments or selections. 5. To return to... the MENU button. Press the W or X keys to select SYSTEM and then press the ENTER key to display the main menu. 2. System menu Analog-only models do not have the Input function. 1. Press the MENU key to enter the menu. 3. OSD Settings - Press the W or X keys to move the ...