
User Manual
Page 1
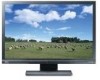
G2110W/G2110WP/G2110WA/G2110WAP G2200W/G2200WP/G2200WA/G2200WAP G2201W/G2201WA LCD Color Monitor User Manual Welcome
G2110W/G2110WP/G2110WA/G2110WAP G2200W/G2200WP/G2200WA/G2200WAP G2201W/G2201WA LCD Color Monitor User Manual Welcome

User Manual
Page 2
... from the wall outlet before cleaning. Clean the LCD monitor surface with respect to notify any particular purpose. Servicing • Do not attempt to service this publication and to make changes from the type of BenQ Corporation to the contents hereof and specifically disclaims any...this product yourself, as dropping or mishandling occurs, contact qualified service personnel for ventilation. Your monitor should be reproduced, transmitted, transcribed, stored in any form or by BenQ Corporation. No part of the cabinet are not sure of the type of the above ...
... from the wall outlet before cleaning. Clean the LCD monitor surface with respect to notify any particular purpose. Servicing • Do not attempt to service this publication and to make changes from the type of BenQ Corporation to the contents hereof and specifically disclaims any...this product yourself, as dropping or mishandling occurs, contact qualified service personnel for ventilation. Your monitor should be reproduced, transmitted, transcribed, stored in any form or by BenQ Corporation. No part of the cabinet are not sure of the type of the above ...
User Manual
Page 3
...Getting started ...4 Getting to know your monitor 6 Front view ...6 Back view ...6 How to assemble your monitor hardware 7 How to detach the stand base 10 Getting the most from your BenQ monitor 11 How to install the monitor on a new computer 12 How to upgrade the monitor on an existing computer 13 How to ...install on Windows Vista systems 14 How to install on Windows XP system 15 Picture optimization ...16 How to adjust your monitor 17 The ...
...Getting started ...4 Getting to know your monitor 6 Front view ...6 Back view ...6 How to assemble your monitor hardware 7 How to detach the stand base 10 Getting the most from your BenQ monitor 11 How to install the monitor on a new computer 12 How to upgrade the monitor on an existing computer 13 How to ...install on Windows Vista systems 14 How to install on Windows XP system 15 Picture optimization ...16 How to adjust your monitor 17 The ...
User Manual
Page 4
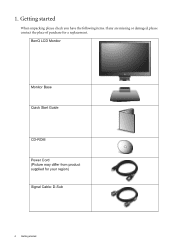
BenQ LCD Monitor Monitor Base Quick Start Guide CD-ROM Power Cord (Picture may differ from product supplied for your region) Signal Cable: D-Sub 4 Getting started When unpacking please check you have the following items. If any are missing or damaged, please contact the place of purchase for a replacement. 1. Getting started
BenQ LCD Monitor Monitor Base Quick Start Guide CD-ROM Power Cord (Picture may differ from product supplied for your region) Signal Cable: D-Sub 4 Getting started When unpacking please check you have the following items. If any are missing or damaged, please contact the place of purchase for a replacement. 1. Getting started

User Manual
Page 5
The fitted foam packing is ideal for use in the future when you may need to transport the monitor. Signal Cable: DVI-D (optional accessory for models with DVI inputs, sold separately) Consider keeping the box and packaging in storage for protecting the monitor during transport. Getting started 5
The fitted foam packing is ideal for use in the future when you may need to transport the monitor. Signal Cable: DVI-D (optional accessory for models with DVI inputs, sold separately) Consider keeping the box and packaging in storage for protecting the monitor during transport. Getting started 5

User Manual
Page 6
2. Getting to know your monitor AC power input jack 2. D-Sub input socket 6 Getting to know your monitor Front view Back view 1. DVI-D input socket (Analog-only models do not have the DVI-D input socket) 3.
2. Getting to know your monitor AC power input jack 2. D-Sub input socket 6 Getting to know your monitor Front view Back view 1. DVI-D input socket (Analog-only models do not have the DVI-D input socket) 3.
User Manual
Page 7
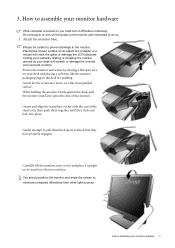
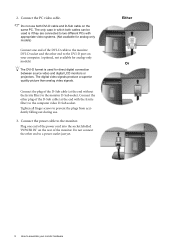
.... Orient and align the stand base socket with the end of the monitor. Carefully lift the monitor, turn it upright on its stand on your desk will crack the glass or damage the LCD substrate voiding your monitor hardware If the computer is turned on a flat clean padded surface. ...How to assemble your desk and placing a soft item like a stapler or a mouse will scratch or damage the monitor surround and controls. Gently lay the screen...
.... Orient and align the stand base socket with the end of the monitor. Carefully lift the monitor, turn it upright on its stand on your desk will crack the glass or damage the LCD substrate voiding your monitor hardware If the computer is turned on a flat clean padded surface. ...How to assemble your desk and placing a soft item like a stapler or a mouse will scratch or damage the monitor surround and controls. Gently lay the screen...
User Manual
Page 8
... outlet just yet. The digital video signals produce a superior quality picture than analog video signals. Connect the other end to the DVI-D port on your monitor hardware Plug one end of the D-Sub cable (at the end with appropriate video systems. (Not available for analog-only models) Connect one end of...) to assemble your computer. (optional, not available for analog-only models) The DVI-D format is used for direct digital connection between source video and digital LCD monitors or projectors. 2.
... outlet just yet. The digital video signals produce a superior quality picture than analog video signals. Connect the other end to the DVI-D port on your monitor hardware Plug one end of the D-Sub cable (at the end with appropriate video systems. (Not available for analog-only models) Connect one end of...) to assemble your computer. (optional, not available for analog-only models) The DVI-D format is used for direct digital connection between source video and digital LCD monitors or projectors. 2.
User Manual
Page 9
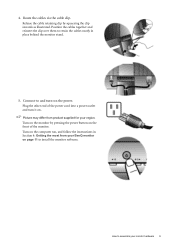
... cable clip. Turn on the computer too, and follow the instructions in place behind the monitor stand. 5. Picture may differ from your monitor hardware 9 Position the cables together and reinsert the clip over them to assemble your BenQ monitor on the front of the power cord into a power outlet and turn -on . Release the...
... cable clip. Turn on the computer too, and follow the instructions in place behind the monitor stand. 5. Picture may differ from your monitor hardware 9 Position the cables together and reinsert the clip over them to assemble your BenQ monitor on the front of the power cord into a power outlet and turn -on . Release the...
User Manual
Page 10
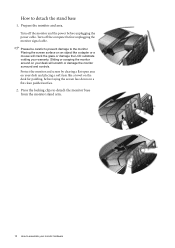
... laying the screen face down on a flat clean padded surface. 2. Protect the monitor and screen by clearing a flat open area on your desk will crack the glass or damage the LCD substrate voiding your monitor hardware Please be careful to prevent damage to detach the stand base 1. Sliding or... scraping the monitor around on your desk and placing a soft item like a stapler or a mouse ...
... laying the screen face down on a flat clean padded surface. 2. Protect the monitor and screen by clearing a flat open area on your desk will crack the glass or damage the LCD substrate voiding your monitor hardware Please be careful to prevent damage to detach the stand base 1. Sliding or... scraping the monitor around on your desk and placing a soft item like a stapler or a mouse ...

User Manual
Page 11
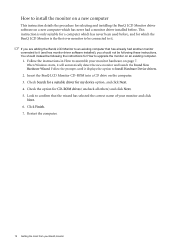
... User Name and Password to login to install the monitor driver software. At that point, click the Have Disk button, insert the BenQ LCD Monitor CD-ROM and select the appropriate monitor model. Furthermore, if your BenQ LCD Monitor will launch its Found New Hardware wizard. The circumstances... under which you connect and install your computer is connected to a network which process you need to successfully install the BenQ LCD Monitor driver software. Further details and step-by-step instructions for both an automatic (new) or upgrade (existing) installation follow to...
... User Name and Password to login to install the monitor driver software. At that point, click the Have Disk button, insert the BenQ LCD Monitor CD-ROM and select the appropriate monitor model. Furthermore, if your BenQ LCD Monitor will launch its Found New Hardware wizard. The circumstances... under which you connect and install your computer is connected to a network which process you need to successfully install the BenQ LCD Monitor driver software. Further details and step-by-step instructions for both an automatic (new) or upgrade (existing) installation follow to...
User Manual
Page 12
...) and click Next. 5. Insert the BenQ LCD Monitor CD-ROM into a CD drive on a new computer which the BenQ LCD Monitor is the first ever monitor to assemble your monitor and click Next. 6. Restart the computer. 12 Getting the most from your BenQ monitor Check Search for a suitable driver for selecting and installing the BenQ LCD Monitor driver software on the computer. 3. Click...
...) and click Next. 5. Insert the BenQ LCD Monitor CD-ROM into a CD drive on a new computer which the BenQ LCD Monitor is the first ever monitor to assemble your monitor and click Next. 6. Restart the computer. 12 Getting the most from your BenQ monitor Check Search for a suitable driver for selecting and installing the BenQ LCD Monitor driver software on the computer. 3. Click...
User Manual
Page 13
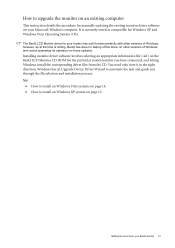
... Windows install the corresponding driver files from your BenQ monitor 13 See: • How to install on Windows Vista systems on page 14. • How to install on Windows XP system on the BenQ LCD Monitor CD-ROM for the particular model monitor you through the file selection and installation process.... It is currently tested as at the time of writing, BenQ has done no testing of this driver on other versions of Windows...
... Windows install the corresponding driver files from your BenQ monitor 13 See: • How to install on Windows Vista systems on page 14. • How to install on Windows XP system on the BenQ LCD Monitor CD-ROM for the particular model monitor you through the file selection and installation process.... It is currently tested as at the time of writing, BenQ has done no testing of this driver on other versions of Windows...

User Manual
Page 14
... files to the following directory: d:\BenQ_LCD\Driver\ (where d is the drive letter designator for the CD-ROM drive). How to restart Windows Vista, as the BenQ LCD monitor drivers will operate immediately with no further action required by you. 14 Getting the most from the example above depending upon your system - The drive...
... files to the following directory: d:\BenQ_LCD\Driver\ (where d is the drive letter designator for the CD-ROM drive). How to restart Windows Vista, as the BenQ LCD monitor drivers will operate immediately with no further action required by you. 14 Getting the most from the example above depending upon your system - The drive...

User Manual
Page 15
... button. Click the Driver tab and the Update Driver button. Insert the BenQ LCD Monitor CD-ROM into a CD drive on Windows XP system 1. Please wait while the wizard searches for drives and the BenQ LCD Monitor CD inserted in these locations' and also check 'Search removable media', then... noting the steps below: 6. The menu options displayed will operate immediately with these property windows. How to restart Windows XP, as the BenQ LCD monitor drivers will depend upon which type of view is selected for your system. • Under the Classic view, click Start | Control Panel...
... button. Click the Driver tab and the Update Driver button. Insert the BenQ LCD Monitor CD-ROM into a CD drive on Windows XP system 1. Please wait while the wizard searches for drives and the BenQ LCD Monitor CD inserted in these locations' and also check 'Search removable media', then... noting the steps below: 6. The menu options displayed will operate immediately with these property windows. How to restart Windows XP, as the BenQ LCD monitor drivers will depend upon which type of view is selected for your system. • Under the Classic view, click Start | Control Panel...

User Manual
Page 16
...ensure that you use to check for screen color, grayscale and line gradient display. 1. However, we recommend that the connected graphic card on the monitor. 3. Use the W or X keys to select DISPLAY and press the ENTER key to the screen. If you can always adjust the screen .... When you connect a digital video output using geometry menu items. To assist you in this endeavour, BenQ has provided a screen test image utility which you notice a vertical noise (like a curtain effect-shimmering of your monitor, the AUTO key and the Auto Adjustment function will be disabled, because the...
...ensure that you use to check for screen color, grayscale and line gradient display. 1. However, we recommend that the connected graphic card on the monitor. 3. Use the W or X keys to select DISPLAY and press the ENTER key to the screen. If you can always adjust the screen .... When you connect a digital video output using geometry menu items. To assist you in this endeavour, BenQ has provided a screen test image utility which you notice a vertical noise (like a curtain effect-shimmering of your monitor, the AUTO key and the Auto Adjustment function will be disabled, because the...
User Manual
Page 17
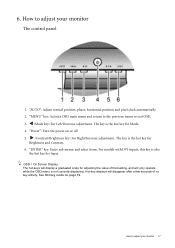
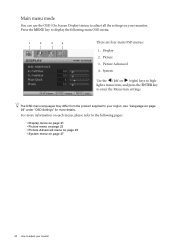
.... 4. "AUTO": Adjust vertical position, phase, horizontal position and pixel clock automatically. 2. "MENU" key: Activate OSD main menu and return to adjust your monitor 17 W /Mode key: For Left/Decrease adjustment. "Power": Turn the power on page 19. The hot-keys will display a graduated scale for Input. ...or exit OSD. 3. See Hot key mode on or off. 5. X /Contrast/Brightness key: For Right/Increase adjustment. How to adjust your monitor The control panel 1. OSD = On Screen Display. The key is also the hot key for adjusting the value of that setting, and will ...
.... 4. "AUTO": Adjust vertical position, phase, horizontal position and pixel clock automatically. 2. "MENU" key: Activate OSD main menu and return to adjust your monitor 17 W /Mode key: For Left/Decrease adjustment. "Power": Turn the power on page 19. The hot-keys will display a graduated scale for Input. ...or exit OSD. 3. See Hot key mode on or off. 5. X /Contrast/Brightness key: For Right/Increase adjustment. How to adjust your monitor The control panel 1. OSD = On Screen Display. The key is also the hot key for adjusting the value of that setting, and will ...
User Manual
Page 18
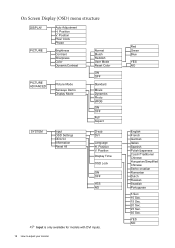
... DVI Language H. Position Display Time OSD Lock ON OFF YES NO Input is only available for models with DVI inputs. 18 How to adjust your monitor Red Green Blue YES NO English French German Italian Spanish Polish/Japanese Czech/Traditional Chinese Hungarian/Simplified Chinese Serbo-croatian Romanian Dutch Russian Swedish Portuguese...
... DVI Language H. Position Display Time OSD Lock ON OFF YES NO Input is only available for models with DVI inputs. 18 How to adjust your monitor Red Green Blue YES NO English French German Italian Spanish Polish/Japanese Czech/Traditional Chinese Hungarian/Simplified Chinese Serbo-croatian Romanian Dutch Russian Swedish Portuguese...
User Manual
Page 19
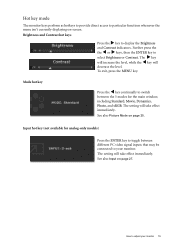
...displaying on page 25. Mode hot key Press the W key continually to switch between different PC video signal inputs that may be connected to your monitor 19 See also Picture Mode on -screen. See also Input on page 27. Brightness and Contrast hot keys Press the X key to select ...Brightness or Contrast. How to toggle between the 5 modes for analog-only models) Press the ENTER key to adjust your monitor. The X key will increase the level, while the W key will take effect immediately. Further press the the W or X keys, then the ENTER key ...
...displaying on page 25. Mode hot key Press the W key continually to switch between different PC video signal inputs that may be connected to your monitor 19 See also Picture Mode on -screen. See also Input on page 27. Brightness and Contrast hot keys Press the X key to select ...Brightness or Contrast. How to toggle between the 5 modes for analog-only models) Press the ENTER key to adjust your monitor. The X key will increase the level, while the W key will take effect immediately. Further press the the W or X keys, then the ENTER key ...
User Manual
Page 20
... menu on page 25 • System menu on page 27 20 How to high- Press the MENU key to adjust all the settings on your monitor System Use the W (left) or X (right) keys to adjust your...
... menu on page 25 • System menu on page 27 20 How to high- Press the MENU key to adjust all the settings on your monitor System Use the W (left) or X (right) keys to adjust your...

