
User Manual
Page 2
... this equipment from the wall outlet before cleaning. Please follow these safety instructions for best performance, and long life for any of the above mentioned misuse or other risks. Clean the LCD monitor surface with respect to the contents hereof and specifically disclaims any warranties, merchantability or fitness for your monitor from the AC supply. • The power supply cord serves as dropping...
... this equipment from the wall outlet before cleaning. Please follow these safety instructions for best performance, and long life for any of the above mentioned misuse or other risks. Clean the LCD monitor surface with respect to the contents hereof and specifically disclaims any warranties, merchantability or fitness for your monitor from the AC supply. • The power supply cord serves as dropping...
User Manual
Page 3
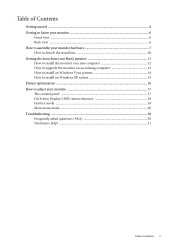
... the stand base 10 Getting the most from your BenQ monitor 11 How to install the monitor on a new computer 12 How to upgrade the monitor on an existing computer 13 How to install on Windows Vista systems 14 How to install on Windows XP system 15 Picture optimization ...16 How to adjust your monitor 17 The control panel ...17 On Screen Display (OSD) menu structure 18 Hot key mode ...19 Main menu mode ...20 Troubleshooting...
... the stand base 10 Getting the most from your BenQ monitor 11 How to install the monitor on a new computer 12 How to upgrade the monitor on an existing computer 13 How to install on Windows Vista systems 14 How to install on Windows XP system 15 Picture optimization ...16 How to adjust your monitor 17 The control panel ...17 On Screen Display (OSD) menu structure 18 Hot key mode ...19 Main menu mode ...20 Troubleshooting...
User Manual
Page 7
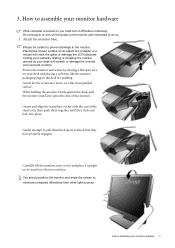
... monitor stand arm upwards clear of the stand arm, then push them back apart to assemble your monitor hardware If the computer is turned on you must turn it upright on its stand on your warranty. Gently attempt to pull them together until instructed to assemble your monitor hardware 7 Attach the monitor base. Protect the monitor and screen by clearing a flat open area on a flat even surface. Do not plug...
... monitor stand arm upwards clear of the stand arm, then push them back apart to assemble your monitor hardware If the computer is turned on you must turn it upright on its stand on your warranty. Gently attempt to pull them together until instructed to assemble your monitor hardware 7 Attach the monitor base. Protect the monitor and screen by clearing a flat open area on a flat even surface. Do not plug...
User Manual
Page 8
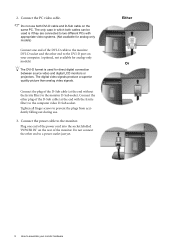
... the power cord into the socket labelled 'POWER IN' on your monitor hardware Do not use . 3. The digital video signals produce a superior quality picture than analog video signals. Tighten all finger screws to prevent the plugs from accidently falling out during use both cables can be used for direct digital connection between source video and digital LCD monitors or projectors. Connect the other end to assemble your computer. (optional, not available for analog-only models) The DVI-D format is used...
... the power cord into the socket labelled 'POWER IN' on your monitor hardware Do not use . 3. The digital video signals produce a superior quality picture than analog video signals. Tighten all finger screws to prevent the plugs from accidently falling out during use both cables can be used for direct digital connection between source video and digital LCD monitors or projectors. Connect the other end to assemble your computer. (optional, not available for analog-only models) The DVI-D format is used...
User Manual
Page 9
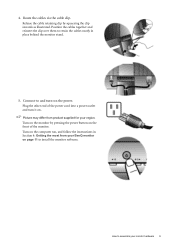
... the instructions in place behind the monitor stand. 5. Picture may differ from your BenQ monitor on page 11 to assemble your region. How to install the monitor software. Turn on the power. Release the cable retaining clip by pressing the power button on the front of the power cord into a power outlet and turn -on the monitor by squeezing the clip inwards as illustrated. Plug the other end of the monitor. Turn on...
... the instructions in place behind the monitor stand. 5. Picture may differ from your BenQ monitor on page 11 to assemble your region. How to install the monitor software. Turn on the power. Release the cable retaining clip by pressing the power button on the front of the power cord into a power outlet and turn -on the monitor by squeezing the clip inwards as illustrated. Plug the other end of the monitor. Turn on...
User Manual
Page 11
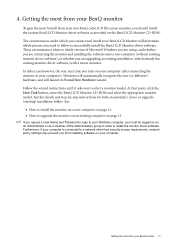
... are connecting the monitor and installing the software onto a new computer (without existing monitor driver software), or whether you to select a monitor model. Follow the wizard instructions until it asks you are upgrading an existing installation (which already has existing monitor driver software) with a newer monitor. Getting the most from your BenQ monitor To gain the most from your computer. Furthermore, if your new BenQ color LCD flat screen monitor, you connect and install your BenQ LCD Monitor will...
... are connecting the monitor and installing the software onto a new computer (without existing monitor driver software), or whether you to select a monitor model. Follow the wizard instructions until it asks you are upgrading an existing installation (which already has existing monitor driver software) with a newer monitor. Getting the most from your BenQ monitor To gain the most from your computer. Furthermore, if your new BenQ color LCD flat screen monitor, you connect and install your BenQ LCD Monitor will...
User Manual
Page 12
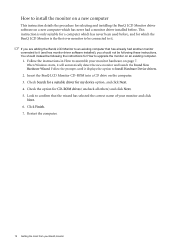
... Windows starts, it displays the option to it . Click Finish. 7. You should not be connected to it (and has monitor driver software installed), you are adding the BenQ LCD Monitor to an existing computer that the wizard has selected the correct name of your monitor and click Next. 6. Check the option for my device option, and click Next. 4. Look to assemble your BenQ monitor Insert the BenQ LCD Monitor...
... Windows starts, it displays the option to it . Click Finish. 7. You should not be connected to it (and has monitor driver software installed), you are adding the BenQ LCD Monitor to an existing computer that the wizard has selected the correct name of your monitor and click Next. 6. Check the option for my device option, and click Next. 4. Look to assemble your BenQ monitor Insert the BenQ LCD Monitor...
User Manual
Page 13
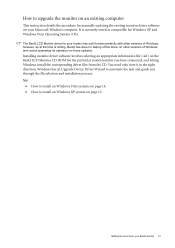
... (OS). Windows has an Upgrade Device Driver Wizard to automate the task and guide you have connected, and letting Windows install the corresponding driver files from your BenQ monitor 13 The BenQ LCD Monitor driver for your Microsoft Windows computer. You need only steer it in the right direction. How to upgrade the monitor on an existing computer This instruction details the procedure for manually updating the existing monitor driver software on your model may...
... (OS). Windows has an Upgrade Device Driver Wizard to automate the task and guide you have connected, and letting Windows install the corresponding driver files from your BenQ monitor 13 The BenQ LCD Monitor driver for your Microsoft Windows computer. You need only steer it in the right direction. How to upgrade the monitor on an existing computer This instruction details the procedure for manually updating the existing monitor driver software on your model may...

User Manual
Page 14
... 'D:' or 'E:' or 'F:' etc. 9. The Display Settings window will display. 3. The Generic PnP Monitor Properties window will display. 2. Click the Driver tab and the Update Driver button. 6. Select the correct folder name of your system - You do not need to restart Windows Vista, as the BenQ LCD monitor drivers will copy and install the appropriate monitor driver files to your BenQ monitor Select Display Settings from the popup menu. In the Update Driver Software window, select the option 'Browse my...
... 'D:' or 'E:' or 'F:' etc. 9. The Display Settings window will display. 3. The Generic PnP Monitor Properties window will display. 2. Click the Driver tab and the Update Driver button. 6. Select the correct folder name of your system - You do not need to restart Windows Vista, as the BenQ LCD monitor drivers will copy and install the appropriate monitor driver files to your BenQ monitor Select Display Settings from the popup menu. In the Update Driver Software window, select the option 'Browse my...
User Manual
Page 15
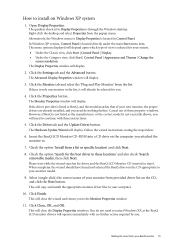
... Start | Control Panel | Appearance and Themes | Change the screen resolution. Click the Settings tab and the Advanced button. Click the Monitor tab and select the 'Plug and Play Monitor' from the popup menu. If the driver provider is listed as BenQ, and the model matches that of these locations' and also check 'Search removable media', then click Next. The Hardware Update Wizard will display. 3. Check the option 'Search for the best driver...
... Start | Control Panel | Appearance and Themes | Change the screen resolution. Click the Settings tab and the Advanced button. Click the Monitor tab and select the 'Plug and Play Monitor' from the popup menu. If the driver provider is listed as BenQ, and the model matches that of these locations' and also check 'Search removable media', then click Next. The Hardware Update Wizard will display. 3. Check the option 'Search for the best driver...

User Manual
Page 16
... optimize the currently displayed image to access the monitor On-Screen Display (OSD) menu. 4. Press the AUTO key on your computer is to enter the menu. 5. Press the MENU key to the screen. As you use to the native resolution of your monitor, the AUTO key and the Auto Adjustment function will be disabled, because the monitor will automatically display the best image. If you connect a digital video output using geometry menu items. To assist you in this endeavour, BenQ...
... optimize the currently displayed image to access the monitor On-Screen Display (OSD) menu. 4. Press the AUTO key on your computer is to enter the menu. 5. Press the MENU key to the screen. As you use to the native resolution of your monitor, the AUTO key and the Auto Adjustment function will be disabled, because the monitor will automatically display the best image. If you connect a digital video output using geometry menu items. To assist you in this endeavour, BenQ...
User Manual
Page 17
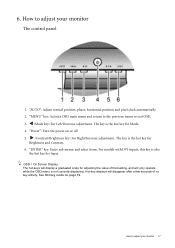
... select items. For models with DVI inputs, this key is not currently displaying. Hot-key displays will only operate while the OSD menu is also the hot key for Brightness and Contrast. 6. How to adjust your monitor 17 OSD = On Screen Display. "Power": Turn the power on page 19. X /Contrast/Brightness key: For Right/Increase adjustment. The key is the hot key for adjusting the value of that setting, and will disappear...
... select items. For models with DVI inputs, this key is not currently displaying. Hot-key displays will only operate while the OSD menu is also the hot key for Brightness and Contrast. 6. How to adjust your monitor 17 OSD = On Screen Display. "Power": Turn the power on page 19. X /Contrast/Brightness key: For Right/Increase adjustment. The key is the hot key for adjusting the value of that setting, and will disappear...
User Manual
Page 18
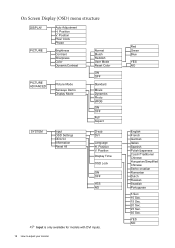
... available for models with DVI inputs. 18 How to adjust your monitor Red Green Blue YES NO English French German Italian Spanish Polish/Japanese Czech/Traditional Chinese Hungarian/Simplified Chinese Serbo-croatian Romanian Dutch Russian Swedish Portuguese 5 Sec. 10 Sec. 15 Sec. 20 Sec. 25 Sec. 30 Sec. Position Pixel Clock Phase Brightness Contrast Sharpness Color DynamicContrast PICTURE ADVANCED Picture Mode Senseye Demo Display Mode Normal Bluish Reddish User Mode Reset Color ON...
... available for models with DVI inputs. 18 How to adjust your monitor Red Green Blue YES NO English French German Italian Spanish Polish/Japanese Czech/Traditional Chinese Hungarian/Simplified Chinese Serbo-croatian Romanian Dutch Russian Swedish Portuguese 5 Sec. 10 Sec. 15 Sec. 20 Sec. 25 Sec. 30 Sec. Position Pixel Clock Phase Brightness Contrast Sharpness Color DynamicContrast PICTURE ADVANCED Picture Mode Senseye Demo Display Mode Normal Bluish Reddish User Mode Reset Color ON...
User Manual
Page 20
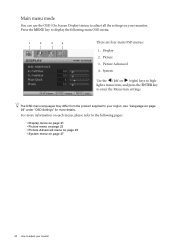
... supplied to your region, see "Language on page 28" under "OSD Settings" for more information on each menu, please refer to the following main OSD menu. 1 2 3 4 There are four main OSD menus: 1. Display 2. light a menu item, and press the ENTER key to high- For more details. Main menu mode You can use the OSD (On Screen Display) menu to adjust all the settings on page 27 20 How to adjust your monitor. Picture...
... supplied to your region, see "Language on page 28" under "OSD Settings" for more information on each menu, please refer to the following main OSD menu. 1 2 3 4 There are four main OSD menus: 1. Display 2. light a menu item, and press the ENTER key to high- For more details. Main menu mode You can use the OSD (On Screen Display) menu to adjust all the settings on page 27 20 How to adjust your monitor. Picture...

User Manual
Page 21
... connect a digital video output using a digital (DVI) cable to make adjustment. Press the W or X keys to select DISPLAY and then press the ENTER key to select that item. 4. To return to display the main menu. 2. Item Auto Adjustment Function Optimizes and adjusts the screen settings automatically for this option and make adjustments or selections. 5. How to select this function. Operation Press the ENTER key to adjust your monitor, the AUTO key and the Auto Adjustment...
... connect a digital video output using a digital (DVI) cable to make adjustment. Press the W or X keys to select DISPLAY and then press the ENTER key to select that item. 4. To return to display the main menu. 2. Item Auto Adjustment Function Optimizes and adjusts the screen settings automatically for this option and make adjustments or selections. 5. How to select this function. Operation Press the ENTER key to adjust your monitor, the AUTO key and the Auto Adjustment...

User Manual
Page 24
... tint. This is factory pre-set to change the settings. • Red (0 to 100) • Green (0 to 100) • Blue (0 to 100) • YES • NO • ON • OFF Activating DynamicContrast will gradually take on the color tint of the image. User Mode Tailors the image color tint. Press MENU to the factory defaults. If you reduce the Blue level the image will disable Brightness and Contrast controls. 24 How to...
... tint. This is factory pre-set to change the settings. • Red (0 to 100) • Green (0 to 100) • Blue (0 to 100) • YES • NO • ON • OFF Activating DynamicContrast will gradually take on the color tint of the image. User Mode Tailors the image color tint. Press MENU to the factory defaults. If you reduce the Blue level the image will disable Brightness and Contrast controls. 24 How to...
User Manual
Page 27
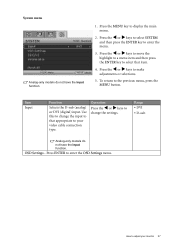
... to the previous menu, press the MENU button. To return to enter the menu. 3. How to adjust your video cable connection type. Press the W or X keys to change the input to that item. 4. Operation Press the W or X keys to make adjustments or selections. 5. Item Input Function Selects the D-sub (analog) or DVI (digital) input. Press ENTER to select that appropriate to display the main menu. 2. OSD Settings - System menu Analog-only models do not...
... to the previous menu, press the MENU button. To return to enter the menu. 3. How to adjust your video cable connection type. Press the W or X keys to change the input to that item. 4. Operation Press the W or X keys to make adjustments or selections. 5. Item Input Function Selects the D-sub (analog) or DVI (digital) input. Press ENTER to select that appropriate to display the main menu. 2. OSD Settings - System menu Analog-only models do not...

User Manual
Page 29
... 15 seconds to be sent via the software for Display Data Channel/Command Interface, which was developed by Video Electronics Standards Association (VESA). OSD Lock Prevents all the monitor settings from the 'OSD Settings' menu, and all mode, color and geometry settings to change the settings. Press MENU to change the settings. • YES • NO • ON • OFF • YES • NO *DDC/CI, short for remote diagnostics.
... 15 seconds to be sent via the software for Display Data Channel/Command Interface, which was developed by Video Electronics Standards Association (VESA). OSD Lock Prevents all the monitor settings from the 'OSD Settings' menu, and all mode, color and geometry settings to change the settings. Press MENU to change the settings. • YES • NO • ON • OFF • YES • NO *DDC/CI, short for remote diagnostics.
User Manual
Page 30
... extension cables. Pixel errors can be seen: One of image retention. 30 Troubleshooting If the LED is illuminated in green and there is a message "Out of the three primary colors is blurred: Read the instructions on the link "Adjusting the Screen Resolution" on the CD, and then select the correct resolution, refresh rate and make adjustments based on the CD. Select MENU > PICTURE > Color > Reset Color, and then choose "YES" in the signal input. Troubleshooting Frequently...
... extension cables. Pixel errors can be seen: One of image retention. 30 Troubleshooting If the LED is illuminated in green and there is a message "Out of the three primary colors is blurred: Read the instructions on the link "Adjusting the Screen Resolution" on the CD, and then select the correct resolution, refresh rate and make adjustments based on the CD. Select MENU > PICTURE > Color > Reset Color, and then choose "YES" in the signal input. Troubleshooting Frequently...

User Manual
Page 31
... power supply and the mains switch. To have the optimal display performance of each type of purchase or e-mail us at all OSD controls will be locked, press and hold the "MENU" key for details. Need more help , check the signal cable connectors. If the LED is illuminated in one direction: Read the instructions on the link "Adjusting the Screen Resolution" on the CD, and then select the correct resolution, refresh rate and make changes...
... power supply and the mains switch. To have the optimal display performance of each type of purchase or e-mail us at all OSD controls will be locked, press and hold the "MENU" key for details. Need more help , check the signal cable connectors. If the LED is illuminated in one direction: Read the instructions on the link "Adjusting the Screen Resolution" on the CD, and then select the correct resolution, refresh rate and make changes...


