Safety Warning and Notice
Page 1
...61550; Exposed to vibrations or impacts in a public place or a harsh environment, contact your nearest BenQ service center for personal use your eyesight, please refer to the user manual to the monitor. 6. Avoid taking either one of children. To reduce eye fatigue, take a break on the floor... or a desk surface directly. Operation 1. Full 3/29/2019 Safety Warning and Notice Before installing and using the monitor. 3. Installation Do not use . To avoid possible damage to chemical substances or smoke Do not block vents and openings by...
...61550; Exposed to vibrations or impacts in a public place or a harsh environment, contact your nearest BenQ service center for personal use your eyesight, please refer to the user manual to the monitor. 6. Avoid taking either one of children. To reduce eye fatigue, take a break on the floor... or a desk surface directly. Operation 1. Full 3/29/2019 Safety Warning and Notice Before installing and using the monitor. 3. Installation Do not use . To avoid possible damage to chemical substances or smoke Do not block vents and openings by...

Safety Warning and Notice
Page 2
.... Always turn off the monitor before cleaning your monitor Use a monitor cleaner and a soft cloth to clean your monitor. power cable) only with the device to avoid possible dangers such as antenna, Cable TV) outside the monitor. Defects caused by BenQ. Never use a power cord... that appears to be damaged or frayed. To avoid possible danger, observe the total electric load when using the monitor with local technical standards if the user ...
.... Always turn off the monitor before cleaning your monitor Use a monitor cleaner and a soft cloth to clean your monitor. power cable) only with the device to avoid possible dangers such as antenna, Cable TV) outside the monitor. Defects caused by BenQ. Never use a power cord... that appears to be damaged or frayed. To avoid possible danger, observe the total electric load when using the monitor with local technical standards if the user ...
Resolution file
Page 1
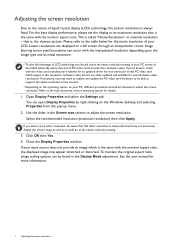
...click Apply. See the user manual for new hardware video resolutions. This is , the clearest picture. If yours doesn't, check with the monitor aspect ratio. Open Display Properties and select the Settings tab. If you select some other resolution is the same with the video card manufacturer...accurately display the screen image as well as described below for your PC, different procedures should select the native resolution setting of the monitor. • Depending on the operating system on your particular model PC video card which is the same with the interpolated resolution ...
...click Apply. See the user manual for new hardware video resolutions. This is , the clearest picture. If yours doesn't, check with the monitor aspect ratio. Open Display Properties and select the Settings tab. If you select some other resolution is the same with the video card manufacturer...accurately display the screen image as well as described below for your PC, different procedures should select the native resolution setting of the monitor. • Depending on the operating system on your particular model PC video card which is the same with the interpolated resolution ...

Resolution file
Page 4
...) v v v v v (*) v (*) v (*) v (*) v (*) v (*) v (*) v (*) v (*) v (*) v (*) Color space YCbCr 4:2:0 Max. bit 12 bit Frame frequency 24, 25, 30 50, 60 100 120 144 HDMI v (*) v (*) v (*) v (*) DisplayPort v (*) v (*) v (*) v (*) USB-C™ (DP Alt mode) v (*) v (*) v (*) v (*) *: The monitor receives 10-bit or 12-bit data and displays 8-bit colors. 144 Hz 8-bit Color space YCbCr 4:2:2 Max. WQHD (2560x1440) video input 120 Hz 10...
...) v v v v v (*) v (*) v (*) v (*) v (*) v (*) v (*) v (*) v (*) v (*) v (*) Color space YCbCr 4:2:0 Max. bit 12 bit Frame frequency 24, 25, 30 50, 60 100 120 144 HDMI v (*) v (*) v (*) v (*) DisplayPort v (*) v (*) v (*) v (*) USB-C™ (DP Alt mode) v (*) v (*) v (*) v (*) *: The monitor receives 10-bit or 12-bit data and displays 8-bit colors. 144 Hz 8-bit Color space YCbCr 4:2:2 Max. WQHD (2560x1440) video input 120 Hz 10...

User Manual
Page 1
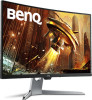
EX Series LCD Monitor User Manual
EX Series LCD Monitor User Manual

User Manual
Page 3
...to H03VV-F, 3G, 0.75mm2 must be operated from the AC supply. • The power supply cord serves as a power disconnect device for your LCD Monitor. Otherwise, scratches on the floor or a desk surface directly. The socket outlet should be installed near the equipment and be easily accessible. • ... of the product is provided) RISK OF EXPLOSION IF BATTERY IS REPLACED BY AN INCORRECT TYPE. Care And Cleaning • Do not place the monitor face down on the panel surface may occur. 3 DISPOSE OF USED BATTERIES ACCORDING TO THE INSTRUCTIONS. Replace the unit if it is inside ....
...to H03VV-F, 3G, 0.75mm2 must be operated from the AC supply. • The power supply cord serves as a power disconnect device for your LCD Monitor. Otherwise, scratches on the floor or a desk surface directly. The socket outlet should be installed near the equipment and be easily accessible. • ... of the product is provided) RISK OF EXPLOSION IF BATTERY IS REPLACED BY AN INCORRECT TYPE. Care And Cleaning • Do not place the monitor face down on the panel surface may occur. 3 DISPOSE OF USED BATTERIES ACCORDING TO THE INSTRUCTIONS. Replace the unit if it is inside ....
User Manual
Page 4
... outlet before operation. • (For models that the wall material and the standard wall mount bracket (purchased separately) are for ventilation. Your monitor should be secured to the building structure before cleaning. If any liquid, aerosol or glass cleaners. • Slots and openings on the back ...are stable enough to support the weight of purchase or visit the local website from www.BenQ.com for more support. Avoid using any of time causes eye fatigue and may deteriorate your monitor and monitor mounting kit on a wall with a lint-free, non-abrasive cloth. They must not...
... outlet before operation. • (For models that the wall material and the standard wall mount bracket (purchased separately) are for ventilation. Your monitor should be secured to the building structure before cleaning. If any liquid, aerosol or glass cleaners. • Slots and openings on the back ...are stable enough to support the weight of purchase or visit the local website from www.BenQ.com for more support. Avoid using any of time causes eye fatigue and may deteriorate your monitor and monitor mounting kit on a wall with a lint-free, non-abrasive cloth. They must not...
User Manual
Page 5
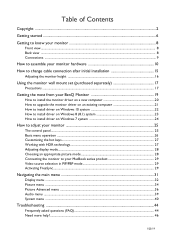
... to change cable connection after initial installation 15 Adjusting the monitor height ...16 Using the monitor wall mount set (purchased separately 17 Precautions ...17 Getting the most from your BenQ Monitor 19 How to install the monitor driver on a new computer 20 How to upgrade the monitor driver on an existing computer 21 How to install...
... to change cable connection after initial installation 15 Adjusting the monitor height ...16 Using the monitor wall mount set (purchased separately 17 Precautions ...17 Getting the most from your BenQ Monitor 19 How to install the monitor driver on a new computer 20 How to upgrade the monitor driver on an existing computer 21 How to install...

User Manual
Page 6
BenQ LCD Monitor Quick Start Guide CD-ROM Power Cord (Picture may differ from product supplied for a replacement. Getting started When unpacking please check you have the following items. If any are missing or damaged, please contact the place of purchase for your region.) Power Adapter Video Cable: DP Video Cable: DP to mini DP (Optional accessory) 6 Getting started
BenQ LCD Monitor Quick Start Guide CD-ROM Power Cord (Picture may differ from product supplied for a replacement. Getting started When unpacking please check you have the following items. If any are missing or damaged, please contact the place of purchase for your region.) Power Adapter Video Cable: DP Video Cable: DP to mini DP (Optional accessory) 6 Getting started

User Manual
Page 7
... Cable (Optional accessory) Back Cover VESA Wall Mount Transfer Kit (Optional accessory) • Available accessories and the pictures shown here may subject to transport the monitor. And the package contents may differ from the actual contents and the product supplied for your product, you can purchase them separately. • Consider keeping...
... Cable (Optional accessory) Back Cover VESA Wall Mount Transfer Kit (Optional accessory) • Available accessories and the pictures shown here may subject to transport the monitor. And the package contents may differ from the actual contents and the product supplied for your product, you can purchase them separately. • Consider keeping...

User Manual
Page 8
.... • *: 1) USB 3.1 with up to 5Gbps data transmission speed; 2) supports up to 2560 x 1440; 3) power delivery up to 5V@1A, 5W. 8 Getting to know your monitor Front view 1. Getting to know your monitor Light sensor 2. Power button / Power LED indicator 3.
.... • *: 1) USB 3.1 with up to 5Gbps data transmission speed; 2) supports up to 2560 x 1440; 3) power delivery up to 5V@1A, 5W. 8 Getting to know your monitor Front view 1. Getting to know your monitor Light sensor 2. Power button / Power LED indicator 3.

User Manual
Page 9
Getting to know your monitor 9 For cables that are for your reference only. For detailed connection methods, see page 11. • If USB-C™ Alternate mode (DP Alt mode) is enabled, USB 2.0 is available from the USB downstream ports. • If the video input is via HDMI or DP and USB-C™ works as upstream port, USB 3.1 Gen 1 (5 Gb/s) is available from the USB downstream ports. Connections The following connection illustrations are not supplied with your product, you can purchase them separately.
Getting to know your monitor 9 For cables that are for your reference only. For detailed connection methods, see page 11. • If USB-C™ Alternate mode (DP Alt mode) is enabled, USB 2.0 is available from the USB downstream ports. • If the video input is via HDMI or DP and USB-C™ works as upstream port, USB 3.1 Gen 1 (5 Gb/s) is available from the USB downstream ports. Connections The following connection illustrations are not supplied with your product, you can purchase them separately.

User Manual
Page 10
... foam packing is turned on the screen surface. The location and available input and output jacks may vary depending on the power to the monitor until instructed to assemble your reference only. Open the box, and remove the cushion that protects the back of the box by input signal.... Attach the monitor base. Take the monitor out of the monitor. 2. Remove the foam wrap from any physical harm. 1. Refer to the "Preset display modes" section on the link "Adjusting ...
... foam packing is turned on the screen surface. The location and available input and output jacks may vary depending on the power to the monitor until instructed to assemble your reference only. Open the box, and remove the cushion that protects the back of the box by input signal.... Attach the monitor base. Take the monitor out of the monitor. 2. Remove the foam wrap from any physical harm. 1. Refer to the "Preset display modes" section on the link "Adjusting ...

User Manual
Page 11
... HDMI cable to prevent the plugs from accidentally falling out during use. 4.Connect the other than DP first. The USB-C™ port on the monitor. See USB-C Configuration on page 42 and Options for data transfer via USB-C™ on the product supplied for more information. 3.Tighten all finger... 1.4 to the laptop. or or or •Connect the plug of the supplied USB-C™ cable to the USB-C™ port on the monitor transfers data only and does not support power delivery to 1.1. The video cables included in your package and the socket illustrations may vary depending on...
... HDMI cable to prevent the plugs from accidentally falling out during use. 4.Connect the other than DP first. The USB-C™ port on the monitor. See USB-C Configuration on page 42 and Options for data transfer via USB-C™ on the product supplied for more information. 3.Tighten all finger... 1.4 to the laptop. or or or •Connect the plug of the supplied USB-C™ cable to the USB-C™ port on the monitor transfers data only and does not support power delivery to 1.1. The video cables included in your package and the socket illustrations may vary depending on...

User Manual
Page 12
... back cover, see How to change cable connection after initial installation on the stand arm first. Connect USB devices via other end to assemble your monitor hardware Pass the cable through the cable management hole on the back side of the cover and check if the it into place as 2 illustrated... USB hubs (downstream ports) are available only when the USB-C™ port is in use. 7. Do not connect the other USB ports (downstream) on the monitor. Align the back cover with the holes on the rear of the back cover against the holes to the headphone jack found on the stand...
... back cover, see How to change cable connection after initial installation on the stand arm first. Connect USB devices via other end to assemble your monitor hardware Pass the cable through the cable management hole on the back side of the cover and check if the it into place as 2 illustrated... USB hubs (downstream ports) are available only when the USB-C™ port is in use. 7. Do not connect the other USB ports (downstream) on the monitor. Align the back cover with the holes on the rear of the back cover against the holes to the headphone jack found on the stand...

User Manual
Page 13
.... Excessive force on the power. Picture may be damaged by placing your hands on the top and on the screen surface. Place the monitor as illustrated. The screen may differ from other end of the power cord into a power outlet and turn -on the display is prohibited... product supplied for your monitor hardware 13 9. Avoid finger pressure on the bottom of monitor, the base or the stand arm. Place the monitor properly. Adjust the screen angle by excessive force. 10.Tilt the monitor. Move the monitor carefully by holding lower part of the monitor as desired after the ...
.... Excessive force on the power. Picture may be damaged by placing your hands on the top and on the screen surface. Place the monitor as illustrated. The screen may differ from other end of the power cord into a power outlet and turn -on the display is prohibited... product supplied for your monitor hardware 13 9. Avoid finger pressure on the bottom of monitor, the base or the stand arm. Place the monitor properly. Adjust the screen angle by excessive force. 10.Tilt the monitor. Move the monitor carefully by holding lower part of the monitor as desired after the ...

User Manual
Page 14
Turn on the monitor by pressing the power button on page 19 to assemble your monitor hardware Turn on the computer too, and follow the instructions in Getting the most from your computer's power management function. 14 How to install the monitor software. To extend the service life of the product, we recommend that you use your BenQ Monitor on the monitor.
Turn on the monitor by pressing the power button on page 19 to assemble your monitor hardware Turn on the computer too, and follow the instructions in Getting the most from your computer's power management function. 14 How to install the monitor software. To extend the service life of the product, we recommend that you use your BenQ Monitor on the monitor.

User Manual
Page 15
How to change cable connection after the initial installation has been completed in How to assemble your monitor hardware on page 10, follow the procedures below. 1. Gently tilt the monitor to change the cable connection after initial installation To protect the curved screen, do not lay ... the computer before unplugging the power cable. To properly tilt the monitor, see Tilt the monitor. Remove the back cover. Re-install the back cover as illustrated. Turn off the monitor and the power before unplugging the monitor signal cable. 2. Remove the back cover from its extended position....
How to change cable connection after the initial installation has been completed in How to assemble your monitor hardware on page 10, follow the procedures below. 1. Gently tilt the monitor to change the cable connection after initial installation To protect the curved screen, do not lay ... the computer before unplugging the power cable. To properly tilt the monitor, see Tilt the monitor. Remove the back cover. Re-install the back cover as illustrated. Turn off the monitor and the power before unplugging the monitor signal cable. 2. Remove the back cover from its extended position....

User Manual
Page 16
Excessive force on the upper or lower part of the height-adjustable stand or at the bottom of the monitor, as ascending or descending monitor might cause personal injuries. Avoid placing hands on the display is prohibited. Avoid finger pressure on the screen surface. Adjusting the monitor height To adjust the monitor height, hold both the left and the right sides of the monitor to lower the monitor or lift it up to assemble your monitor hardware Keep children out of reach of the monitor while performing this operation. 16 How to the desired height.
Excessive force on the upper or lower part of the height-adjustable stand or at the bottom of the monitor, as ascending or descending monitor might cause personal injuries. Avoid placing hands on the display is prohibited. Avoid finger pressure on the screen surface. Adjusting the monitor height To adjust the monitor height, hold both the left and the right sides of the monitor to lower the monitor or lift it up to assemble your monitor hardware Keep children out of reach of the monitor while performing this operation. 16 How to the desired height.
User Manual
Page 17
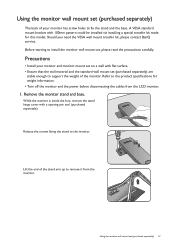
...the stand arm up to the product specifications for this model. Before starting to the monitor. Remove the monitor stand and base. Release the screws fixing the stand to install the monitor wall mount set (purchased separately) 17 Should you need the VESA wall mount transfer kit..., please contact BenQ service. Precautions • Install your monitor has screw holes to fix the stand and the base. Using the monitor wall mount set , please read the precautions carefully. A VESA standard mount bracket with ...
...the stand arm up to the product specifications for this model. Before starting to the monitor. Remove the monitor stand and base. Release the screws fixing the stand to install the monitor wall mount set (purchased separately) 17 Should you need the VESA wall mount transfer kit..., please contact BenQ service. Precautions • Install your monitor has screw holes to fix the stand and the base. Using the monitor wall mount set , please read the precautions carefully. A VESA standard mount bracket with ...


