
User Manual
Page 7
Always keep the product and accessories out of reach of small children. Video Cable: HDMI USB Cable: USB-C™ Audio Cable (Optional accessory) Back Cover VESA Wall Mount Transfer Kit (Optional accessory) • Available accessories and the pictures shown here may need to change without prior notice. The fitted foam packing is ideal...
Always keep the product and accessories out of reach of small children. Video Cable: HDMI USB Cable: USB-C™ Audio Cable (Optional accessory) Back Cover VESA Wall Mount Transfer Kit (Optional accessory) • Available accessories and the pictures shown here may need to change without prior notice. The fitted foam packing is ideal...
User Manual
Page 17
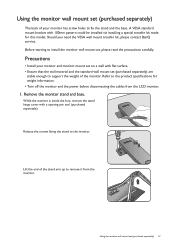
...support the weight of the stand arm up to remove it from the LCD monitor. 1. A VESA standard mount bracket with a opening pry tool (purchased separately). Using the monitor wall mount set , please read the precautions carefully. Release the screws fixing the stand to install the ...monitor wall mount set (purchased separately) 17 Lift the end of the monitor. Should you need the VESA wall mount transfer kit, please contact BenQ service. Before starting ...
...support the weight of the stand arm up to remove it from the LCD monitor. 1. A VESA standard mount bracket with a opening pry tool (purchased separately). Using the monitor wall mount set , please read the precautions carefully. Release the screws fixing the stand to install the ...monitor wall mount set (purchased separately) 17 Lift the end of the monitor. Should you need the VESA wall mount transfer kit, please contact BenQ service. Before starting ...

User Manual
Page 18
2. Install the VESA wall mount transfer kit as illustrated. Use a magnetic tip screwdriver to fix the VESA wall mount transfer kit to complete the installation. Follow the instruction manuals of the wall mount bracket you purchased to the monitor with 6 screws from step 1. 3. Use four M4 x 10 mm screws to fix a VESA standard wall mount bracket to the monitor. Consult a professional technician or BenQ service for wall mount installation and safety precautions. 18 Using the monitor wall mount set (purchased separately) Make sure that all screws are tightened and secured properly.
2. Install the VESA wall mount transfer kit as illustrated. Use a magnetic tip screwdriver to fix the VESA wall mount transfer kit to complete the installation. Follow the instruction manuals of the wall mount bracket you purchased to the monitor with 6 screws from step 1. 3. Use four M4 x 10 mm screws to fix a VESA standard wall mount bracket to the monitor. Consult a professional technician or BenQ service for wall mount installation and safety precautions. 18 Using the monitor wall mount set (purchased separately) Make sure that all screws are tightened and secured properly.
