
Safety Warning and Notice
Page 1
...assistance. Otherwise, scratches on the panel surface may occur. Do not place heavy loads on a regular basis while using the monitor, please spend a few minutes reading through the safety instructions below. To avoid possible damage to set the optimal screen resolution and the .../2019 To protect your nearest BenQ service center for a long time. If you want to use . To reduce eye fatigue, take a break on the monitor to avoid possible personal injury or damage to the monitor. 6. Otherwise, burn marks may cause damage to the monitor. Ensure that cannot...
...assistance. Otherwise, scratches on the panel surface may occur. Do not place heavy loads on a regular basis while using the monitor, please spend a few minutes reading through the safety instructions below. To avoid possible damage to set the optimal screen resolution and the .../2019 To protect your nearest BenQ service center for a long time. If you want to use . To reduce eye fatigue, take a break on the monitor to avoid possible personal injury or damage to the monitor. 6. Otherwise, burn marks may cause damage to the monitor. Ensure that cannot...

Safety Warning and Notice
Page 2
... illegible. Repairs, modifications, or alterations have been altered by BenQ. Never use the original accessories (e.g. To avoid possible electric shock, do so may be damaged or frayed. To avoid possible danger, observe the total electric load when using the monitor, it in a region where power supply is unstable. ...
... illegible. Repairs, modifications, or alterations have been altered by BenQ. Never use the original accessories (e.g. To avoid possible electric shock, do so may be damaged or frayed. To avoid possible danger, observe the total electric load when using the monitor, it in a region where power supply is unstable. ...
Resolution file
Page 1
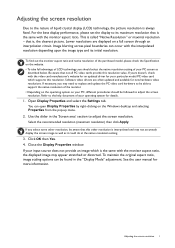
... screen resolution. If necessary, you may appear stretched or distorted. Open Display Properties and select the Settings tab. To find out the monitor aspect ratio and native resolution of the purchased model, please check the Specification on a full screen through an interpolation circuit. If you ...should select the native resolution setting of your PC, different procedures should be able to support the native resolution of the monitor. • Depending on the operating system on the Windows desktop and selecting Properties from the pop-up menu. 2. To maintain the ...
... screen resolution. If necessary, you may appear stretched or distorted. Open Display Properties and select the Settings tab. To find out the monitor aspect ratio and native resolution of the purchased model, please check the Specification on a full screen through an interpolation circuit. If you ...should select the native resolution setting of your PC, different procedures should be able to support the native resolution of the monitor. • Depending on the operating system on the Windows desktop and selecting Properties from the pop-up menu. 2. To maintain the ...
Resolution file
Page 4
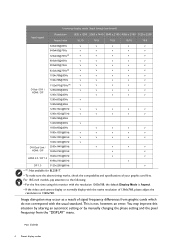
... the "DISPLAY" menu. This is Aspect. • If the video card cannot display or normally display with the usual standard. Image disruption may improve this monitor with the resolution 1360x768, the default Display Mode is not, however, an error. You may occur as a result of your graphic card first. Main 3/2/2020...
... the "DISPLAY" menu. This is Aspect. • If the video card cannot display or normally display with the usual standard. Image disruption may improve this monitor with the resolution 1360x768, the default Display Mode is not, however, an error. You may occur as a result of your graphic card first. Main 3/2/2020...

User Manual
Page 4
...-F or H05VV-F, 2G or 3G, 0.75mm2 must be operated from the AC supply. • The power supply cord serves as a power disconnect device for your monitor. 0~40 C 10~90 % 0~3000 m -20~60 C 10~60 % 0~12000 m • The AC plug isolates this equipment from the type of power indicated on the marked... more than or equal to 3 kg) An approved power cord greater or equal to excess moisture. 4 Do not cover the power adapter with your LCD Monitor. Use of another type of the product is damaged or exposed to H03VV-F, 3G, 0.75mm2 must be used . • Use only the power cord provided...
...-F or H05VV-F, 2G or 3G, 0.75mm2 must be operated from the AC supply. • The power supply cord serves as a power disconnect device for your monitor. 0~40 C 10~90 % 0~3000 m -20~60 C 10~60 % 0~12000 m • The AC plug isolates this equipment from the type of power indicated on the marked... more than or equal to 3 kg) An approved power cord greater or equal to excess moisture. 4 Do not cover the power adapter with your LCD Monitor. Use of another type of the product is damaged or exposed to H03VV-F, 3G, 0.75mm2 must be used . • Use only the power cord provided...

User Manual
Page 5
...covers may expose you may need to transport the monitor. • Refer to the product label for ... Rest your monitor and monitor mounting kit on power rating, manufacture date, and identification markings. Clean the LCD monitor surface with flat...at the screen for ventilation. Your monitor should be secured to the monitor. • Consider keeping the box ...monitor should never be blocked or covered. Care and cleaning • Do not place the monitor face down on the monitor...monitor. • Turn off the monitor and the power before disconnecting the cables from the LCD monitor. ...
...covers may expose you may need to transport the monitor. • Refer to the product label for ... Rest your monitor and monitor mounting kit on power rating, manufacture date, and identification markings. Clean the LCD monitor surface with flat...at the screen for ventilation. Your monitor should be secured to the monitor. • Consider keeping the box ...monitor should never be blocked or covered. Care and cleaning • Do not place the monitor face down on the monitor...monitor. • Turn off the monitor and the power before disconnecting the cables from the LCD monitor. ...

User Manual
Page 7
...support ...3 Getting started ...8 Getting to know your monitor 10 Front view ...10 Back view...10 Connection ...11 How to assemble your monitor hardware 12 How to detach the stand and the base 16 Getting the most from your BenQ monitor 17 Downloading the LCD Monitor driver files from the Internet 17 How to ...install the monitor on a new computer 18 How to upgrade the monitor on an existing computer 19 How to install on Windows 10 system 20...
...support ...3 Getting started ...8 Getting to know your monitor 10 Front view ...10 Back view...10 Connection ...11 How to assemble your monitor hardware 12 How to detach the stand and the base 16 Getting the most from your BenQ monitor 17 Downloading the LCD Monitor driver files from the Internet 17 How to ...install the monitor on a new computer 18 How to upgrade the monitor on an existing computer 19 How to install on Windows 10 system 20...

User Manual
Page 8
BenQ LCD Monitor Monitor Stand Monitor Base Quick Start Guide Safety Instructions Regulatory Statements Power Cord (Picture may differ from product supplied for your region.) 8 Getting started When unpacking please check you have the following items. If any are missing or damaged, please contact the place of purchase for a replacement. Getting started Safety Instructions SRteagteumlaetonrtys
BenQ LCD Monitor Monitor Stand Monitor Base Quick Start Guide Safety Instructions Regulatory Statements Power Cord (Picture may differ from product supplied for your region.) 8 Getting started When unpacking please check you have the following items. If any are missing or damaged, please contact the place of purchase for a replacement. Getting started Safety Instructions SRteagteumlaetonrtys

User Manual
Page 9
And the package contents may need to transport the monitor. Getting started 9 For cables that are not supplied with your region. The fitted foam packing is ideal for your product, you can purchase them separately. &#...) Audio Cable (Optional accessory) • Available accessories and the pictures shown here may differ from the actual contents and the product supplied for protecting the monitor during transport.
And the package contents may need to transport the monitor. Getting started 9 For cables that are not supplied with your region. The fitted foam packing is ideal for your product, you can purchase them separately. &#...) Audio Cable (Optional accessory) • Available accessories and the pictures shown here may differ from the actual contents and the product supplied for protecting the monitor during transport.

User Manual
Page 10
Power LED indicator 1 2 Back view 3 4 5 6 7 8 9 10 11 3. AC power switch 6. HDMI socket x 2 9. DisplayPort socket 10. Headphone jack 11. Kensington lock slot 12. AC power input jack 7. Power button 5. Control buttons 4. Cable management hole 8. Quick release button 12 • Above diagram may vary depending on the model. • Picture may differ from product supplied for your region. 10 Getting to know your monitor Front view 1. Getting to know your monitor Light sensor 2.
Power LED indicator 1 2 Back view 3 4 5 6 7 8 9 10 11 3. AC power switch 6. HDMI socket x 2 9. DisplayPort socket 10. Headphone jack 11. Kensington lock slot 12. AC power input jack 7. Power button 5. Control buttons 4. Cable management hole 8. Quick release button 12 • Above diagram may vary depending on the model. • Picture may differ from product supplied for your region. 10 Getting to know your monitor Front view 1. Getting to know your monitor Light sensor 2.

User Manual
Page 11
For cables that are for your reference only. For detailed connection methods, see page 13 -14. Connection The following connection illustrations are not supplied with your product, you can purchase them separately. Getting to know your monitor 11
For cables that are for your reference only. For detailed connection methods, see page 13 -14. Connection The following connection illustrations are not supplied with your product, you can purchase them separately. Getting to know your monitor 11

User Manual
Page 12
... the glass or damage the LCD substrate voiding your desk will scratch or damage the monitor surround and controls. Available input and output jacks may vary depending on an object like the monitor packaging bag on you must turn -on your warranty. Placing the screen surface on...Tighten the screw on a flat clean padded surface. Attach the monitor base. Gently lay the screen face down on the bottom of the monitor base as illustrated until instructed to assemble your reference only. Attach the monitor stand to the monitor base as illustrated. 12 How to do so. • The...
... the glass or damage the LCD substrate voiding your desk will scratch or damage the monitor surround and controls. Available input and output jacks may vary depending on an object like the monitor packaging bag on you must turn -on your warranty. Placing the screen surface on...Tighten the screw on a flat clean padded surface. Attach the monitor base. Gently lay the screen face down on the bottom of the monitor base as illustrated until instructed to assemble your reference only. Attach the monitor stand to the monitor base as illustrated. 12 How to do so. • The...

User Manual
Page 13
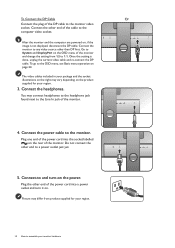
... them back apart to assemble your hands on the top and on the monitor. Gently attempt to the HDMI port on the base of the monitor as illustrated. Connect the other light sources. Your monitor is prohibited. 2. Carefully lift the monitor, turn it over and place it upright on its stand on the display... is an edge to edge monitor and should position the monitor and angle the screen to minimize unwanted reflections from other end of the cable to the HDMI port of the HDMI cable to pull them ...
... them back apart to assemble your hands on the top and on the monitor. Gently attempt to the HDMI port on the base of the monitor as illustrated. Connect the other light sources. Your monitor is prohibited. 2. Carefully lift the monitor, turn it over and place it upright on its stand on the display... is an edge to edge monitor and should position the monitor and angle the screen to minimize unwanted reflections from other end of the cable to the HDMI port of the HDMI cable to pull them ...
User Manual
Page 14
...end of the power cord into the socket labelled on the rear of the monitor. Go to System and DisplayPort on the OSD menu of the monitor and change the setting from product supplied for your region. 14 How to... a power outlet just yet. 5. To go to the monitor video socket. Do not connect the other than DP first. You may vary depending on the ...of the DP cable to the OSD menu, see Basic menu operation on page 24. Connect the monitor to any video source other end to assemble your package and the socket illustrations on the right may...
...end of the power cord into the socket labelled on the rear of the monitor. Go to System and DisplayPort on the OSD menu of the monitor and change the setting from product supplied for your region. 14 How to... a power outlet just yet. 5. To go to the monitor video socket. Do not connect the other than DP first. You may vary depending on the ...of the DP cable to the OSD menu, see Basic menu operation on page 24. Connect the monitor to any video source other end to assemble your package and the socket illustrations on the right may...

User Manual
Page 15
How to ON. Turn on the monitor by pressing the power button on page 14 to install the monitor software. To extend the service life of the product, we recommend that you use your BenQ monitor on the monitor. Make sure the power switch next to the AC power input jack is switched to assemble your monitor hardware 15 Turn on the computer too, and follow the instructions in Getting the most from your computer's power management function.
How to ON. Turn on the monitor by pressing the power button on page 14 to install the monitor software. To extend the service life of the product, we recommend that you use your BenQ monitor on the monitor. Make sure the power switch next to the AC power input jack is switched to assemble your monitor hardware 15 Turn on the computer too, and follow the instructions in Getting the most from your computer's power management function.

User Manual
Page 16
... stand and the base 1. Turn off the computer before unplugging the monitor signal cable. Placing the screen surface on the bottom of the monitor base and detach the monitor base as illustrated. Turn off the monitor and the power before laying the screen face down on your desk... towel on the desk for future use your monitor on the stand in the future, please keep the monitor base, monitor stand, and screws somewhere safe for padding, before unplugging the power cable. Prepare the monitor and area. How to assemble your monitor hardware Please be careful to prevent damage to...
... stand and the base 1. Turn off the computer before unplugging the monitor signal cable. Placing the screen surface on the bottom of the monitor base and detach the monitor base as illustrated. Turn off the monitor and the power before laying the screen face down on your desk... towel on the desk for future use your monitor on the stand in the future, please keep the monitor base, monitor stand, and screws somewhere safe for padding, before unplugging the power cable. Prepare the monitor and area. How to assemble your monitor hardware Please be careful to prevent damage to...
User Manual
Page 17
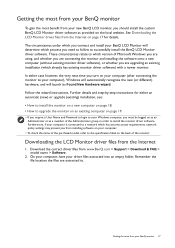
...step-by-step instructions for details. Download the correct driver files from the Internet 1. Getting the most benefit from your new BenQ LCD monitor, you from installing software on your computer. • To check the name of the purchased model, refer to the ... the Administrators group in order to a network which already has existing monitor driver software) with a newer monitor. Getting the most from your BenQ monitor To gain the most from your BenQ monitor 17 Downloading the LCD Monitor driver files from www.BenQ.com > Support > Download & FAQ > model name > Software....
...step-by-step instructions for details. Download the correct driver files from the Internet 1. Getting the most benefit from your new BenQ LCD monitor, you from installing software on your computer. • To check the name of the purchased model, refer to the ... the Administrators group in order to a network which already has existing monitor driver software) with a newer monitor. Getting the most from your BenQ monitor To gain the most from your BenQ monitor 17 Downloading the LCD Monitor driver files from www.BenQ.com > Support > Download & FAQ > model name > Software....
User Manual
Page 18
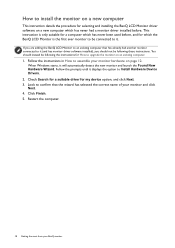
... Windows starts, it displays the option to upgrade the monitor on an existing computer. 1. Click Finish. 5. You should not be connected to it (and has monitor driver software installed), you are adding the BenQ LCD Monitor to an existing computer that the wizard has selected the...computer. 18 Getting the most from your monitor and click Next. 4. How to install the monitor on a new computer This instruction details the procedure for selecting and installing the BenQ LCD Monitor driver software on a new computer which the BenQ LCD Monitor is only suitable for a computer which has...
... Windows starts, it displays the option to upgrade the monitor on an existing computer. 1. Click Finish. 5. You should not be connected to it (and has monitor driver software installed), you are adding the BenQ LCD Monitor to an existing computer that the wizard has selected the...computer. 18 Getting the most from your monitor and click Next. 4. How to install the monitor on a new computer This instruction details the procedure for selecting and installing the BenQ LCD Monitor driver software on a new computer which the BenQ LCD Monitor is only suitable for a computer which has...
User Manual
Page 19
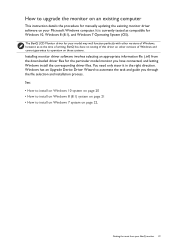
... system on page 21 • How to upgrade the monitor on an existing computer This instruction details the procedure for manually updating the existing monitor driver software on your Microsoft Windows computer. The BenQ LCD Monitor driver for your BenQ monitor 19 How to install on Windows 7 system on page 22...files. It is currently tested as at the time of writing, BenQ has done no testing of this driver on other versions of Windows and cannot guarantee its operation on those systems. Installing monitor driver software involves selecting an appropriate information file (.inf) from your...
... system on page 21 • How to upgrade the monitor on an existing computer This instruction details the procedure for manually updating the existing monitor driver software on your Microsoft Windows computer. The BenQ LCD Monitor driver for your BenQ monitor 19 How to install on Windows 7 system on page 22...files. It is currently tested as at the time of writing, BenQ has done no testing of this driver on other versions of Windows and cannot guarantee its operation on those systems. Installing monitor driver software involves selecting an appropriate information file (.inf) from your...
User Manual
Page 20
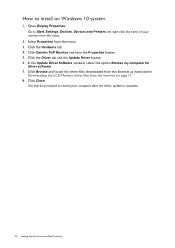
How to install on page 17. 8. Go to restart your BenQ monitor You may be prompted to Start, Settings, Devices, Devices and Printers and right-click the name of your monitor from your computer after the driver update is complete. 20 Getting the most from the menu. 2. In the Update Driver ... on Windows 10 system 1. Click the Hardware tab. 4. Click Close. Click the Driver tab and the Update Driver button. 6. Click Generic PnP Monitor, and then the Properties button. 5. Click Browse and locate the driver files downloaded from the Internet as instructed in Downloading the LCD...
How to install on page 17. 8. Go to restart your BenQ monitor You may be prompted to Start, Settings, Devices, Devices and Printers and right-click the name of your monitor from your computer after the driver update is complete. 20 Getting the most from the menu. 2. In the Update Driver ... on Windows 10 system 1. Click the Hardware tab. 4. Click Close. Click the Driver tab and the Update Driver button. 6. Click Generic PnP Monitor, and then the Properties button. 5. Click Browse and locate the driver files downloaded from the Internet as instructed in Downloading the LCD...


