User Manual
Page 1
OmniView® Remote IP Manager Control Control your computer or KVM switch through a web browser-from anywhere User Manual F1DE101H
OmniView® Remote IP Manager Control Control your computer or KVM switch through a web browser-from anywhere User Manual F1DE101H
User Manual
Page 2
Menu Options...32 4-1 Remote Control 32 • KVM Console 32 • Telnet Console 32 4-2 Virtual Media...34 • Floppy Disk 34 • CD-ROM Image 35 • Drive Redirection 38 • Options...40 4-3 User Management 42 • Change Password 43 • Users ...44 Installation ...8 2-1 Hardware Installation 9 2-2 Device Setup 12 2-3 Software Installation 13 2-4 Configuration via Serial Interface 14 2-5 Using your Remote IP Manager 15 3. Table of the Remote IP Manager 31 4. The Remote Console...16 3-1 Login to the Remote IP Manager 16 3-2 Remote IP Manager ...
Menu Options...32 4-1 Remote Control 32 • KVM Console 32 • Telnet Console 32 4-2 Virtual Media...34 • Floppy Disk 34 • CD-ROM Image 35 • Drive Redirection 38 • Options...40 4-3 User Management 42 • Change Password 43 • Users ...44 Installation ...8 2-1 Hardware Installation 9 2-2 Device Setup 12 2-3 Software Installation 13 2-4 Configuration via Serial Interface 14 2-5 Using your Remote IP Manager 15 3. Table of the Remote IP Manager 31 4. The Remote Console...16 3-1 Login to the Remote IP Manager 16 3-2 Remote IP Manager ...
User Manual
Page 3
Table of Contents 4-4 KVM Settings 44 • User Console 45 • Keyboard/Mouse 48 • Video ...50 • KVM Ports 51 4-5 Device Settings 52 • Network ...52 • Dynamic DNS 54 • Security ...56 • Certificate ...58 • Serial Port...60 • Intelligent Platform Management Interface (IPMI 62 • Date and Time 63 • Authentication 64 • Event Log ...67 • SNMP Settings 68 4-6 Maintenance ...69 • Device Information 69 • Event Log ...70 • Update Firmware 71 • Unit Reset...72 5. Information...75 ...
Table of Contents 4-4 KVM Settings 44 • User Console 45 • Keyboard/Mouse 48 • Video ...50 • KVM Ports 51 4-5 Device Settings 52 • Network ...52 • Dynamic DNS 54 • Security ...56 • Certificate ...58 • Serial Port...60 • Intelligent Platform Management Interface (IPMI 62 • Date and Time 63 • Authentication 64 • Event Log ...67 • SNMP Settings 68 4-6 Maintenance ...69 • Device Information 69 • Event Log ...70 • Update Firmware 71 • Unit Reset...72 5. Information...75 ...
User Manual
Page 4
Designed to let businesses easily add KVM-over 1 million Belkin OmniView products are in the unlikely event of a problem. Administrators can now troubleshoot faster via round-the-clock remote access from anywhere. 1-1 Introduction and Package ... Supply Rack-Mount Bracket Software with your business and are confident that you 'll need to install and operate the RIPM, and for purchasing this Belkin OmniView Remote IP Manager (RIPM). The RIPM sets up easily to dramatically reduce server downtime and service costs. We appreciate your existing Local Area Network...
Designed to let businesses easily add KVM-over 1 million Belkin OmniView products are in the unlikely event of a problem. Administrators can now troubleshoot faster via round-the-clock remote access from anywhere. 1-1 Introduction and Package ... Supply Rack-Mount Bracket Software with your business and are confident that you 'll need to install and operate the RIPM, and for purchasing this Belkin OmniView Remote IP Manager (RIPM). The RIPM sets up easily to dramatically reduce server downtime and service costs. We appreciate your existing Local Area Network...
User Manual
Page 5
Setup requires no additional software. 6 • User-Friendly Interface The user-friendly interface allows you to set up to provide remote access to an individual computer or server. 2 • Digital Users 3 The RIPM allows one serial device, such as a power distribution unit (PDU), so you can access it, as long as it is web-browser-based; It also enables an additional 25 users to your servers. • Virtual Media* With virtual-media capability, you to access the basic input/output system (BIOS) of your servers remotely. • Enhanced Security The RIPM provides 256...
Setup requires no additional software. 6 • User-Friendly Interface The user-friendly interface allows you to set up to provide remote access to an individual computer or server. 2 • Digital Users 3 The RIPM allows one serial device, such as a power distribution unit (PDU), so you can access it, as long as it is web-browser-based; It also enables an additional 25 users to your servers. • Virtual Media* With virtual-media capability, you to access the basic input/output system (BIOS) of your servers remotely. • Enhanced Security The RIPM provides 256...
User Manual
Page 6
... 0U installation. • Firmware Updates Flash upgrades allow you to be positioned on your desktop or mounted on the back of the RIPM. Visit www.belkin.com for your RIPM. These firmware updates ensure that the RIPM is compact enough to obtain the latest firmware updates for upgrade information and support. 3
... 0U installation. • Firmware Updates Flash upgrades allow you to be positioned on your desktop or mounted on the back of the RIPM. Visit www.belkin.com for your RIPM. These firmware updates ensure that the RIPM is compact enough to obtain the latest firmware updates for upgrade information and support. 3

User Manual
Page 7
section 1-3 Equipment Requirements Overview Hardware Requirements 1 • OmniView Series Remote IP Manager (included) • PS/2 Cable Kit (included) 2 • VGA Cable (included) 3 • Mini-USB Cable (included) 4 • 5V DC, 2A Power Supply (included) • Keyboard, monitor, and mouse 5 • Connection to network using 10/100Base-T Ethernet port (RJ45) 6 • CAT5 cable • Rack-mount bracket with screws (included in box for rack-mount-install option) 4
section 1-3 Equipment Requirements Overview Hardware Requirements 1 • OmniView Series Remote IP Manager (included) • PS/2 Cable Kit (included) 2 • VGA Cable (included) 3 • Mini-USB Cable (included) 4 • 5V DC, 2A Power Supply (included) • Keyboard, monitor, and mouse 5 • Connection to network using 10/100Base-T Ethernet port (RJ45) 6 • CAT5 cable • Rack-mount bracket with screws (included in box for rack-mount-install option) 4

User Manual
Page 8
Red Hat® Linux® 7.x and above (requires KVM); Mac OS® X v10.0 and above ; UNIX®; 1-4 Systems Supported Overview Windows 2000, 2003, XP; Sun™ Solaris™ 8.x and above (with Sun adapter-Belkin part# F1DE083) Browsers Supported • Microsoft® Internet Explorer 6.0 and above • Netscape® Navigator® 7.0 5
Red Hat® Linux® 7.x and above (requires KVM); Mac OS® X v10.0 and above ; UNIX®; 1-4 Systems Supported Overview Windows 2000, 2003, XP; Sun™ Solaris™ 8.x and above (with Sun adapter-Belkin part# F1DE083) Browsers Supported • Microsoft® Internet Explorer 6.0 and above • Netscape® Navigator® 7.0 5

User Manual
Page 9
... 140° F (-20° C to 60° C) Humidity: 5% to 80% Warranty: 2 years Note: Specifications are subject to change without notice. 6 1-5 Specifications Overview section Part Number: F1DE101H 1 Power: 5V DC, 2A 2 No.
... 140° F (-20° C to 60° C) Humidity: 5% to 80% Warranty: 2 years Note: Specifications are subject to change without notice. 6 1-5 Specifications Overview section Part Number: F1DE101H 1 Power: 5V DC, 2A 2 No.

User Manual
Page 10
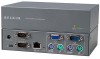
1-5 Remote IP Manager Diagram Front of Unit Overview Connection LED Link/Activity LED Back of Unit Power Jack Modem Port Network Connection Console VGA Port CPU/KVM Switch VGA Port Mini-USB Port Serial Device Port Reset Console Button Keyboard Port CPU/KVM Switch Keyboard Port Console Mouse Port CPU/KVM Switch Mouse Port 7
1-5 Remote IP Manager Diagram Front of Unit Overview Connection LED Link/Activity LED Back of Unit Power Jack Modem Port Network Connection Console VGA Port CPU/KVM Switch VGA Port Mini-USB Port Serial Device Port Reset Console Button Keyboard Port CPU/KVM Switch Keyboard Port Console Mouse Port CPU/KVM Switch Mouse Port 7

User Manual
Page 11
section 2-1 Hardware Installation Installation 1 Typical RIPM Configuration with a Computer 2 3 4 5 6 Typical RIPM Configuration with a KVM Switch ���� 8
section 2-1 Hardware Installation Installation 1 Typical RIPM Configuration with a Computer 2 3 4 5 6 Typical RIPM Configuration with a KVM Switch ���� 8

User Manual
Page 12
Belkin Corporation is not responsible for installation in 19-inch racks. 1.1 Attach the included bracket to the top or bottom of the RIPM with the provided ...
Belkin Corporation is not responsible for installation in 19-inch racks. 1.1 Attach the included bracket to the top or bottom of the RIPM with the provided ...

User Manual
Page 13
section 2-1 Hardware Installation Installation Step 3 Option 1: Connecting the RIPM to a KVM Switch 1 (Host System) 2 3.1 Power down the computer. 3.2 Using the provided PS/2 and VGA cables, connect one end to the ���� monitor, keyboard, and mouse ports on your computer. See Fig. 3. 5 3.3 Connect the other end to the "CPU/KVM switch" monitor, keyboard, and mouse ports on your KVM switch. 6 . See Fig. 4. 3.3 Connect the other end to the "CPU/KVM switch" monitor, 4 keyboard, and mouse ports on the RIPM....
section 2-1 Hardware Installation Installation Step 3 Option 1: Connecting the RIPM to a KVM Switch 1 (Host System) 2 3.1 Power down the computer. 3.2 Using the provided PS/2 and VGA cables, connect one end to the ���� monitor, keyboard, and mouse ports on your computer. See Fig. 3. 5 3.3 Connect the other end to the "CPU/KVM switch" monitor, keyboard, and mouse ports on your KVM switch. 6 . See Fig. 4. 3.3 Connect the other end to the "CPU/KVM switch" monitor, 4 keyboard, and mouse ports on the RIPM....

User Manual
Page 14
See Fig. 5. Fig. 5 Note: You can connect any computer running Windows, you do the above setup. Fig 6 11 Note: If your computer is NOT running the Windows OS to the RIPM to support virtual media-the computer does not need to do not need to an available USB port on your KVM switch or computer. 2-1 Hardware Installation Installation Step 4 Connecting the Mini-USB Cable to Support Virtual Media 4.1 Power down the computer. 4.2 Using the provided mini-USB cable, connect one end to the mini-USB port on the RIPM and the other end to be the host system. Step 5 Powering Up the ...
See Fig. 5. Fig. 5 Note: You can connect any computer running Windows, you do the above setup. Fig 6 11 Note: If your computer is NOT running the Windows OS to the RIPM to support virtual media-the computer does not need to do not need to an available USB port on your KVM switch or computer. 2-1 Hardware Installation Installation Step 4 Connecting the Mini-USB Cable to Support Virtual Media 4.1 Power down the computer. 4.2 Using the provided mini-USB cable, connect one end to the mini-USB port on the RIPM and the other end to be the host system. Step 5 Powering Up the ...
User Manual
Page 15
You can use terminal software (e.g., HyperTerminal®). 2 Note: Belkin recommends using the device-setup software provided. 3 4 5 6 12 section 2-2 Device Setup Installation There are two ways to the RIPM and use the 1 device-setup software provided on the CD enclosed in the box, or you can connect a serial interface cable to set up and configure the RIPM.
You can use terminal software (e.g., HyperTerminal®). 2 Note: Belkin recommends using the device-setup software provided. 3 4 5 6 12 section 2-2 Device Setup Installation There are two ways to the RIPM and use the 1 device-setup software provided on the CD enclosed in the box, or you can connect a serial interface cable to set up and configure the RIPM.
User Manual
Page 16
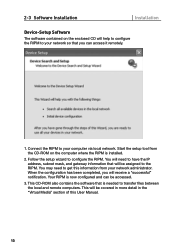
You will need to get this User Manual. 13 This will be covered in more detail in the "Virtual Media" section of this information from the CD-ROM on the enclosed CD will help to configure the RIPM to your computer via local network. Start the setup tool from your network administrator. You may need to have the IP address, subnet mask, and gateway information that will receive a "successful" notification. Your RIPM is needed to configure the RIPM. This CD-ROM also contains the software that you will be accessed. 3. 2-3 Software Installation Installation Device-Setup Software...
You will need to get this User Manual. 13 This will be covered in more detail in the "Virtual Media" section of this information from the CD-ROM on the enclosed CD will help to configure the RIPM to your computer via local network. Start the setup tool from your network administrator. You may need to have the IP address, subnet mask, and gateway information that will receive a "successful" notification. Your RIPM is needed to configure the RIPM. This CD-ROM also contains the software that you will be accessed. 3. 2-3 Software Installation Installation Device-Setup Software...
User Manual
Page 17
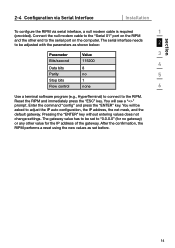
You will be asked to adjust the IP auto configuration, the IP address, the net mask, and the default gateway. Connect the null modem cable to the "Serial 01" port on the RIPM and the other value for no 5 Stop bits 1 Flow control none 6 Use a terminal software program (e.g., HyperTerminal) to connect to be set before. 14 The serial interface needs to the RIPM. After the confirmation, the RIPM performs a reset using the new values as shown below: 2 Parameter Value 3 Bits/second 115200 4 Data bits 8 Parity no gateway) or any other end to "0.0.0.0" (for ...
You will be asked to adjust the IP auto configuration, the IP address, the net mask, and the default gateway. Connect the null modem cable to the "Serial 01" port on the RIPM and the other value for no 5 Stop bits 1 Flow control none 6 Use a terminal software program (e.g., HyperTerminal) to connect to be set before. 14 The serial interface needs to the RIPM. After the confirmation, the RIPM performs a reset using the new values as shown below: 2 Parameter Value 3 Bits/second 115200 4 Data bits 8 Parity no gateway) or any other end to "0.0.0.0" (for ...
User Manual
Page 18
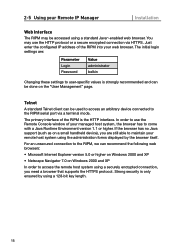
... unsecured connection to user-specific values is the HTTP interface. You may be accessed using a securely encrypted connection, you are : Parameter Login Password Value administrator belkin Changing these settings to the RIPM, we can recommend the following web browsers: • Microsoft Internet Explorer version 5.0 or higher on Windows 2000 and XP...
... unsecured connection to user-specific values is the HTTP interface. You may be accessed using a securely encrypted connection, you are : Parameter Login Password Value administrator belkin Changing these settings to the RIPM, we can recommend the following web browsers: • Microsoft Internet Explorer version 5.0 or higher on Windows 2000 and XP...
User Manual
Page 19
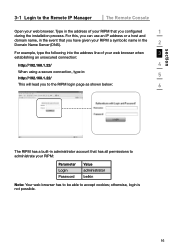
... use an IP address or a host and domain name, in the event that has all permissions to administrate your RIPM: Parameter Login Password Value administrator belkin Note: Your web browser has to be able to the Remote IP Manager The Remote Console Open your web browser when 3 establishing an unsecured connection...
... use an IP address or a host and domain name, in the event that has all permissions to administrate your RIPM: Parameter Login Password Value administrator belkin Note: Your web browser has to be able to the Remote IP Manager The Remote Console Open your web browser when 3 establishing an unsecured connection...

User Manual
Page 20
The Remote Console will behave exactly the same way as usual. Some of the available menu options include: Auto-Adjust Button If the video displayed is of bad quality or distorted in front of the screen of your remote system; Video Settings in which the RIPM is installed. you install Sun JVM (Java Virtual Machine) 1.4. You can use the keyboard and mouse as if you were sitting directly in some values, for instance, those related to the default settings for accessing the RIPM must supply a Java Runtime Environment version 1.1 or higher. 3-2 Remote IP Manager Interface The ...
The Remote Console will behave exactly the same way as usual. Some of the available menu options include: Auto-Adjust Button If the video displayed is of bad quality or distorted in front of the screen of your remote system; Video Settings in which the RIPM is installed. you install Sun JVM (Java Virtual Machine) 1.4. You can use the keyboard and mouse as if you were sitting directly in some values, for instance, those related to the default settings for accessing the RIPM must supply a Java Runtime Environment version 1.1 or higher. 3-2 Remote IP Manager Interface The ...