
User Manual
Page 3
..., give the user manual as a reference for several other models. Therefore, please read this user manual first! A Warning for electric shock. B Warning for hazardous situations with our National Environment Regulations. Follow all other wastes. This product was manufactured using the product and keep it as well. Do not dispose of the product are used: C Important information or useful hints about usage. Packaging materials...
..., give the user manual as a reference for several other models. Therefore, please read this user manual first! A Warning for electric shock. B Warning for hazardous situations with our National Environment Regulations. Follow all other wastes. This product was manufactured using the product and keep it as well. Do not dispose of the product are used: C Important information or useful hints about usage. Packaging materials...

User Manual
Page 4
... useful hints about usage. Please read this entire user manual and all warnings and information in the manual. Dear Customer, We hope that this user manual is also applicable for several other wastes. If you get the best results from recyclable materials in accordance with the domestic or other models. Do not dispose of -the-art technology. A Warning for electric...
... useful hints about usage. Please read this entire user manual and all warnings and information in the manual. Dear Customer, We hope that this user manual is also applicable for several other wastes. If you get the best results from recyclable materials in accordance with the domestic or other models. Do not dispose of -the-art technology. A Warning for electric...
User Manual
Page 5
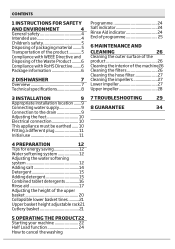
...6 2 DISHWASHER 7 Overview 7 Technical specifications 8 Programme 24 Salt indicator 24 Rinse Aid indicator 24 End of programme 25 6 MAINTENANCE AND CLEANING 26 Cleaning the outer surface of the product 26 Cleaning the interior of the machine.26 Cleaning the filters 26 Cleaning the hose filter 27 Cleaning the impellers 27 Lower impeller 27 Upper impeller 28 3 INSTALLATION 9 7 TROUBLESHOOTING 29 Appropriate installation location........9 Connecting water supply 9 8 GUARANTEE 34 Connection to the drain 9 Adjusting the feet 10 Electrical connection 10 This...
...6 2 DISHWASHER 7 Overview 7 Technical specifications 8 Programme 24 Salt indicator 24 Rinse Aid indicator 24 End of programme 25 6 MAINTENANCE AND CLEANING 26 Cleaning the outer surface of the product 26 Cleaning the interior of the machine.26 Cleaning the filters 26 Cleaning the hose filter 27 Cleaning the impellers 27 Lower impeller 27 Upper impeller 28 3 INSTALLATION 9 7 TROUBLESHOOTING 29 Appropriate installation location........9 Connecting water supply 9 8 GUARANTEE 34 Connection to the drain 9 Adjusting the feet 10 Electrical connection 10 This...
User Manual
Page 6
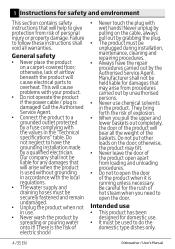
... Authorised Service Agent. •• Connect the product to a grounded outlet protected by a fuse complying with the local regulations. •• The water supply and draining hoses must be unplugged during installation, maintenance, cleaning and repairing procedures. •• Always have the grounding installation made by spreading or pouring water onto it is used to do the domestic type dishes only. 4 /35 EN Dishwasher / User's Manual Do not put other loads...
... Authorised Service Agent. •• Connect the product to a grounded outlet protected by a fuse complying with the local regulations. •• The water supply and draining hoses must be unplugged during installation, maintenance, cleaning and repairing procedures. •• Always have the grounding installation made by spreading or pouring water onto it is used to do the domestic type dishes only. 4 /35 EN Dishwasher / User's Manual Do not put other loads...
User Manual
Page 7
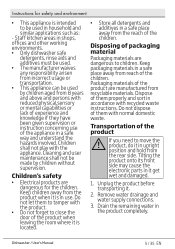
... away from the rear side. Remove water drainage and water supply connections. 3. Children shall not play with the appliance. Cleaning and user maintenance shall not be used . •• The manufacturer waives any responsibility arisen from incorrect usage or transportation. •• This appliance can be made by children aged from recyclable materials. Drain the remaining water in upright position and hold...
... away from the rear side. Remove water drainage and water supply connections. 3. Children shall not play with the appliance. Cleaning and user maintenance shall not be used . •• The manufacturer waives any responsibility arisen from incorrect usage or transportation. •• This appliance can be made by children aged from recyclable materials. Drain the remaining water in upright position and hold...

User Manual
Page 9
2 Dishwasher Overview 1. Door 9. Upper basket rail 14. Lower impeller 5. Filters 6. Rating Label 7. Salt reservoir lid 13. Upper basket Dishwasher / User's Manual 7 / 35 EN Top Cover (depends on model) 2. Control panel 8. Lower basket 4. Detergent dispenser 10. Lower impeller slot 11. Cutlery basket 12. Upper impeller 3.
2 Dishwasher Overview 1. Door 9. Upper basket rail 14. Lower impeller 5. Filters 6. Rating Label 7. Salt reservoir lid 13. Upper basket Dishwasher / User's Manual 7 / 35 EN Top Cover (depends on model) 2. Control panel 8. Lower basket 4. Detergent dispenser 10. Lower impeller slot 11. Cutlery basket 12. Upper impeller 3.
User Manual
Page 10
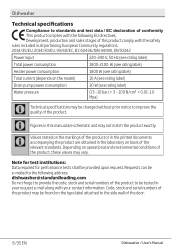
... the model) Drain pump power consumption Water pressure 220-240 V, 50 Hz (see rating label) 1800-2100 W (see rating label) 1800 W (see rating label) 10 A (see rating label) 30 W (see rating label) 0.3 -10 bar (= 3 - 100 N/cm² = 0.01-1.0 Mpa) C Technical specifications may be tested in the laboratory on operational and environmental conditions of the product, these values may be provided upon request. Code, stock and serial numbers...
... the model) Drain pump power consumption Water pressure 220-240 V, 50 Hz (see rating label) 1800-2100 W (see rating label) 1800 W (see rating label) 10 A (see rating label) 30 W (see rating label) 0.3 -10 bar (= 3 - 100 N/cm² = 0.01-1.0 Mpa) C Technical specifications may be tested in the laboratory on operational and environmental conditions of the product, these values may be provided upon request. Code, stock and serial numbers...
User Manual
Page 11
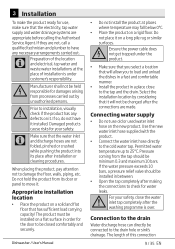
... that the water inlet and discharge hoses are made. Damaged products cause risks for water leaks. C Make sure that the electricity, tap water supply and water drainage systems are not, call a qualified technician and plumber to the tap and the drain. Appropriate installation location •• Place the product on a long pile rug or similar surfaces. Use the new water inlet hose supplied with the product. •• Connect the water inlet hose directly to the drain hole...
... that the water inlet and discharge hoses are made. Damaged products cause risks for water leaks. C Make sure that the electricity, tap water supply and water drainage systems are not, call a qualified technician and plumber to the tap and the drain. Appropriate installation location •• Place the product on a long pile rug or similar surfaces. Use the new water inlet hose supplied with the product. •• Connect the water inlet hose directly to the drain hole...
User Manual
Page 12
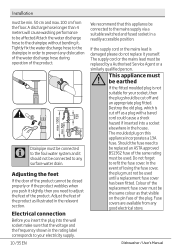
... be replaced by a Authorised Service Agent or a similarly qualified person. The supply cord or the mains lead must be affected.Attach the water discharge hose to adjust the feet of the product. The moulded plug on the pin face of the product as illustrated in a readily accessible position. Adjust the feet of the plug. Electrical connection Before you need to the mains supply via a suitable switched and fused...
... be replaced by a Authorised Service Agent or a similarly qualified person. The supply cord or the mains lead must be affected.Attach the water discharge hose to adjust the feet of the product. The moulded plug on the pin face of the product as illustrated in a readily accessible position. Adjust the feet of the plug. Electrical connection Before you need to the mains supply via a suitable switched and fused...
User Manual
Page 15
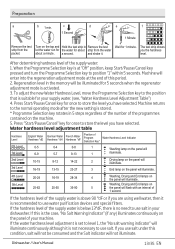
... normal operating mode after the new setting is no need to use water purification devices and special filters. Press "Start/Pause/Cancel" key for once to use salt in 5 steps regardless of the number of the programmes contained on the panel of your supply water. (see, "Water Hardness Level Adjustment Table") 4. Drying lamp on the panel will illuminate. 16-19 13-15 23-27 3 End lamp on the panel will illuminate. 4th Level...
... normal operating mode after the new setting is no need to use water purification devices and special filters. Press "Start/Pause/Cancel" key for once to use salt in 5 steps regardless of the number of the programmes contained on the panel of your supply water. (see, "Water Hardness Level Adjustment Table") 4. Drying lamp on the panel will illuminate. 16-19 13-15 23-27 3 End lamp on the panel will illuminate. 4th Level...
User Manual
Page 17
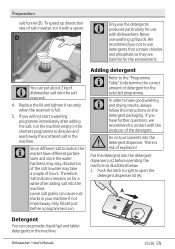
... in water may take a couple of the detergent. Dishwasher / User's Manual 15/35 EN C Only use the detergents produced particularly for the selected programme. Therefore, Salt Indicator remains on the detergent packaging. We recommend you have good washing and drying results, always follow the instructions on for the environment. Adding detergent C Refer to the "Programme Table" to open the detergent dispenser lid (A). Put the detergent into the detergent dispenser...
... in water may take a couple of the detergent. Dishwasher / User's Manual 15/35 EN C Only use the detergents produced particularly for the selected programme. Therefore, Salt Indicator remains on the detergent packaging. We recommend you have good washing and drying results, always follow the instructions on for the environment. Adding detergent C Refer to the "Programme Table" to open the detergent dispenser lid (A). Put the detergent into the detergent dispenser...
User Manual
Page 18
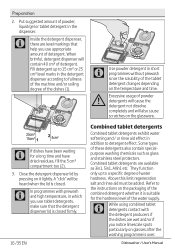
... detergent effect. Close the detergent dispenser lid by pressing on the temperature and time. Dishwasher / User's Manual Fill detergent up to a specific degree of the tablet detergent changes depending on it is closed firmly. 16 /35 EN Combined tablet detergents Combined tablet detergents exhibit water softening and / or rinse aid effect in addition to the instructions on glasses after the washing programme is closed . C If dishes have been waiting for the hardness level...
... detergent effect. Close the detergent dispenser lid by pressing on the temperature and time. Dishwasher / User's Manual Fill detergent up to a specific degree of the tablet detergent changes depending on it is closed firmly. 16 /35 EN Combined tablet detergents Combined tablet detergents exhibit water softening and / or rinse aid effect in addition to the instructions on glasses after the washing programme is closed . C If dishes have been waiting for the hardness level...
User Manual
Page 19
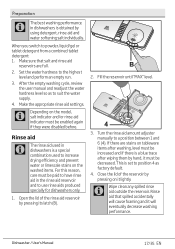
... detergent: 1. After the empty washing cycle, review the user manual and readjust the water hardness level so as factory default. 4. Open the lid of the reservoir by pressing its latch (B). 2. C Wipe clean any spilled rinse aid outside the reservoir. Make sure that spilled accidentally will cause foaming and it lightly. Make the appropriate rinse aid settings. Rinse aid that salt and rinse aid reservoirs are stains on the model, salt indicator and/or rinse aid indicator...
... detergent: 1. After the empty washing cycle, review the user manual and readjust the water hardness level so as factory default. 4. Open the lid of the reservoir by pressing its latch (B). 2. C Wipe clean any spilled rinse aid outside the reservoir. Make sure that spilled accidentally will cause foaming and it lightly. Make the appropriate rinse aid settings. Rinse aid that salt and rinse aid reservoirs are stains on the model, salt indicator and/or rinse aid indicator...

User Manual
Page 24
... pressing Start / Stop key. 22 /35 EN Dishwasher / User's Manual Open the door of the machine. 9. 5 Operating the product 1 23 4 7 65 1. "ON" light will start , pause or cancel the selected programme. Half Load key Select Half Load when using the table of detergent in to start . Half Load key 7. Check if the Salt and Rinse Aid indicators light and add salt and / or rinse aid if needed and close its lid. 7. Start the programme by using any wash programme...
... pressing Start / Stop key. 22 /35 EN Dishwasher / User's Manual Open the door of the machine. 9. 5 Operating the product 1 23 4 7 65 1. "ON" light will start , pause or cancel the selected programme. Half Load key Select Half Load when using the table of detergent in to start . Half Load key 7. Check if the Salt and Rinse Aid indicators light and add salt and / or rinse aid if needed and close its lid. 7. Start the programme by using any wash programme...

User Manual
Page 26
... is used to open the door of rinse aid in the dishwasher or not. There may cause changes in the dishwasher or not. Half Load indicator lights up. 4. You need to see whether there is cancelled when washing light goes off. Washing programme will resume running depending on the panel of the supply water. Then, you have cancelled was in the machine using the lower and upper baskets of softening salt in the programme duration. Rinse Aid indicator...
... is used to open the door of rinse aid in the dishwasher or not. There may cause changes in the dishwasher or not. Half Load indicator lights up. 4. You need to see whether there is cancelled when washing light goes off. Washing programme will resume running depending on the panel of the supply water. Then, you have cancelled was in the machine using the lower and upper baskets of softening salt in the programme duration. Rinse Aid indicator...

User Manual
Page 28
... least once a week in the machine, drain the water by running water. 1. Cleaning the outer surface of the product Clean the outer surface and door gaskets of the product extends and frequently faced problems decrease if it out from the seating (C). 3. Wipe the control panel only with detergent based on the filters. If the water cannot be discharged, clean any cleaning procedures. Press the two pawls on...
... least once a week in the machine, drain the water by running water. 1. Cleaning the outer surface of the product Clean the outer surface and door gaskets of the product extends and frequently faced problems decrease if it out from the seating (C). 3. Wipe the control panel only with detergent based on the filters. If the water cannot be discharged, clean any cleaning procedures. Press the two pawls on...

User Manual
Page 31
... starting the programme, turn the lower and upper impellers by pressing the On / Off button. 7 Troubleshooting Machine does not start. • Power cable is unplugged. >>> Check if the power cable is plugged in. • Fuse is blown. >>> Check the fuses in your house. • Water is cut. >>> Make sure that the water inlet tap is open. • Door of the machine is open . >>> Make sure that the detergent dispenser lid is clean...
... starting the programme, turn the lower and upper impellers by pressing the On / Off button. 7 Troubleshooting Machine does not start. • Power cable is unplugged. >>> Check if the power cable is plugged in. • Fuse is blown. >>> Check the fuses in your house. • Water is cut. >>> Make sure that the water inlet tap is open. • Door of the machine is open . >>> Make sure that the detergent dispenser lid is clean...
User Manual
Page 32
... wait for evacuation of the steam inside 30 /35 EN Dishwasher / User's Manual Start unloading process from the lower basket. C It is normal that the salt reservoir lid is tightly closed container if possible. Tea, cafe or lipstick stains remain on deteriorated surfaces. Run the prewash programme to a touchable level. Unload the dishes after washing process is stored under unsuitable conditions. >>> If you...
... wait for evacuation of the steam inside 30 /35 EN Dishwasher / User's Manual Start unloading process from the lower basket. C It is normal that the salt reservoir lid is tightly closed container if possible. Tea, cafe or lipstick stains remain on deteriorated surfaces. Run the prewash programme to a touchable level. Unload the dishes after washing process is stored under unsuitable conditions. >>> If you...
User Manual
Page 34
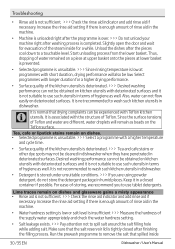
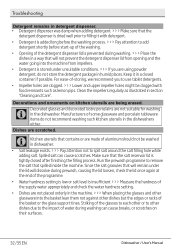
... water going into the basket lean them not against other dishes due to spill salt around the salt filling hole while adding salt. Troubleshooting Detergent remains in detergent dispenser. • Detergent dispenser was damp when adding detergent. >>> Make sure that the detergent dispenser is dried well prior to filling it in a closed after finishing the filling process. Dishes are being erased. Run the prewash programme to remove...
... water going into the basket lean them not against other dishes due to spill salt around the salt filling hole while adding salt. Troubleshooting Detergent remains in detergent dispenser. • Detergent dispenser was damp when adding detergent. >>> Make sure that the detergent dispenser is dried well prior to filling it in a closed after finishing the filling process. Dishes are being erased. Run the prewash programme to remove...
User Manual
Page 35
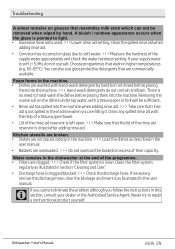
... or fork will be removed when wiped by hand. Clean the filter system regularly as described in the user manual. • Baskets are not placed orderly in the machine. >>> Load the dishes as illustrated in section "Cleaning and Care". • Discharge hose is used. >>>Lower rinse aid setting. Never try to light. • Excessive rinse aid is clogged/blocked. >>> Check the discharge hose. Clean the spilled rinse aid when adding rinse aid. • Corrosion has...
... or fork will be removed when wiped by hand. Clean the filter system regularly as described in the user manual. • Baskets are not placed orderly in the machine. >>> Load the dishes as illustrated in section "Cleaning and Care". • Discharge hose is used. >>>Lower rinse aid setting. Never try to light. • Excessive rinse aid is clogged/blocked. >>> Check the discharge hose. Clean the spilled rinse aid when adding rinse aid. • Corrosion has...


