User Manual
Page 2
... most meticulous quality control procedures, will provide you with years of good service. Electronic products not included in order to minimise its impact on the environment. Dear Customer, We hope that this manual may need it at hand for waste electrical and electronic equipment (WEEE). This means that your product. • Follow the instructions, especially those for...
... most meticulous quality control procedures, will provide you with years of good service. Electronic products not included in order to minimise its impact on the environment. Dear Customer, We hope that this manual may need it at hand for waste electrical and electronic equipment (WEEE). This means that your product. • Follow the instructions, especially those for...
User Manual
Page 3
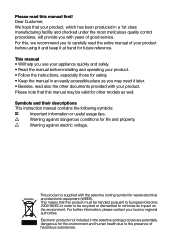
... 1 Your refrigerator 4 5 Using your refrigerator 15 TEMPERATURE CONTROL AND 2 Warnings 5 ADJUSTMENT 15 ELECTRICAL REQUIREMENTS.......... 6 SUGGESTED ARRANGEMENT OF FOOD IN THE FRIDGE/FREEZER..... 16 WARNING! THIS APPLIANCE MUST BE EARTHED 6 STORING FROZEN FOOD 17 ENERGY SAVING TIPS 7 FREEZING FRESH FOOD 17 MAKING ICE CUBES 18 3 Installation 8 DEFROSTING 18 TRANSPORTATION INSTRUCTIONS. 8 6 Maintenance and INSTALLATION INSTRUCTIONS........ 8 cleaning 19 REPLACING THE INTERIOR LIGHT BULB 10 7 Do's and Don'ts 20 REVERSING THE DOORS 11 Reversing the doors 13 4 Before...
... 1 Your refrigerator 4 5 Using your refrigerator 15 TEMPERATURE CONTROL AND 2 Warnings 5 ADJUSTMENT 15 ELECTRICAL REQUIREMENTS.......... 6 SUGGESTED ARRANGEMENT OF FOOD IN THE FRIDGE/FREEZER..... 16 WARNING! THIS APPLIANCE MUST BE EARTHED 6 STORING FROZEN FOOD 17 ENERGY SAVING TIPS 7 FREEZING FRESH FOOD 17 MAKING ICE CUBES 18 3 Installation 8 DEFROSTING 18 TRANSPORTATION INSTRUCTIONS. 8 6 Maintenance and INSTALLATION INSTRUCTIONS........ 8 cleaning 19 REPLACING THE INTERIOR LIGHT BULB 10 7 Do's and Don'ts 20 REVERSING THE DOORS 11 Reversing the doors 13 4 Before...
User Manual
Page 4
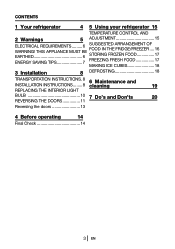
.... Fan 14. Thermostat control 2. Interior Light 3. Crisper cover 6. Icebank tray 8. Egg holders 12. Fridge compartment 15. Defrost water collection channel - Crisper 7. Deep-freeze compartment 9. Freezer compartment C Figures that take place in the product you have purchased, then it is valid for other models. 4 EN 1 Your refrigerator 1 2 3 14 3 3 4 5 6 7 13 8 8 15 8 8 10 12 * 11 10 10 9 1. Adjustable body shelves 4. Wine rack 13. Drain tube 5. If the subject parts are not included in this instruction manual...
.... Fan 14. Thermostat control 2. Interior Light 3. Crisper cover 6. Icebank tray 8. Egg holders 12. Fridge compartment 15. Defrost water collection channel - Crisper 7. Deep-freeze compartment 9. Freezer compartment C Figures that take place in the product you have purchased, then it is valid for other models. 4 EN 1 Your refrigerator 1 2 3 14 3 3 4 5 6 7 13 8 8 15 8 8 10 12 * 11 10 10 9 1. Adjustable body shelves 4. Wine rack 13. Drain tube 5. If the subject parts are not included in this instruction manual...

User Manual
Page 5
... facilities available. • See Installation Instructions on on page 8 for its intended purpose i.e the storing and freezing of edible foodstuff. • Do not dispose of the appliance on suitable location. 5 • To obtain the best possible performance and trouble free operation from your right to free service during the guarantee period. • Keep ventilation openings, in the appliance enclosure or...
... facilities available. • See Installation Instructions on on page 8 for its intended purpose i.e the storing and freezing of edible foodstuff. • Do not dispose of the appliance on suitable location. 5 • To obtain the best possible performance and trouble free operation from your right to free service during the guarantee period. • Keep ventilation openings, in the appliance enclosure or...
User Manual
Page 6
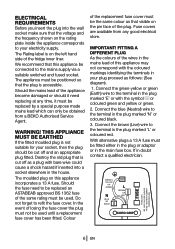
... The moulded plug on the left hand side of the fridge inner liner. Fuse covers are available from a BEKO Authorised Service Agent. Should the fuse need replacing at any good electrical store. In the event of the replacement fuse cover must be cut off and an appropriate plug fitted. GREEN... be used until a replacement fuse cover has been fitted. If in your electricity supply. Connect the green-yellow or green (Earth) wire to your plug proceed as that is accessible. Should the mains lead of this appliance be the same colour as follows: (See diagram). 1....
... The moulded plug on the left hand side of the fridge inner liner. Fuse covers are available from a BEKO Authorised Service Agent. Should the fuse need replacing at any good electrical store. In the event of the replacement fuse cover must be cut off and an appropriate plug fitted. GREEN... be used until a replacement fuse cover has been fitted. If in your electricity supply. Connect the green-yellow or green (Earth) wire to your plug proceed as that is accessible. Should the mains lead of this appliance be the same colour as follows: (See diagram). 1....
User Manual
Page 8
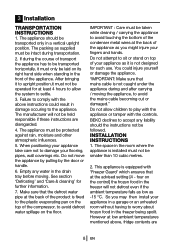
...wires at low ambient temperatures mentioned above instructions could injure yourself or damage the appliance. See section 'Defrosting' and 'Care & cleaning' for at the advised setting [4 - You could result in damage occuring to the appliance. Do not allow the system to avoid defrost water spillage on top of the compressor, to settle. 3. This appliance is equipped with 'Freezer...the drain tray before moving the appliance, to be transported horizontally, it must only be laid on the control] the frozen food in the room where the appliance is fixed to the plastic evaporating pan on...
...wires at low ambient temperatures mentioned above instructions could injure yourself or damage the appliance. See section 'Defrosting' and 'Care & cleaning' for at the advised setting [4 - You could result in damage occuring to the appliance. Do not allow the system to avoid defrost water spillage on top of the compressor, to settle. 3. This appliance is equipped with 'Freezer...the drain tray before moving the appliance, to be transported horizontally, it must only be laid on the control] the frozen food in the room where the appliance is fixed to the plastic evaporating pan on...
User Manual
Page 9
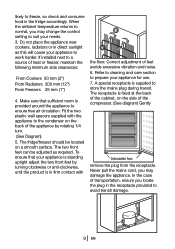
... fridge/freezer should be adjusted as this will cause your appliance is standing upright adjust the two front feet by turning clockwise or anti-clockwise, until the product is supplied to work harder. To ensure that sufficient room is fixed at the back of the cabinet, on the side of feet avoids excessive vibration and noise. 6. Correct adjustment of the compressor. (See diagram) Gently remove...
... fridge/freezer should be adjusted as this will cause your appliance is standing upright adjust the two front feet by turning clockwise or anti-clockwise, until the product is supplied to work harder. To ensure that sufficient room is fixed at the back of the cabinet, on the side of feet avoids excessive vibration and noise. 6. Correct adjustment of the compressor. (See diagram) Gently remove...

User Manual
Page 10
... of the burnt-out light bulb immediately. If the bulb works, replace the light cover by ensuring it useful to remove shelves for easy access. 2. Replace the bulb with a new 15 watt (max) screw cap (SES) bulb. 5. REPLACING THE INTERIOR LIGHT BULB Should the light fail to work , switch off each side. 3. Replace the plug and switch on. Use a flat tipped screwdriver to locate the front two lugs. 4. First check that the bulb hasn't worked loose by inserting the...
... of the burnt-out light bulb immediately. If the bulb works, replace the light cover by ensuring it useful to remove shelves for easy access. 2. Replace the bulb with a new 15 watt (max) screw cap (SES) bulb. 5. REPLACING THE INTERIOR LIGHT BULB Should the light fail to work , switch off each side. 3. Replace the plug and switch on. Use a flat tipped screwdriver to locate the front two lugs. 4. First check that the bulb hasn't worked loose by inserting the...

User Manual
Page 11
... and remove the middle hinge while holding the lower door firmly.(3) 6.Remove lower door carefully off the middle hinge and stand door upright in a plastic bag with the appliance: - Please refer to protect the appliance, your wall and floor coverings. To follow numbers in brackets below, refer to the main diagram. 1.Switch off plastic hinge covers on both sides of hinge.(8) 11 EN Take care to diagrams supplied. Use...
... and remove the middle hinge while holding the lower door firmly.(3) 6.Remove lower door carefully off the middle hinge and stand door upright in a plastic bag with the appliance: - Please refer to protect the appliance, your wall and floor coverings. To follow numbers in brackets below, refer to the main diagram. 1.Switch off plastic hinge covers on both sides of hinge.(8) 11 EN Take care to diagrams supplied. Use...

User Manual
Page 12
... door left hand side middle hinge pin bushing/door stopper supplied in the plastic bag.(20) 26.Wait for at the bottom of both doors. Upper door top trim hinge covers are tightened. Use small flat-headed screwdrivers to mark doors.(9) 12.Reposition left hand side.(18), (19) 21.Carefully stand the appliance upright and adjust the two front feet if necessary. 22.Check that doors open...
... door left hand side middle hinge pin bushing/door stopper supplied in the plastic bag.(20) 26.Wait for at the bottom of both doors. Upper door top trim hinge covers are tightened. Use small flat-headed screwdrivers to mark doors.(9) 12.Reposition left hand side.(18), (19) 21.Carefully stand the appliance upright and adjust the two front feet if necessary. 22.Check that doors open...
User Manual
Page 14
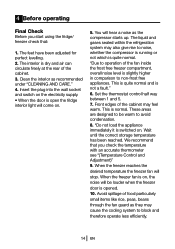
... not load the appliance immediately it is open the fridge interior light will be warm to operation of the cabinet. 3. Wait until the correct storage temperature has been reached. When the freezer reaches the desired temperature the freezer fan will hear a noise as the compressor starts up. Set the thermostat control half way between 1 and 5. 7. The feet have been adjusted for perfect levelling. 2. "Due to avoid condensation. 8. Front edges...
... not load the appliance immediately it is open the fridge interior light will be warm to operation of the cabinet. 3. Wait until the correct storage temperature has been reached. When the freezer reaches the desired temperature the freezer fan will hear a noise as the compressor starts up. Set the thermostat control half way between 1 and 5. 7. The feet have been adjusted for perfect levelling. 2. "Due to avoid condensation. 8. Front edges...

User Manual
Page 15
... defrosting again as the salad crisper and the top part of the freezer should be adjusted so that the storage compartments are kept to obtain the desired temperature i. Some sections of the fridge may increase the thermostat setting, if required. 15 EN Remember you may be cooler or warmer ( such as normal, then you must take your refrigerator TEMPERATURE CONTROL AND ADJUSTMENT Operating temperatures are controlled...
... defrosting again as the salad crisper and the top part of the freezer should be adjusted so that the storage compartments are kept to obtain the desired temperature i. Some sections of the fridge may increase the thermostat setting, if required. 15 EN Remember you may be cooler or warmer ( such as normal, then you must take your refrigerator TEMPERATURE CONTROL AND ADJUSTMENT Operating temperatures are controlled...
User Manual
Page 16
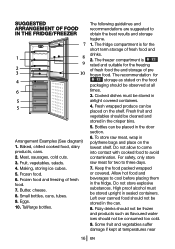
... or covered. Meat, sausages, cold cuts. 3. Fruit, vegetables, salads. 4. The freezer compartment is for storage as flavoured water ices should be placed in the crisper bins. 5. Do not allow to come into contact with cooked food to cool before placing them in polythene bags and place on the food packaging should not be cleaned and stored in the door section...
... or covered. Meat, sausages, cold cuts. 3. Fruit, vegetables, salads. 4. The freezer compartment is for storage as flavoured water ices should be placed in the crisper bins. 5. Do not allow to come into contact with cooked food to cool before placing them in polythene bags and place on the food packaging should not be cleaned and stored in the door section...
User Manual
Page 17
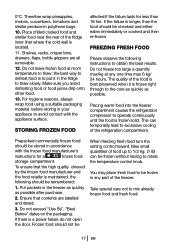
... at room temperature to put it is located. 11. Take special care not to excessive cooling of the freezer. the best way to defrost food is to thaw; This can be frozen in the fridge to avoid contact with the frozen food manufacturer's instructions for less than 18 hrs. Frozen food should be When freezing fresh food turn the setting control toward...
... at room temperature to put it is located. 11. Take special care not to excessive cooling of the freezer. the best way to defrost food is to thaw; This can be frozen in the fridge to avoid contact with the frozen food manufacturer's instructions for less than 18 hrs. Frozen food should be When freezing fresh food turn the setting control toward...
User Manual
Page 18
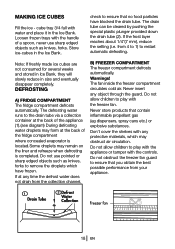
... protective materials, which have blocked the drain tube. The fan inside the freezer compartment circulates cold air. Do not obstruct the freezer fan guard to restart automatic defrosting. Warnings! DEFROSTING A) FRIDGE COMPARTMENT The fridge compartment defrosts automatically. Do not use sharp edged objects such as knives, forks to play with the appliance or tamper with the freezer fan. MAKING ICE CUBES Fill the ice - cube tray 3/4 full with any object through...
... protective materials, which have blocked the drain tube. The fan inside the freezer compartment circulates cold air. Do not obstruct the freezer fan guard to restart automatic defrosting. Warnings! DEFROSTING A) FRIDGE COMPARTMENT The fridge compartment defrosts automatically. Do not use sharp edged objects such as knives, forks to play with the appliance or tamper with the freezer fan. MAKING ICE CUBES Fill the ice - cube tray 3/4 full with any object through...

User Manual
Page 19
... be used for cleaning. ** Check door seals regularly to ensure they may cause the cooling system to clean the interior and wipe it dry. ** To remove a freezer drawer, pull it as far as they are clean and free from food particles. ** Removal of door rack • To remove door racks, remove all the contents and then simply push the door rack upwards from the base. ** Use luke warm water to clean...
... be used for cleaning. ** Check door seals regularly to ensure they may cause the cooling system to clean the interior and wipe it dry. ** To remove a freezer drawer, pull it as far as they are clean and free from food particles. ** Removal of door rack • To remove door racks, remove all the contents and then simply push the door rack upwards from the base. ** Use luke warm water to clean...

User Manual
Page 20
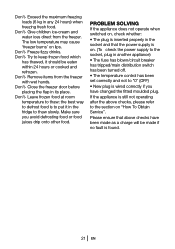
...instructions given on the stem. Leave the door open for freezing in a polythene bag excluding as much air as they may burst. 20 EN Don't- Put hot food into the freezer as possible. Keep raw meat and poultry below cooked food and dairy products. dates. Defrost food in your appliance regularly (See "Cleaning and Care... seperately. Remove ice cream from the freezer 10-20 minutes before you freeze it flavouring other food. Don't- Wrap bread well to "Best Before", "Use by" etc. Prepare fresh food for long periods as possible and adhere to keep it cool down first...
...instructions given on the stem. Leave the door open for freezing in a polythene bag excluding as much air as they may burst. 20 EN Don't- Put hot food into the freezer as possible. Keep raw meat and poultry below cooked food and dairy products. dates. Defrost food in your appliance regularly (See "Cleaning and Care... seperately. Remove ice cream from the freezer 10-20 minutes before you freeze it flavouring other food. Don't- Wrap bread well to "Best Before", "Use by" etc. Prepare fresh food for long periods as possible and adhere to keep it cool down first...
User Manual
Page 21
...switch has been turned off. • The temperature control has been set correctly and not to thaw; Close the freezer door before placing the flap in any 24 hours) when freezing fresh food. Leave frozen food at room temperature to "0" (OFF) • New plug is still not operating after the above checks have changed the fitted moulded plug. Please ensure that the power supply...Don't- Don't- Remove items from the freezer. Make sure you have been made if no fault is on lips. If the appliance is wired correctly if you avoid defrosting food or food juices drip onto other food...
...switch has been turned off. • The temperature control has been set correctly and not to thaw; Close the freezer door before placing the flap in any 24 hours) when freezing fresh food. Leave frozen food at room temperature to "0" (OFF) • New plug is still not operating after the above checks have changed the fitted moulded plug. Please ensure that the power supply...Don't- Don't- Remove items from the freezer. Make sure you have been made if no fault is on lips. If the appliance is wired correctly if you avoid defrosting food or food juices drip onto other food...

User Manual
Page 22
...; The cost of functional replacement parts, but excluding consumable items. • The labour costs of a Beko approved repairer to products used in commercial or non-residential domestic household premises. • The product must be correctly installed, located and operated in accordance with the instructions contained in the User Instructions Booklet provided. • Professional installation by a qualified Electrical Domestic Appliance Installer is recommended for all...
...; The cost of functional replacement parts, but excluding consumable items. • The labour costs of a Beko approved repairer to products used in commercial or non-residential domestic household premises. • The product must be correctly installed, located and operated in accordance with the instructions contained in the User Instructions Booklet provided. • Professional installation by a qualified Electrical Domestic Appliance Installer is recommended for all...
User Manual
Page 23
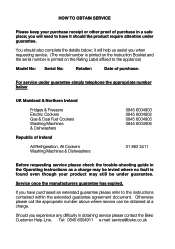
... Fridges & Freezers Electric Cookers Gas & Dual Fuel Cookers Washing Machines & Dishwashers Republic of Ireland All Refrigeration, All Cookers Washing Machines & Dishwashers 0845 6004903 0845 6004902 0845 6004905 0845 6004906 01 862 3411 Before requesting service please check the trouble-shooting guide in the Operating Instructions ... is printed on the Instruction Booklet and the serial number is found even though your purchase receipt or other proof of purchase in obtaining service please contact the Beko Customer Help-Line. Tel: 0845 6004911 e-mail: service@beko.co.uk You should the...
... Fridges & Freezers Electric Cookers Gas & Dual Fuel Cookers Washing Machines & Dishwashers Republic of Ireland All Refrigeration, All Cookers Washing Machines & Dishwashers 0845 6004903 0845 6004902 0845 6004905 0845 6004906 01 862 3411 Before requesting service please check the trouble-shooting guide in the Operating Instructions ... is printed on the Instruction Booklet and the serial number is found even though your purchase receipt or other proof of purchase in obtaining service please contact the Beko Customer Help-Line. Tel: 0845 6004911 e-mail: service@beko.co.uk You should the...

