User Manual
Page 2
... user manual as a reference for purchasing this Beko product. Remember that you handover the product to life and property. We hope that this user manual is also applicable for several other accompanying documents carefully before using the latest technology in the user manual. Therefore, please read this user manual first! Follow all other models. Ai Warning of symbols Throughout this user manual the following symbols are used...
... user manual as a reference for purchasing this Beko product. Remember that you handover the product to life and property. We hope that this user manual is also applicable for several other accompanying documents carefully before using the latest technology in the user manual. Therefore, please read this user manual first! Follow all other models. Ai Warning of symbols Throughout this user manual the following symbols are used...
User Manual
Page 3
... General information on baking, roasting and grilling16 How to operate the electric oven 16 Operating modes 17 Using the oven clock 17 Cooking times table 20 Cooking times table 20 How to operate the top oven 21 Cooking times table 21 How to operate the top grill 23 Top oven cooking times table for grilling 23 M Maintenance and care 24 General information 24 Cleaning the control panel 24 Cleaning the oven 24 Removing the oven door 24 Removing the door inner glass 25 Replacing the oven lamp 26 0 Troubleshooting...
... General information on baking, roasting and grilling16 How to operate the electric oven 16 Operating modes 17 Using the oven clock 17 Cooking times table 20 Cooking times table 20 How to operate the top oven 21 Cooking times table 21 How to operate the top grill 23 Top oven cooking times table for grilling 23 M Maintenance and care 24 General information 24 Cleaning the control panel 24 Cleaning the oven 24 Removing the oven door 24 Removing the door inner glass 25 Replacing the oven lamp 26 0 Troubleshooting...
User Manual
Page 4
... warranty. Cleaning and user maintenance shall not be made by a qualified electrician while using the product with the local regulations. • Never wash the product by spreading or pouring water onto it must be replaced by an Authorized Service Agent. There is the risk of electric shock! • The product must be disconnected during installation, maintenance, cleaning and repairing procedures. • If the power connection...
... warranty. Cleaning and user maintenance shall not be made by a qualified electrician while using the product with the local regulations. • Never wash the product by spreading or pouring water onto it must be replaced by an Authorized Service Agent. There is the risk of electric shock! • The product must be disconnected during installation, maintenance, cleaning and repairing procedures. • If the power connection...

User Manual
Page 5
... drugs. • Be careful when using alcoholic drinks in your dishes. Care should be taken to avoid touching heating elements inside the oven. • Keep all ventilation slots clear of obstructions. • Do not heat closed tins and glass jars in the "Technical specifications". • The appliance must be provided by the use of short circuit. • Any work on electrical equipment and systems...
... drugs. • Be careful when using alcoholic drinks in your dishes. Care should be taken to avoid touching heating elements inside the oven. • Keep all ventilation slots clear of obstructions. • Do not heat closed tins and glass jars in the "Technical specifications". • The appliance must be provided by the use of short circuit. • Any work on electrical equipment and systems...

User Manual
Page 6
Slide the wire shelf or tray between 2 rails and make sure that the appliance is switched off before placing food on the oven door handles. Do not hang up towel, gloves, or similar textile products when the grill function is at open door. 6/EN • Always use heat resistant oven gloves when putting in shattering of the glass. • Do not use steam cleaners to clean the...
Slide the wire shelf or tray between 2 rails and make sure that the appliance is switched off before placing food on the oven door handles. Do not hang up towel, gloves, or similar textile products when the grill function is at open door. 6/EN • Always use heat resistant oven gloves when putting in shattering of the glass. • Do not use steam cleaners to clean the...

User Manual
Page 7
...; The packaging materials will be used for children. Keep the packaging materials away from the product when it . Disposing of the old product Compliance with high quality parts and materials which can be dangerous for defrosting, baking, roasting and grilling food. This product has been manufactured with the WEEE Directive and Disposing of electrical and electronic equipment. Take it...
...; The packaging materials will be used for children. Keep the packaging materials away from the product when it . Disposing of the old product Compliance with high quality parts and materials which can be dangerous for defrosting, baking, roasting and grilling food. This product has been manufactured with the WEEE Directive and Disposing of electrical and electronic equipment. Take it...
User Manual
Page 9
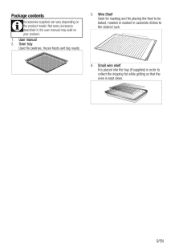
Wire Shelf Used for roasting and for pastries frn7en foods and big roasts. 3. Package contents ccessories supplied can vary depending on your product. 1. Oven tray Used for placing the food to be baked, roasted or cooked in casserole dishes to collect the dripping fat while grilling so that the oven is placed into the tray (if supplied) in the user manual may exist on the product model. Small wire shelf It is kept clean. 9/EN User manual 2. Not every accessory described in order to the desired rack.
Wire Shelf Used for roasting and for pastries frn7en foods and big roasts. 3. Package contents ccessories supplied can vary depending on your product. 1. Oven tray Used for placing the food to be baked, roasted or cooked in casserole dishes to collect the dripping fat while grilling so that the oven is placed into the tray (if supplied) in the user manual may exist on the product model. Small wire shelf It is kept clean. 9/EN User manual 2. Not every accessory described in order to the desired rack.

User Manual
Page 13
... installation in the "Technical specifications" table. A damaged power cable must not be replaced by unauthorised persons. DANGER: Before starting any damages that will arise due to using the product without a transformer. Align the two brackets 'B' with the top edge of the of cabinet and secure with the screws provided setting the leading edge of each side of the oven using the product with...
... installation in the "Technical specifications" table. A damaged power cable must not be replaced by unauthorised persons. DANGER: Before starting any damages that will arise due to using the product without a transformer. Align the two brackets 'B' with the top edge of the of cabinet and secure with the screws provided setting the leading edge of each side of the oven using the product with...

User Manual
Page 14
.... 1 4/EN Tape the oven door to the side walls. • Do not use the door or handle to a suitable double-pole control unit with a minimum contact clearance of your product by following the instructions in cabinet and the front of the product. After completing the wire connections, close the terminal block cover. 6. Final check 1. Follow the instructions on . 2. Power cable must only be connected to your product 1 for about...
.... 1 4/EN Tape the oven door to the side walls. • Do not use the door or handle to a suitable double-pole control unit with a minimum contact clearance of your product by following the instructions in cabinet and the front of the product. After completing the wire connections, close the terminal block cover. 6. Final check 1. Follow the instructions on . 2. Power cable must only be connected to your product 1 for about...
User Manual
Page 15
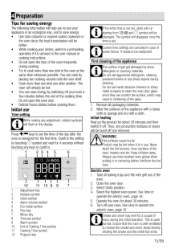
... is set , clock will run starting from the hot oven. Initial use Time setting While making any production residues or layers will be better. • While cooking your dishes, perform a preheating operation if it is advised in the user manual or cooking instructions. • Do not open the oven door. • Defrost frozen dishes before the end of the day after another. Confirm the setting by switching off . It needs to...
... is set , clock will run starting from the hot oven. Initial use Time setting While making any production residues or layers will be better. • While cooking your dishes, perform a preheating operation if it is advised in the user manual or cooking instructions. • Do not open the oven door. • Defrost frozen dishes before the end of the day after another. Confirm the setting by switching off . It needs to...
User Manual
Page 16
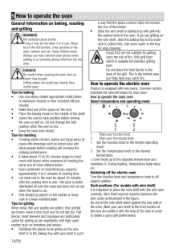
... the space covered does not exceed the size of the heater. • Slide the wire shelf or baking tray with grill into /from the hot oven. ^1 • DANGER: Be careful when opening the oven door as steam may escape. Keep children away. Flat pieces, meat skewers and sausages are particularly suited for intensive grilling heat. la How to operate the oven General information on baking, roasting Aand grilling...
... the space covered does not exceed the size of the heater. • Slide the wire shelf or baking tray with grill into /from the hot oven. ^1 • DANGER: Be careful when opening the oven door as steam may escape. Keep children away. Flat pieces, meat skewers and sausages are particularly suited for intensive grilling heat. la How to operate the oven General information on baking, roasting Aand grilling...

User Manual
Page 17
... time. Suitable for grilling. • Set the temperature to maximum level. • Turn the food after half of meat. • Put big or medium-sized portions in correct rack position under the grill heater for cakes, pastries, or cakes and casseroles in baking moulds. Program will flash on your product. Oven lamp The oven is in operation. Only the fan (in the rear wall...
... time. Suitable for grilling. • Set the temperature to maximum level. • Turn the food after half of meat. • Put big or medium-sized portions in correct rack position under the grill heater for cakes, pastries, or cakes and casseroles in baking moulds. Program will flash on your product. Oven lamp The oven is in operation. Only the fan (in the rear wall...
User Manual
Page 18
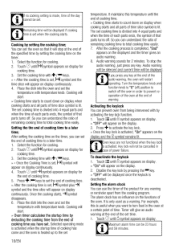
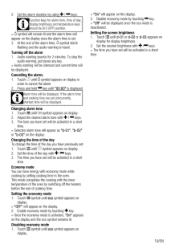
... cooking time is divided into the oven and set temperature. Setting the the end of cooking time to set the end of time. Selected operating mode is heated up to a later time. 1. Oven keys are not functional when the key lock s activated. After setting the cooking time on display continuously. Touch C% until et symbol appears on display. » "On" will appear on the timer, you press any key. If you can use the timer...
... cooking time is divided into the oven and set temperature. Setting the the end of cooking time to set the end of time. Selected operating mode is heated up to a later time. 1. Oven keys are not functional when the key lock s activated. After setting the cooking time on display continuously. Touch C% until et symbol appears on display. » "On" will appear on the timer, you press any key. If you can use the timer...
User Manual
Page 19
... symbol remains lit. To stop the audio warning, just press any key. » Audio warning will be silenced and current time will be displayed. If the alarm time and cooking time are set will appear as "b-01", "b-02" or "b-03" on display. 2. Disable economy mode by using +1le" keys. At the end of the alarm time, 4 symbol starts flashing and the audio...
... symbol remains lit. To stop the audio warning, just press any key. » Audio warning will be silenced and current time will be displayed. If the alarm time and cooking time are set will appear as "b-01", "b-02" or "b-03" on display. 2. Disable economy mode by using +1le" keys. At the end of the alarm time, 4 symbol starts flashing and the audio...
User Manual
Page 21
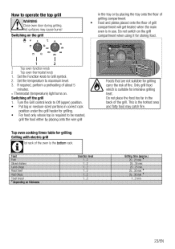
... a guide. Cooking times table The timings in the figure. The wire grill must be placed so that there is the bottom rack. • Do not place cookware with rough bases on the oven door. • Ensure that it . Set the Function knob to the desired operating mode. » Oven heats up to position the wire grill on . When removing tray from two sides. 1st rack of the oven...
... a guide. Cooking times table The timings in the figure. The wire grill must be placed so that there is the bottom rack. • Do not place cookware with rough bases on the oven door. • Ensure that it . Set the Function knob to the desired operating mode. » Oven heats up to position the wire grill on . When removing tray from two sides. 1st rack of the oven...
User Manual
Page 23
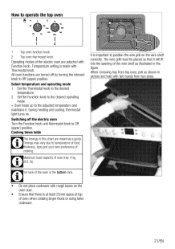
... 5 minutes. » Thermostat (temperature) light turns on the grill P 50 100 350 ROO in correct rack position under the grill heater for grilling. • For food only whose top is required to be roasted, grill the food either by placing onto the wire grill Top oven cooking times table for storing food. 1 Top oven function knob 2 Top oven thermostat knob 1. Turn the Grill control knob to...
... 5 minutes. » Thermostat (temperature) light turns on the grill P 50 100 350 ROO in correct rack position under the grill heater for grilling. • For food only whose top is required to be roasted, grill the food either by placing onto the wire grill Top oven cooking times table for storing food. 1 Top oven function knob 2 Top oven thermostat knob 1. Turn the Grill control knob to...
User Manual
Page 24
... the product to clean the oven door glass since they can scratch the surface, which may result in the figure. Don't use any excess liquid is self-cleaning by absorbing and converting spitting fat (steam and carbon dioxide). Open the front door (1). 2. Cleaning the control panel Clean the control panel and knobs with a damp cloth and wipe them down before starting maintenance and cleaning works. Hot surfaces may be covered with...
... the product to clean the oven door glass since they can scratch the surface, which may result in the figure. Don't use any excess liquid is self-cleaning by absorbing and converting spitting fat (steam and carbon dioxide). Open the front door (1). 2. Cleaning the control panel Clean the control panel and knobs with a damp cloth and wipe them down before starting maintenance and cleaning works. Hot surfaces may be covered with...

User Manual
Page 25
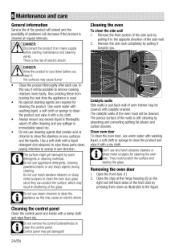
... 2 Plastic part Pull towards the inner. Remove the front door by pulling it from the right and left hinges. Removing the door inner glass The entire inner glass panel of the oven door can be performed in direction A andpulfft,00tindtrectionp,,, B A When installing the inner glass panel (1), make sure that the printed side of inner glass panel into the lower plastic slot. Open the oven door. 3 12 1 Inner glass panel 2 Outer glass panel 3 Plastic glass panel slot...
... 2 Plastic part Pull towards the inner. Remove the front door by pulling it from the right and left hinges. Removing the door inner glass The entire inner glass panel of the oven door can be performed in direction A andpulfft,00tindtrectionp,,, B A When installing the inner glass panel (1), make sure that the printed side of inner glass panel into the lower plastic slot. Open the oven door. 3 12 1 Inner glass panel 2 Outer glass panel 3 Plastic glass panel slot...
User Manual
Page 27
... the trouble although you have implemented the instructions in this section. Never attempt to repair a defective product yourself. 27/EN en light does not work. • Oven lamp is defective. >» Replace oven lamp. • Power is cut . >>> Check if there is not a fault. Check the fuses in the fuse box. Troubleshooting oven emits steam when it on again. If necessary, replace or reset the fuses. oduct emits metal noises while heating and...
... the trouble although you have implemented the instructions in this section. Never attempt to repair a defective product yourself. 27/EN en light does not work. • Oven lamp is defective. >» Replace oven lamp. • Power is cut . >>> Check if there is not a fault. Check the fuses in the fuse box. Troubleshooting oven emits steam when it on again. If necessary, replace or reset the fuses. oduct emits metal noises while heating and...
User Manual
Page 28
... functional replacement parts. • The labour costs of all Washing & Dishwashing Machines and Electric Cookers • Gas Cookers must be correctly installed, located and operated in accordance with the instructions contained in the User Instructions Booklet provided. • Professional Installation by a Gas Safe (or BORD GAIS) registered Gas Installer. • The guarantee is given only within the extended guarantee agreement document. 8 Guarantee and Service Your Beko product is...
... functional replacement parts. • The labour costs of all Washing & Dishwashing Machines and Electric Cookers • Gas Cookers must be correctly installed, located and operated in accordance with the instructions contained in the User Instructions Booklet provided. • Professional Installation by a Gas Safe (or BORD GAIS) registered Gas Installer. • The guarantee is given only within the extended guarantee agreement document. 8 Guarantee and Service Your Beko product is...


