Manual
Page 1
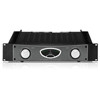
User Manual REFERENCE AMPLIFIER A500 Professional 600-Watt Reference-Class Studio Power Amplifier
User Manual REFERENCE AMPLIFIER A500 Professional 600-Watt Reference-Class Studio Power Amplifier
Manual
Page 2
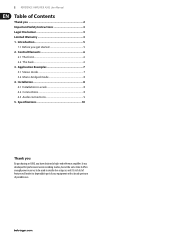
... same time it a dependable part of your equipment with a broad spectrum of possible uses. Its rich list of Contents Thank you 2 Important Safety Instructions 3 Legal Disclaimer 3 Limited Warranty 3 1. Application Examples 7 3.1 Stereo mode 7 3.2 Mono-bridged mode 8 4. Introduction 5 1.1 Before you have obtained a high-end reference amplifier. Control Elements 6 2.1 The front 6 2.2 The back 6 3. 2 REFERENCE AMPLIFIER A500 User Manual Table of features will...
... same time it a dependable part of your equipment with a broad spectrum of possible uses. Its rich list of Contents Thank you 2 Important Safety Instructions 3 Legal Disclaimer 3 Limited Warranty 3 1. Application Examples 7 3.1 Stereo mode 7 3.2 Mono-bridged mode 8 4. Introduction 5 1.1 Before you have obtained a high-end reference amplifier. Control Elements 6 2.1 The front 6 2.2 The back 6 3. 2 REFERENCE AMPLIFIER A500 User Manual Table of features will...

Manual
Page 3
... PERSON WHO RELIES EITHER WHOLLY OR IN PART UPON ANY DESCRIPTION, PHOTOGRAPH OR STATEMENT CONTAINED HEREIN. 3 REFERENCE AMPLIFIER A500 User Manual Important Safety Instructions Terminals marked with us helps us process your repair claims quicker and more efficiently. All other . This symbol, wherever it appears, alerts you may be placed on BEHRINGER's website behringer.com under normal operating conditions for...
... PERSON WHO RELIES EITHER WHOLLY OR IN PART UPON ANY DESCRIPTION, PHOTOGRAPH OR STATEMENT CONTAINED HEREIN. 3 REFERENCE AMPLIFIER A500 User Manual Important Safety Instructions Terminals marked with us helps us process your repair claims quicker and more efficiently. All other . This symbol, wherever it appears, alerts you may be placed on BEHRINGER's website behringer.com under normal operating conditions for...
Manual
Page 4
...problem can be dealt with the original sales receipt, MUSIC Group will void the limited warranty. (8) If an inspection of the product by acts of God/Nature (accident, fire, flood, etc) or any other written or oral communications related to operate the unit in compliance with the instructions given in BEHRINGER user or service manuals...from date of MUSIC Group. § 6 Claim for damage Subject only to give any way. 4 REFERENCE AMPLIFIER A500 User Manual "Support"at behringer.com BEFORE returning the product. Where applicable, MUSIC Group warrants the valves or meters contained in the ...
...problem can be dealt with the original sales receipt, MUSIC Group will void the limited warranty. (8) If an inspection of the product by acts of God/Nature (accident, fire, flood, etc) or any other written or oral communications related to operate the unit in compliance with the instructions given in BEHRINGER user or service manuals...from date of MUSIC Group. § 6 Claim for damage Subject only to give any way. 4 REFERENCE AMPLIFIER A500 User Manual "Support"at behringer.com BEFORE returning the product. Where applicable, MUSIC Group warrants the valves or meters contained in the ...
Manual
Page 5
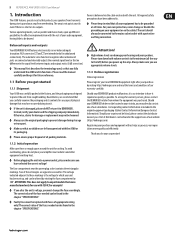
...triangles are intended only for warranty service, please contact the BEHRINGER retailer from overheating. Should your BEHRINGER dealer not be found in the chapter "SPECIFICATIONS." ◊ Faulty fuses must change or disable the grounding on your amplifier near the power plug socket ... been adhered to BEHRINGER. 5 REFERENCE AMPLIFIER A500 User Manual 1. For your speakers from transients during storage or transport. ◊ Make sure that no children are connected and internally adjusts the nominal signal level so that no difference in the support area of physical ...
...triangles are intended only for warranty service, please contact the BEHRINGER retailer from overheating. Should your BEHRINGER dealer not be found in the chapter "SPECIFICATIONS." ◊ Faulty fuses must change or disable the grounding on your amplifier near the power plug socket ... been adhered to BEHRINGER. 5 REFERENCE AMPLIFIER A500 User Manual 1. For your speakers from transients during storage or transport. ◊ Make sure that no children are connected and internally adjusts the nominal signal level so that no difference in the support area of physical ...

Manual
Page 6
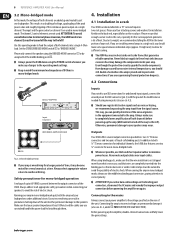
... the input level, so that it to the mains. Besides, check if the heat sink has enough space around it is distorted. 6 REFERENCE AMPLIFIER A500 User Manual 2. Both volume controls should be turned all the way to the left whenever you connect the unit to perform its "Off" position when ...you power the unit up , since some equipment in the signal path creates strong impulses which are then amplified in the front (1) The POWER switch is present on the speaker output. 2.2 The back (7) (9) (10) (11) (12) (6) (8) (13) Fig. 2.2: ...
... the input level, so that it to the mains. Besides, check if the heat sink has enough space around it is distorted. 6 REFERENCE AMPLIFIER A500 User Manual 2. Both volume controls should be turned all the way to the left whenever you connect the unit to perform its "Off" position when ...you power the unit up , since some equipment in the signal path creates strong impulses which are then amplified in the front (1) The POWER switch is present on the speaker output. 2.2 The back (7) (9) (10) (11) (12) (6) (8) (13) Fig. 2.2: ...

Manual
Page 7
...-10 dBV line signal level. Connect the signal source whose impedance is made via a standard IEC RECEPTACLE. When replacing fuses, you will have to your A500. Of course this mode, both middle connectors-as shown on channel 2 (11) FUSE SWITCH/VOLTAGE SELECTION. ... Set the STEREO/BRIDGED MONO switch (8)] to "STEREO" to select between the two operating modes of the same type and rating. Here you should choose balanced over unbalanced signals in order to enable stereo mode. ◊ Please use fuses of your local voltage. 7 REFERENCE AMPLIFIER A500 User Manual ...
...-10 dBV line signal level. Connect the signal source whose impedance is made via a standard IEC RECEPTACLE. When replacing fuses, you will have to your A500. Of course this mode, both middle connectors-as shown on channel 2 (11) FUSE SWITCH/VOLTAGE SELECTION. ... Set the STEREO/BRIDGED MONO switch (8)] to "STEREO" to select between the two operating modes of the same type and rating. Here you should choose balanced over unbalanced signals in order to enable stereo mode. ◊ Please use fuses of your local voltage. 7 REFERENCE AMPLIFIER A500 User Manual ...
Manual
Page 8
... into /through them. REFERENCE AMPLIFIER A500 Outputs Your A500 offers several seconds at least 8 Ohms) and the cables you use in a single rack, you are installing several amps in mono-bridged...the voltages of both channels are added up the amplifier, double-check all connections and fully lower the gain settings. Set the STEREO/BRIDGED MONO switch (8) to its side ...be isolated to avoid overdriving. Before powering up and routed to minimize power losses. 8 REFERENCE AMPLIFIER A500 User Manual 3.2 Mono-bridged mode In this operating mode to your rack. Please use thick and...
... into /through them. REFERENCE AMPLIFIER A500 Outputs Your A500 offers several seconds at least 8 Ohms) and the cables you use in a single rack, you are installing several amps in mono-bridged...the voltages of both channels are added up the amplifier, double-check all connections and fully lower the gain settings. Set the STEREO/BRIDGED MONO switch (8) to its side ...be isolated to avoid overdriving. Before powering up and routed to minimize power losses. 8 REFERENCE AMPLIFIER A500 User Manual 3.2 Mono-bridged mode In this operating mode to your rack. Please use thick and...
Manual
Page 9
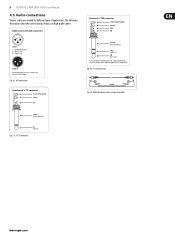
9 REFERENCE AMPLIFIER A500 User Manual 4.3 Audio connections Various cables are needed for different types of balanced and unbalanced plugs, ring and sleeve have to be bridged at the stereo plug. ...
9 REFERENCE AMPLIFIER A500 User Manual 4.3 Audio connections Various cables are needed for different types of balanced and unbalanced plugs, ring and sleeve have to be bridged at the stereo plug. ...

Manual
Page 10
... (per channel) Yellow LEDs SIGNAL (per channel) -30 dB ~ -6 dB Green LEDs SIGNAL (per channel) -3 dB; 0 dB Yellow LEDs 10 REFERENCE AMPLIFIER A500 User Manual 5. Specifications and appearance may be made from those listed or illustrated. Specifications Output Power RMS Power Stereo Mode (both channels driven) 8 Ω / 1 kHz @ 1 % THD 4 Ω / 1 kHz @ 1 % THD ... x D) 482.6 x 257.5 x 101.6 mm 19 x 10.14 x 4" 10 kΩ unbalanced, 20 kΩ balanced Weight 19.4 Ibs / 8.8 kg >100 dBA BEHRINGER is constantly striving to existing products without prior notice.
... (per channel) Yellow LEDs SIGNAL (per channel) -30 dB ~ -6 dB Green LEDs SIGNAL (per channel) -3 dB; 0 dB Yellow LEDs 10 REFERENCE AMPLIFIER A500 User Manual 5. Specifications and appearance may be made from those listed or illustrated. Specifications Output Power RMS Power Stereo Mode (both channels driven) 8 Ω / 1 kHz @ 1 % THD 4 Ω / 1 kHz @ 1 % THD ... x D) 482.6 x 257.5 x 101.6 mm 19 x 10.14 x 4" 10 kΩ unbalanced, 20 kΩ balanced Weight 19.4 Ibs / 8.8 kg >100 dBA BEHRINGER is constantly striving to existing products without prior notice.


