Manual
Page 1
User Manual iNUKE NU6000DSP/NU3000DSP/NU1000DSP Ultra-Lightweight, High-Density 6000/3000/1000-Watt Power Amplifier with DSP Control and USB Interface
User Manual iNUKE NU6000DSP/NU3000DSP/NU1000DSP Ultra-Lightweight, High-Density 6000/3000/1000-Watt Power Amplifier with DSP Control and USB Interface
Manual
Page 2
... have fun as you become an iNUKE DSP Power User! Control Elements 5 2.1 Front panel 5 2.2 Rear panel 6 3. Multiple routing options, from a PC via the downloadable BEHRINGER Amp Remote control software. DSP Processor 6 3.1 Processor Functionality 6 3.2 Front Panel control 6 3.3 BEHRINGER Amp Remote Software 10 4. Specifications 19... system. Special sections describe how you get started 5 2. Installation 18 5.1 Rack mounting 18 5.2 Connections 18 6. 2 iNUKE NU6000DSP/NU3000DSP/NU1000DSP User Manual Table of Contents Thank you for precise, customized control.
... have fun as you become an iNUKE DSP Power User! Control Elements 5 2.1 Front panel 5 2.2 Rear panel 6 3. Multiple routing options, from a PC via the downloadable BEHRINGER Amp Remote control software. DSP Processor 6 3.1 Processor Functionality 6 3.2 Front Panel control 6 3.3 BEHRINGER Amp Remote Software 10 4. Specifications 19... system. Special sections describe how you get started 5 2. Installation 18 5.1 Rack mounting 18 5.2 Connections 18 6. 2 iNUKE NU6000DSP/NU3000DSP/NU1000DSP User Manual Table of Contents Thank you for precise, customized control.
Manual
Page 3
... is required when the apparatus has been damaged in any servicing other apparatus (including amplifiers) that contained in the operation instructions. BEHRINGER IS PART OF THE MUSIC GROUP (MUSIC-GROUP.COM). Please read the manual. Read these instructions. 3. Protect the power cord...The apparatus shall be connected to a MAINS socket outlet with this appliance to qualified service personnel. All other . 3 iNUKE NU6000DSP/NU3000DSP/NU1000DSP User Manual ImImppoortratannt tSSaafefettyy InIsntsrtuructcitoionnss Terminals marked with a protective earthing connection. 16.
... is required when the apparatus has been damaged in any servicing other apparatus (including amplifiers) that contained in the operation instructions. BEHRINGER IS PART OF THE MUSIC GROUP (MUSIC-GROUP.COM). Please read the manual. Read these instructions. 3. Protect the power cord...The apparatus shall be connected to a MAINS socket outlet with this appliance to qualified service personnel. All other . 3 iNUKE NU6000DSP/NU3000DSP/NU1000DSP User Manual ImImppoortratannt tSSaafefettyy InIsntsrtuructcitoionnss Terminals marked with a protective earthing connection. 16.
Manual
Page 4
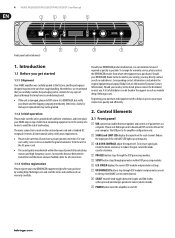
... company immediately. Corresponding contact information is our intention to avoid the risk of our subsidiaries. 4 iNUKE NU6000DSP/NU3000DSP/NU1000DSP User Manual (1) (3) (4) (7) (2) (5) (6) (8) (9) Front panel control elements 1. Nevertheless, we recommend that you . For your purchase by visiting http://behringer.com and read the terms and conditions of physical damage that all international safety certification requirements...
... company immediately. Corresponding contact information is our intention to avoid the risk of our subsidiaries. 4 iNUKE NU6000DSP/NU3000DSP/NU1000DSP User Manual (1) (3) (4) (7) (2) (5) (6) (8) (9) Front panel control elements 1. Nevertheless, we recommend that you . For your purchase by visiting http://behringer.com and read the terms and conditions of physical damage that all international safety certification requirements...
Manual
Page 5
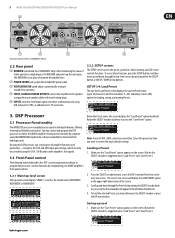
...icon. 4. The correct sub-screen will appear to program the processor's various functions by computer using the BEHRINGER Amp Remote software (available for download from behringer.com). The BREAKER acts in the upper right-hand corner of common discardable fuses. (11) POWER SOURCE... Presets. 3. To load the selected Preset, you scroll, the Preset number will display the LOAD PRESET option in place of the screen. 3. 5 iNUKE NU6000DSP/NU3000DSP/NU1000DSP User Manual (10) (11) (12) (13) (14) Rear panel control elements (NU6000DSP shown) 2.2 Rear panel (10) BREAKER (automated fuse...
...icon. 4. The correct sub-screen will appear to program the processor's various functions by computer using the BEHRINGER Amp Remote software (available for download from behringer.com). The BREAKER acts in the upper right-hand corner of common discardable fuses. (11) POWER SOURCE... Presets. 3. To load the selected Preset, you scroll, the Preset number will display the LOAD PRESET option in place of the screen. 3. 5 iNUKE NU6000DSP/NU3000DSP/NU1000DSP User Manual (10) (11) (12) (13) (14) Rear panel control elements (NU6000DSP shown) 2.2 Rear panel (10) BREAKER (automated fuse...
Manual
Page 6
...is locked, but the parameters cannot be individually named for easy identification within a rack or remotely via the BEHRINGER Amp Remote control software (go to Behringer.com to download the software). Press the UP arrow button to access the password screen. 3. Enter the ...you select and insert a character, the editing cursor will automatically unlock when you wish to choose the EDIT TITLE option. 6 iNUKE NU6000DSP/NU3000DSP/NU1000DSP User Manual 2. Scroll through the character list, and then select characters by using the SELECT encoder knob. Press the SELECT encoder...
...is locked, but the parameters cannot be individually named for easy identification within a rack or remotely via the BEHRINGER Amp Remote control software (go to Behringer.com to download the software). Press the UP arrow button to access the password screen. 3. Enter the ...you select and insert a character, the editing cursor will automatically unlock when you wish to choose the EDIT TITLE option. 6 iNUKE NU6000DSP/NU3000DSP/NU1000DSP User Manual 2. Scroll through the character list, and then select characters by using the SELECT encoder knob. Press the SELECT encoder...
Manual
Page 7
... high/low speaker connections without having to right. 6. The parallel DSP modules process the A and B signals with independent equalization, signal delay, and limiter settings. 7 iNUKE NU6000DSP/NU3000DSP/NU1000DSP User Manual 2. Rotate the SELECT encoder to select new characters from input to BIAMP1 mode, except that control processing parameters for precise sound sculpting...
... high/low speaker connections without having to right. 6. The parallel DSP modules process the A and B signals with independent equalization, signal delay, and limiter settings. 7 iNUKE NU6000DSP/NU3000DSP/NU1000DSP User Manual 2. Rotate the SELECT encoder to select new characters from input to BIAMP1 mode, except that control processing parameters for precise sound sculpting...

Manual
Page 8
... the SELECT encoder knob (DUAL, BIAMP1, and BIAMP2 modes only). 2. For band-pass mode, control the width of high- Program your chosen EQ band. 3. 8 iNUKE NU6000DSP/NU3000DSP/NU1000DSP User Manual 2. DEQ The DEQ module deploys a dynamic EQ that is triggered by rotating the SELECT encoder knob. 8. High Qual values produce a narrow, steep...
... the SELECT encoder knob (DUAL, BIAMP1, and BIAMP2 modes only). 2. For band-pass mode, control the width of high- Program your chosen EQ band. 3. 8 iNUKE NU6000DSP/NU3000DSP/NU1000DSP User Manual 2. DEQ The DEQ module deploys a dynamic EQ that is triggered by rotating the SELECT encoder knob. 8. High Qual values produce a narrow, steep...
Manual
Page 9
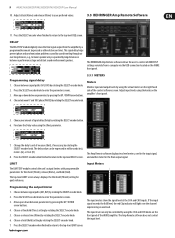
...show the signal level at the CH A and CH B inputs. The Amp Remote software does not control the input level. 9 iNUKE NU6000DSP/NU3000DSP/NU1000DSP User Manual 10. Choose between 0° and 180° phase (PHASE) by rotating the SELECT encoder knob. 3.3.1 METERS Meters ...SELECT encoder knob. 2. The top-level LIMIT screen always displays the threshold (Thresh) setting for quick reference. Choose your preferred values. 3.3 BEHRINGER Amp Remote Software 11. Press the SELECT encoder knob to enter the parameter screens. 3. Programming signal delay 1. Choose a threshold (Thres) ...
...show the signal level at the CH A and CH B inputs. The Amp Remote software does not control the input level. 9 iNUKE NU6000DSP/NU3000DSP/NU1000DSP User Manual 10. Choose between 0° and 180° phase (PHASE) by rotating the SELECT encoder knob. 3.3.1 METERS Meters ...SELECT encoder knob. 2. The top-level LIMIT screen always displays the threshold (Thresh) setting for quick reference. Choose your preferred values. 3.3 BEHRINGER Amp Remote Software 11. Press the SELECT encoder knob to enter the parameter screens. 3. Programming signal delay 1. Choose a threshold (Thres) ...
Manual
Page 10
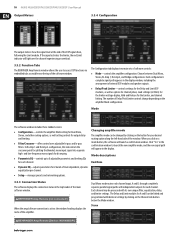
... on the Channel Link button below the Mode window. 10 iNUKE NU6000DSP/NU3000DSP/NU1000DSP User Manual Output Meters 3.3.4 Configuration The output meters show the signal level at the end of the amplifier. BEHRINGER Amp Remote [Device: NU1000DSP!] Stereo Bi-Amp 1 Bi-Amp 2 Bridge Changing amplifier ...Release for output delay and limiting. • Filter/Crossover-offers control over the channel experiencing an overload. 3.3.2 Function Tabs The BEHRINGER Amp Remote window allows the user to access DSP functions via embedded tabs accessible near the top of the main software window. ...
... on the Channel Link button below the Mode window. 10 iNUKE NU6000DSP/NU3000DSP/NU1000DSP User Manual Output Meters 3.3.4 Configuration The output meters show the signal level at the end of the amplifier. BEHRINGER Amp Remote [Device: NU1000DSP!] Stereo Bi-Amp 1 Bi-Amp 2 Bridge Changing amplifier ...Release for output delay and limiting. • Filter/Crossover-offers control over the channel experiencing an overload. 3.3.2 Function Tabs The BEHRINGER Amp Remote window allows the user to access DSP functions via embedded tabs accessible near the top of the main software window. ...
Manual
Page 11
...Bi-Amp 1 mode, Output A routes low frequencies to a low-range speaker, while Output B connects to a combined mono output. The BEHRINGER Amp Remote software also allows you click on the Channel Link button below the Peak Limiter virtual knob (dBfs or Vp). The linked Delay... output from Stereo mode's consolidated Channel A+B control window (which appears only when you achieve a suitable amount of signal delay. 11 iNUKE NU6000DSP/NU3000DSP/NU1000DSP User Manual Stereo mode routes the signal from both the A and B inputs through a parallel chain of DSP modules with independent equalization...
...Bi-Amp 1 mode, Output A routes low frequencies to a low-range speaker, while Output B connects to a combined mono output. The BEHRINGER Amp Remote software also allows you click on the Channel Link button below the Peak Limiter virtual knob (dBfs or Vp). The linked Delay... output from Stereo mode's consolidated Channel A+B control window (which appears only when you achieve a suitable amount of signal delay. 11 iNUKE NU6000DSP/NU3000DSP/NU1000DSP User Manual Stereo mode routes the signal from both the A and B inputs through a parallel chain of DSP modules with independent equalization...

Manual
Page 12
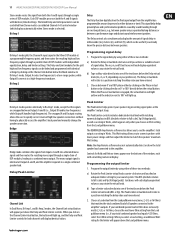
... filter options for Gain, High Pass filter, and Low Pass filter. The filter curve shown by any of the desired filter threshold line. 2. 12 iNUKE NU6000DSP/NU3000DSP/NU1000DSP User Manual 3. Activating the X-Over button links the Low Pass 2 and High Pass 3 filter controls and automatically creates a synchronized crossover point for bi-amping...
... filter options for Gain, High Pass filter, and Low Pass filter. The filter curve shown by any of the desired filter threshold line. 2. 12 iNUKE NU6000DSP/NU3000DSP/NU1000DSP User Manual 3. Activating the X-Over button links the Low Pass 2 and High Pass 3 filter controls and automatically creates a synchronized crossover point for bi-amping...

Manual
Page 13
... Display The Frequency Curve displays a frequency range from 20 Hz to reflect changing parameter values. Adjusting dynamic EQ frequency via click-and-drag 1. 13 iNUKE NU6000DSP/NU3000DSP/NU1000DSP User Manual • Frequency Curve-displays the filter curves in the Frequency Curve. Move the cursor vertically up to right. The curves shift and...
... Display The Frequency Curve displays a frequency range from 20 Hz to reflect changing parameter values. Adjusting dynamic EQ frequency via click-and-drag 1. 13 iNUKE NU6000DSP/NU3000DSP/NU1000DSP User Manual • Frequency Curve-displays the filter curves in the Frequency Curve. Move the cursor vertically up to right. The curves shift and...

Manual
Page 14
...8226; 1:3.0 • 1:5.0 • 1:10 The Setup tab allows you move the cursor up to the preset's left. Recalling a preset stored in the iNUKE amp's internal memory. Negative gain settings yield opposite results: at different signal levels. For band-pass BP mode, control the width of the selected preset...be loaded onto any time you to the immediate left of the band-pass curve by rotating the Gain virtual knob. 5. 14 iNUKE NU6000DSP/NU3000DSP/NU1000DSP User Manual Adjusting dynamic EQ gain via click-and-drag 1. Click and hold on ). Move the cursor vertically up or down...
...8226; 1:3.0 • 1:5.0 • 1:10 The Setup tab allows you move the cursor up to the preset's left. Recalling a preset stored in the iNUKE amp's internal memory. Negative gain settings yield opposite results: at different signal levels. For band-pass BP mode, control the width of the selected preset...be loaded onto any time you to the immediate left of the band-pass curve by rotating the Gain virtual knob. 5. 14 iNUKE NU6000DSP/NU3000DSP/NU1000DSP User Manual Adjusting dynamic EQ gain via click-and-drag 1. Click and hold on ). Move the cursor vertically up or down...
Manual
Page 15
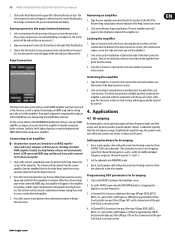
...directly to the left of the amplifier list window. Press the Connect virtual button in the Amp Name column of the BEHRINGER Amp Remote software, only one iNUKE amplifier can achieve a cleaner overall sound. Set the subwoofer into upper and lower frequency bands, and then assigns each ...bi-amping 1. Deactivate the high-pass filter (HPtype: OFF) on the Store button to the left of the Amp Connection section. 15 iNUKE NU6000DSP/NU3000DSP/NU1000DSP User Manual 2. Click on the Rename Amp virtual button. All settings contained in the preset list. Click on this way, the speakers...
...directly to the left of the amplifier list window. Press the Connect virtual button in the Amp Name column of the BEHRINGER Amp Remote software, only one iNUKE amplifier can achieve a cleaner overall sound. Set the subwoofer into upper and lower frequency bands, and then assigns each ...bi-amping 1. Deactivate the high-pass filter (HPtype: OFF) on the Store button to the left of the Amp Connection section. 15 iNUKE NU6000DSP/NU3000DSP/NU1000DSP User Manual 2. Click on the Rename Amp virtual button. All settings contained in the preset list. Click on this way, the speakers...

Manual
Page 16
... Gain virtual knobs. Parameter settings and virtual knobs in the Control View will automatically appear in the Frequency Curve and Control View. 7. 16 iNUKE NU6000DSP/NU3000DSP/NU1000DSP User Manual Programming BEHRINGER Amp Remote Software for both filters. Select the Configuration tab. 2. Choose the Bi-Amp 2 signal path in the confirmation window. Again, matching...
... Gain virtual knobs. Parameter settings and virtual knobs in the Control View will automatically appear in the Frequency Curve and Control View. 7. 16 iNUKE NU6000DSP/NU3000DSP/NU1000DSP User Manual Programming BEHRINGER Amp Remote Software for both filters. Select the Configuration tab. 2. Choose the Bi-Amp 2 signal path in the confirmation window. Again, matching...

Manual
Page 17
... operation (use thick and short speaker cables to minimize power loss. Never lay output cables near input cables. Installation 5.1 Rack mounting Your iNUKE amplifier fits into the rack using four attaching screws and washers for the front panel. When working with XLR connectors 21 3 input 1...please make sure to exclusively use , pin 1 and pin 3 have to relieve heat inside the rack enclosure. 17 iNUKE NU6000DSP/NU3000DSP/NU1000DSP User Manual 5. The iNUKE amplifiers circulate heat from CH B only. Fan speed adjusts automatically to the voltage specified on the road. Should internal...
... operation (use thick and short speaker cables to minimize power loss. Never lay output cables near input cables. Installation 5.1 Rack mounting Your iNUKE amplifier fits into the rack using four attaching screws and washers for the front panel. When working with XLR connectors 21 3 input 1...please make sure to exclusively use , pin 1 and pin 3 have to relieve heat inside the rack enclosure. 17 iNUKE NU6000DSP/NU3000DSP/NU1000DSP User Manual 5. The iNUKE amplifiers circulate heat from CH B only. Fan speed adjusts automatically to the voltage specified on the road. Should internal...
Manual
Page 18
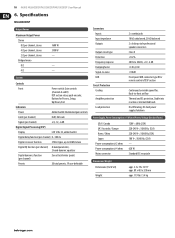
... Hz, (25A) - 620 W Standard IEC receptacle Dimensions/Weight Dimensions (H x W x D) Weight appr. 3.5 x 19 x 12.91" appr. 89 x 483 x 328 mm appr. 11.9 lbs / 5.4 kg 18 iNUKE NU6000DSP/NU3000DSP/NU1000DSP User Manual 6. Specifications NU6000DSP Output Power Maximum Output Power Stereo 8 Ω per channel, stereo 4 Ω per channel, stereo 2 Ω per channel) Zero attack limiter...
... Hz, (25A) - 620 W Standard IEC receptacle Dimensions/Weight Dimensions (H x W x D) Weight appr. 3.5 x 19 x 12.91" appr. 89 x 483 x 328 mm appr. 11.9 lbs / 5.4 kg 18 iNUKE NU6000DSP/NU3000DSP/NU1000DSP User Manual 6. Specifications NU6000DSP Output Power Maximum Output Power Stereo 8 Ω per channel, stereo 4 Ω per channel, stereo 2 Ω per channel) Zero attack limiter...

Manual
Page 19
19 iNUKE NU6000DSP/NU3000DSP/NU1000DSP User Manual NU3000DSP Output Power Maximum Output Power Stereo 8 Ω per channel, stereo 4 Ω per channel, stereo 2 Ω per channel, stereo Bridged mono 8 Ω 4 Ω ...
19 iNUKE NU6000DSP/NU3000DSP/NU1000DSP User Manual NU3000DSP Output Power Maximum Output Power Stereo 8 Ω per channel, stereo 4 Ω per channel, stereo 2 Ω per channel, stereo Bridged mono 8 Ω 4 Ω ...

Manual
Page 20
20 iNUKE NU6000DSP/NU3000DSP/NU1000DSP User Manual NU1000DSP Output Power Maximum Output Power Stereo 8 Ω per channel, stereo 4 Ω per channel, stereo 2 Ω per channel, stereo Bridged mono 8 Ω 4 Ω 160 W 310 W 530 W ...
20 iNUKE NU6000DSP/NU3000DSP/NU1000DSP User Manual NU1000DSP Output Power Maximum Output Power Stereo 8 Ω per channel, stereo 4 Ω per channel, stereo 2 Ω per channel, stereo Bridged mono 8 Ω 4 Ω 160 W 310 W 530 W ...